
A complete build guide for the last metre of an automation: from the finished weekly review on the blog to the mail in the reader’s inbox. With a sign-up form, double opt-in, your own sender domain and an unsubscribe link that really works.
Can I rebuild this? Yes. If a post carrying a distinctive tag appears regularly on your WordPress website, you can rebuild the newsletter dispatch completely from phase 1 onwards. The automatic creation of the weekly review with the workflows A20 and A21 is not part of this guide; the components needed for it are described in the linked previous articles.
To make this guide easier to follow, three people accompany you: the typical office characters: the competent IT colleague, the self-appointed expert and the honest beginner. These three perspectives help you spot the usual pitfalls.
Tanja is the IT expert. She knows how it works, explains patiently and in a structured way – and does not let bad advice unsettle her. If you have a question, Tanja has the answer.
Bernd is the self-appointed “expert” who knows everything better – and is usually wrong. His shortcuts and his half-knowledge lead to problems again and again. He stands for all the dangerous myths and bad practices you should avoid.
Ulf is the learner, just like you. He asks the questions buzzing around in your head, and sometimes needs a comparison from everyday life to understand IT. If Ulf does not understand something, that is perfectly fine, that is what Tanja is there for.
“And… action!”
Why a Finished Text Is Still Nowhere Near Being Mail
Saturday morning, just after nine. Bernd holds his phone up like a trophy.
Bernd: “Look at this. The AI Weekly Review is here. Collected, written, voiced, sent. Fully automatic. I am a genius.”
Ulf: “Impressive. And who does it go to?”
Bernd: “To me.”
Tanja: “Then you have built a print shop that prints a newspaper on time every week. Circulation: one copy.”
There is a moment in every automation project when you feel very clever. In this project it was the Saturday when the AI Weekly Review came into being entirely on its own for the first time: collected, written, voiced, filed as a draft in WordPress and sent as a mail on top of that. To exactly one address. My own.
The question that follows is an obvious one: if the review is produced as a mail every week anyway, why should others not get it too?
Bernd: “No problem. I will just put a few more addresses in the recipient field. Five minutes.”
It is not five minutes, and the reason for that is not a technical one. A mail to yourself is a note. A mail to strangers is a newsletter, and rules apply to it: whoever receives it must have agreed beforehand, verifiably. They must be able to unsubscribe again with one click. And the big mailbox providers check very carefully whether the sender is who they claim to be.
This used to be the domain of marketing departments with expensive dispatch platforms. Today the components lie around individually, many of them free of charge, and can be assembled on your own website. This guide shows how that works: with n8n (a piece of software with which you click workflows together from building blocks), WordPress and the newsletter plugin MailPoet Newsletter. The readers’ addresses stay in your own database in the process. That is the part with digital self-determination, and here it is not a buzzword but a row in a table.
As with the predecessors of this guide: almost every rule on the following pages grew out of a mistake. The mistakes are included, because they teach more than the rules do. Most of them are demonstrated for you in this guide by Bernd. They are not invented: they really did happen while this system was being built.
What You End Up With
Ulf: “Before I click on anything here: what comes out at the end?”
Before we start, the result in figures:
| Metric | Value |
|---|---|
| Workflow that writes the review | Saturdays from 09:00, 9 minutes 28 seconds to the finished draft |
| Dispatch to the subscribers | immediately after publishing, separated by language |
| Delivery at Gmail | inbox, not spam |
| new pages in WordPress | six: Subscribe, Confirmed and Manage, in German and in English |
| new entries in the domain’s DNS | three |
| new nodes in the n8n workflow | two |
| running costs | €0 on the MailPoet Starter plan, up to 500 subscribers and 5,000 mails a month |
A reader experiences the system like this:
- They find the pointer to the newsletter under an article or in the footer.
- They enter their address on the sign-up page and choose the language.
- They get a mail with a button and confirm their subscription with it.
- From then on they get the complete review every week, with an unsubscribe link at the end.
At a Glance
Tested With
Ulf: “A field is called something different for me than in the guide. Have I broken something?”
Click paths and field names change from version to version. If a field is called something different for you, that is usually down to the version, not to you. State of the system in this article, October 2026:
| Component | Version or state |
|---|---|
| WordPress | 7.1.2 |
| MailPoet | 5.40.0, Starter plan (free, up to 500 subscribers) |
| Code Snippets | 3.10.2 |
| Polylang | 3.8.9 (only needed if the website is bilingual) |
| WP Fastest Cache | 1.5.2 (optional, only if you use a cache plugin) |
| Theme | Astra |
| n8n | 2.1.5, self-hosted in a Docker container |
| Domain and DNS | Strato |
The Route Through This Guide
| Section | Content | |
|---|---|---|
| Phase 1 | Install MailPoet, connect the account | mandatory |
| Phase 2 | Authenticate the sender address and the domain | mandatory |
| Phase 3 | List, language field and segments | mandatory, language field and segments only with two languages |
| Phase 4 | Sign-up forms | mandatory |
| Phase 5 | Pages for subscribing, confirming and managing, privacy policy | mandatory |
| Phase 6 | The confirmation mail | mandatory |
| Phase 7 | The test sign-up | mandatory |
| Phase 8 | Making the sign-up findable | recommended |
| Phase 9 | The bridge from the workflow to the dispatch | mandatory, the n8n part only with route A |
| Phase 10 | Saturday in operation | mandatory |
| Checklist | Tick off whether everything is in place | at the end |
| Operation & Maintenance | What has to be done every week, every month and after updates | during operation |
| Troubleshooting | Symptom, cause, solution | for reference |
Reckon on three working sessions: one for the account and the domain, one for forms, pages and the test sign-up, one for discoverability and dispatch.
What Is Different for You
Ulf: “So I just type everything exactly as in the example, right?”
Tanja: “Almost. The blueprint is the same for everyone, the house number is yours.”
The guide shows the values of the example system. The table says which of them you replace and which are deliberately the same for everyone. In the text, the note Different for you appears at the relevant place.
| Value in the example | Where it occurs | What you use instead | Replace? |
|---|---|---|---|
foundic.org, deine-domain.de | Phase 1, 2, 8, 9 | your domain | yes |
noreply@… | Phase 1, 5, 6 | your sender address | yes |
the check value in the TXT record _mailpoet | Phase 2 | the value MailPoet shows you | yes |
the prefixes mailpoet1._domainkey, mailpoet2._domainkey, _mailpoet | Phase 2 | the same ones | no |
the CNAME targets dkim1.sendingservice.net, dkim2.sendingservice.net | Phase 2 | the same ones | no |
the DMARC record _dmarc | Phase 2 | your existing record stays. If it is missing, the value from MailPoet’s dialog | only if it is missing |
KI-Wochenrückblick, Wochenrueckblick Deutsch, Wochenrueckblick English | Phase 3, 9 | your names for the list and the segments, freely chosen | yes |
mailpoet_form id="1", id="2" | Phase 4, 5 | the IDs of your forms | yes |
| the slugs of the six pages | Phase 5, 8 | freely chosen, but they have to reappear in the footer and in the snippet | yes |
[mailpoet_page], [activation_link], [site:title], [newsletter:post_title], [link:subscription_unsubscribe_url], [link:subscription_manage_url] | Phase 5, 6, 9 | the same ones, character for character | no |
8, 21, 5091, 5092 | Phase 8 | the IDs of your categories and sign-up pages | yes |
Wochenrückblick, Weekly Review | Phase 9 | your tag | yes |
/wp-cron.php?doing_wp_cron after the domain | Phase 9 | the same one | no |
| the time 12:02 in the node for waiting | Phase 9 | freely chosen | as needed |
| all texts on pages, in mails and in the notice block | Phase 4 to 9 | your wording | yes |
Prerequisites: What Must Already Be Running
Bernd: “I skip prerequisites on principle. I am not a beginner, after all.”
Tanja: “There are five points. Read them.”
1. One post per week that carries a tag of its own.
That is the interface of this guide, and it is deliberately narrow:
Required input for the mail dispatch
- a WordPress website
- ONE post with the review appears there per week
- this post carries a tag that no other post carries
(in the example: "Wochenrückblick")
Where this post comes from is irrelevant to the mail dispatch. There are two routes for it:
- Route A, the existing workflow. With the AI Weekly Review, a workflow (a sequence of steps built in n8n) called A20 collects podcasts, YouTube videos and web pages every day. A second workflow called A21 writes the review from them every Saturday at 09:00, files it as a draft in WordPress, voices it and sends a copy by mail to the operator. How the collecting and writing works is described in “Automatically evaluating podcasts, YouTube and websites with n8n”. How the post ends up in WordPress and turns into a podcast is described in “An Automatic Podcast with n8n, Google Text-to-Speech and WordPress”. The basic installation is described by “n8n self-hosting: n8n Installation on Synology NAS”.
- Route B, any weekly post. You write the review by hand or have it produced by some other tool. As long as it appears as a post with the agreed tag, everything from phase 1 onwards works unchanged. Only the n8n part in phase 9 is then dropped or moves into a small workflow of its own.
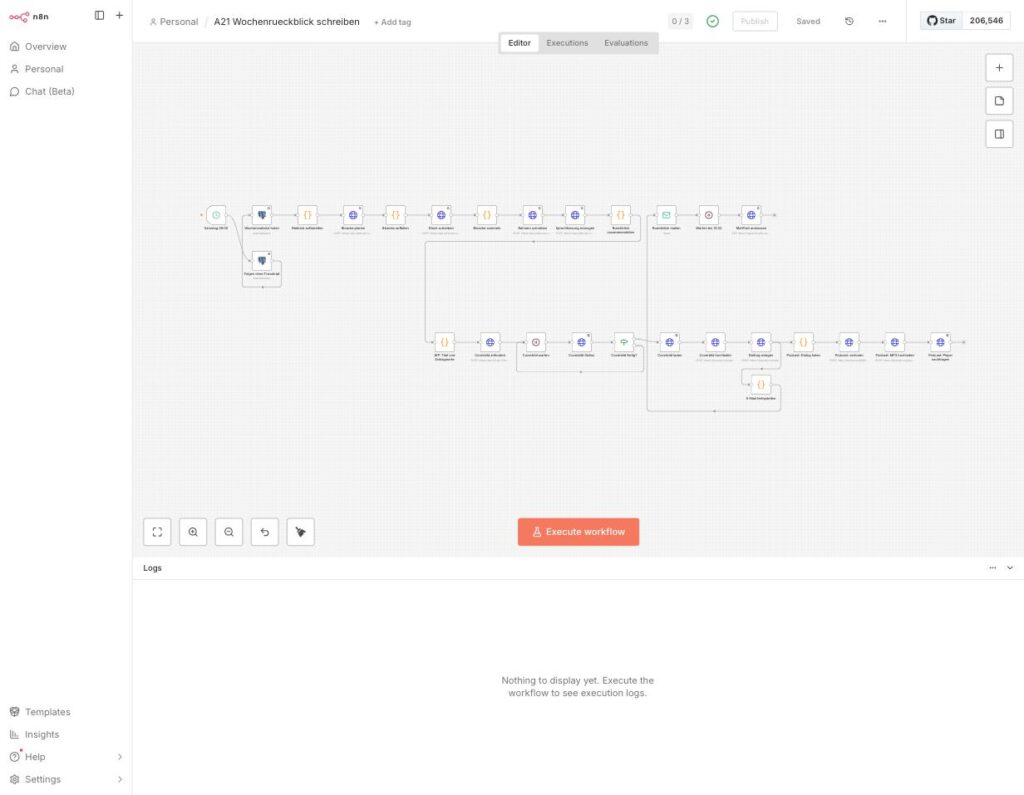
This is how the chain in n8n ends after the rebuild: top right the two new nodes that are created in phase 9. Everything before that is the existing workflow that writes the review.
2. Administrator rights in WordPress and the plugin Code Snippets (allows small pieces of PHP code to be added without touching the theme). It is needed in phase 8.
3. A domain of your own whose DNS you are allowed to edit. The DNS (Domain Name System, the address book of the internet) tells the mailbox providers who is allowed to send mails in the name of your domain. Without access to it, this guide ends in phase 2.
4. Two mail addresses of your own for testing, one of them at Gmail. Why at Gmail of all places is explained in phase 7.
5. The legal preconditions. This is not legal advice, but these are the points on which such projects fail, not the technology:
- Double confirmation, called double opt-in as well: whoever enters their address first gets a mail with a confirmation link. Only the click makes them a recipient.
- The consent must be verifiable and carry a point in time.
- In every mail there is an unsubscribe link.
- The privacy policy names the newsletter.
- The mail contains a postal address.
Ulf: “Double confirmation, what for? If someone enters their address, they do want the mails.”
Tanja: “Or somebody else entered it. That is why we ask at the address itself before it goes on the list.”
The good news: the software enforces the first three points by itself. The last two are manual work, and you forget the very last one until it shows up as a placeholder in the first real mail. More on that later.
The Routes That Were on the Table
Bernd: “I will take Amazon SES. Ten cents for a thousand mails. It does not get cheaper than that, end of discussion.”
Tanja: “SES is a pure dispatch pipe. The form, the confirmation and the unsubscribe are completely missing. You then build those yourself.”
Ulf: “So a stadium without a ticket office, without stewards and without an exit?”
Tanja: “The turf is very cheap, though.”
You do not have to build this with MailPoet. Five routes were on the table, compared with the prices of 27 September 2026:
| Route | What comes ready-made | Limits on the free plan | Catch |
|---|---|---|---|
| Brevo(dispatch service) | form, double opt-in, unsubscribe, deliverability | 300 mails a day | the line “Sent with Brevo” in every mail, the addresses are held by the provider |
| MailerLite(dispatch service) | the same scope | 250 subscribers, 2,500 mails a month | too tight as a growth path |
| MailPoet in your own WordPress | form, double opt-in, unsubscribe, dispatch service included | 500 subscribers, 5,000 mails a month | one more plugin, a brand line in every mail |
| Amazon SES(pure dispatch pipe) | only the dispatch | 0.10 US dollars per 1,000 mails | form, confirmation and unsubscribe are completely missing |
| Everything built yourself in n8n | nothing | costs as with SES | build and maintain the subscriber table, the confirmation mail, the unsubscribe page and the dispatch loop yourself |
The cost calculation is quickly done. One review per week is 52 mails a year per subscriber, that is, the number of subscribers times 4.33 mails a month. With 250 subscribers that is around 1,083 mails, with 500 around 2,167. With 250 subscribers three routes cost zero euros. With 500 the field splits up: MailerLite then costs money, and with Brevo, because of the daily limit of 300 mails, the rest has to be sent by hand every week.
Amazon SES is unbeatably cheap per mail and still not the cheapest solution. What is saved there is paid for in build time and in the risk of a legal warning. The maxim for it: The cheapest price per unit is not the cheapest price if the unit is only one part of the job.
Building it yourself in n8n failed on something else. The n8n installation sits behind an access barrier and cannot be reached from outside. A sign-up form on the website could not send it anything at all without deliberately drilling a hole in that barrier. That was the moment the decision was made: MailPoet, free of charge, in your own WordPress. The addresses sit in your own database and therefore in your own backup, and the legally required parts are ready-made instead of self-built.
What you give up for that belongs in the picture: the free plan puts a brand line under every mail. The dispatch runs through MailPoet’s service, not through your own server. And at 500 subscribers free of charge is over.
The Blueprint from a Bird’s-Eye View
Ulf: “Can we finally click on something now?”
Tanja: “In a moment. The blueprint first.”
Before we press any buttons, the whole thing seen from above. There are two separate streams that touch at only one point:
SIGN-UP (runs at any time, entirely without n8n)

  Notice under the article / link in the footer
    → sign-up page with form           address and language
    → confirmation mail                one button, bilingual
    → click                            status changes to "Subscribed"
    → page "Subscription confirmed"
    → the reader is on the list and in the segment for their language


DISPATCH (runs every Saturday)

  09:00  A21 writes the review             (existing)
         → post as a draft, with the tag "Wochenrückblick"
         → copy mail to the operator        (existing, stays)
  afterwards a human reads and publishes
         → MailPoet notices the new post with the tag
         → post notification to the segment for the language
  12:02  A21 wakes the WordPress scheduler (safety net)
Three build decisions are contained in it, and all three have proved themselves:
The trigger is a tag, not a mechanism of its own. MailPoet can send a mail by itself as soon as a new post appears. You only have to tell it which one. Before you build a trigger, check whether the data already provides one.
There are two different mails, and that is as it should be. The copy mail from n8n goes by SMTP (the classic protocol for sending mail) to a fixed address. It has no unsubscribe link and does not need one. The newsletter goes through MailPoet to everyone who has subscribed. Anyone who confuses the two spends half an hour looking for an unsubscribe link that was never there.
The human stays the goalkeeper. A21 creates a draft. Nothing is sent until someone has read and published the review. The click on “Publish” is therefore also the click on “Send”.
Bernd: “A goalkeeper is for people who do not trust their automation. I would send everything out automatically straight away.”
Tanja: “A mail cannot be called back. We will talk about that again right at the end.”
Phase 1: Installing MailPoet and Connecting an Account
Ulf: “MailPoet. Is that a plugin now or a service on the internet?”
Tanja: “Both. And that is exactly what you have to keep apart.”
MailPoet consists of two parts, and it helps to keep them apart. The plugin runs in your WordPress and manages subscribers, forms and templates. The dispatch service (“MailPoet Sending Service” in the plugin) runs at MailPoet and actually puts the mails on their way. The plugin is the office, the dispatch service is the post room.
Step 1.1: Installing the Plugin
Click path: WordPress admin → Plugins → Add New Plugin → enter MailPoet in the search field → Install Now → Activate.
Expected result: The menu item MailPoet appears in the left-hand bar. A click on it leads to a welcome page. As long as the setup wizard has not been completed, MailPoet redirects every one of its pages there.
Bernd: “Four subscribers after two minutes. And you wanted to tell me something about forms and confirmations.”
Tanja: “Those are our own four user accounts, Bernd. None of them ordered anything.”
An observation on the side that becomes important later: on activation MailPoet creates a list called “WordPress Users” of its own accord and enters all the user accounts of your website in it, unasked. With four accounts, four “subscribers” therefore appear in the overview straight away, although nobody has subscribed. A plugin that fills a list during installation has made an assumption about consent that nobody checked. The rule that follows from this applies for the rest of this guide: The newsletter never goes to the “WordPress Users” list.
Step 1.2: The Setup Wizard
Click path: MailPoet → Start setup → in the first step enter the sender name (in the example FOUNDIC.org) and the From address → Continue.
Which address belongs here is one of the few real decisions in this project. Three things are worth knowing beforehand:
- An address at a freemail provider (Gmail, GMX, Web.de) is out. Since the tightened requirements of the big providers, MailPoet no longer accepts such domains as a sender.
- The address has to be on your own domain.
- No deliverability hangs on the front part of the address. That hangs on the domain and on its authentication.
In the example it became noreply@foundic.org, a pure dispatch address that nobody is supposed to reply to. Anyone who does want replies takes something friendlier such as newsletter@. The only important thing is: if you pick noreply then tell the readers so too. The sign-up page and the confirmation mail then need the sentence that replies are not read, together with a pointer to the imprint.
Click path: In the second step set the two privacy settings as you see fit → Continue. In the third step Connect MailPoet.
On the two settings in the second step: the first loads fonts and help texts from third-party servers, the second sends usage data to the manufacturer. Both can be switched off.
Expected result: After the click on Connect MailPoet the manufacturer’s website opens in a new window. Things continue there in step 1.3.
Step 1.3: Creating the Account at MailPoet
Click path: On the pricing page choose the Starter plan (free, up to 500 subscribers, up to 5,000 mails a month) → Connect with WordPress.com → sign in with a WordPress.com account or create one → use Approve to confirm the authorisation for MailPoet.
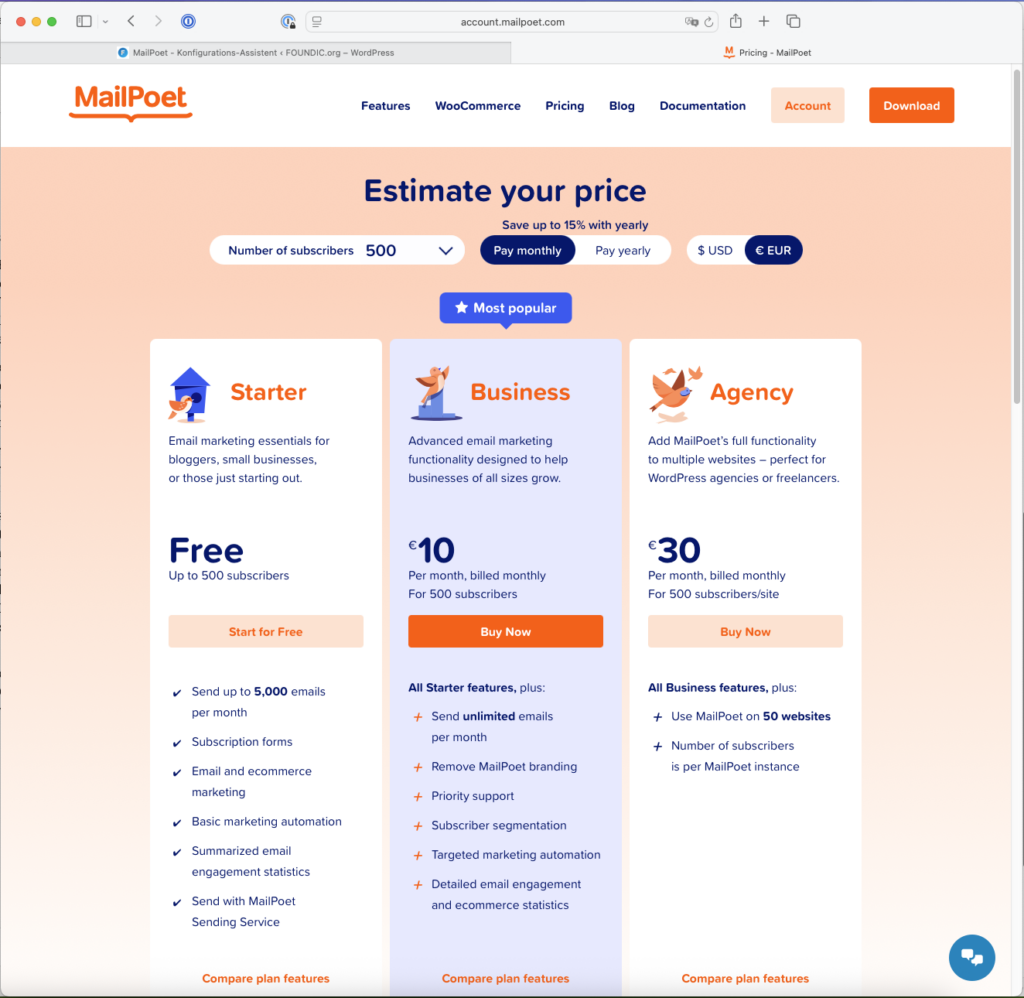
The pricing page. For a weekly review the limit of 500 subscribers bites long before the limit of 5,000 mails: 5,000 mails a month are arithmetically enough for around 1,150 weekly recipients.
After that MailPoet asks three questions before it unlocks the plan.
Click path: At What’s your website’s URL? enter your own domain → at the question about an existing list choose No, I’m starting a new list → Next → confirm the anti-spam policy → Submit for review.
Expected result: A page confirms the plan and shows an activation key, a long character string. Copy it into your password manager.
Bernd: “I have backed the key up. Screenshot of the page, it is in the project folder now.”
Tanja: “Then we will replace it.”
Ulf: “Can you not simply black the picture out?”
Tanja: “Once your front-door key has hung in a display case, you change the lock.”
Two rules about this key, both from experience. Enter it yourself and give it to nobody, not even to a helpful assistant. And do not take a screenshot of the page it is on. Exactly that happened while this system was being built, and the maxim for it is: A secret that has once appeared in a screenshot is replaced, not blacked out.
Step 1.4: Entering the Key in WordPress
Click path: Back in the WordPress window paste the key into the field Activation key → Verify account.
Expected result: The message “MailPoet account connected”.
Anyone who goes to MailPoet’s start page now is still not greeted with confetti, but with two warning boxes.
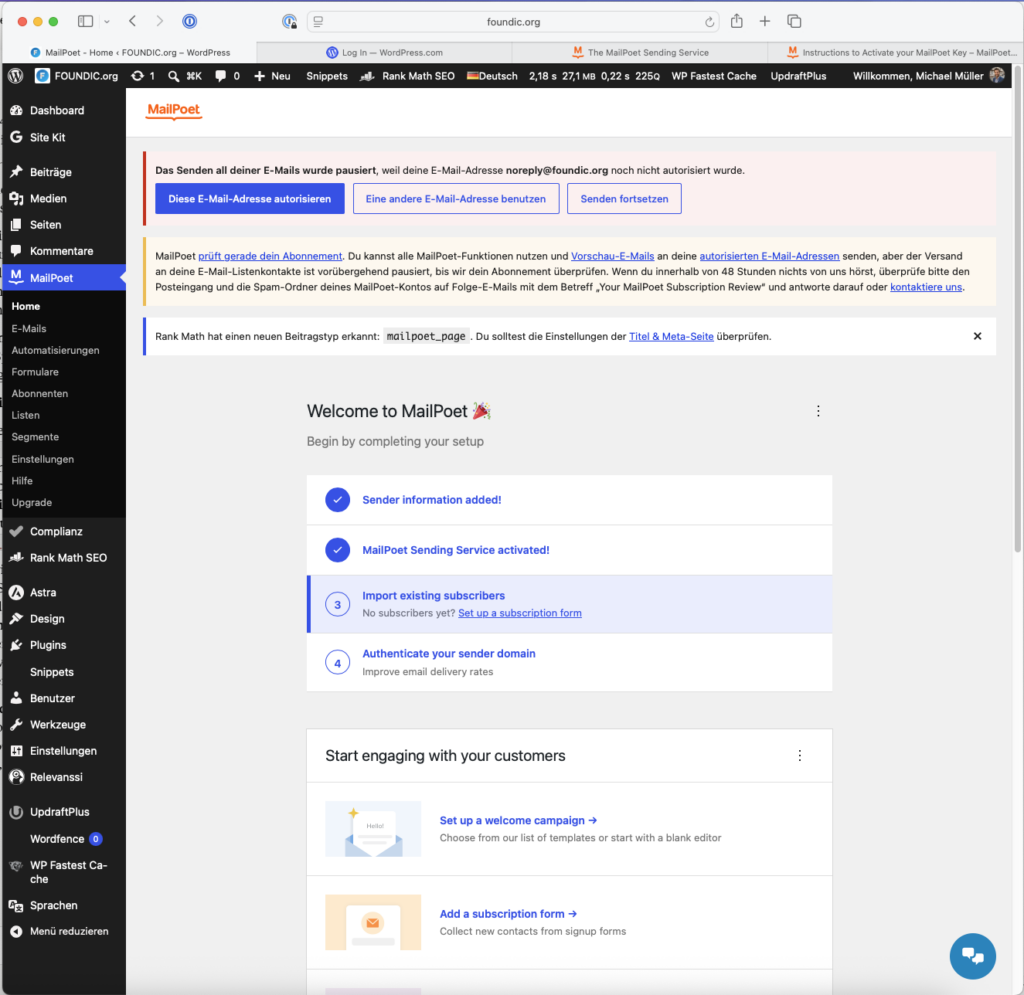
Two blocks at once: the sender address is not authenticated yet, and MailPoet is reviewing the new account.
The red box says that the dispatch is paused because the sender address has not been approved yet. Phase 2 takes care of that. The yellow box says that MailPoet is reviewing the new account, with a deadline of up to 48 hours. Only waiting helps here. While this system was being built, the review was through after about an hour. If nobody gets in touch, it is worth looking in the spam folder for a mail with the subject “Your MailPoet Subscription Review”.
Phase 2: Proving to the Internet That You Are Yourself
Now comes the part most people shirk, because it sounds like network engineering. It consists of three lines in one dialog.
Why This Is Necessary
Ulf: “Why do I have to prove that I am me? I do write my sender on it.”
Tanja: “Anyone can write that on it. You can write ‚Sender: the national coach‘ on an envelope too, and the post office will still deliver it.”
Anyone can send a mail and write any address they like into it as the sender. So that this does not end in chaos, there are three procedures that mailbox providers check:
- SPF (a list in the DNS of which servers are allowed to send for the domain),
- DKIM (a digital signature that the dispatch service puts under every mail and that the recipient checks against an entry in the DNS),
- DMARC (a rule in the DNS that says what is to happen to mails that fail both checks).
As a mental image: SPF is the guest list at the entrance. DKIM is the seal on the envelope. DMARC is the instruction to the bouncer about what happens to guests who are neither on the list nor show a seal.
Bernd: “If it does not fit, the mail just ends up in spam. Somebody looks in there now and then.”
Tanja: “Not with our domain.”
With the example domain DMARC was on the strictest level, p=reject. That means: a mail that passes itself off as @foundic.org and does not match the domain is not sorted into spam but rejected. Without authentication the first newsletter would therefore not have arrived badly, but not at all.
MailPoet knows two ways of approving a sender:
| Route | What happens | Mailbox needed? |
|---|---|---|
| single address | a confirmation link goes to exactly this address | yes |
| whole domain | the domain is proven via DNS records, after which every address on it is allowed | no |
For operation the second route is what counts. Only with it does the mail carry the DKIM signature of your own domain. As long as only the single address is approved, a telltale line appears in the MailPoet settings under the sender: Sent as: noreply=deine-domain.de@replies.sendingservice.net. The mail then travels under a foreign flag.
Step 2.1: Fetching the Values from MailPoet
Click path: MailPoet → Settings → tab Basics (in the German interface Grundlagen) → under the sender field in the yellow box click Authenticate.
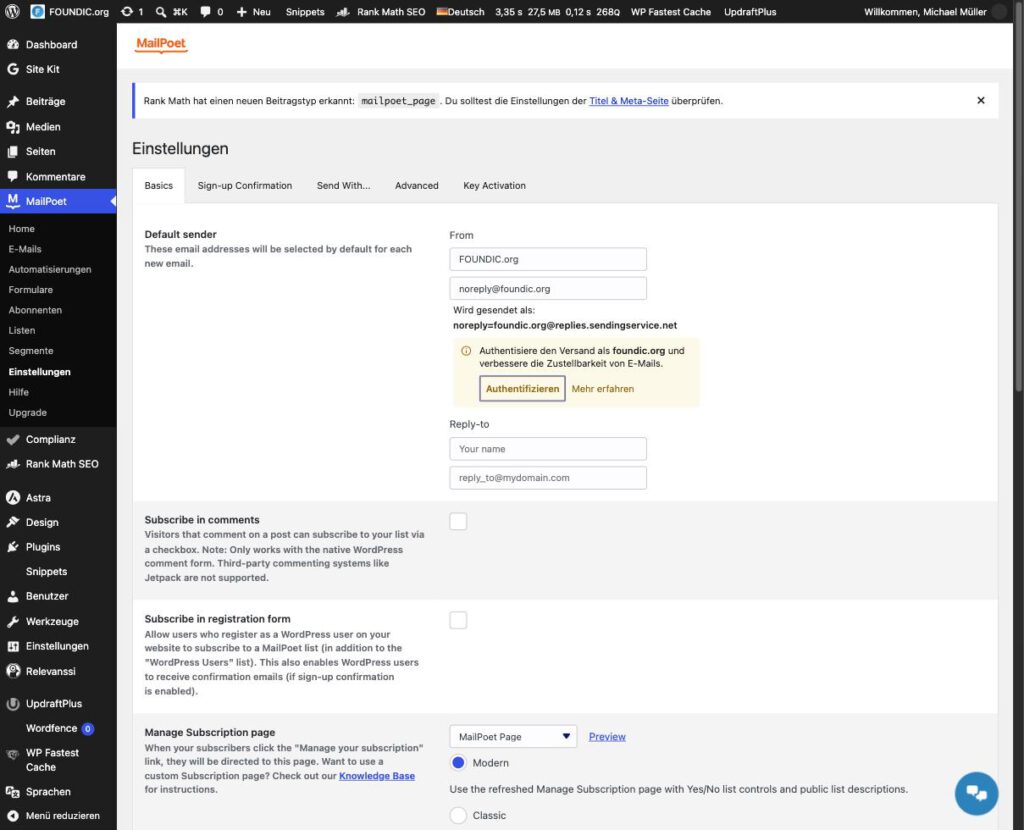
The settings before authentication: the line “Sent as” and the “Authenticate” button.
Expected result: A window Manage Sender Domain in the state “Pending authentication” lists four entries:
| Type | Host | Value |
|---|---|---|
| CNAME | mailpoet1._domainkey.deine-domain.de | dkim1.sendingservice.net |
| CNAME | mailpoet2._domainkey.deine-domain.de | dkim2.sendingservice.net |
| TXT | _mailpoet.deine-domain.de | a check value that MailPoet generates for you |
| TXT | _dmarc.deine-domain.de | v=DMARC1;p=reject; or your existing value |
A CNAME is a pointer from one name to another, a TXT record is free text in the DNS. Next to every entry that is still missing, “No records found.” appears in red.
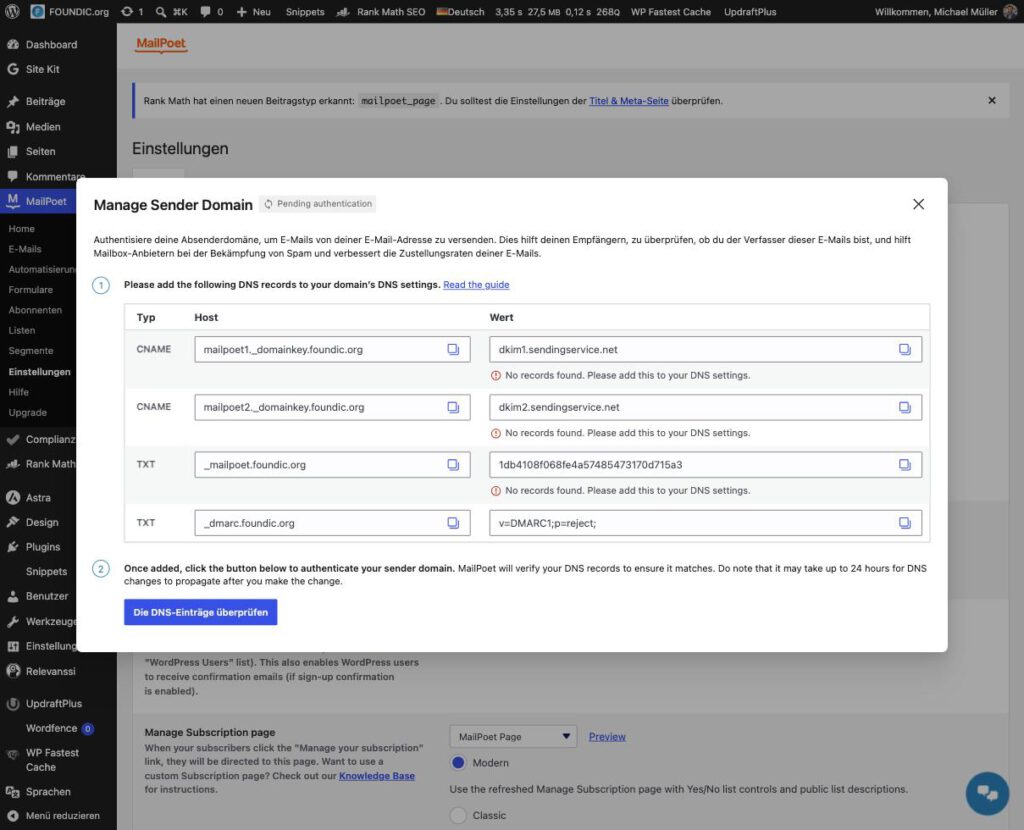
The four records MailPoet requires. In the example the DMARC record already existed, so three had to be set.
If a DMARC record is missing on your side, you create it in step 2.2 as a fourth record: type TXT, prefix _dmarc, with the value MailPoet’s dialog shows in that row.
Bernd: “Is SPF not missing there?”
Tanja: “No. And that is exactly what matters here.”
Two things stand out. MailPoet does not ask for an SPF record of its own, because the dispatch runs through MailPoet’s service and carries its SPF. And the DMARC record may already exist, many providers set it as a default rule. “You need SPF, DKIM and DMARC” is the general rule. What a particular service needs is in its dialog. While this system was being built, the wrong number of records was in the notes twice, once with SPF, once without the TXT record. The dialog had been right from the start.
Step 2.2: Setting the Records at the Domain Provider
The click path depends on the provider. At Strato it is:
Click path: Customer area → Domains → Domain management → click the cog next to the domain → tab DNS → TXT and CNAME records → manage.
Now create three records, one after the other:
Different for you: the check value in the third record. The two CNAME records are the same for everyone.
| Type | Prefix | Value |
|---|---|---|
| CNAME | mailpoet1._domainkey | dkim1.sendingservice.net |
| CNAME | mailpoet2._domainkey | dkim2.sendingservice.net |
| TXT | _mailpoet | the check value from MailPoet |
Click path for each record: Create another record → choose the type → enter the prefix and the value → Apply setting.
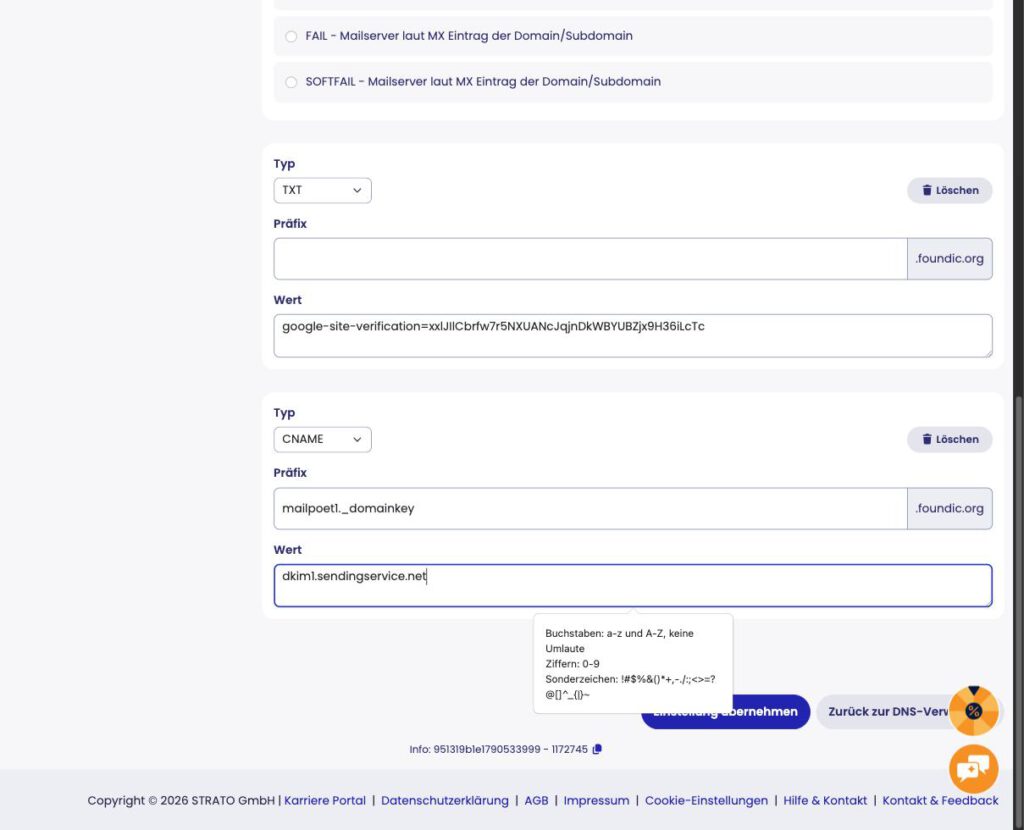
The first CNAME before saving. To the right of the “Prefix” field the domain is already pinned in place.
Bernd: “Copy, paste, save. Full name from MailPoet, done.”
Ulf: “But the domain is in there twice in a row now.”
Tanja: “The dialog is like an address label on which the town is already printed.”
Here the classic trap lurks. MailPoet shows the full name, that is mailpoet1._domainkey.deine-domain.de. The provider’s dialog, however, appends the domain by itself. Anyone who pastes the full name in produces mailpoet1._domainkey.deine-domain.de.deine-domain.de, and nothing works, without an error message appearing anywhere. The rule: if the field already shows the domain beside it, only the front part goes in.
Expected result: After every save the message “Your action was carried out successfully.” That the provider appends a dot to the CNAME targets (dkim1.sendingservice.net.) is correct and belongs there. You leave the existing DMARC record and everything else untouched.
Step 2.3: Having It Checked
MailPoet warns that DNS changes can take up to 24 hours. In the example the name servers delivered all records around twenty seconds after the last save. So go ahead and try it straight away.
Click path: MailPoet → Settings → Basics → Authenticate → Check the DNS records.
Expected result: Success shows in two places. In the settings the yellow box and the line “Sent as” have disappeared. And on MailPoet’s start page it says “Sender domain authenticated!” with a tick.
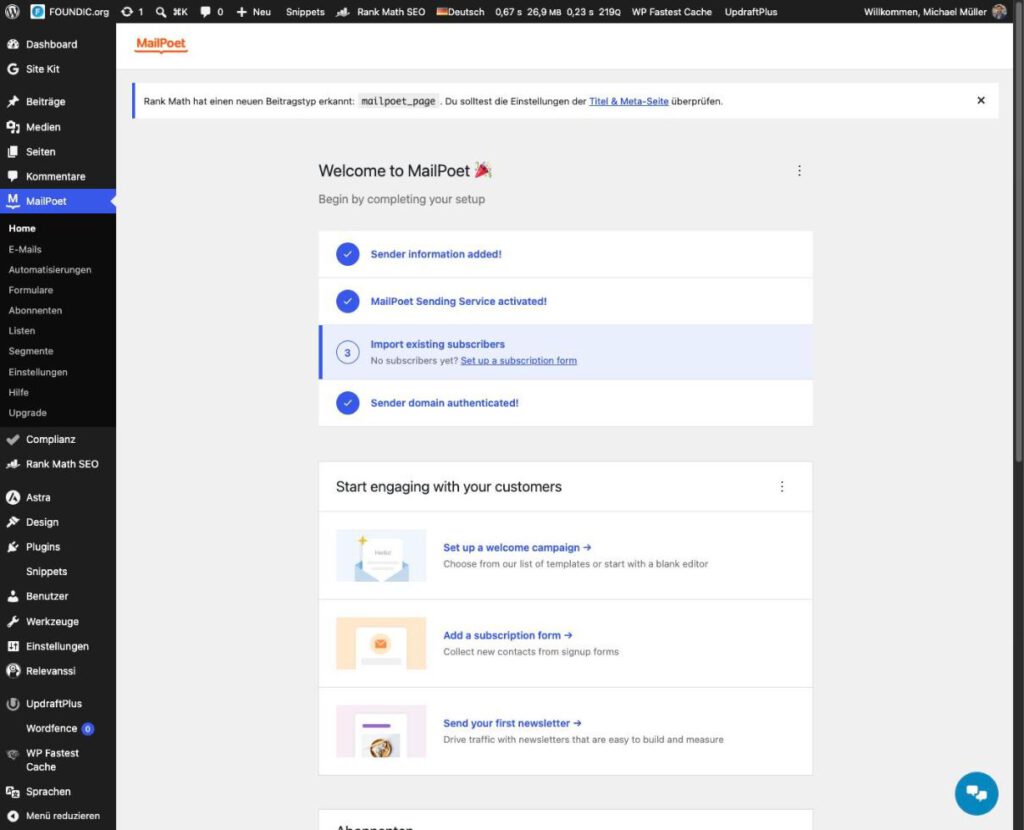
The setup list on the start page. The only thing left open is the import of existing subscribers, and there is none here.
Whether the authentication also holds in practice is only shown by a real mail to a strict recipient. That comes in phase 7.
Phase 3: One List, One Language Field, Two Segments
Ulf: “List, segment. Where is the difference? Both sound like a spreadsheet.”
Tanja: “Think of the sports club. You enter yourself in the membership list. You fall into the line-up of left-footed players.”
MailPoet sorts subscribers with two tools, and the difference matters for everything that follows. A list is a pot that someone enters themselves in. A segment is a filter that picks out of all subscribers those to whom a condition applies.
Monolingual? Then you need no language field, no segments and only three pages instead of six. In detail: from phase 3 only step 3.1, in phase 4 a form without a language field, in phase 5 each page only once, in phase 8 only the German branch of the notice block, in phase 9 a single notification with the list as the recipient. Everything else stays the same.
Anyone who publishes in German and English as in the example faces a decision: two lists or one?
The obvious reflex is two lists. What was built was one list with a “Sprache” column and two segments, and that for three reasons. The language is then in the subscriber overview and in the export as a column of its own. Anyone who changes language stays one subscriber with one history. And unsubscribing is one action, not two.
One question had to be settled beforehand, and it belongs to the questions you check before you build: can the free plan do segments at all? It can. How to convince yourself of that is in step 3.4.
Step 3.1: Giving the List a Name
MailPoet created two lists during the installation: the empty “Newsletter mailing list” and the already familiar “WordPress Users”. The empty list gets renamed. Creating a third one would be unnecessary, and when renaming, the internal ID stays the same, so nothing breaks.
Click path: MailPoet → Lists → at “Newsletter mailing list” click Edit → fill the fields according to the following table → Save.
| Field | Content | Who sees it |
|---|---|---|
| Public list name | KI-Wochenrückblick (different for you) | the reader |
| Public description | one sentence about what they get. In the example: “Once a week: what really happened in AI, concise and put in context, without marketing language.” | the reader |
| Description | a note to yourself, something like: “The language is in the Sprache field, dispatch via the segments. Do not use for WordPress Users.” | only you |
| List visibility | tick the box | makes the list appear on the management page |
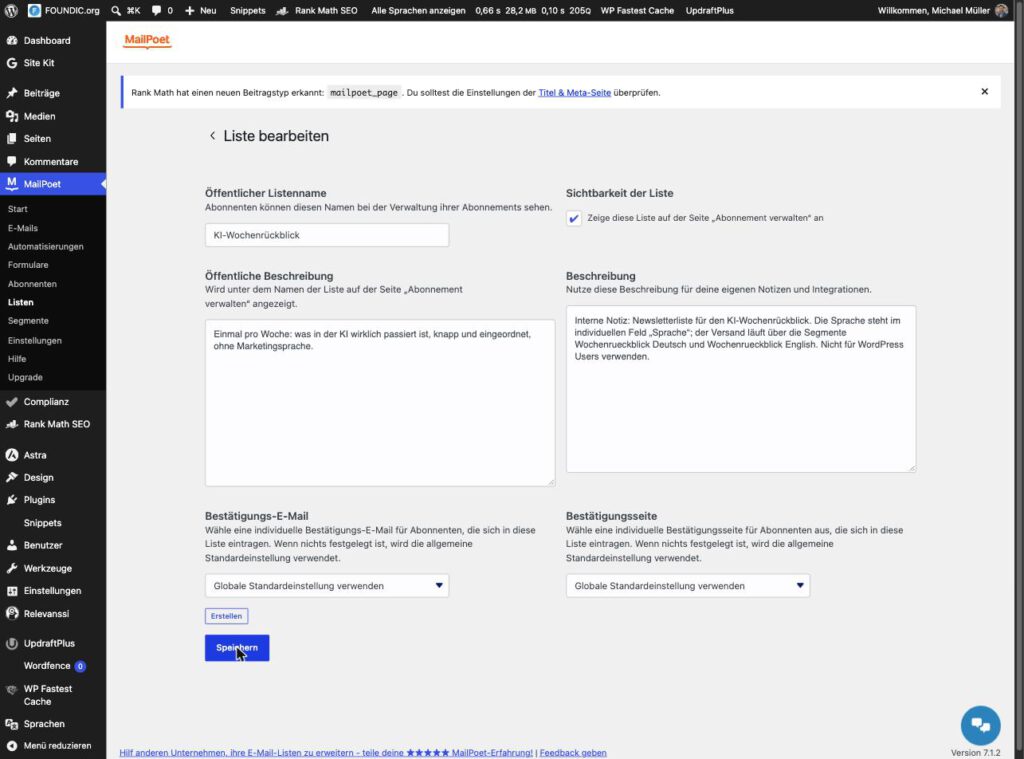
The list dialog in its final state. At the top the description for the readers, below it the note for the operator.
Bernd: “Done. My note about segments and fields is in there.”
Tanja: “In the upper field. Guess who reads it now.”
The two description fields look confusingly alike, and exactly that happened during the build. The internal note ended up in the public field and after that stood in the management form that every subscriber gets to see: a sentence about segments and fields, addressed to nobody. The help text under the field would have given it away. For the lower field it says explicitly that it is “for your own notes”.
Expected result: The message “List successfully updated!”. In the overview the list is now called KI-Wochenrückblick, the addition “(private)” has disappeared.
A note on the language of the interface: MailPoet is only partly translated. Depending on the version, the same fields appear sometimes in German, sometimes in English (“Public list name” and “Öffentlicher Listenname” are the same field). That runs through the whole plugin and is not a fault of your installation.
Step 3.2: Creating the “Sprache” Field
MailPoet knows the mail address, first name and last name out of the box. Everything beyond that is a custom field (“Custom Field” in the interface).
Ulf: “The window says ‚Radio buttons‘ right away. What does a form have to do with radio?”
Tanja: “Think of an old car radio with station buttons. Press one and the other pops out. Exactly one is always active. That is why selection buttons are called that.”
Click path: MailPoet → Subscribers → Custom Fields → Add new custom field → fill in the window according to the table → Create custom field.
| Field in the window | Value |
|---|---|
| FIELD TYPE | Radio buttons (selection buttons of which exactly one can be active) |
| FIELD NAME | Sprache |
| LABEL | Sprache / Language |
| Mandatory field | off |
| Options | Deutsch (with a tick at “Default”) and English |
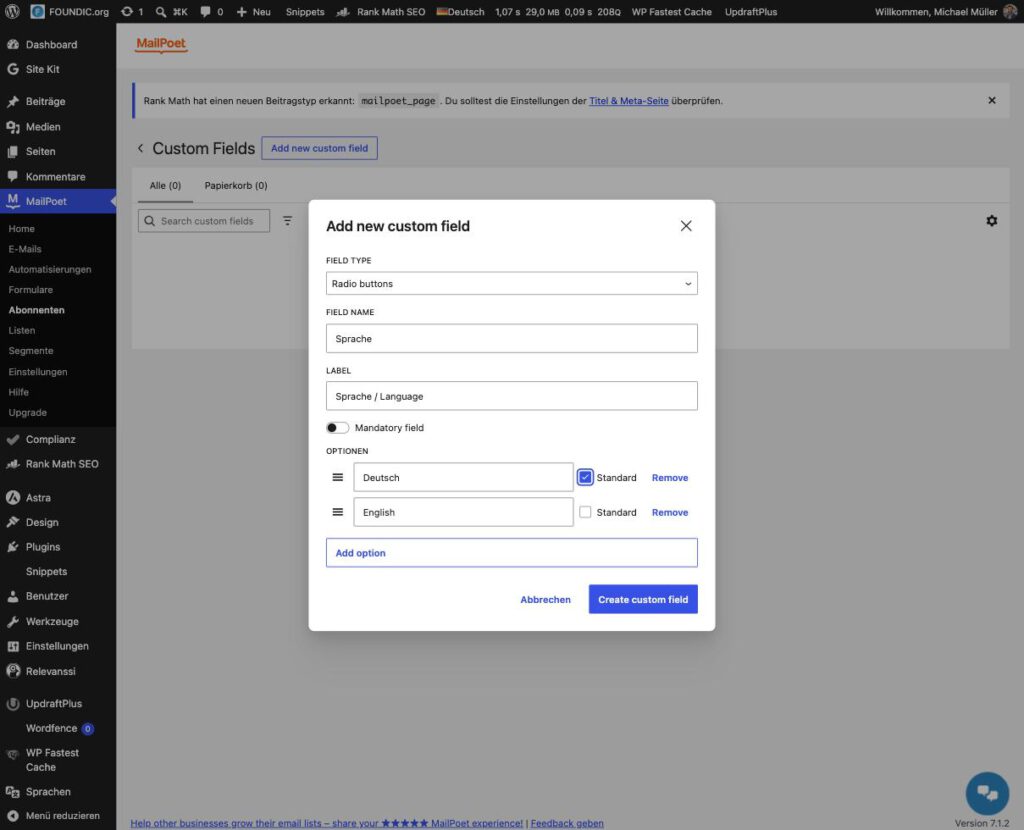
The filled-in window. The two values “Deutsch” and “English” are later what is in the database.
Expected result: The message Custom field "Sprache" created. and a table row with the new field, 0 subscribers, 0 forms.
Remember the exact spelling of the two values. The segments in the next step compare letter by letter. Anyone who later turns English into Englisch has a segment that no longer finds anybody, and gets no error message for it.
Step 3.3: Building Two Segments
Click path: MailPoet → Segments → Add new segment → at Name Wochenrueckblick Deutsch enter it → under Conditions click the first selection field and type custom → MailPoet custom field → as the field Sprache, as the comparison is, as the value Deutsch → Save.
Here the first optical illusion of this guide is waiting. The construction kit opens with the preset condition “WordPress user role”, and right underneath a padlock with the word UPGRADE is on display. That looks as if everything apart from the user role costs money. While this system was being built, exactly that was believed at first, and it was wrong.
Bernd: “Do you see the padlock? UPGRADE. Segments cost money.”
Tanja: “Look more closely at which button the padlock hangs on.”
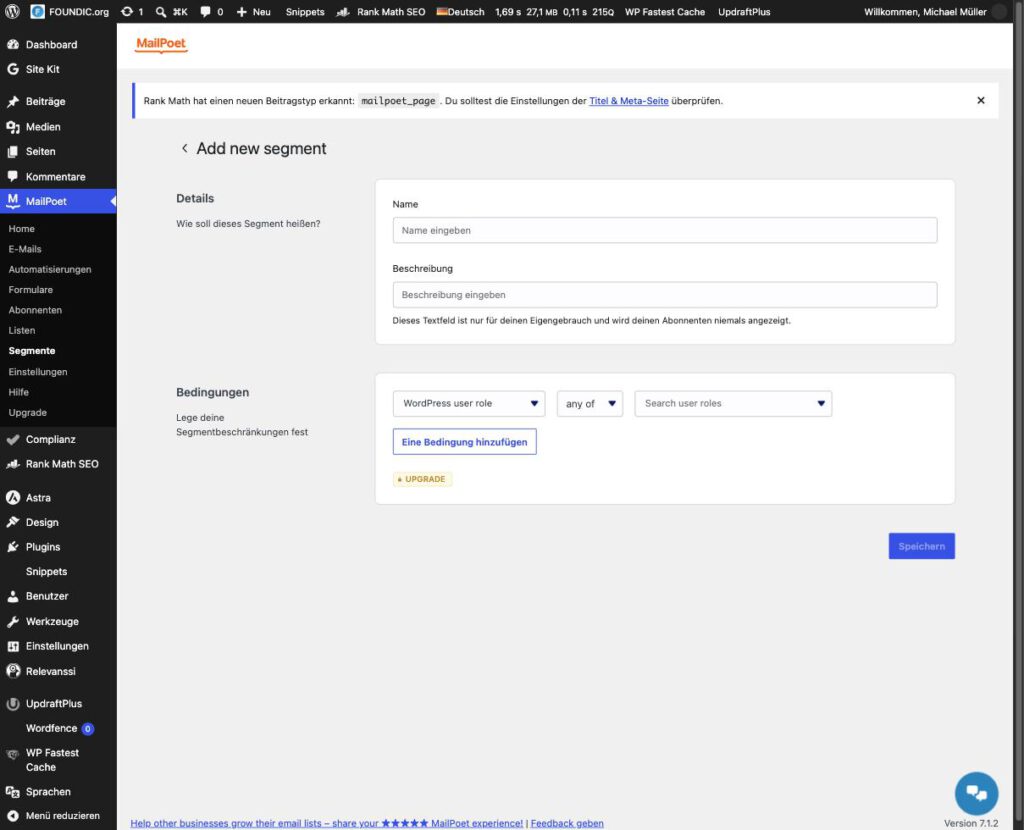
The misleading view: a preset condition and a padlock. The padlock belongs to the “Add a condition” button, that is, to the second condition.
Two things solve the riddle. The UPGRADE marker applies only to a second condition in the same segment. One condition is free, and nothing more is needed here. And the selection fields only show their entries once you type. Opening them alone shows only the preselected entry. With a few letters in the search field around thirty conditions appear.
Expected result before saving: Next to the save button it says “This segment has 0 subscribers.”Zero is correct, because nobody has a value in the field yet.
The first segment before saving: name, condition, size zero.
Expected result after saving: The message “Segment successfully added!”.
Different for you: The names of the segments are freely chosen. You select them as recipients in phase 9, nothing more hangs on them.
Repeat the whole thing for Wochenrueckblick English with the condition Sprache is English. The names deliberately carry no umlaut, which saves trouble in places that cannot handle umlauts.
Step 3.4: The Cross-Check in the Dispatch Step
Whether a segment works as a recipient on the free plan only shows up where you select recipients. For the build, a throwaway newsletter was clicked through to the last step and not sent. You do not have to repeat that. What matters is what came out of it, because it decides one click in phase 9:
| Element in the dispatch step | What it does | Free plan |
|---|---|---|
| Field “Send to” | choose recipients. Lists and segments appear together in the same selection. | works |
| Switch “Filter by segment” | additionally restrict a chosen list by a segment | costs money |
The rule from it: With two languages the recipient is always the segment, never the list. The paid switch is not needed.
One limitation of the free plan should not be concealed. Because only one condition is free, the segment cannot additionally be restricted to your own list. If somebody entered a language by hand on a record from “WordPress Users”, that record would fall into the segment. The rule “never to WordPress Users” therefore hangs on a habit instead of on a lock. Two requirements keep it stable: never set a language by hand, and before every dispatch hold the recipient count against the number of real sign-ups.
Phase 4: Two Forms, One Button and a Stubborn Editor
Bernd: “Name, company, phone and birthday go into the form. You can never have enough data.”
Tanja: “Anyone who has to fill in a questionnaire at the door turns around.”
The sign-up form is the door. It should open easily and ask for nothing that is not needed: an address, a language, a button.
Step 4.1: Creating the German Form
Click path: MailPoet → Forms → Add new form → on the template page choose the type Others (widget) → click the plainest template. Which one does not matter, because in the end only three blocks remain.
“Others (widget)” is a form that you place on a page yourself, as opposed to pop-ups and slide-ins. In newer versions of MailPoet the same type is called Shortcode & other.
An editor opens that resembles the WordPress page editor. On the left the form, on the right a sidebar with the tabs Form and Block. In the Form tab set:
| Setting | Value |
|---|---|
| Name | KI-Wochenrückblick Anmeldung (deutsch) |
| This form adds the subscribers to these lists | KI-Wochenrückblick |
| After submit | Show message |
| Message text | see below |
The message text is the first thing a new subscriber reads from you. It has exactly one job: to send the reader to their mailbox.
Fast geschafft: Wir haben dir eine Mail mit einem Bestätigungslink geschickt. Bitte bestätige darin deine Anmeldung, dann bekommst du den KI-Wochenrückblick. Sieh notfalls im Spam-Ordner nach.That only your own list appears in the list selection and “WordPress Users” is missing is no accident. MailPoet keeps that list as private and does not offer it to forms at all.
Now to the form itself. In the end it consists of exactly three blocks:
| Block | Setting |
|---|---|
| Mail field | Label E-Mail-Adresse, mandatory field. MailPoet adds the asterisk after it for mandatory fields by itself. |
| Sprache | Selection buttons Deutsch and English, Deutsch preselected, not a mandatory field |
| Button | Label Abonnieren! |
The mail field and the button come with the template. You change the label of a block by clicking it and replacing the text on the right in the Block tab. Whatever else the template contains, such as a field for the first name or a heading, you delete. The language field is missing.
Click path: In the form click the plus between the mail field and the button → Browse all → under the custom fields choose the block Sprache → click the block → on the right in the Block tab under Settings for custom field tick the box next to Deutsch and leave Required field switched off → click the button and label it Abonnieren! → top right Save.
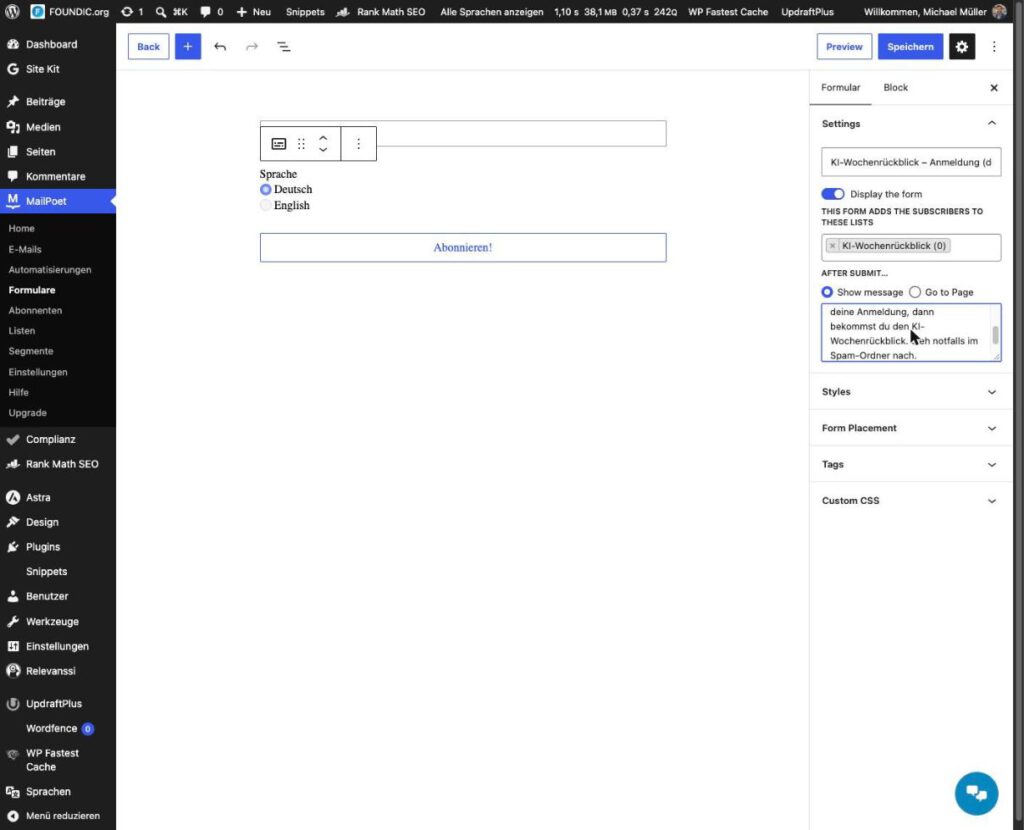
The German form before saving. On the left the language field and the button, on the right the name, the list and the text of the success message.
Expected result: The message “Form saved.” The addition about reset cookies that follows it concerns only pop-up forms.
Three stumbling blocks from this editor, all experienced first-hand.
Bernd: “I will just quickly write an explanatory sentence into the form.”
Ulf: “Bernd, an empty box appears there with every keystroke.”
Bernd: “The editor is broken.”
First: click first, then type. On the first attempt an explanatory paragraph was supposed to go into the form. The input did not land in the paragraph but in the search field of the block selection, and every keystroke produced an empty block. One sentence turned into dozens of empty paragraphs. The form was discarded before it was saved. The rule: click, check where the cursor is, then type. And the conclusion: explanatory text belongs on the page next to the form, not inside it. There it writes itself without this risk.
Ulf: “The button says ‚Update custom field‘. Does everything in this panel then apply to both forms?”
Second: what belongs to the field and what to the form. The panel on the right is called “Settings for custom field” and ends with a button Update custom field. That suggests everything in it applies to the field as a whole, that is, to both forms. Not true. The preselection and the mandatory setting belong to the individual form, only the values themselves belong to the field. During the build this error led to a detour: an English form without a preselection but with a mandatory field, including the asterisk that was missing in the German form. The correct way is: preselect the matching language in each form, mandatory off in both.
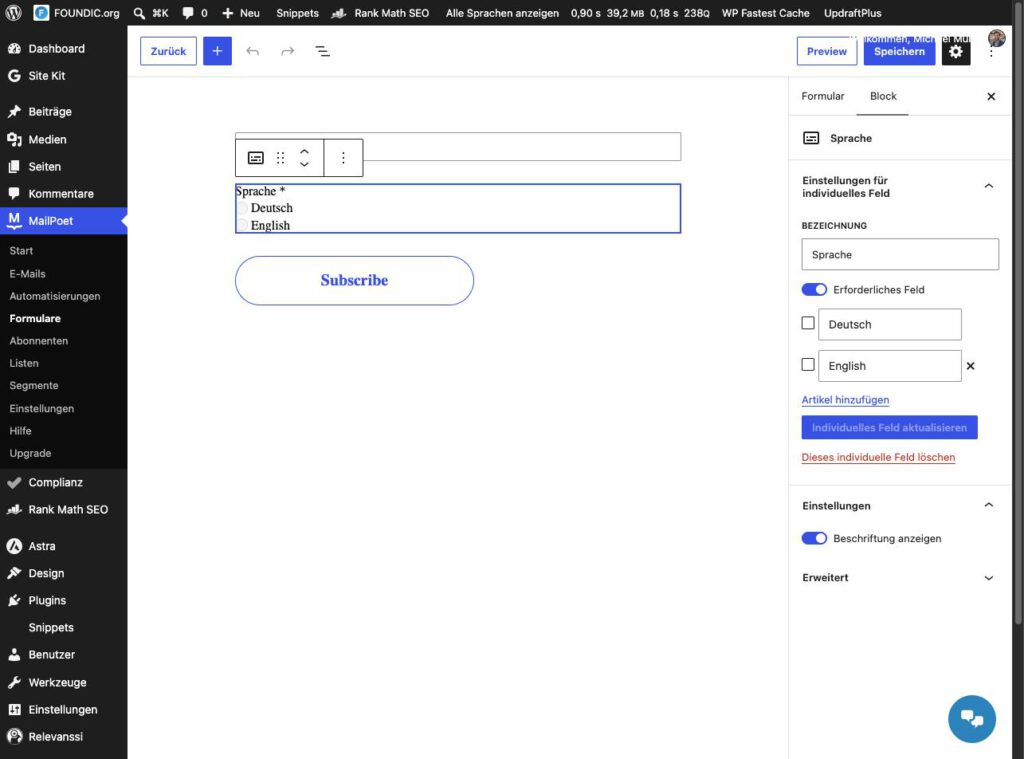
The panel that leads you astray: the label, the mandatory switch and the values sit above the “Update custom field” button. The boxes next to the values are the preselection of this one form.
Third: the label above the field. Above the selection buttons the form shows the label of the field. In the German form it fits. The editor does not offer it for changing per form, though, because the field Label in the panel belongs to the field as a whole, not to this one form. For the English form the same panel has the switch Display label. Switch it off there. Then the English form shows only the two selection buttons “Deutsch” and “English”, and those explain themselves.
Step 4.2: Getting the Button into Shape
MailPoet’s button is as wide as the form and as flat as a ruler out of the box. Measured: 1160 by 30 pixels. The “Post comment” button under the articles on the same website measures 308 by 60 pixels, with rounded corners. The sign-up button should look like its neighbour.
That takes two interventions, and the first one alone is not enough.
Click path: In the form editor click the button → on the right in the Block tab under Styles switch the Display Fullwidth toggle off → change to the Form tab → open the Custom CSS section → put the following rule at the end → Save.
/* Button in the shape of the comment button.
!important is necessary because MailPoet writes the padding
as an inline style directly onto the button. */
.mailpoet_form .mailpoet_submit {
min-width: 300px !important;
padding: 20px 40px !important;
font-size: 20px !important;
font-weight: 600 !important;
line-height: 20px !important;
border-radius: 50px !important;
}Bernd: “I know CSS. I will write the rule without the exclamation mark, that is cleaner.”
Ulf: “The button looks the same as before.”
Why the exclamation mark? MailPoet writes padding:5px as an inline style directly onto the element (a style specification that sits in the HTML on the button itself). An inline style beats every rule from a stylesheet. Only !important turns the order around. Anyone who does not know this writes a correct rule and wonders why nothing happens.
Expected result: The button is narrow, tall and round. What it looks like on the finished page is shown by the screenshot of the sign-up page in step 5.1.
Step 4.3: The English Form
Repeat steps 4.1 and 4.2 with these values. The CSS rule is the same.
| Setting | Value |
|---|---|
| Name | AI Weekly Review sign-up (English) |
| List | KI-Wochenrückblick (the same one) |
| Label of the mail field | Email address |
| Preselection in the language field | English |
| Display label (language field) | off |
| Button | Subscribe |
Almost there: we have sent you an email with a confirmation link. Please confirm your subscription there, then you will receive the AI Weekly Review. Check your spam folder if it does not arrive.Both forms feed the same list. The separation by language is handled by the field, and the field serves the segments.
Expected result: The form overview shows two forms, both with the list KI-Wochenrückblick, both of the type “Others (widget)”, both active.
Step 4.4: Noting Down the Shortcodes of the Forms
Ulf: “Shortcode? Is that a keyboard shortcut?”
Tanja: “More of a placeholder slip. You stick it on the page, and when displaying, WordPress hangs the form up in its place.”
A form gets onto a page via a shortcode (a placeholder in square brackets that WordPress replaces with content when displaying).
Click path: open the form → tab Form → Form Placement → at the entry Others (widget) copy the shortcode.
Expected result: Two shortcodes, one per form. The number is the ID of the form. In the example:
[mailpoet_form id="1"] German form
[mailpoet_form id="2"] English form
Different for you: The numbers are assigned by MailPoet. If you already have forms, yours will be different ones. Take the ones your editor shows.
Phase 5: Six Pages and Five Fields
A subscriber passes through three stations, and each one needs a page of its own: one for subscribing, one that says after the confirmation click that it worked, and one for managing and unsubscribing. With two languages that is six pages.
| Purpose | German | English |
|---|---|---|
| Subscribe | /de/ki-wochenrueckblick-abonnieren/ | /en/subscribe-ai-weekly-review/ |
| Confirmed | /de/anmeldung-bestaetigt/ | /en/subscription-confirmed/ |
| Manage | /de/abonnement-verwalten/ | /en/manage-your-subscription/ |
That was not the first plan. The first plan was: one page for everything. Subscribe at the top, manage and unsubscribe at the bottom. That sounds tidy and failed in two places that only became visible in operation. More on that shortly.
Step 5.1: The Two Sign-Up Pages
Click path: Pages → Add Page → give it a title → write two paragraphs → via the plus insert a Shortcodeblock and put the shortcode of the German form into it → a third paragraph underneath, in italics → in the sidebar set the slug (the rear part of the address) → Save draft.
Ulf: “What do I even write on a sign-up page like that?”
The structure follows the order in which a reader asks: what do I get? What happens when I enter my details? Then the form. Then the note about who the mails come from.
Different for you: The titles, slugs and texts of the six pages in this and the two following steps are those of the example. You can choose them freely. Just remember the slugs of the two sign-up pages, they come up again in phase 8 in the footer.
The German page, slug ki-wochenrueckblick-abonnieren:
Title:
KI-Wochenrückblick als wöchentlichen Newsletter abonnieren

Paragraph 1:
Der KI-Wochenrückblick fasst einmal pro Woche zusammen, was in der KI tatsächlich passiert ist, knapp, eingeordnet und ohne Marketingsprache. Jeden Samstag eine Mail mit dem vollständigen Rückblick, zum Lesen und zum Hören.

Paragraph 2 (bold: "erst wenn du darauf klickst, beginnt der Versand", as a link: "Datenschutzerklärung"):
Trage unten deine E-Mail-Adresse ein und wähle die Sprache. Du erhältst danach eine Mail mit einem Bestätigungslink; erst wenn du darauf klickst, beginnt der Versand. Abmelden kannst du dich jederzeit über den Link am Ende jeder Mail. Was mit deiner Adresse geschieht, steht in der Datenschutzerklärung.

Shortcode block:
[mailpoet_form id="1"]

Paragraph 3 (italic, "Impressum" as a link):
Der Versand erfolgt von noreply@deine-domain.de. Antworten auf diese Adresse werden nicht gelesen, schreib uns bitte über die Kontaktangaben im Impressum.
Paragraph 3 (italic, “Impressum” as a link): Der Versand erfolgt von noreply@deine-domain.de. Antworten auf diese Adresse werden nicht gelesen, schreib uns bitte über die Kontaktangaben im Impressum.
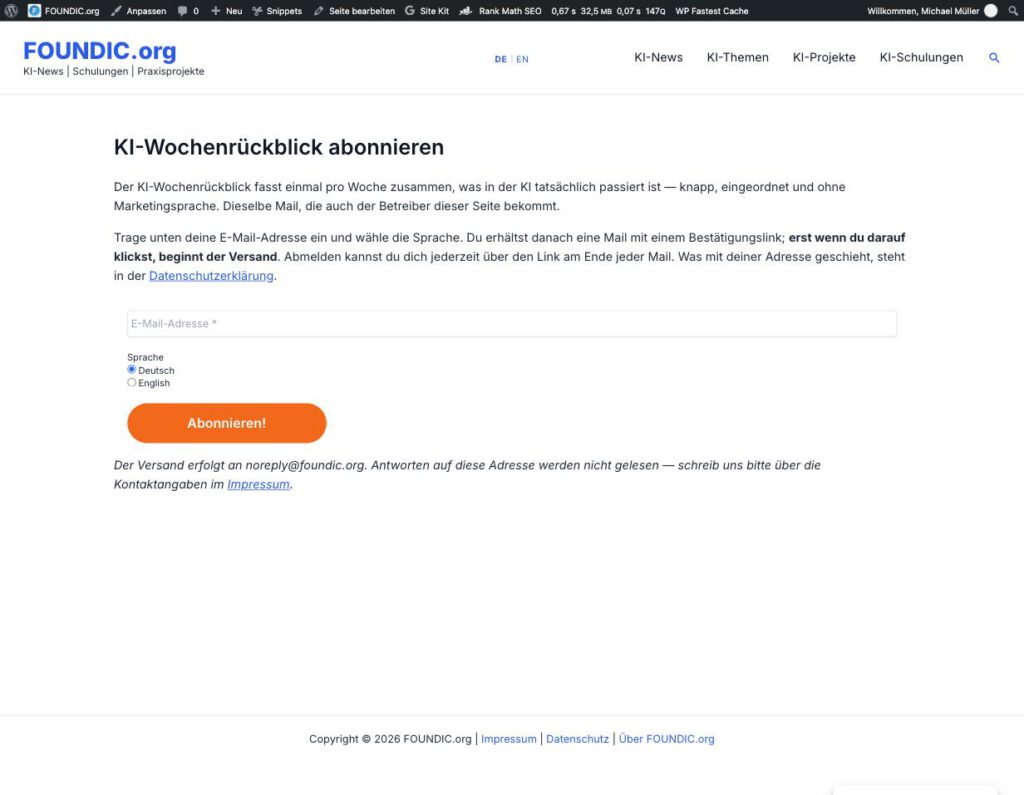
The German sign-up page: text, form, sender note. Nothing more.
The English page, slug subscribe-ai-weekly-review:
Title:
Subscribe to the AI Weekly Review as a weekly newsletter

Paragraph 1:
The AI Weekly Review sums up once a week what actually happened in AI, short, with context, and without marketing language. One email every Saturday with the complete review.

Paragraph 2 (bold: "delivery only starts once you click it", as a link: "privacy policy"):
Enter your email address below and choose your language. You will then receive an email with a confirmation link; delivery only starts once you click it. You can unsubscribe at any time using the link at the end of every email. What happens to your address is explained in the privacy policy.

Shortcode block:
[mailpoet_form id="2"]

Paragraph 3 (italic, "legal notice" as a link):
Emails are sent from noreply@deine-domain.de. Replies to this address are not read, please use the contact details in the legal notice.
Paragraph 3 (italic, “legal notice” as a link): Emails are sent from noreply@deine-domain.de. Replies to this address are not read, please use the contact details in the legal notice.
The two pages are linked to each other as translations. With Polylang (the plugin that makes the website bilingual) this happens in the page editor: there you give the page its language and enter the respective other page as the translation. Whether the link is in place is shown by the page list. In the language columns a pencil appears instead of a plus sign.
Create new pages as a draft first and look at them in the preview. A new public page is a visible change to the site. Publishing happens in step 5.4, all six at once.
Expected result: Two drafts. In the page list both show a pencil instead of a plus sign in the language columns. The preview shows text, form and sender note.
Step 5.2: The Two “Subscription Confirmed” Pages
Ulf: “I clicked Confirm in the mail and I am standing in front of the empty form again. Did it work now or not?”
Tanja: “Good question. The page does not tell you.”
Where does the click in the confirmation mail lead? On the first attempt it led back to the sign-up page. So the freshly minted subscriber ended up in front of an empty input field again, as if nothing had happened. MailPoet’s confirmation sentence was on the page, but right at the bottom, where nobody looks for it.
The solution is a page of its own that is linked nowhere and has only one job.
Click path: Pages → Add Page → title and four paragraphs following the pattern → set the slug → Save draft. The same for the English page, linked to the German one.
The German page, slug anmeldung-bestaetigt:
Title:
Anmeldung bestätigt

Paragraph 1 (the first sentence in bold):
Deine Anmeldung ist bestätigt. Ab der nächsten Ausgabe bekommst du den KI-Wochenrückblick, einmal pro Woche, knapp und eingeordnet, ohne Marketingsprache. Jeden Samstag eine Mail mit dem vollständigen Rückblick, zum Lesen und zum Hören.

Paragraph 2 ("Datenschutzerklärung" as a link):
Abmelden kannst du dich jederzeit mit einem Klick am Ende jeder Mail, sofort und ohne Rückfrage. Was mit deiner Adresse geschieht, steht in der Datenschutzerklärung.

Paragraph 3 (italic, "Impressum" as a link):
Der Versand erfolgt von noreply@deine-domain.de. Antworten auf diese Adresse werden nicht gelesen, schreib uns bitte über die Kontaktangaben im Impressum.

Paragraph 4 (as a link to the German home page):
Zurück zur Startseite
The English page, slug subscription-confirmed:
Title:
Subscription confirmed

Paragraph 1 (the first sentence in bold):
Your subscription is confirmed. From the next issue you will receive the AI Weekly Review, once a week, short and with context, without marketing language. One email every Saturday with the complete review.

Paragraph 2 ("privacy policy" as a link):
You can unsubscribe at any time with one click at the end of every email, immediately and without being asked why. What happens to your address is explained in the privacy policy.

Paragraph 3 (italic, "legal notice" as a link):
Emails are sent from noreply@deine-domain.de. Replies to this address are not read, please use the contact details in the legal notice.

Paragraph 4 (as a link to the English home page):
Back to the home page
The first sentence is in bold right at the top, because it is the answer to the only question the reader has at that moment. This page needs no shortcode. MailPoet only requires one for the unsubscribe pages.
Expected result: Two more drafts, linked to each other, both without a shortcode.
Step 5.3: The Two “Manage Subscription” Pages
Now to the second place where the “one page for everything” plan failed.
Bernd: “The shortcode for unsubscribing is broken. It shows up on the page as plain text.”
Tanja: “It is not broken. It is careful.”
For managing and unsubscribing, MailPoet supplies a shortcode: [mailpoet_page]. If you put it on a page and open that page, what is there is: [mailpoet_page]. As text. Visible to every visitor.
That is not a fault but deliberate, and the intention is sensible. The shortcode only turns into a form if the visitor comes via the personal link from a mail. That link carries a token that belongs to exactly one address. A field saying “enter address and unsubscribe” deliberately does not exist. Otherwise anyone could unsubscribe other people’s addresses or try out who is subscribed.
For the page planning that means: the shortcode belongs on a page of its own that is only reached via the mail, and not on the public sign-up page.
Click path: Pages → Add Page → title, two paragraphs and the shortcode as the third paragraph → set the slug → Save draft. The same in English, linked.
The German page, slug abonnement-verwalten:
Title:
Abonnement verwalten

Paragraph 1:
Hier änderst du dein Abonnement oder beendest es: Sprache wechseln oder dich vollständig abmelden, sofort und ohne Rückfrage.

Paragraph 2 ("Erscheint hier nichts" in bold):
Die Angaben unten gehören zu der Adresse, aus deren Mail du hierher gekommen bist. Erscheint hier nichts, öffne diese Seite bitte über den Link am Ende einer unserer Mails. Ohne ihn lässt sich nicht feststellen, um welches Abonnement es geht.

Paragraph 3:
[mailpoet_page]
The English page, slug manage-your-subscription:
Title:
Manage your subscription

Paragraph 1:
Here you can change your subscription or end it: switch the language, or unsubscribe completely, immediately and without being asked why.

Paragraph 2 ("If nothing appears" in bold):
The details below belong to the address whose email brought you here. If nothing appears, please open this page using the link at the end of one of our emails. Without it there is no way to tell which subscription is meant.

Paragraph 3:
[mailpoet_page]
The sentence in bold catches the case where somebody does end up on the page without a token.
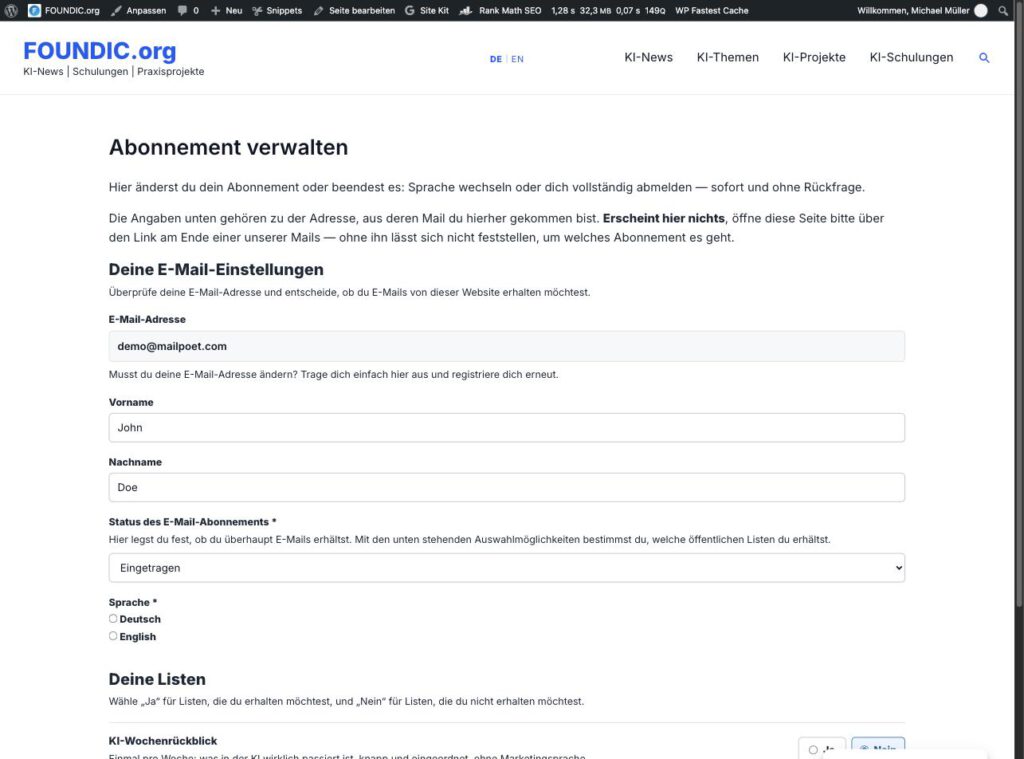
The management page, opened via MailPoet’s preview link: address, name, status, language, list, save. The details in the picture are MailPoet’s sample data.
Expected result: Two more drafts, linked to each other. If you call up one of the pages without the link from a mail, the shortcode appears there as text. At this point that is correct.
Step 5.4: Publishing and Showing MailPoet the Pages
The order is compulsory here: MailPoet’s selection fields list only published pages. Drafts do not appear there. So publish first, then assign.
Click path: Pages → open each of the six pages → Publish.
Click path: MailPoet → Settings → tab Basics → switch the four page fields according to the table → Save settings.
| Section in the Basics tab | Field | points to |
|---|---|---|
| Manage Subscription page | selection field, below it the variant Modern (with yes/no fields per list and the public list description) | Abonnement verwalten |
| Unsubscribe page | confirmation page | Abonnement verwalten |
| Unsubscribe page | success page | Abonnement verwalten |
| Resubscribe page | selection field | Abonnement verwalten |
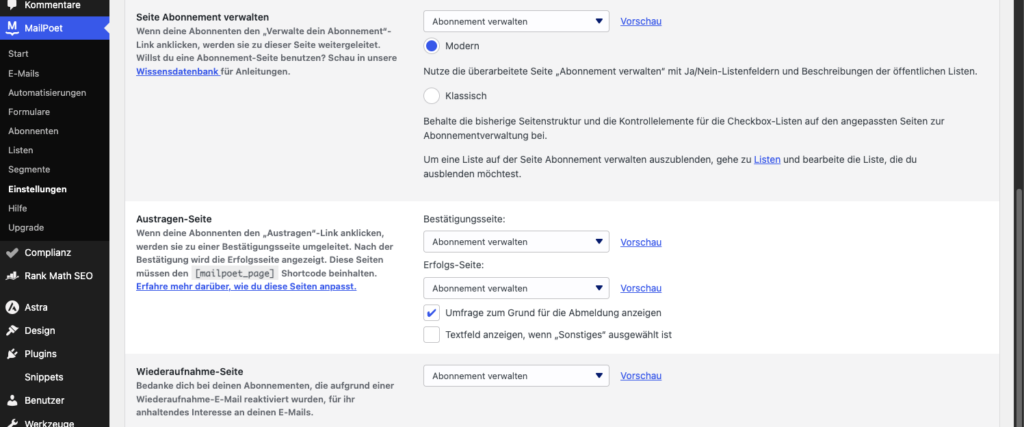
The four page fields in the Basics tab, all set to “Abonnement verwalten”. Next to each field the “Preview” link.
Ulf: “Four fields switched over. Final whistle?”
Tanja: “Injury time. There is one more field, and it is hiding.”
And now the part that is easily overlooked: there is a fifth field, and it sits on a different tab.
Click path: tab Sign-up Confirmation → set the field Confirmation page to Anmeldung bestätigt → Save settings.
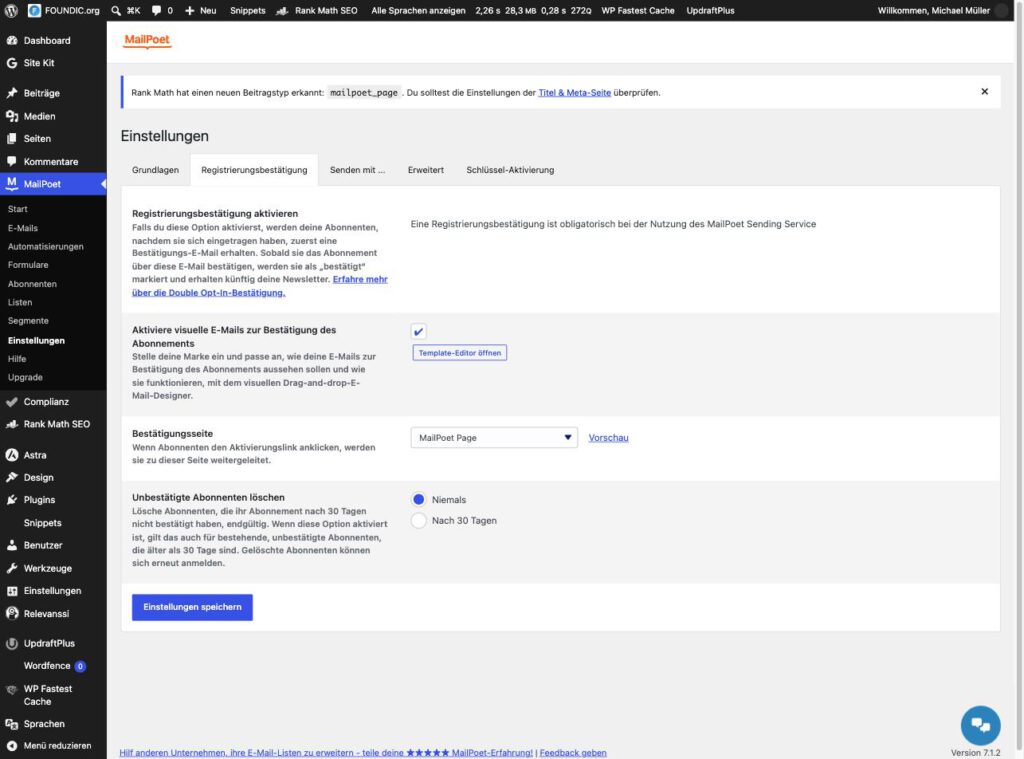
The Sign-up Confirmation tab in its initial state. At the top it says in black and white that double confirmation is mandatory with MailPoet’s dispatch service. At the bottom the fifth page field in its delivery state “MailPoet Page”.
Expected result: Each time the message “Settings saved”. Reload the page afterwards and check whether all five fields have kept their value. Next to each field there is a link Preview. It opens the page the way a reader coming from the mail sees it, with sample data.
With two languages all five fields point to the German pages. MailPoet knows only one page per purpose, not one per language. The English pages hang on them as linked translations.
Two further settings sit on the same tabs and are quickly done:
- Notifications for new subscribers (Basics tab) to No. Otherwise you get a mail for every sign-up, and that goes through the dispatch service and counts against your monthly quota.
- Delete unconfirmed subscribers (Sign-up Confirmation tab) stays on Never. Deleting cannot be undone.
Step 5.5: Adding to the Privacy Policy
Bernd: “Nobody reads the privacy policy. We will leave it as it is.”
Tanja: “Then you are sending a newsletter that, according to your own policy, does not exist at all.”
A newsletter that does not appear in the privacy policy is an open barn door. In the example, before the rebuild none of the words newsletter, MailPoet or subscriber appeared in it.
Click path: Pages → open the privacy policy → insert a new section before the closing section → renumber the following sections by one → Update. The same in the English version, there as section 7.
The section in the wording of the example. It is a template and not legal advice. You settle the wording for your website with somebody who is liable for it:
10. Newsletter „KI-Wochenrückblick“

Zweck. Wenn Sie sich für den KI-Wochenrückblick anmelden, verwenden wir Ihre E-Mail-Adresse ausschließlich dazu, Ihnen diesen Newsletter zuzusenden. Eine Weitergabe an Dritte zu Werbezwecken findet nicht statt.

Eingesetzte Software: MailPoet. Für die Verwaltung der Empfängerliste und den Versand setzen wir das WordPress-Plugin MailPoet ein. Anbieter ist die Automattic Inc., 60 29th Street #343, San Francisco, CA 94110, USA. Ihre Daten werden in der Datenbank dieser Website gespeichert. Für den Versand werden sie an den MailPoet Sending Service übermittelt und dort verarbeitet; damit ist eine Übermittlung in die USA verbunden. Grundlage der Übermittlung sind die Standardvertragsklauseln der EU-Kommission beziehungsweise die Zertifizierung des Anbieters unter dem EU-US Data Privacy Framework. Näheres zum Datenschutz des Anbieters: automattic.com/privacy.

Gespeicherte Daten. Gespeichert werden Ihre E-Mail-Adresse, die von Ihnen gewählte Sprache sowie Zeitpunkt und IP-Adresse der Anmeldung und der Bestätigung. Zeitpunkte und IP-Adressen dienen ausschließlich dem Nachweis Ihrer Einwilligung.

Doppelte Bestätigung. Nach der Anmeldung erhalten Sie eine E-Mail mit einem Bestätigungslink. Der Versand beginnt erst, wenn Sie diesen Link angeklickt haben.

Öffnungs- und Klickmessung. MailPoet ist so eingestellt, dass gemessen wird, ob eine Mail geöffnet und ob auf Links darin geklickt wird; dabei werden auch Cookies eingesetzt. Diese Auswertung dient allein dazu, die Qualität des Newsletters einzuschätzen.

Rechtsgrundlage. Die Verarbeitung erfolgt auf Grundlage Ihrer Einwilligung nach Art. 6 Abs. 1 lit. a DSGVO. Sie können Ihre Einwilligung jederzeit mit Wirkung für die Zukunft widerrufen; die Rechtmäßigkeit der bis dahin erfolgten Verarbeitung bleibt davon unberührt.

Widerruf und Abmeldung. Am Ende jeder Newsletter-Mail finden Sie einen Abmeldelink und einen Link zur Verwaltung Ihres Abonnements. Nach der Abmeldung wird Ihre Adresse aus dem Verteiler entfernt. Der Nachweis der erteilten Einwilligung wird zur Erfüllung der Rechenschaftspflicht aufbewahrt, solange er dafür benötigt wird.
And the English version:
7. Newsletter “AI Weekly Review”

Purpose. If you subscribe to the AI Weekly Review, we use your email address solely to send you this newsletter. It is not passed on to third parties for advertising purposes.

Software used: MailPoet. We use the WordPress plugin MailPoet to manage the recipient list and to send the newsletter. The provider is Automattic Inc., 60 29th Street #343, San Francisco, CA 94110, USA. Your data is stored in the database of this website. For sending, it is transmitted to and processed by the MailPoet Sending Service, which involves a transfer to the USA. This transfer is based on the European Commission's standard contractual clauses and on the provider's certification under the EU-US Data Privacy Framework. For details on the provider's data protection: automattic.com/privacy.

Data stored. We store your email address, the language you chose, and the time and IP address of both your sign-up and your confirmation. Times and IP addresses serve solely as proof of your consent.

Double opt-in. After signing up you receive an email containing a confirmation link. Delivery only begins once you have clicked that link.

Open and click measurement. MailPoet is configured to measure whether an email is opened and whether links inside it are clicked; cookies are used for this. The purpose is solely to judge the quality of the newsletter.

Legal basis. Processing is based on your consent under Art. 6(1)(a) GDPR. You may withdraw your consent at any time with effect for the future; the lawfulness of processing carried out until then remains unaffected.

Withdrawal and unsubscribing. Every newsletter email ends with an unsubscribe link and a link to manage your subscription. Once you unsubscribe, your address is removed from the list. Proof of the consent given is retained for as long as it is needed to meet the accountability obligation.
Expected result: Both versions of the privacy policy contain the new section, and the sections after it are numbered one higher.
The paragraph on open and click measurement belongs to a setting that is easily overlooked.
Click path: MailPoet → Settings → tab Advanced → Engagement analytics tracking.
Out of the box it is set to Full: MailPoet measures opens and clicks and sets cookies for that. That is how it is configured in the example, and that is why the paragraph is in the template. Anyone who does not need open rates switches to Basic or None and deletes the paragraph from the privacy policy. The setting and the policy have to match, in whichever direction.
Phase 6: The Most Important Mail Is the First One
The confirmation mail is the only mail every subscriber is guaranteed to get, and the only one they can still back out of. MailPoet’s default is in English, reads “Confirm your subscription to [site:title]” in the subject line and deserves a rewrite.
One peculiarity first: MailPoet knows one confirmation mail for the whole website. There is no version per language. Anyone who signs up on the English page gets the same mail as the German reader. The solution that works without buying anything: every line appears in both languages, German first.
Step 6.1: Rewriting the Text
Click path: MailPoet → Settings → tab Sign-up Confirmation → tick Enable visual emails for subscription confirmation → Open template editor → replace the subject and the text blocks according to the table → set the button to a width of 288 → Save.
| Place | Content |
|---|---|
| Subject (the field above the template) | Ein Klick noch: KI-Wochenrückblick / One click to go: AI Weekly Review |
| Header | [site:title] (is replaced by the name of the website when sending) |
| above the button | Ein Klick fehlt noch, dann bist du dabei. / One click to go, then you’re in. |
| Button | Bestätigen / Confirm, target [activation_link] (already written like this in the template and stays) |
| under the button, German | Danach kommt der KI-Wochenrückblick einmal pro Woche: was in der KI wirklich passiert ist, knapp und eingeordnet, ohne Marketingsprache. Jeden Samstag eine Mail mit dem vollständigen Rückblick, zum Lesen und zum Hören. Abmelden kannst du dich mit einem Klick am Ende jeder Ausgabe. Du hast dich nicht angemeldet? Dann ignoriere diese Mail, ohne deinen Klick passiert nichts. |
| under the button, English | Afterwards the AI Weekly Review arrives once a week: what actually happened in AI, short and with context, without marketing language. One email every Saturday with the complete review. You can unsubscribe with one click at the end of every issue. Did not sign up? Then simply ignore this email, without your click nothing happens. |
| Footer | Gesendet von noreply@deine-domain.de. Antworten werden hier nicht gelesen; die Kontaktangaben stehen im Impressum. / Sent from noreply@deine-domain.de. Replies are not read here; contact details are in the legal notice. |
Ulf: “If the mail is bilingual and there is a button in it, what can still be wrong with it?”
Tanja: “The order. And a thank-you in the wrong place.”
This is not the first version. The first one was bilingual too and still botched, and the reasons are instructive:
- The same note appeared twice, once in the running text, once in the small print.
- “Thank you!” came before the click. A thank-you belongs after the deed, not in the request.
- Not a word about what the reader gets. The mail explained what they should do, but not what for.
- The subject was too long and was cut off in the preview line of the mailbox.
The new version follows the order in which it is read: what to do, the button, the reason, the small print.
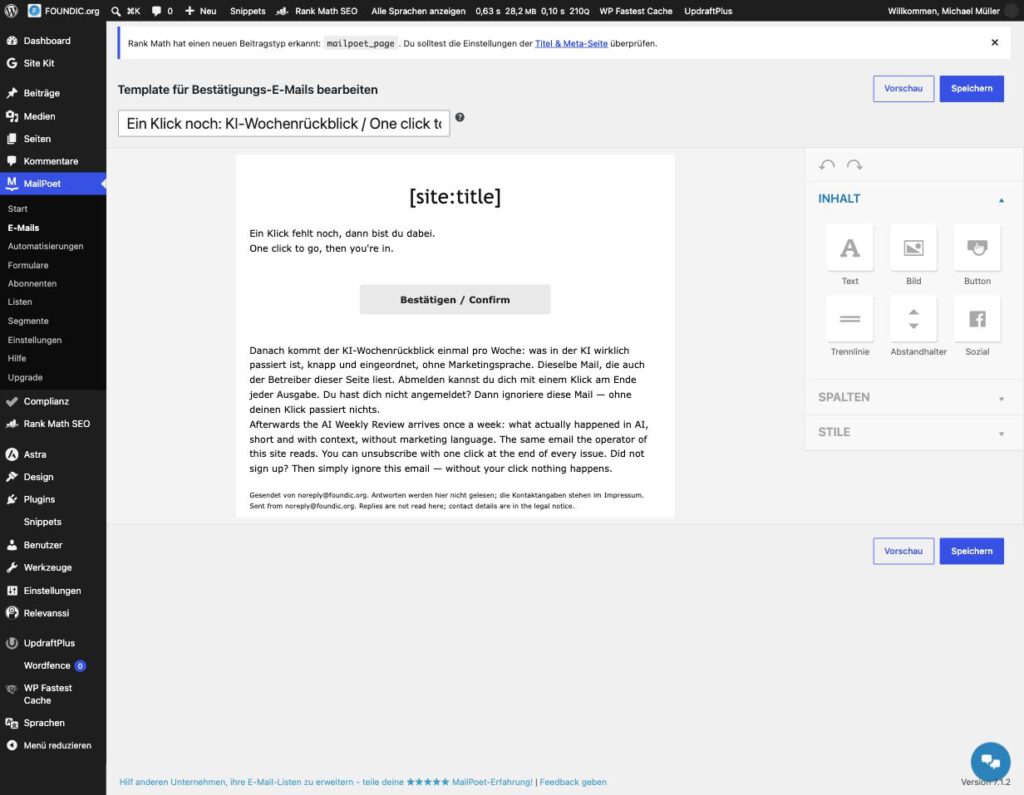
The new version in the editor: one sentence, the button, and only then the explanation.
Expected result: In the editor the new subject is above the template and below it the new order: one sentence, the button, the explanation, the footer.
Bernd: “The text does not fit in the button? I will set the width to 420. Done.”
Ulf: “The button is exactly as wide as before.”
A small piece of nastiness is waiting at the button text. The first idea was “Anmeldung bestätigen / Confirm subscription”. The text wrapped, the second line ran out of the button. So increase the width: the field accepted the value 420 without complaint. The button stayed as it was. The template limits the width to 288 pixels and silently caps every larger value. The rule: if a number field swallows an input and nothing happens, it probably has an upper limit. The solution was a shorter text.
Step 6.2: Save, Reload, Preview
Click path: Save → reload the page in the browser → check whether the new text is still there → Preview → Mobile device.
Expected result: In the preview, instead of [site:title] the name of your website appears, and the button fits on one line.
Reloading is not a ritual. An editor that reports “saved” has not thereby proved that the server knows the same thing. Only the state after reloading is the state.
Phase 7: The Acid Test
Bernd: “Test? It works at my end. I set everything up correctly, after all.”
Tanja: “I will believe you as soon as a mail is in the inbox.”
Up to this point everything is a claim. Now you sign up yourself, and in the way a stranger would.
Step 7.1: Two Addresses, Two Forms
For the test take an address at Gmail. The reason is not convenience. Gmail checks senders as strictly as hardly any other provider. If the confirmation mail lands in the inbox there, that is a very good indication that the authentication from phase 2 and the delivery work. It is not a proof for each individual procedure.
Click path: Open a private browser window (so that you are not signed in as an administrator) → call up the German sign-up page → enter the address → Abonnieren!
Expected result: In place of the form the message from step 4.1 appears.
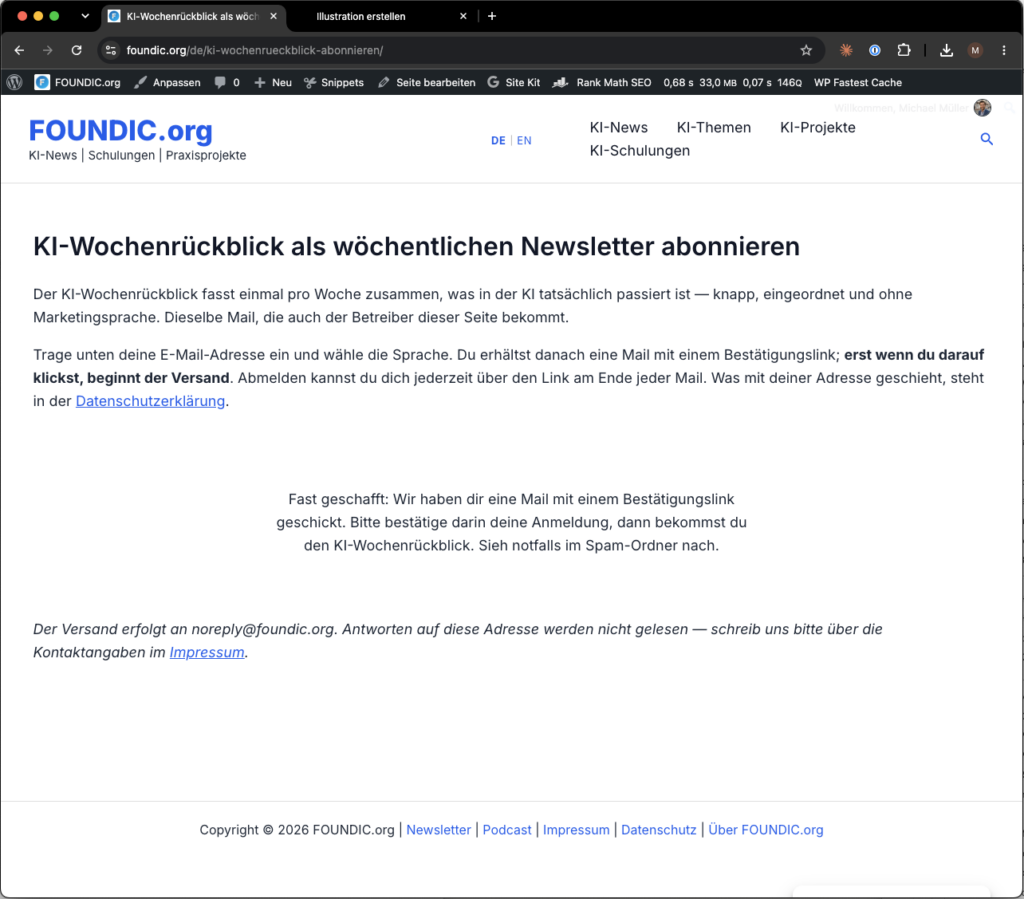
After submitting: the form is gone, in its place stands the request to look in the mailbox.
Repeat this on the English page with a second address.
A note on choosing the addresses: an address on your own domain is only usable if a mailbox really exists behind it. Mails to non-existent mailboxes come back as hard bounces, and those count against the reputation of a freshly authenticated domain. MailPoet suspends accounts with a high bounce rate.
Step 7.2: The Mail in the Mailbox
Expected result: After a short time the confirmation mail is in the inbox, not in the spam folder. The sender is the name of your website, the subject the one from step 6.1.
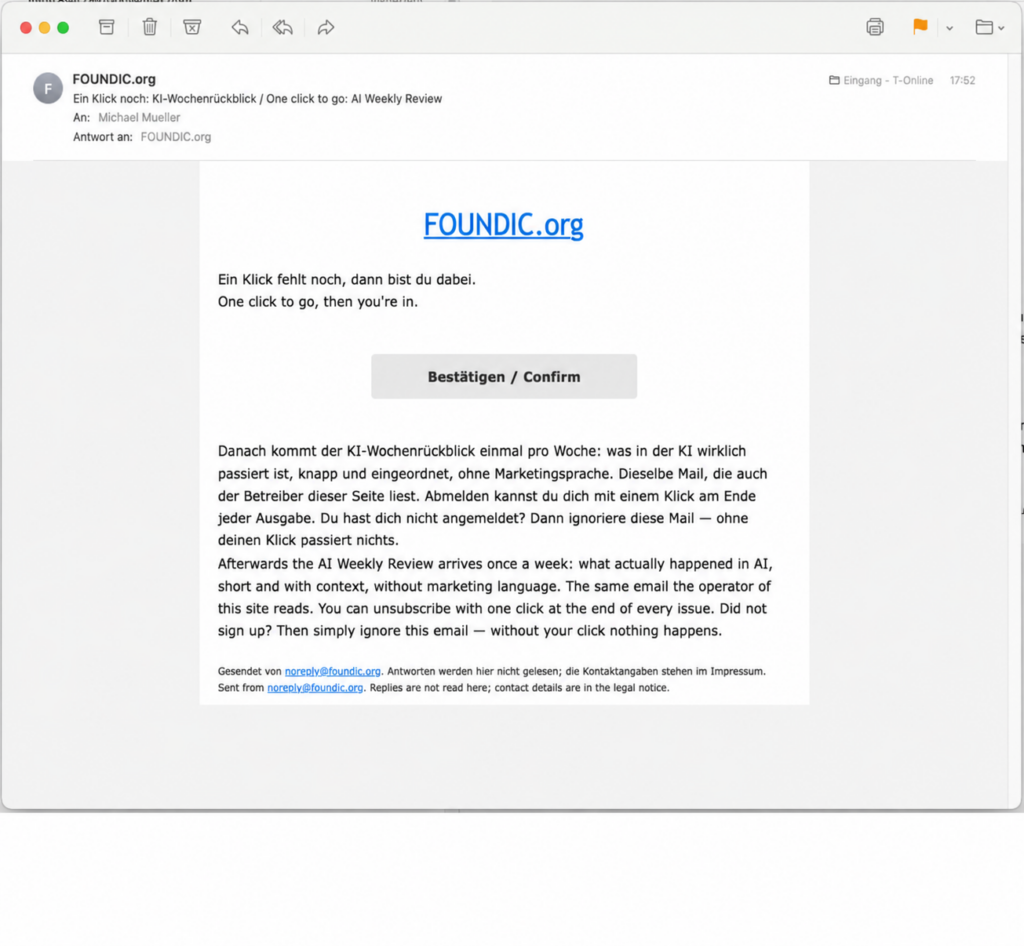
The confirmation mail as it arrives in the mailbox.
While this system was being built, the two mails arrived on 28 September at 10:00:16 and at 10:02:05, both in the inbox. Against a DMARC rule set to p=reject. With that, phase 2 had passed its practical test.
Step 7.3: The Click
Click path: In the mail use Bestätigen / Confirm to confirm.
Expected result: The page “Anmeldung bestätigt” opens, with the sentence in bold right at the top.
Step 7.4: Checking What MailPoet Made of It
Click path: MailPoet → Subscribers.
Expected result: Both test addresses appear with the status Subscribed in the list KI-Wochenrückblick.
Click path: MailPoet → Segments.
Expected result: Each of the two segments counts exactly one subscriber.
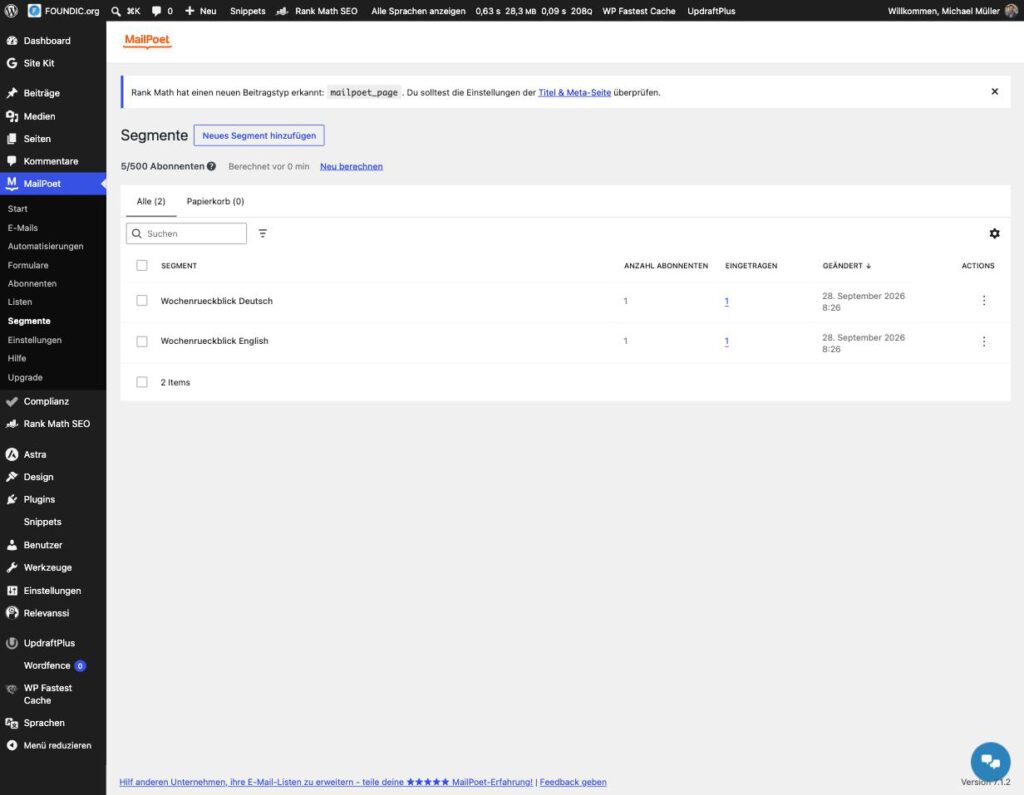
The moment of truth: one subscribed subscriber in each language segment.
This last look is the most important one of the whole phase. The dispatch hangs on the segment, not on the list. If the language had not come through, the subscriber would be on the list and would still never get a mail, without anything turning red anywhere.
Bernd: “Alarm! Segment English: zero. The segment is broken, I will reverse the condition.”
Tanja: “Have you already clicked the button in the confirmation mail?”
Exactly at this point there was a moment of fright during the build, and it is a lesson about intermediate states. One of the two test addresses was already known to MailPoet, as an unconfirmed record from “WordPress Users”. Shortly after the sign-up its record showed: list attached, language empty. Segment English: zero. A warning was noted immediately, together with the suggestion to reverse the segment condition. Then came the confirmation click, and the language was there. MailPoet had written the field for an already existing subscriber only with the confirmation. The warning was withdrawn, and the suggestion with it. The rule: An intermediate state is not a finding. First let the chain run to the end, then measure.
The sign-up route is therefore in place: form, confirmation mail, inbox, click, confirmation page, list, correct segment. What is missing is readers who find it.
Phase 8: A Door Nobody Finds Is a Wall
Ulf: “I wanted to sign up again yesterday for fun and could not find the page.”
Bernd: “The address is perfectly simple. Slash de, slash ki, hyphen wochenrueckblick, hyphen abonnieren.”
Tanja: “Exactly.”
After phase 7 there were two published sign-up pages that were linked from nowhere. The main menu knew only categories, the footer only the mandatory links. Anyone who wanted to sign up would have had to guess the address.
Three places were on the table. An entry in the main menu was rejected: among four categories, “Newsletter” would read like a fifth one. What remained are two places with different jobs. The footer is for the person who is searching. A notice under the articles is for the person who has just finished reading.
Implementation with Astra, Polylang and Code Snippets. This phase shows the route of the example system. With other themes and without Polylang the goal stays the same, the click path changes. It is not strictly part of the MailPoet setup: the dispatch also works without a footer link and a notice block.
Step 8.1: A Link in the Footer
Bernd: “I put two entries in the footer menu. Saved. Done.”
Ulf: “But there is nothing new in the footer.”
How the link gets into the footer depends on the theme. The first attempt in the example was two entries in the footer menus. Saved, page loaded: nothing. The visible footer of the Astra theme is not a menu. It is a text component called Copyright in the theme’s footer builder. The menu entries were removed again.
With a bilingual website using Polylang a second level is added: the text component is a translatable string, and each language gets its own version.
Click path: Languages → Translations → enter Copyright in the search field → at the entry footer-copyright-editor (group themes/astra) fill the German and the English field → Save changes.
The template that the theme brings along and that stays untouched reads in the example:
<span style="font-size: 12pt;">Copyright [copyright] [current_year] [site_title] | <a href="/impressum/">Impressum</a> | <a href="/datenschutz/">Datenschutz</a></span>Different for you: the template itself and the two link targets. Copy your own template into the fields and only add the link to your sign-up page.
The German field gets the same line with the new link in front of the mandatory links:
<span style="font-size: 12pt;">Copyright [copyright] [current_year] [site_title] | <a href="/de/ki-wochenrueckblick-abonnieren/">Newsletter</a> | <a href="/impressum/">Impressum</a> | <a href="/datenschutz/">Datenschutz</a></span>The English field gets:
<span style="font-size: 12pt;">Copyright [copyright] [current_year] [site_title] | <a href="/en/subscribe-ai-weekly-review/">Newsletter</a> | <a href="/impressum/">Impressum</a> | <a href="/datenschutz/">Datenschutz</a></span>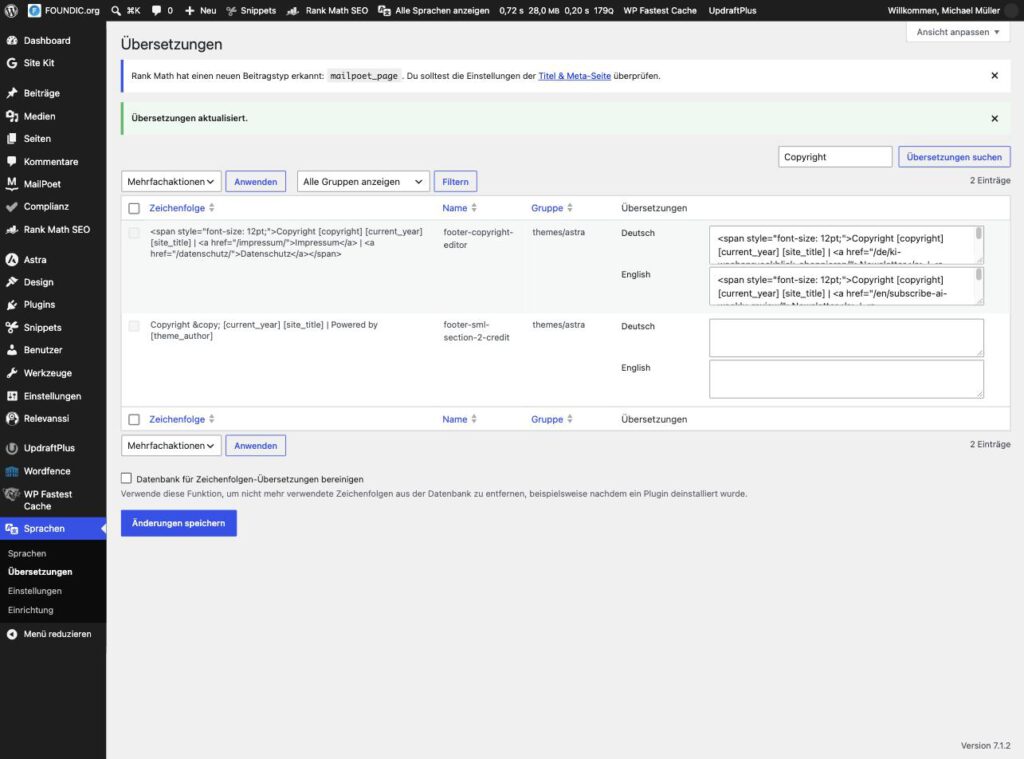
*The string of the Astra component in Polylang’s translation dialog. The template in the middle stays untouched, only the two language fields are filled.
- The route via the translation fields has a pleasant side effect: it is completely reversible. If you empty both fields, the template takes over again. Anyone running Astra without Polylang changes the same text in the theme’s customizer, in the footer builder at the Copyright element. With other themes the link belongs where the theme manages its footer text or its footer menu.
Expected result: In the footer of every pageNewsletterappears in front of the mandatory links, in each language with the matching target. If nothing is to be seen: step 8.3.
Step 8.2: A Notice Under Every Article in the Category
Ulf: “Do we have to write the notice into every single post now? That is around 400.”
Tanja: “Into not a single one. Picture a stamp at the exit. The letters in the archive stay as they are. Only whoever leaves the building gets the stamp.”
The second place is the end of the articles. Not the beginning and not the middle. A request comes after the service, never before.
The obvious implementation would be to write the notice into every post. With around 200 German and 200 English posts in the category and two workflows that keep creating new ones, that would be a permanent building site. The better solution writes nothing into a single post. A small piece of code attaches the notice while displaying, via a filter (a place where WordPress allows foreign code to change content on its way to the reader). That works retrospectively for all posts, applies automatically to all future ones and can be switched off everywhere with one switch.
You need four numbers: the IDs of the two categories and of the two sign-up pages. The ID of a category appears in the browser’s address bar if you open it under Posts → Categories for editing, in the form tag_ID=8. The one for a page is there when you edit the page, in the form post=5091. Different for you:In the example they are 8 (KI-News), 21 (AI-News), 5091 (German sign-up page) and 5092 (English sign-up page). What is meant is the category under whose articles the notice is to appear. That can also be the only category of your blog.
Click path: Snippets → create a new snippet → give it a title → insert the following code → adapt the four numbers and the texts to your website → as the execution location pick Only run on site front-end with priority 10 → save and activate.
/**
 * Notice about the AI Weekly Review under posts in the KI-News category.
 * Attaches itself to the post text, the posts themselves stay unchanged.
 * Switching this snippet off removes the notice everywhere.
 */
add_filter( 'the_content', function ( $inhalt ) {

	if ( ! is_singular( 'post' ) || ! in_the_loop() || ! is_main_query() || is_feed() ) {
		return $inhalt;
	}

	$id = get_the_ID();

	$deutsch  = has_category( 8, $id );   // KI-News: ID of YOUR German category
	$englisch = has_category( 21, $id );  // AI-News: ID of YOUR English category
	if ( ! $deutsch && ! $englisch ) {
		return $inhalt;
	}

	$sprache = $englisch ? 'en' : 'de';
	if ( function_exists( 'pll_get_post_language' ) ) {
		$pll = pll_get_post_language( $id );
		if ( $pll ) { $sprache = $pll; }
	}

	if ( 'en' === $sprache ) {
		$titel = 'The week in AI, once a week';
		$text  = 'The AI Weekly Review sums up on Saturdays what actually happened in AI, short and with context. One email every Saturday with the complete review, to read and to listen to. Free, no advertising, unsubscribe any time.';
		$knopf = 'Subscribe for free';
		$ziel  = get_permalink( 5092 );   // ID of YOUR English sign-up page
	} else {
		$titel = 'Einmal pro Woche das Wichtigste';
		$text  = 'Der KI-Wochenrückblick fasst zusammen, was in der KI wirklich passiert ist, knapp und eingeordnet. Jeden Samstag eine Mail mit dem vollständigen Rückblick, zum Lesen und zum Hören. Kostenlos, keine Werbung, jederzeit abbestellbar.';
		$knopf = 'Kostenlos abonnieren';
		$ziel  = get_permalink( 5091 );   // ID of YOUR German sign-up page
	}

	if ( ! $ziel ) {
		return $inhalt;
	}

	$block  = '<aside class="foundic-newsletter-hinweis" style="margin:3em 0 1em;padding:1.5em 0 0;border-top:1px solid rgba(0,0,0,.12);">';
	$block .= '<p style="margin:0 0 .3em;font-weight:700;font-size:1.15em;">' . esc_html( $titel ) . '</p>';
	$block .= '<p style="margin:0 0 2.8em;">' . esc_html( $text ) . '</p>';
	$block .= '<div class="wp-block-button"><a class="wp-block-button__link wp-element-button" href="' . esc_url( $ziel ) . '">' . esc_html( $knopf ) . '</a></div>';
	$block .= '</aside>';

	return $inhalt . $block;
}, 20 );
Anyone who has only one language makes the line with $englisch point to a category that does not exist, or sets it to false. The English branch is then never entered.
Four decisions in the code are worth explaining.
The conditions come first. The filter runs on every text WordPress outputs, including in feeds, lists and excerpts. Without the first condition the notice would suddenly hang in the article overview and in the RSS feed.
The target comes from get_permalink(). The obvious route would be to assemble the address from the website’s home address and the path. Polylang, however, already puts the language code in front of the home address, and what would come out is a path with a doubled /de/de/. The function get_permalink() asks WordPress for the finished address of the page and makes that mistake impossible.
The button carries the classes of the theme, no colours of its own. It therefore looks like every other button on the website and moves along when the theme is changed.
The spacing above the button hangs on a single value, the bottom margin of the text paragraph (margin:0 0 2.8em). During the build it first said 1.2em, then 1.9em. The change to 1.9 was noticed by nobody. Only measuring the finished rendered block showed why: 34 instead of 22 pixels. With 2.8em it is 50 pixels, and the button stands free.
First demonstrate the snippet on a single post. To do that, temporarily insert these two lines directly after the line with get_the_ID()and enter the ID of a post:
	// TEST RUN: only this one post
	if ( 1234 !== $id ) { return $inhalt; }
Expected result in the test run: Under that one post the notice appears, under a second post in the same category it does not. If both are true, the two lines come out again.
Expected result afterwards: Under every post in the category there is a thin line, a heading, a paragraph and a button, in the language of the post.
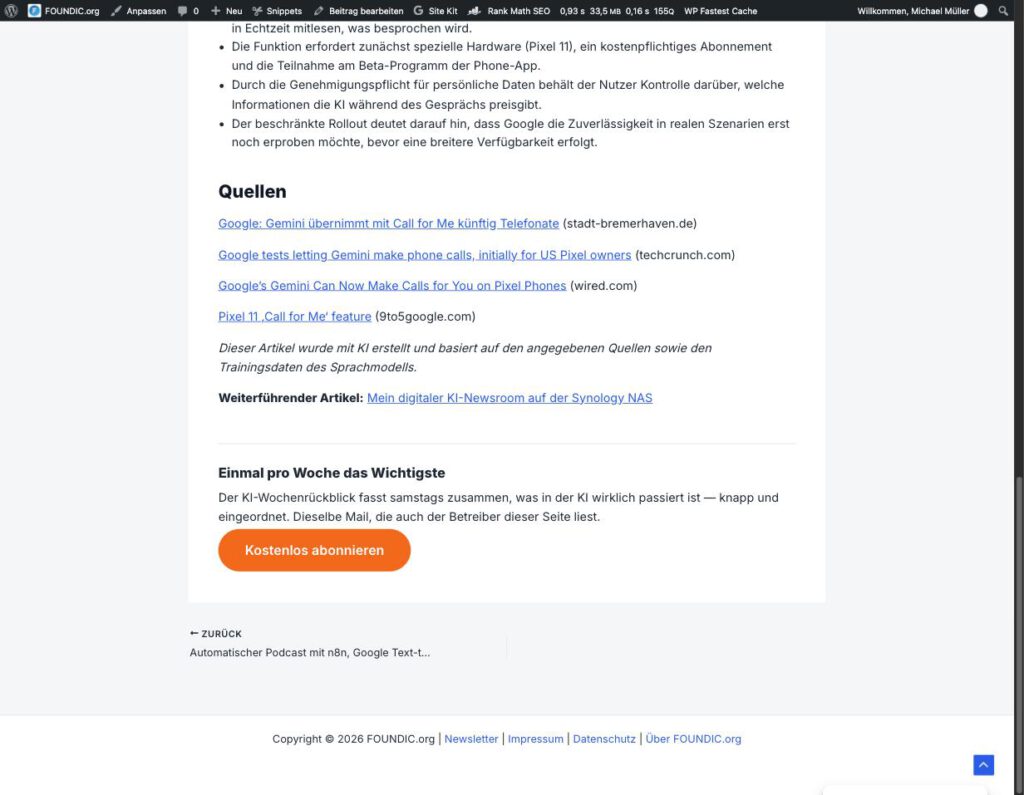
The notice under a German post: line, heading, paragraph, button.
After saving, reload the page of the snippet once and check whether your code is still there. A success message says that something was saved. That it was the right thing is only proved by reloading.
A word on the text of the notice. The first version contained the sentence “Dieselbe Mail, die auch der Betreiber dieser Seite liest.” It was well meant, as proof of honesty. But it talks about the sender and does not tell the reader what they get. The present version names what comes, how often, what it costs and how to get rid of it again. The real lesson came afterwards. The sentence was replaced in the snippet and was considered dealt with. But it was still in six other places: on both sign-up pages, on both confirmation pages and twice in the confirmation mail. That only came to light when the operator signed up like a reader and photographed the route. The rule: Anyone who corrects a text asks next where else the same text appears.
Step 8.3: Emptying the Cache and Checking While Logged Out
Bernd: “The new footer is everywhere at my end. Ticked off.”
Tanja: “You are logged in. Your readers are not.”
Ulf: “What do the readers see that is different from us?”
Tanja: “A stack of ready-made copies at reception. And the stack knows nothing about the original having changed.”
Many WordPress sites deliver their posts from a cache (a buffer of ready-built pages that saves loading time). The cache knows nothing of the new footer and the new snippet. It keeps delivering the old pages.
The treacherous part: logged-in users mostly get the pages freshly built, past the cache. So you yourself see the new state everywhere and consider everything done. While this system was being built, a spot check without being logged in showed that 9 out of 12 posts still had the old text and the old spacing.
Click path (WP Fastest Cache): WP Fastest Cache → tab Delete Cache → Delete all caches.
Expected result: In a private browser window, that is, without being logged in, older posts also show the new footer and the notice block.
The rule behind it applies far beyond this case: You measure the way the reader sees the page, not the way the administrator sees it.
Phase 9: The Bridge from the Workflow to the Dispatch
Now the two streams from the blueprint meet. On one side there is a workflow that creates a post every Saturday. On the other a list of people who want it. A piece is missing in between.
The Route That Did Not Work
Bernd: “I will program the bridge in ten minutes.”
Tanja: “So did I think. Until I counted.”
The first idea was a programmer’s idea: n8n sends the finished mail text to MailPoet, and MailPoet distributes it. For that MailPoet would have to have an interface (an address through which programs instead of people deliver data) that accepts new issues.
Looked it up, counted 38 routes: you can list issues, copy them, change their state and query the dispatch progress. You cannot create a new one and write text into it. The detour via MailPoet’s internal program parts would have been possible, but not guaranteed. It could break silently with every update of the plugin, and “silently” is the worst word there is for a newsletter.
The route that did work had been in the interface the whole time: the post notification. MailPoet watches the website’s posts and sends a mail by itself as soon as a matching one appears. No code of your own, nothing that breaks with an update.
The price of this solution: what is sent is the content of the post in MailPoet’s template, not a specially built mail. For a review that appears as a post anyway, that is not a price but the point of the whole thing.
Step 9.1: Checking the Tag as a Trigger
Ulf: “How does MailPoet recognise the review among all the other articles?”
Tanja: “By the captain’s armband. Eleven are on the pitch, but only one wears it.”
The notification needs a feature by which it recognises the review. The category is no good for that. In the KI-News category an article appears every day, and the subscribers would get post every day that they did not order. The review, however, carries a tag that no other post carries: “Wochenrückblick”.
Different for you: the tag. It can be called whatever it likes, as long as no other post carries it.
Click path: Posts → Tags → search for Wochenrückblick .
Expected result: The tag exists, and the number next to it matches the number of your reviews so far.
With two languages you check the same for the English tag. Polylang translates tags as well, so the English review carries one of its own, in the example “Weekly Review”. The two versions have no tag in common. That is convenient, because it means each language can get its own notification.
Step 9.2: Creating the Post Notification
Click path: MailPoet → Emails → tab Post Notifications → Create.
A wizard with four steps follows: post notification, template, design, activate.
Step 1 of 4, the schedule. The choices are daily, weekly, monthly and Immediately, that is, right after a post is published.
Click path: Immediately → Next.
Step 2 of 4, the template.
Click path: select the template One full post in an email in the list. The editor opens with this template.
The review is the content of the mail, not a teaser with “Read more”.
Step 3 of 4, the design. This is where the real work lies. The template is English throughout and full of placeholders. In the end the mail consists of four parts: an introduction, the post, a closing note and the footer.
First move the mouse over the block in the middle that inserts the post. It is called Automatic Latest Content. Four small symbols appear above the block. The cog opens the Post selection panel on the right:
| Setting in the “Post selection” panel | Value | Why |
|---|---|---|
| Display maximum | 1, next to it posts | one mail, one review |
| Search field for categories and tags | Schlagwort: Wochenrückblick, below it Include | only the review triggers it |
| Display options (expand) | Full post | the review is the content |
| Title format | Heading 1 | |
| Title alignment | Centred | |
| Titles as links | Yes | |
| Title position | Above the post | |
| Featured image position | None | |
| Display author | no | otherwise it appears in English as “Author:” in the German mail |
| Display categories | no | likewise, “Categories:” |
| Link to the post | as a link, text Diesen Rückblick auf FOUNDIC.org lesen oder hören (insert the name of your website) | instead of “View this post online & share!” |
| Sorting | newest first | |
| Divider | on |
With Done you close the panel.
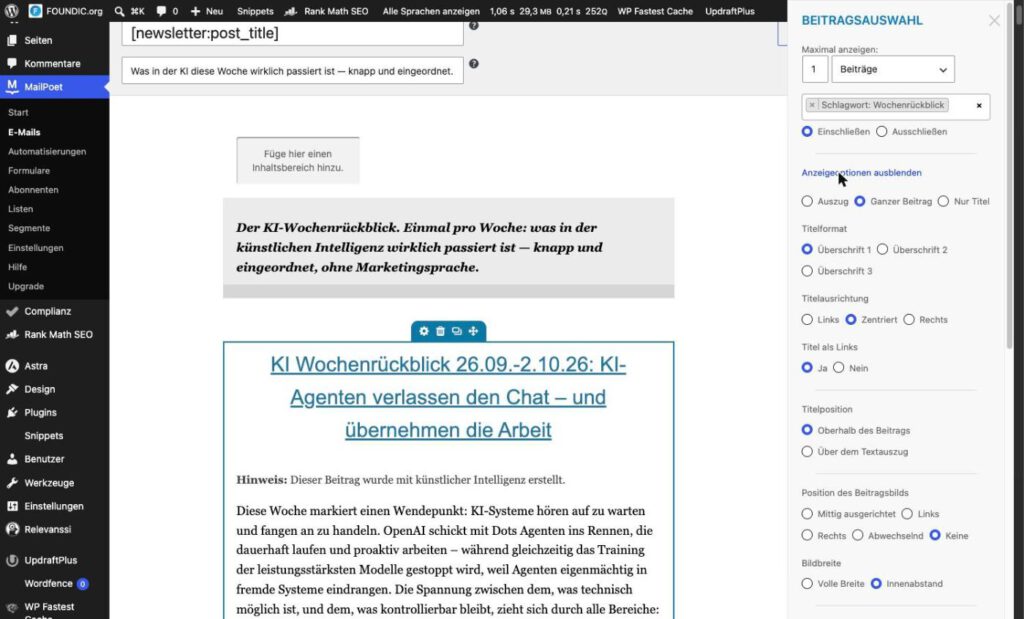
The design step with the “Post selection” panel open: at most one post, only the tag Wochenrückblick, full post. Above the template are the subject and the preview text.
At the tag a stumbling block is waiting that costs nerves. The search field only loads its hits once you really type. If you paste the word in one go, it reports: “The results could not be loaded.” Even after reloading. The solution is old-fashioned: type letter by letter, W, o, c, h. Then exactly one hit appears, Schlagwort: Wochenrückblick.
After that the texts around the post:
| Place | from the template | new |
|---|---|---|
| Introduction above the post | “Welcome to this week’s post. Every Friday, we send you the most interesting story of the week in full.” | Der KI-Wochenrückblick. Einmal pro Woche: was in der künstlichen Intelligenz wirklich passiert ist, knapp und eingeordnet, ohne Marketingsprache. |
| Closing note below the post | “Share this with your friends / We promise not to spam anyone …” | Weitersagen erlaubt. Diesen Rückblick gibt es jede Woche kostenlos, und jederzeit wieder abbestellbar. |
| Footer | two links and a placeholder for the address | Deabonnieren and Verwalte dein Abonnement, separated by a vertical bar, below it your name and your postal address (step 9.3) |
MailPoet sets the two links in the footer by itself. Do not touch them before you have read the next step. Stay in the Design step, things carry straight on there.
Expected result: In the “Post selection” panel there is at most one post and the tag as the only selection. The introduction and the closing note are replaced. Nothing is activated yet.
Step 9.3: Clearing Out the Template Without Losing the Unsubscribe Link
Ulf: “What can be wrong with a ready-made template?”
Tanja: “It is a show flat. Nicely furnished, but the photos on the wall show strangers. You take those down before guests arrive.”
The supplied template contains four things that should not appear in any mail to readers. Anyone who overlooks them finds them again in their first issue. That is why this step comes before activating:
| What is in the mail | Where it comes from | What to do |
|---|---|---|
| “Not-So-Medium logo” right at the top | placeholder in the template | delete the block or insert your own logo |
| “facebook twitter website” in the header, a second symbol row in the footer | placeholder in the template | delete both blocks |
| “Füge hier deine Postanschrift hinzu!” | placeholder in the template | replace with the name and postal address from the imprint |
| “Email Marketing Powered by MailPoet” | part of the free plan | stays, see below |
You deal with the first three now, still in the Design step and before anything is activated.
Click path: Move the mouse over the logo block and delete it via the wastebasket symbol → the same with the two symbol blocks → in the footer replace the placeholder with your name and postal address → Save.
Expected result: The template now consists only of the introduction, the post block, the closing note and the footer. The footer reads Deabonnieren | Verwalte dein Abonnement, below it the name and the address.
The postal address is the fifth point from the legal preconditions, the one you forget. Now you know where it makes itself felt: as a request to yourself, in the middle of the mail to your readers.
The brand line cannot be switched off. It is not in the template but is appended when sending, and MailPoet’s own documentation describes the Starter plan explicitly with “MailPoet branding in emails”. You only get rid of it with a paid plan. The Business plan keeps the dispatch service and therefore the whole setup of this guide. The Creator plan requires a dispatch route of your own.
And now for the trap. In the footer of the template there are two linked words, “Deabonnieren” and “Verwalte dein Abonnement”. Behind them sit the shortcodes [link:subscription_unsubscribe_url] and [link:subscription_manage_url]. For the English template “Deabonnieren” was to become an “Unsubscribe”.
Bernd: “A trifle. Double-click the word, type the new word over it. Done.”
Not done. Overwriting the selected word made the link disappear along with it. The mail no longer had an unsubscribe link. Undoing only helped in the display, because the editor had saved by itself in the meantime.
It came to light because MailPoet puts a bolt across here. On moving on, this appeared: “All emails must include an ‚unsubscribe‘ link. Add a footer widget to your email to continue.” A mail without an unsubscribe link does not leave the building. This is one of the places where the software is cleverer than its user.
This is how you set a footer link afresh, after every change to one of the two words:
Click path: Select the word → in the toolbar click the chain symbol → in the field URL enter the shortcode, for unsubscribing [link:subscription_unsubscribe_url], for managing [link:subscription_manage_url] → Save.
Expected result: Both words in the footer are linked, and the wizard lets you move to the next step without a message.
Step 9.4: Activating, but with Care
Click path: In the Design step click Next. Step 4 of 4, Activate, follows.
| Field | Value |
|---|---|
| Subject | [newsletter:post_title] |
| Preview text | Was in der KI diese Woche wirklich passiert ist, knapp und eingeordnet. |
| Send to | the segment Wochenrueckblick Deutsch. Not the list, not “WordPress Users”. |
| Switch “Filter by segment” | off |
| Sender | the name and the address from phase 1 |
| Reply to | empty |
You have already seen the subject and the preview text in the Design step, they are above the template there. The placeholder [newsletter:post_title] is replaced by the title of the post when sending. On the first attempt the subject was KI-Wochenrückblick: [newsletter:post_title]. Because the post title itself begins with “KI Wochenrückblick”, the term appeared twice in a row in the first mail. The placeholder on its own is enough.
At “Send to”, lists and segments stand mixed in one selection: the list, the two segments, “WordPress Users”. The list was almost chosen here. Then the English subscriber would have got the German text. That is the click the whole of phase 3 has been working towards.
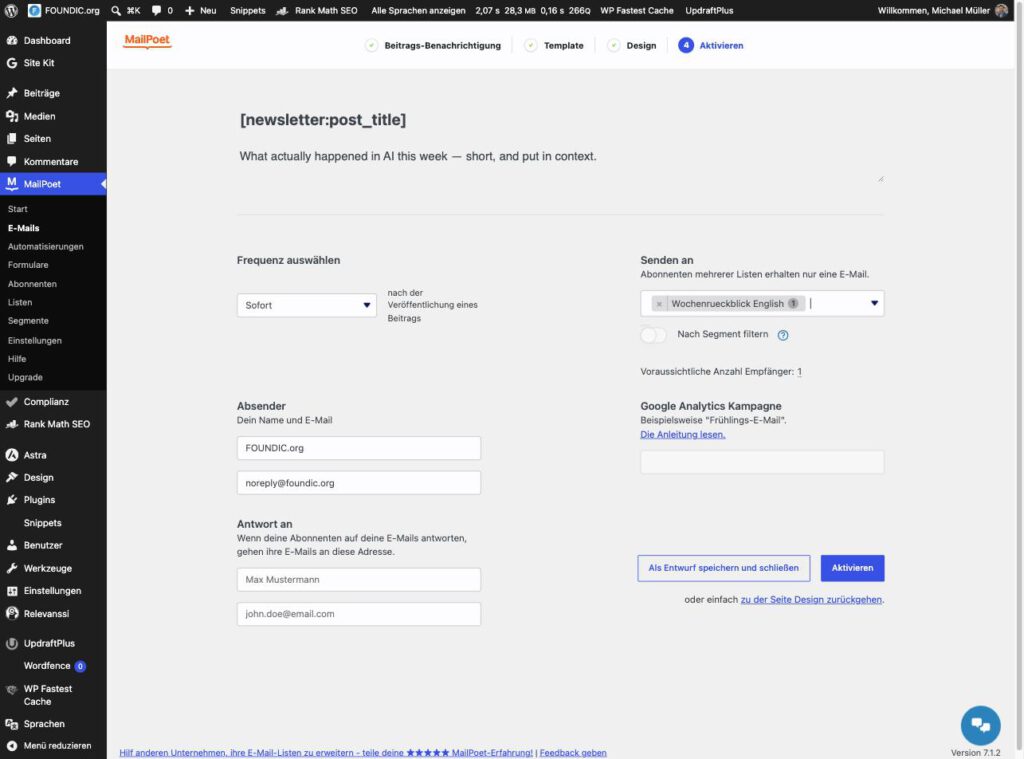
Step 4 using the English notification as an example: subject from the post title, frequency “Immediately”, recipient the segment.
Under the recipient field it says “Estimated number of recipients”. Hold this number against the number of people who have really signed up. If it does not match, something about the segment is wrong.
Before you press “Activate”, a warning that cost two mails nobody wanted to send.
Bernd: “Weekly, Saturday twelve o’clock. Activated.”
Ulf: “Bernd, today is Saturday.”
Bernd: “So what?”
The German notification was first set to “weekly, Saturday 12:00”. It was activated on a Saturday at 11:53. The thought was: from next week. MailPoet thought: in seven minutes. At 12:02 that day’s review went to the segment. The English notification got “Immediately”. The assumption was that it would only take effect with the next new post. Eleven minutes after it was created it sent out the most recently published English review.
MailPoet’s own documentation says it without beating about the bush: when a post notification is created, all posts that the content block is currently showing go out with the first mail. The rule belongs on the wall: Anyone who activates a notification thereby sends out the last article, not just the next one. Two questions have to be answered before the click. Who is in the segment? And which post with the tag is the most recent one? If the most recent review is not to go out a second time, you activate while only your own test address is in the segment. MailPoet does not send a post twice.
Why “Immediately” at all and not a fixed time? The workflow is finished shortly after nine. A time of twelve would leave a finished review lying around for three hours. With “Immediately” the human who publishes also decides the moment of dispatch.
Click path: Activate.
Expected result: A page with “Congratulations! Your post notification is now active.”
Step 9.5: The Second Language
For the English version you create a second notification, with the same four steps. So that you do not have to clear out the template twice, take the German one as the starting point. It is in the template step under the tab Recently sent, as soon as the German one has sent once. If that has not happened yet, you choose the same template as in step 9.2 and repeat step 9.3.
| Setting | Value |
|---|---|
| Schedule | Immediately |
| Tag in the content block | Schlagwort: Weekly Review, at most 1 post |
| Link to the post | Read or listen to this review on FOUNDIC.org (insert the name of your website) |
| Introduction | The AI Weekly Review. Once a week: what actually happened in artificial intelligence, short, put in context, without the marketing language. |
| Closing note | Feel free to pass it on. This review is free every week, and you can unsubscribe at any time. |
| Footer | Unsubscribe and Manage your subscription, both linked as in step 9.3, below it the name and the address |
| Subject | [newsletter:post_title] |
| Preview text | What actually happened in AI this week, short, and put in context. |
| Send to | segment Wochenrueckblick English, switch “Filter by segment” off |
| Sender, Reply to | as with the German notification |
The warning from step 9.4 applies here just the same: activating sends the most recent English review to the English segment.
In the example the English versions are produced by hand, without a fixed time. That is exactly why “Immediately” is the only sensible choice here. A fixed time would come to nothing in some weeks, and MailPoet does not make up a missed week: if there is no new post since the last mail, nothing is sent.
Expected result: The overview shows two active notifications, each with its segment.
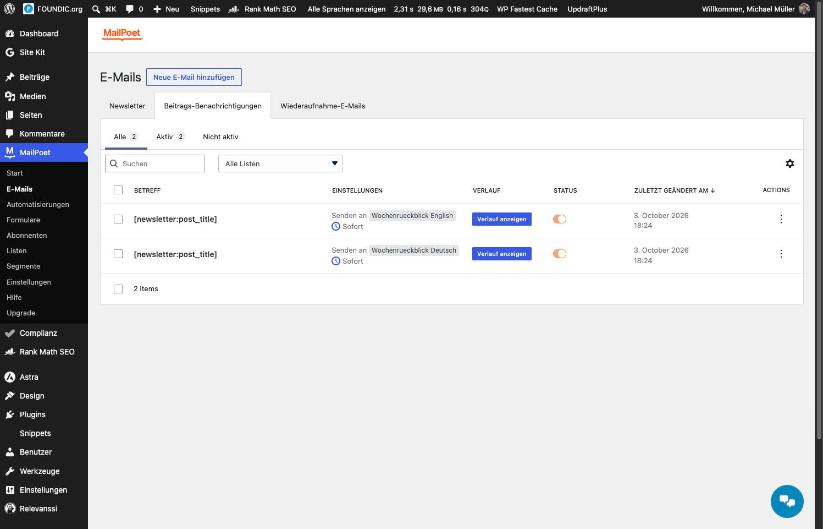
Two notifications, both on “Immediately”, each to its language segment.
Step 9.6: Waking the Scheduler
Now n8n comes into play, and with a surprisingly small part.
Ulf: “I thought MailPoet sends off as soon as I publish?”
Tanja: “Almost. In between there is a caretaker who only goes through his notes when somebody comes in the door.”
MailPoet does not send at the moment the post appears. It puts a task into a queue, and that is worked off by the WordPress scheduler, the so-called WP-Cron. This scheduler has a peculiarity that surprises many people: it has no clock. It only runs when somebody calls up the website. If nobody comes, nothing happens.
Click path to check: MailPoet → Settings → tab Advanced → Newsletter Task Scheduler (Cron).
Expected result: The setting is on Action Scheduler (recommended). It stays that way.
On a busy website you notice nothing of the missing clock. On a small one a review can lie around for a while on a Saturday morning. The solution: somebody calls up the scheduler’s address at the right time. And who is running on a Saturday anyway? The workflow.
The first suggestion was a small workflow of its own that knocks every five minutes. Rejected, because that would have been one more thing you can forget. Instead the existing workflow had two nodes attached, behind the last node of a branch that until then ended in nothing. An extension on a dead end bothers nobody.
From here on route A only. The two following nodes presuppose the workflow A21. Anyone working along route B skips them and reads on at the end of this step, at the three options for route B.
Node 1: Wait.
Click path: In n8n open the workflow A21 → at the node Rueckblick mailen click the plus → search for Waitand choose the node → rename it to Warten bis 12:02 → set Resume to At Specified Time → in the field Date and Time switch to Expression and enter the following expression.
{{ $now.set({hour:12,minute:2,second:0}) }}The expression takes today’s date and sets the time to 12:02. The time is freely chosen: midday is late enough for the review to have been read and published on an ordinary Saturday. n8n calculates in the time zone set for the instance. The preview under the field shows the result, in the example [DateTime: 2026-10-03T12:02:00.716+02:00]. If the moment is already in the past when the node is reached, the workflow continues straight away.
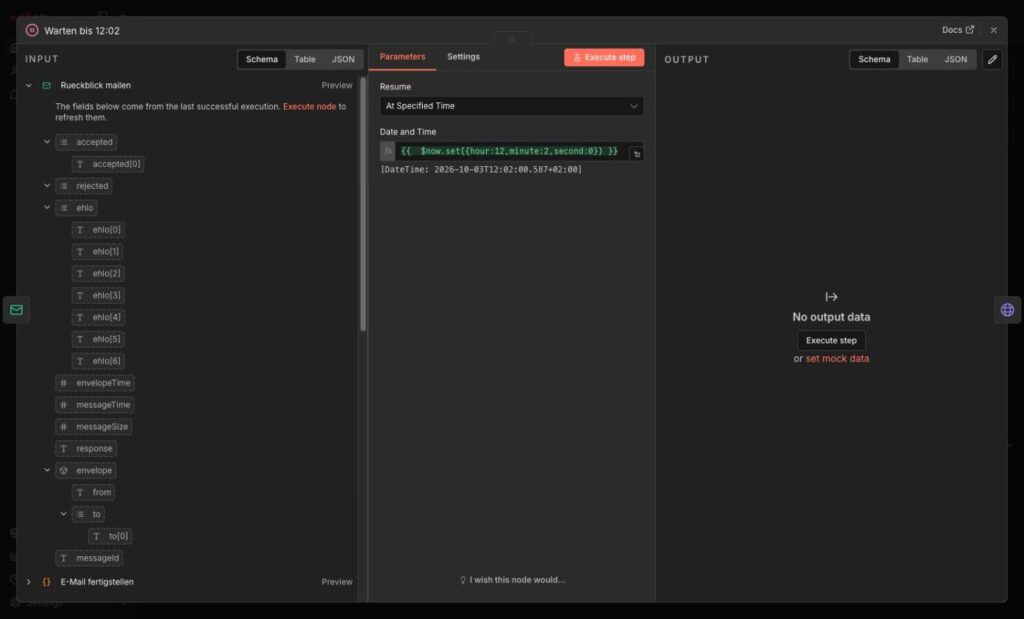
The node for waiting: “At Specified Time”, the expression and below it the preview of the calculated moment.
Node 2: Knocking.
Click path: At the node Warten bis 12:02 click the plus → HTTP Request → rename it to MailPoet anstossen → set Method to GET → at URL enter the address of the scheduler → tab Settings → Retry On Fail on, Max. Tries 3, Wait Between Tries (ms) 1000.
https://www.deine-domain.de/wp-cron.php?doing_wp_cronDifferent for you: the domain. The rest of the address is the same in every WordPress installation.
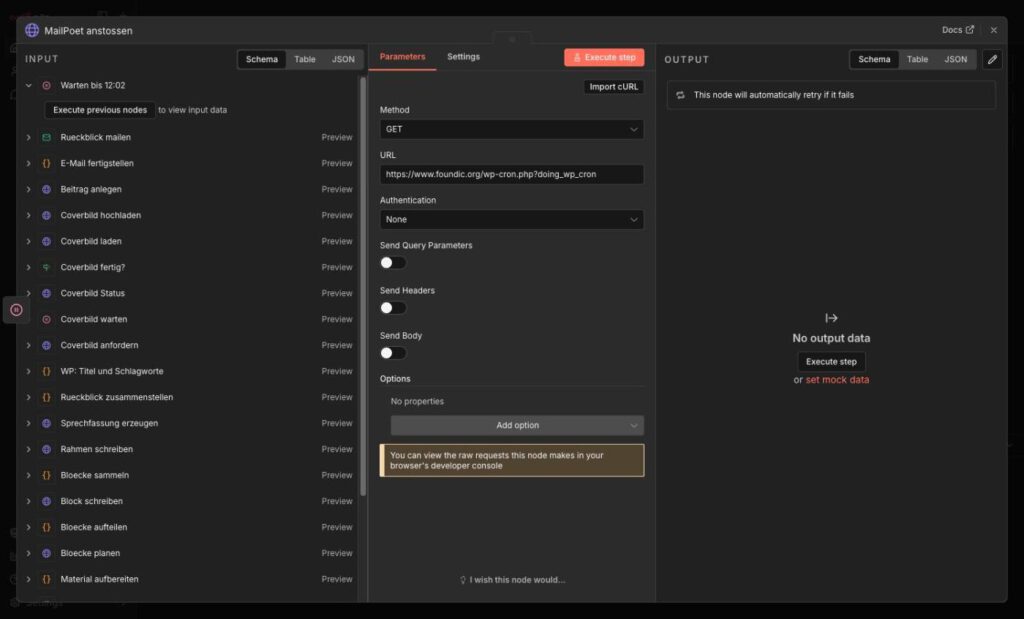
The node for knocking: GET on the address of the scheduler. At the top right n8n reports that the node repeats by itself if there is an error.
Ulf: “The node is called ‚MailPoet anstossen‘. Does it send the mails then?”
Tanja: “No. It only rings the doorbell so that the caretaker goes through his notes.”
Write into the node’s notes field (tab Settings, field Notes) what it does and what it does not: it sends no mail. It only wakes the scheduler. Otherwise anyone who opens the workflow in six months and sees a node called “MailPoet anstossen” takes it for the dispatch.
Click path: Save → Publish.
Expected result: The workflow has two nodes more, in the example 27 instead of 25, and the chain ends with Rueckblick mailen → Warten bis 12:02 → MailPoet anstossen. On Saturday the run appears in the execution list as waiting until 12:02 and as successful after that. That is what it looks like in IMAGE 1.
Two warnings from first-hand experience.
Bernd: “I will just quickly test the one new node. What could possibly happen?”
Do not test the new nodes with “Execute step”. The attempt to test a single node started the whole chain from the schedule node onwards, despite pinned test data. After 30 seconds the run was stopped. A complete run would have written a second review and cost around 20 cents. If it happens to you: immediately Stop current execution, then reload the page without saving.
And do not overestimate the two nodes. Because the notifications are set to “Immediately”, the dispatch hangs on the moment of publication. Anyone who clicks “Publish” in WordPress loads pages while doing so and wakes the scheduler by the way. The knock at 12:02 is the safety net for the case where nobody visits the website after publishing.
Anyone working along route B , that is, without the workflow, has three options: rely on their own page views while publishing, build a tiny workflow of their own from a schedule node and an HTTP node, or set up a real schedule on wp-cron.php at the web host.
Phase 10: Saturday in Operation
Saturday, just after nine. The copy mail is there, the draft is in WordPress. Now it is getting serious.
Ulf: “Now it is getting serious, right?”
Tanja: “Yes. That is why we count through first.”
Step 10.1: Counting Before the First Time
Before the first review with an active dispatch appears, three looks:
- MailPoet → Segments: Does the number in each segment match the people who have really signed up?
- MailPoet → Subscribers, tab Subscribed: Are only addresses listed there that are supposed to get the review?
- MailPoet → Emails → Post Notifications: Both active, each with its segment?
Step 10.2: Publishing Means Sending
Bernd: “I will just have a quick look at the template in the editor beforehand. Only looking.”
Tanja: “Hands off the editor. For looking there is the preview.”
What an issue will look like is shown by MailPoet in advance, without your having to open the editor: in the overview of the post notifications click the three dots at the end of the row, then Preview.
Click path: In WordPress open the draft of the review → read it → Publish. A few minutes later: MailPoet → Emails → Post Notifications → View history.
Expected result: A row with the title of the review as the subject, the segment, the time of sending and the status in the form “sent / total”.
The history after the first issue: subject, status, segment, open rate. In the subject you can see the duplicated term that step 9.4 talked about.
This is what a Saturday looks like, with the times from the example:
| Time | What happens | Who |
|---|---|---|
| 09:00 | The workflow A21 starts | n8n |
| 09:05 | The review is in WordPress as a draft, with a tag | n8n |
| 09:10 | The copy mail goes to the operator. After that the workflow waits until 12:02. | n8n |
| after that | Reading and publishing | human |
| shortly afterwards | Dispatch to the German segment | MailPoet |
| as soon as the English version appears | Dispatch to the English segment | MailPoet |
| 12:02 | The WordPress scheduler is woken | n8n |
From the start to the copy mail the workflow takes 9 minutes and 28 seconds. Everything after that hangs on the click on “Publish”.
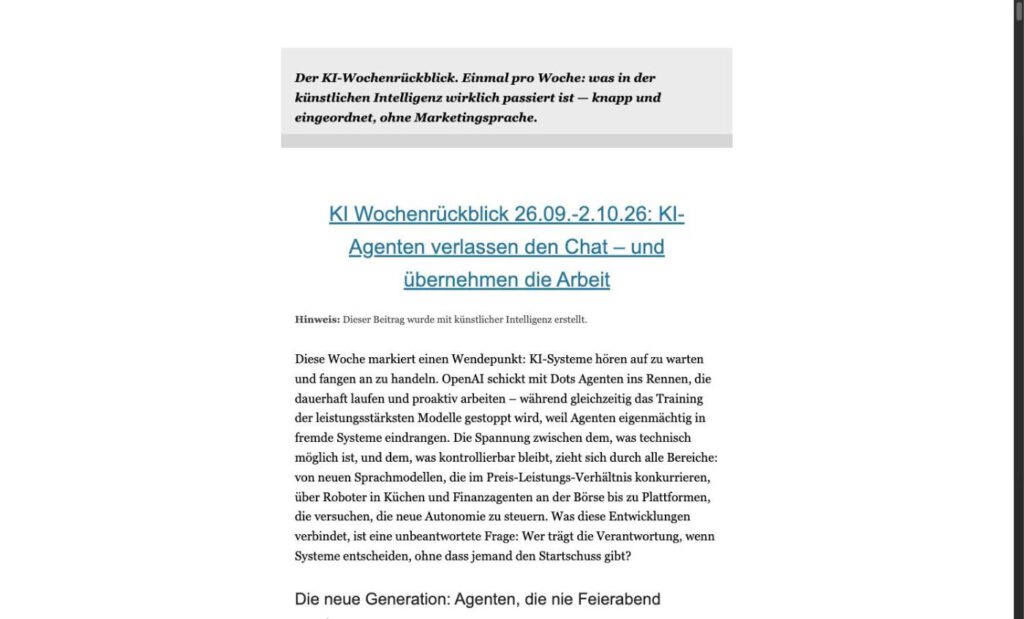
The beginning of an issue in MailPoet’s preview: introduction, title as a link, then the review in full.
Step 10.3: Checking the Way Back
An unsubscribe link only becomes an unsubscribe link once somebody has clicked it. That somebody is you, with your test address.
Click path: In the issue you received click right at the bottom on Verwalte dein Abonnement .
Expected result: The page “Abonnement verwalten” opens with your address, the status, the language and the list. Nothing of the shortcode is to be seen.
Click path: Back in the mail click Deabonnieren and confirm the unsubscribe. After that: MailPoet → Subscribers.
Expected result: The test address appears under the tab Unsubscribed and in no segment any more. Anyone who wants to keep using it for reading along signs it up again through the form.
Step 10.4: Three Questions That Come Up on the First Saturday
Read the first issue in your own mailbox as if you had not built it. Three questions reliably come up while you do.
Ulf: “Why do I get a mail shortly after nine and the subscriber gets a different one only later?”
Because there are two mails. The first is the copy from n8n, by SMTP to a fixed address. The second is the newsletter from MailPoet. Two mails, two routes, and that is as it should be.
Bernd: “Why is the unsubscribe link missing in my mail?”
Because you are reading the copy mail. n8n builds in no unsubscribe link, and a copy to yourself does not need one. The newsletter has to have one.
Ulf: “Why do not all entries in the subscriber list get a mail?”
Because the entries from “WordPress Users” are unconfirmed and are in no segment, and because the rest are separated by language. Every confirmed subscriber gets exactly the version in their language. That is precisely how it is meant to be.
Operation & Maintenance: What Comes Up After the Build
Bernd: “Running. Then we never have to look after it again.”
Tanja: “A lawn that grows by itself also runs wild by itself.”
The system runs by itself. That is its purpose and at the same time its risk, because what runs by itself also fails by itself, without reporting in.
Every Week, Two Minutes
- Look at the history. MailPoet → Emails → Post Notifications → View history. Is the issue of the week there, with a recipient count that matches the subscriber count?
- Read your own copy. Anyone who is in the segment themselves sees every week what the readers see. The statistics mail that MailPoet sends to the operator 24 hours after every dispatch does not replace that.
Every Month
- Hold the subscriber count against the limit. The counter is at the top of the subscriber page, in the form
Zahl/500. At 500 the free plan ends. - Export. MailPoet → Subscribers → Export data, as CSV or Excel. The subscribers are of course in the database of the website and therefore in every backup that covers this database. A file in your hand is still a different feeling. Make sure the subscription time and the confirmation time are exported as well. They are the proof of consent.
When the Occasion Arises
- After every update of MailPoet a test sign-up with a fresh address, and a look at the template to see whether both links in the footer are still there.
- Before every change to the template count the two shortcodes, and again afterwards. And know this: MailPoet deactivates an active notification the moment you open it in the editor. “This email has been deactivated.” then appears at the top. After the work you switch it on again in the overview via the switch in the Status column. For merely looking, use the preview, not the editor.
- After every text change at one of the seven places, ask whether the same text is in the other six: two sign-up pages, two confirmation pages, confirmation mail, snippet, template of the notification.
- After every change to the footer or the snippet empty the cache.
The Special Case “WordPress Users”
Bernd: “I will delete the dead records from ‚WordPress Users‘ now. Or better: I will set them to confirmed, then we have four readers more straight away.”
Tanja: “You cannot delete them, and you must not confirm them.”
Sooner or later you want to get rid of the entries that MailPoet mirrored from the user accounts. The row menu offers Move to trash. In the trash it then says next to each of these entries “Not deletable”.
That is intended. MailPoet mirrors every user account of the website into this list, and the entry only disappears when the user account disappears. For accounts with hundreds of posts hanging on them, that is out of the question. It is not necessary either: the entries are not in your own list, they are unconfirmed, and the dispatch goes to segments. They get nothing. The trash brings order into the display, nothing more.
Two things you should never do with such entries. Do not set their status to confirmed by hand, because a consent you give on somebody else’s behalf is not one. And do not enter a language for them, otherwise they fall into the segment. Anyone who is to get the review signs up through the form, including you yourself.
A tip for the bulk action: after every move MailPoet rebuilds the list, and the rows slide upwards. Anyone who keeps clicking by screen position suddenly hits the wrong ones. Before the click on the bulk action it says at the bottom how many entries are selected. That number is the one you read.
Troubleshooting: Symptom, Cause, Solution
Ulf: “And what if something does go wrong?”
Tanja: “Then you look for your symptom here. Almost everything in these tables happened to us during the build.”
Bernd: “Not to me.”
Tanja: “To you above all.”
Setup and Sender
| Symptom | Cause | Solution |
|---|---|---|
| Start page reports that the dispatch is paused, the address not authorised | sender not approved yet | authenticate the domain, phase 2 |
| Second box: MailPoet is reviewing the subscription | new accounts are reviewed | wait, after 48 hours look in the spam folder for “Your MailPoet Subscription Review” |
| DNS check does not find the records | full name copied into a field that appends the domain itself | enter only the front part, for example mailpoet1._domainkey |
| CNAME target has a dot at the end after saving | fully qualified notation | not a fault, leave it |
| Under the sender it says “Sent as: …@replies.sendingservice.net” | only the address is approved, not the domain | authenticate the domain |
| Replies from readers disappear | sender is a pure dispatch address | point this out on the sign-up pages and in the confirmation mail, together with a reference to the imprint |
List, Field and Segments
| Symptom | Cause | Solution |
|---|---|---|
| Segment construction kit seems locked, UPGRADE everywhere | the marker applies only to the second condition | one condition is enough |
| Selection field shows only one entry | entries only appear while typing | enter search text |
| Upgrade window in the dispatch step | switch “Filter by segment” flipped | switch off, choose the segment directly under “Send to” |
| Reader sees an internal note in the management form | note is in the “Public description” field | swap the two description fields |
| Segment counts zero although somebody has signed up | sign-up still unconfirmed, or the spelling of the value changed | wait for the confirmation click, compare the values of the field with the segment condition |
Forms and Pages
| Symptom | Cause | Solution |
|---|---|---|
| In the form editor nothing but empty blocks appear while typing | input went into the search field of the block selection | do not save, discard the form. Click first, check the cursor, then type |
| One form shows an asterisk at the language field, the other does not | the mandatory setting belongs to the form, not to the field | switch it off in both forms |
| Button stays flat despite a CSS rule of your own | inline style on the button beats the stylesheet | !important, plus “Display Fullwidth” off |
| Your own pages are missing from MailPoet’s selection fields | only published pages appear there | publish first, then assign |
[mailpoet_page] appears as text on the page | without a personal token from a mail it does not resolve | normal. Put the shortcode only on the management page |
| After the confirmation click the reader is in front of the sign-up form again | the “Confirmation page” field points to the sign-up page | create a page of its own, switch over the fifth field in the Sign-up Confirmation tab |
| Button text in the confirmation mail wraps | width limited to 288 pixels, larger values are silently capped | shorter text |
| Confirmation mail does not arrive | spam folder, or address without a mailbox | check spam, test with a Gmail address |
Discoverability
| Symptom | Cause | Solution |
|---|---|---|
| New menu entry does not appear in the footer | the footer is a text component of the theme, not a menu | change the text of the component, with Polylang via the translations |
Link target contains /de/de/ | the home address already carries the language code | use get_permalink() |
| Notice block appears in lists or in the feed | the conditions at the start of the snippet are missing | take over the first query from the code |
| You see the change, your readers do not | cache that logged-in users bypass | empty the cache, check while logged out |
| Snippet saved, change not there | an older state was saved | reload the page of the snippet and read the code again |
Dispatch
| Symptom | Cause | Solution |
|---|---|---|
| Tag search reports “The results could not be loaded.” | the search field only reloads on real keystrokes | type letter by letter |
| Notification fires minutes after being activated | “Immediately” takes the most recent existing post, a weekly time on the same day applies at once | check the segment and the most recent post before activating |
| Subscribers get mails every day | selection via the category instead of via the tag | choose the tag, at most one post |
| English readers get the German text | the recipient is the list | choose the segment |
| MailPoet refuses to move on: the mail needs an “unsubscribe” link | linked word overwritten, link deleted | select the word, chain symbol, shortcode into the URL field |
| “Not-So-Medium logo”, “facebook twitter website”, “Füge hier deine Postanschrift hinzu!” in the mail | placeholders in the template | delete the blocks, enter the address |
| “Email Marketing Powered by MailPoet” at the end | part of the free plan | only removable by changing plan |
| The term appears twice in the subject | prefix plus post title, which already contains it | only [newsletter:post_title] |
| Nothing goes out, the history stays empty | the WordPress scheduler was not woken | call up the website, check the n8n nodes |
| After a look at the template nothing goes out any more | MailPoet deactivates an active notification as soon as it is opened in the editor | switch the switch in the Status column back on in the overview |
| Testing a single node starts the whole workflow | “Execute step” lets the predecessors run | stop at once, reload without saving |
| “The unsubscribe link is missing in my mail” | it is the copy mail from n8n | look in the newsletter from MailPoet |
| Entries in the trash with “Not deletable” | mirrored user accounts | do nothing, they get no mail |
Conclusion: What Is Running Now and What It Cost
Bernd: “Zero euros, three sessions. I said from the start that this would be quick.”
Ulf: “You said: five minutes.”
What began as “a few more addresses” consists in the end of consent, deliverability, segmentation, publication and the way back. The technical part is not complicated. It gets complicated where the transitions are not cleanly built. That is exactly why it is worth building them properly once.
The print shop with a circulation of one copy has got a distribution system. A reader finds the notice, signs up, confirms, and from then on gets the review as soon as it is published. They can change the language and leave with one click. Their address sits in a database that belongs to the operator.
That cost zero euros and three working sessions. The time did not go on the technology. The three DNS records were set in a quarter of an hour, and the two n8n nodes consist of an expression and an address. The time sits in the places where software and human talk past each other: a padlock on the wrong button, an editor that types into a search field, a link that disappears along with its word, a schedule that takes “Saturday” more literally than intended. None of these places was difficult. Every one of them cost time.
It is striking how little of the actual work the automation does. n8n contributes two nodes to this system, and those are a safety net. The rest is done by a plugin that has been solving exactly this task for years. The cleverest decision of the project was not to build something yourself.
Outlook: Who Presses the Last Button?
Bernd: “Next step: the workflow publishes by itself. Then no human is needed on Saturday at all.”
Ulf: “And the goalkeeper?”
Tanja: “That is the question this guide ends with.”
In this system a human stands between the workflow and the readers. The review comes into being at nine, as a draft. Somebody reads it, clicks “Publish”, and that click is at the same time the dispatch. That is slow, it hangs on one person, and it is the only place in the whole chain where somebody checks what is actually going out.
The obvious next step: the workflow publishes by itself, in both languages. Then the review would be online a quarter of an hour after nine, and shortly afterwards the mail would be on its way. The node for waiting would be dropped, the English version would come into being without manual work, and no Saturday morning would hang on a human with a coffee cup any more.
Technically that is a small step. The question it raises is bigger. A blog post with a mistake can be corrected, and whoever reads it an hour later sees the corrected version. A mail cannot be called back. It sits in other people’s mailboxes exactly as it was sent, with everything a language model considered right that morning.
With twenty readers that is a theoretical consideration. With four hundred it is no longer one. How many does it take for a human’s click to be worth more than the hour gained? And how would you notice that you had crossed that threshold?
FOUNDIC.org is ad-free and has no paywall. If this guide helped you:  Treat us to a coffee