What is OpenClaw – and what will you have at the end?
OpenClaw is an AI agent that you run locally on your Synology DiskStation. Instead of running in the cloud it runs at your home – you keep control over your data, you pay only for the API requests you actually use, and you reach your personal assistant via Telegram or a browser.
What OpenClaw actually is and how gateway, runtime and skills work together is described in OpenClaw (ex Moltbot): How a WhatsApp Message Becomes an Acting AI Agent — this guide takes it as read.
By the end of this guide you will have:
- A running OpenClaw container on your DiskStation
- A Telegram bot you can simply write to from your smartphone
- An optional web interface, reachable in the browser through an SSH tunnel
- Optional: network isolation that denies the container access to your home network
- Optional: an embedded browser with which OpenClaw can also operate JavaScript-heavy websites
The basic installation – container running, Telegram answering – takes about 30 minutes. The optional steps come afterwards, once the foundation is in place.
Requirements
Before you start – make sure you have the following at hand:
- Synology DS1621+ with current DSM 7.2 or newer
- Container Manager installed (from the Package Center)
- SSH access to the DiskStation (explained in this guide)
- An API key from Anthropic (Claude) or OpenAI
- Telegram on your smartphone
No API key yet? For Claude, go to console.anthropic.com, sign in, add a payment method and create a key. It starts with sk-ant-...
Architecture at a glance
This is what the finished folder structure on your DiskStation looks like. It takes shape step by step – you do not have to prepare anything manually.
/volume1/docker/openclaw/
├── compose.yaml             ← container configuration (permissions, network, volumes)
├── openclaw-firewall.sh     ← network isolation (optional, but recommended)
├── config/                  ← API keys, settings (filled during onboarding)
└── workspace/               ← the agent working files
OpenClaw consists of two services, defined in the compose.yaml file:
- openclaw-gateway – the permanently running service. It keeps the connection to Telegram, provides the web UI and talks to the AI API.
- openclaw-cli – a one-off container for administrative tasks (onboarding, configuration, pairing). It starts on demand and ends by itself afterwards.
Container or VM? The first big decision
To make this guide easier to follow, three people accompany you:
The typical office characters: the competent IT colleague, the self-appointed expert and the honest beginner. These three perspectives help you spot the usual pitfalls.
Tanja is the IT expert. She knows how it works, explains patiently and in a structured way – and is not thrown off by bad advice. If you have a question, Tanja has the answer.
Bernd is the self-appointed “expert” who knows everything better – and is usually wrong. His shortcuts and his half-knowledge regularly lead to problems. He stands for all the dangerous myths and bad practices you should avoid.
Ulf is the learner, just like you. He asks the questions that are buzzing around in your head, and sometimes needs a comparison from everyday life to understand IT. If Ulf does not understand something, that is perfectly fine, that is what Tanja is there for.
“And… action!”
It is Monday morning. Bernd is standing at the whiteboard, marker in hand, and has written “VM” in capital letters. He leans back, folds his arms, looks very pleased with himself.
Bernd: “VM. Always VM. Safer. More professional. Real admins use VMs. End of discussion.”
Ulf: “What is the difference again? VM sounds like VfL Mönchengladbach.”
Tanja: “Think of a VM as a fully equipped football stadium – its own changing room, its own pitch, its own canteen. A Docker container, by contrast, is just the player with his boots. No stadium of his own, but he gets onto the pitch much faster.”
Bernd: “Exactly! That is why VM – because of the isolation!”
Tanja: “That is half true, Bernd. A VM offers better kernel isolation. But OpenClaw was built as a Docker application – with a ready-made Dockerfile and docker-compose.yml in the repo. We take the container route here. And anyone who really wants maximum isolation can also install OpenClaw inside a VM via Docker Compose – the rest of the guide then stays identical.”
| Criterion | Container (Docker) | VM (Synology VMM) |
|---|---|---|
| Performance | Better – no complete OS kernel of its own needed | Worse – needs about 2 GB RAM as a minimum |
| Installation | Simple – docker-compose.yml is ready to use | Laborious – install an OS, set up Node ≥22, configure autostart |
| Isolation | Process isolation at kernel level | Full kernel isolation, no direct host access |
| Summary | Faster, lighter, closer to the official OpenClaw installation | Stronger isolation, but heavier and more resource-hungry |
This guide takes the container route. The additional iptables rules in the optional security chapter reduce the risk that a compromised container reaches internal devices in the home network. They do not, however, replace VM isolation, patch management or a careful review of the container images in use.
Part 1: Preparation on the DiskStation
Step 1.1: Install Container Manager
Ulf: “Container Manager – is that some kind of transfer manager for Docker players?”
Tanja: “Almost! Container Manager is the graphical interface on your DiskStation through which you start, stop and monitor Docker containers. Without it nothing runs at all.”
Bernd: “Never needed it. I do all that via SSH. A real admin does not need a GUI.”
Tanja: “Bernd, last month you accidentally deleted all the containers because you mistyped the IP.”
- Open the DiskStation interface in the browser.
- Open the Package Center.
- Search for Container Manager.
- Click Install – if it is not already there.
Step 1.2: Enable SSH
SSH (Secure Shell) is your encrypted tunnel straight into the DiskStation. Instead of clicking through the web interface for every command, you can type commands directly – like a direct line to the heart of your server.
Bernd: “I keep SSH open permanently and have forwarded port 22 straight to the internet. More efficient.”
Tanja: “… We are not doing that. SSH here is only meant for connecting inside the local network.”
- Open the Control Panel.
- Go to Terminal & SNMP.
- Tick the box at Enable SSH service.
- The port stays at 22.
- Click Apply.
Step 1.3: Connect via SSH
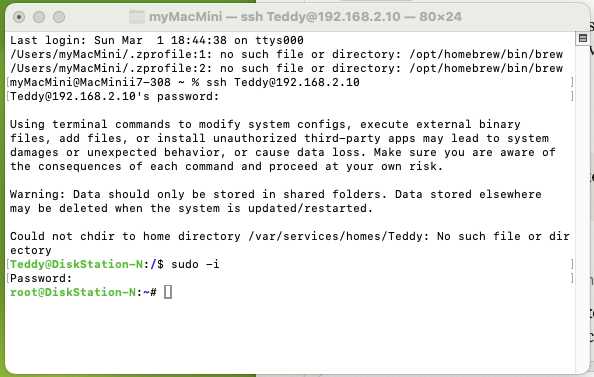
Now you connect to your DiskStation through the terminal for the first time. Do not worry – this is not a black screen from a hacker film. It is just a text window in which you type commands.
On the Mac (Applications → Utilities → Terminal):
ssh your-username@your_NAS_IP
On Windows (Windows key, cmd, Enter):
ssh your-username@your_NAS_IP
You find the IP address of your DiskStation in DSM under Control Panel → Network → Network Interface.
Step 1.4: Create the folders
After the first login you switch to root. Without root rights you may not create folders in /volume1/.
Ulf: “Root, is that the captain of the system?”
Tanja: “Root is the admin of all admins. On a Linux system root is allowed to do anything. We need root now for the folders – afterwards, though, the container deliberately does not run as root.”
Once you are connected via SSH:
# Switch to root
sudo -i

# Create the folders
mkdir -p /volume1/docker/openclaw/config
mkdir -p /volume1/docker/openclaw/workspace

# Set the permissions
chown -R 1000:1000 /volume1/docker/openclaw
chmod -R 755 /volume1/docker/openclaw
Why 1000:1000? That is the user ID the container later runs under. By setting the folders to this user now, the container has the write permissions it needs – without requiring administrator rights.
Expected result – this is how you check that it worked:
ls -la /volume1/docker/openclaw/
You should see that both subfolders (config, workspace) belong to the user with UID 1000:
drwxr-xr-x  1000 users  config/
drwxr-xr-x  1000 users  workspace/
Step 1.5: Create compose.yaml
Now it gets concrete. The compose.yaml is the heart of it: it holds everything the container needs – permissions, network, volumes, security settings.
Ulf: “Compose.yaml – is that like the team sheet before kick-off?”
Tanja: “Exactly that! Picture it: the coach writes down who is allowed to play, what position he has, and what is forbidden. That is precisely what the compose.yaml does for your container.”
Bernd: “I do all that without a compose file. docker run with ten flags is far more flexible.”
Tanja: “And when you no longer remember the flags at the next restart?”
Bernd: “…then I just start over.”
Still in the SSH session as root. Copy the whole block and paste it into the terminal:
cat > /volume1/docker/openclaw/compose.yaml << 'DATEIENDE'
services:
  openclaw-gateway:
    image: ghcr.io/openclaw/openclaw:latest
    container_name: openclaw-gateway
    restart: unless-stopped
    user: "1000:1000"
    security_opt:
      - no-new-privileges:true
    cap_drop:
      - ALL
    read_only: true
    tmpfs:
      - /tmp
      - /run
    pids_limit: 256
    dns:
      - 1.1.1.1
      - 8.8.8.8
    networks:
      - openclaw-isolated
    ports:
      - "18789:18789"
    volumes:
      - /volume1/docker/openclaw/config:/home/node/.openclaw
      - /volume1/docker/openclaw/workspace:/home/node/.openclaw/workspace
    environment:
      - HOME=/home/node
      - TERM=xterm-256color
      - NODE_ENV=production
    healthcheck:
      test: ["CMD-SHELL", "wget -qO- http://127.0.0.1:18789/ >/dev/null 2>&1 || exit 1"]
      interval: 60s
      timeout: 10s
      retries: 3
      start_period: 30s
    init: true
    command:
      [
        "node",
        "dist/index.js",
        "gateway",
        "--bind",
        "lan",
        "--port",
        "18789",
      ]

  openclaw-cli:
    image: ghcr.io/openclaw/openclaw:latest
    container_name: openclaw-cli
    user: "1000:1000"
    security_opt:
      - no-new-privileges:true
    cap_drop:
      - ALL
    network_mode: "service:openclaw-gateway"
    volumes:
      - /volume1/docker/openclaw/config:/home/node/.openclaw
      - /volume1/docker/openclaw/workspace:/home/node/.openclaw/workspace
    environment:
      - HOME=/home/node
      - TERM=xterm-256color
      - NODE_ENV=production
    stdin_open: true
    tty: true
    init: true
    entrypoint: ["node", "dist/index.js"]
    profiles:
      - cli

networks:
  openclaw-isolated:
    driver: bridge
    ipam:
      config:
        - subnet: 172.30.0.0/24
          gateway: 172.30.0.1
DATEIENDE
What do the most important settings mean?
| Setting | Meaning |
|---|---|
user: "1000:1000" | The container does not run as root – no administrator access. |
cap_drop: ALL | All Linux special rights (capabilities) are dropped. |
read_only: true | Root file system write-protected – malware cannot settle in permanently. |
tmpfs: /tmp, /run | Temporary storage in RAM for programs that have to write there. |
pids_limit: 256 | A maximum of 256 processes – protection against fork bombs. |
dns: 1.1.1.1 / 8.8.8.8 | DNS requests go straight to the internet. Without this setting they would run to the router – which is blocked by the optional firewall, and the container would have no internet. |
"18789:18789" | Web UI reachable on port 18789. |
No docker.sock volume | The container cannot control Docker or the host. |
subnet: 172.30.0.0/24 | Fixed subnet that can be blocked specifically in the optional firewall chapter. |
Expected result – validate the file:
docker compose -f /volume1/docker/openclaw/compose.yaml configdocker compose config validates the file and prints it in normalised form. That is more reliable than a plain cat. You should see a complete, error-free YAML output. An error message such as mapping values are not allowed here points to an indentation error – in that case paste the cat block from the previous step again.
Step 1.6: Run the OpenClaw onboarding
The onboarding is an interactive setup assistant. It asks you for the API key, the model and the communication channel – and then writes a ready-made configuration file into the config/ directory. This step has to be done via SSH, because the assistant needs a direct terminal connection.
Bernd: “I just pulled the image and started it. Ran right away.”
Tanja: “And then?”
Bernd: “Then an error message came up. But that is normal.”
Tanja: “That is not normal. That is missing configuration. Which is why we do the onboarding before the first start.”
cd /volume1/docker/openclaw
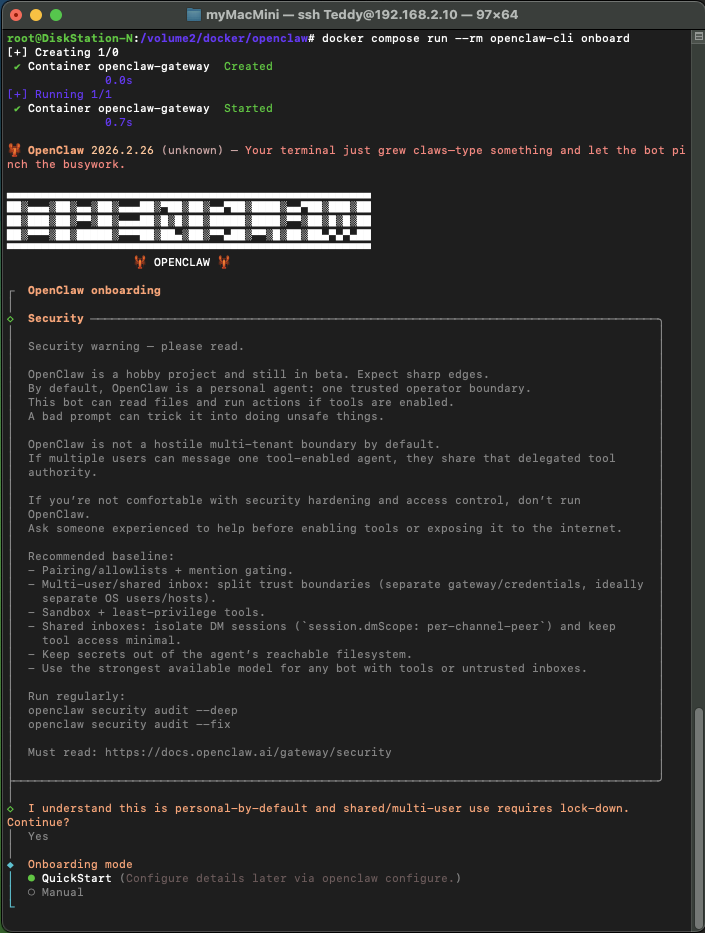
docker compose run --rm openclaw-cli onboard
The assistant guides you through the following steps:
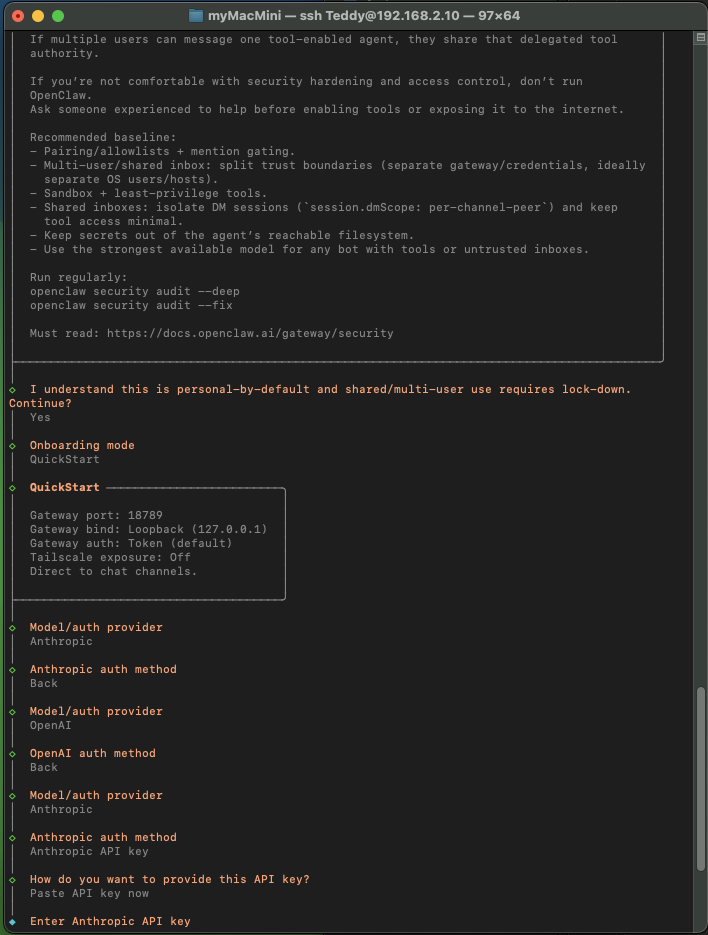
Step 1 – Confirm the security notices
Input: Yes
Step 2 – Choose the onboarding mode
Input: QuickStart
QuickStart is the guided setup path for new installations. It asks only for the essentials and skips advanced configuration options.
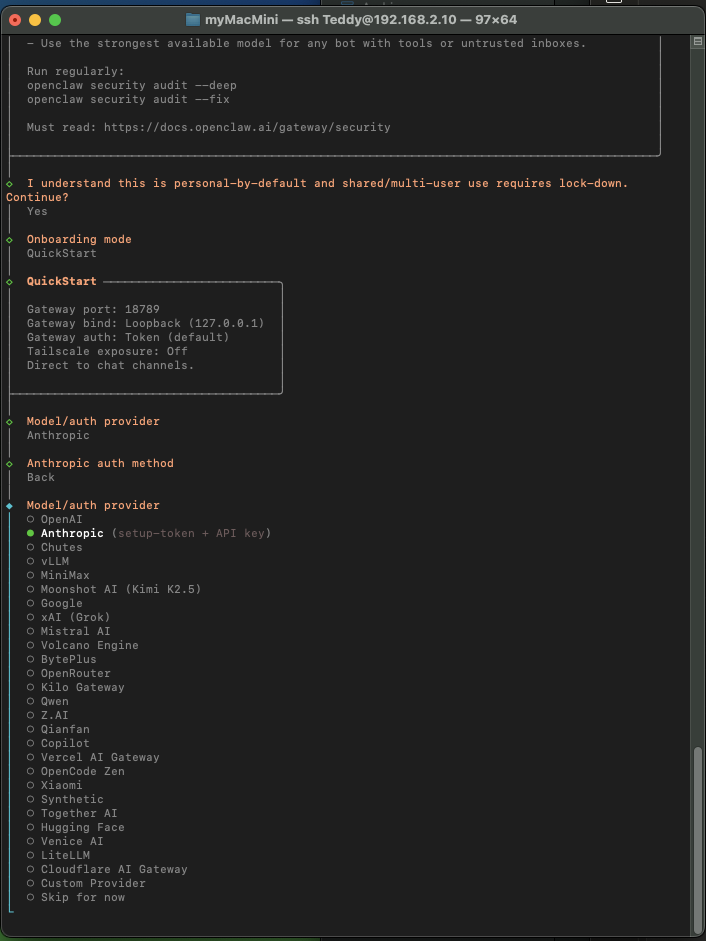
Step 3 – Choose the AI provider and the model
Ulf: “Which provider should I take? Is that like choosing between the Bundesliga and the Champions League?”
Tanja: “The choice affects quality and cost. Here is an overview:”
| Model | Input (per million tokens) | Output (per million tokens) |
|---|---|---|
| OpenAI GPT-4.1 nano | ~$0.10 | ~$0.40 |
| OpenAI GPT-4.1 mini | ~$0.40 | ~$1.60 |
| Anthropic Haiku 3.5 | ~$0.80 | ~$4.00 |
| OpenAI GPT-4o | ~$2.50 | ~$10 |
| Anthropic Sonnet 4 | ~$3.00 | ~$15 |
(as of February 2026)
For a chat assistant in home use we are talking about a few cents per conversation with either provider. In practice the difference is small.
Recommendation: Take Anthropic, because Claude is often stronger in quality on longer conversations and complex instructions. Choose Haiku if you want to save money, Sonnet if you want quality. You can switch at any time. If the lowest price matters most to you: OpenAI with GPT-4.1 mini or nano.
If you do not have an API key yet: for Claude, go to console.anthropic.com. If you do not want to set that up right now: choose Back, then Skip for now. You can add the provider later:
cd /volume1/docker/openclaw
docker compose run --rm openclaw-cli configure
Step 4 – Authentication method
Input: Anthropic API key
Step 5 – Enter the API key
Enter your sk-ant-... key.
Step 6 – Confirm the default model
Input: Keep current (claude-sonnet-4-6)
| Model | Strength | Relative cost |
|---|---|---|
| Haiku | Fast, cheap – for simple tasks | ~1/4 of Sonnet |
| Sonnet | Best price-performance ratio | Medium |
| Opus | Most capable – for complex tasks | ~5× Sonnet |
Step 7 – Choose the communication channel
Input: Telegram (Bot API)
Telegram is the recommended channel for smartphone use. You also have Synology Chat as an option. If you are unsure: choose Skip for now – channels can be added at any time.
Step 8 – Set up the Telegram bot
If you chose Telegram, you need a bot token:
- Open Telegram and search for the contact @BotFather.
- Write to him:
/newbot - Give it a display name (freely chosen, e.g. “MyOpenClaw”) and a username (it has to be unique on Telegram and must end in
bot, e.g.myopenclaw_bot). - BotFather gives you a bot token – a long character string. You now enter that in the onboarding assistant.
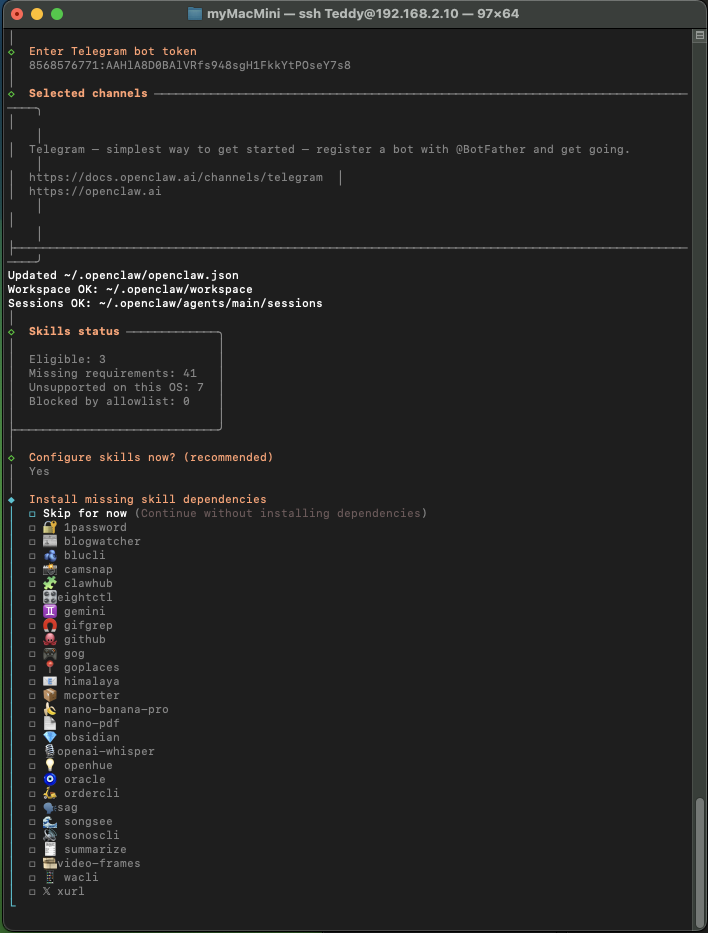
Step 9 – Configure skills
Input: No
Skills are optional add-on modules (browser automation, calendar, notes and so on). Each of them downloads its own software and can cause conflicts with our write-protected container. The core function – chatting with Claude via Telegram – works without skills. Individual skills can be added later in a targeted way.
Steps 10 – 15 Further API keys (Google Places, Gemini, Notion, OpenAI Image, Whisper, ElevenLabs)
Answer all of them with No. These are optional skills for special use cases.
Step 16 – Enable hooks
Input: Skip for now
Hooks are automations that are triggered by certain events. Not needed to get started.
The onboarding is complete!
Important: Write down the gateway token that is shown at the end of the onboarding. It looks like this:
#token=2bbea678f.........................67003d38You need it for the optional web interface. Write it down now.
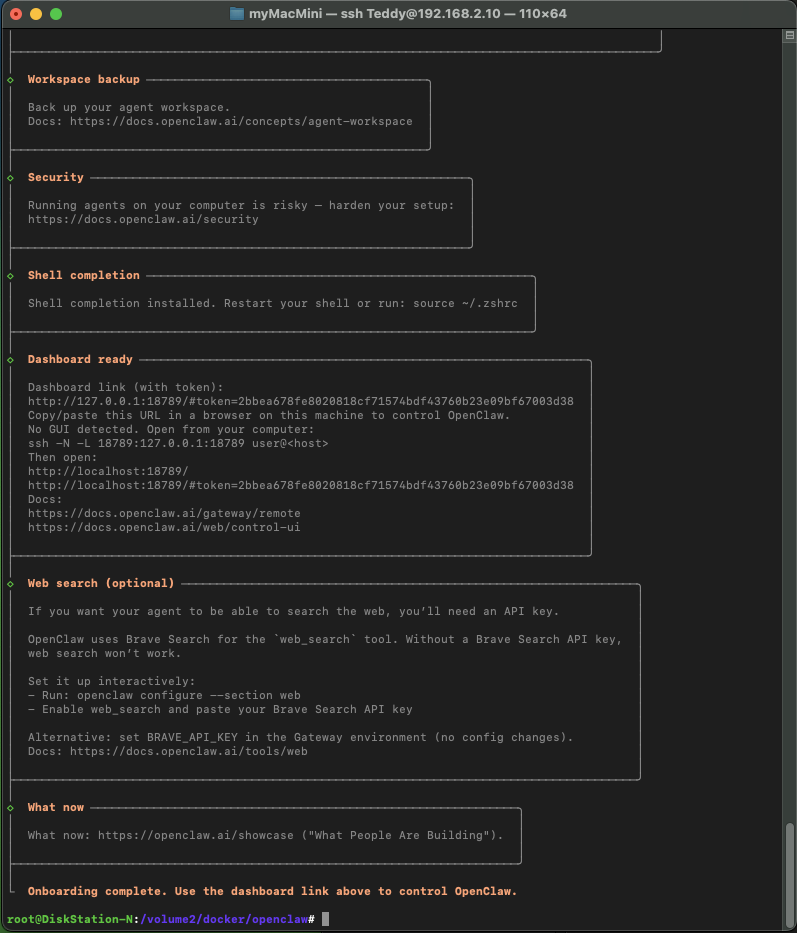
Before you start the gateway for the first time, one necessary configuration step. Without it the gateway starts with an error:
cd /volume1/docker/openclaw
docker compose run --rm openclaw-cli config set gateway.controlUi.allowedOrigins '["http://localhost:18789"]'
What is allowedOrigins? It is a security setting that determines which addresses the Control UI – the web interface of the gateway – may be called from. Without this permission OpenClaw refuses access, because the web UI is reachable through localhost (via the SSH tunnel), which is not allowed by default.
Step 1.7: Start the container
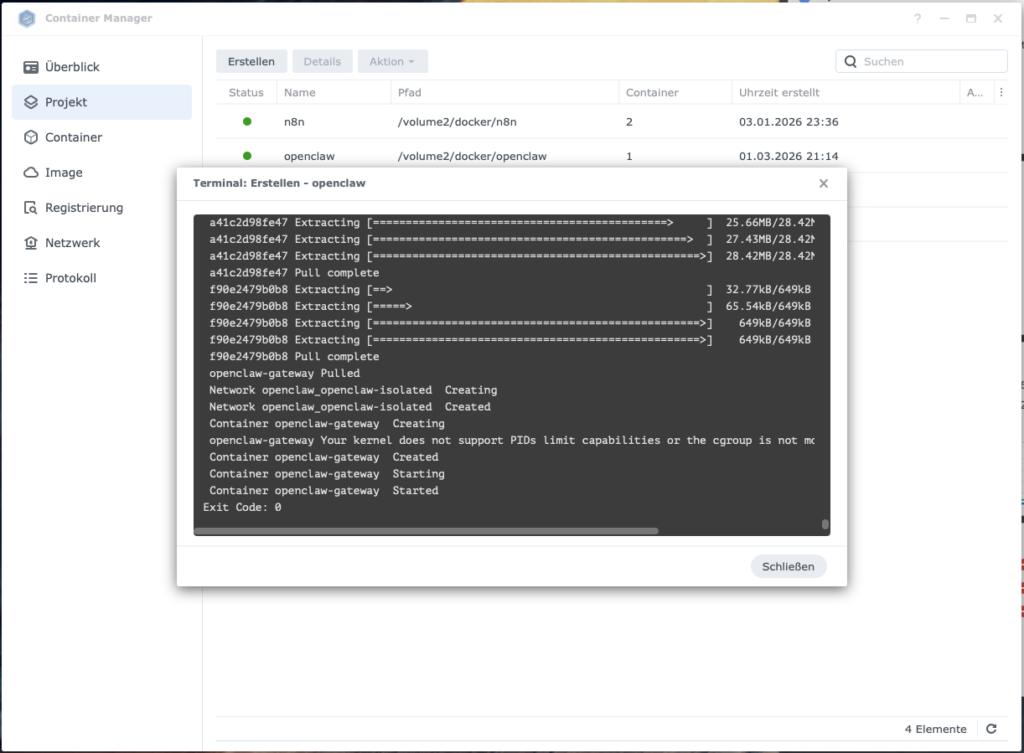
Variant A: Through Container Manager
- Open Container Manager in the DiskStation interface.
- Go to Projekt.
- Click Erstellen.
- Projektname:
openclaw - Pfad:
/volume1/docker/openclaw - Container Manager shows the compose.yaml → Weiter → Erstellen.
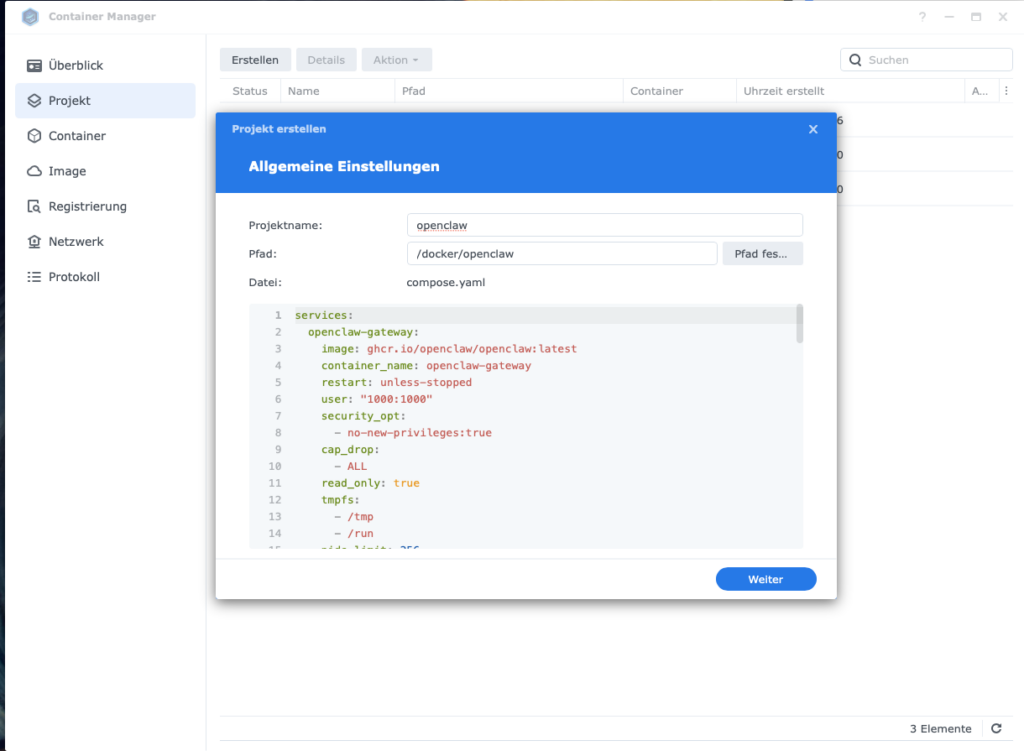
Experience shows that the first download of the image takes around 8 minutes. If you use Container Manager and created the project before the onboarding: Container Manager starts the project immediately after creating it. The container then reports “Missing config” and ends. That is not an error – stop the project, run the onboarding (step 1.6), and then start again.
Variant B: Via SSH
cd /volume1/docker/openclaw
docker compose up -d openclaw-gateway
Expected result – this is how you check that the container is running:
# Is the container running?
docker ps --filter name=openclaw-gateway

# What do the logs say?
docker logs openclaw-gateway --tail 50
What you should see:
[gateway] listening on ws://0.0.0.0:18789
[telegram] starting provider (@your_botname)
What are normal first-start messages (not an error):
[warn] pids_limit discarded– the Synology kernel does not support this feature, it is ignored.
What is a real error:Missing config→ the onboarding (step 1.6) was not completed.non-loopback Control UI requires allowedOrigins→ catch up on theconfig setcommand at the end of step 1.6.Error: EACCES: permission denied→ check the folder permissions (chown -R 1000:1000 /volume1/docker/openclaw).
Step 1.8: Test Telegram
The very first time, your bot answers with a pairing code. Pairing means: you confirm once that this device (your smartphone) is authorised to chat with the bot. Without this confirmation the bot does not answer.
Write anything to the bot in Telegram. It answers with a code. Then, in the SSH session:
cd /volume1/docker/openclaw
docker compose run --rm openclaw-cli pairing approve telegram <CODE>
Insert the code from the Telegram message. After that the chat works perfectly normally.
Expected result: The bot answers your next message with a sensible AI reply.
Part 2: Optional extensions
The basic installation is running. OpenClaw answers via Telegram. What follows now is optional – but recommended.
Optional A: Web interface through an SSH tunnel
In addition to Telegram there is a browser-based interface. It is deliberately not reachable directly in the network – access runs through an SSH tunnel. That is not a detour but intentional: the web UI should not hang open in the home network.
Open the SSH tunnel (on the Mac, a new terminal window):
ssh -L 18789:127.0.0.1:18789 your-username@your_NAS_IPThe command forwards your local port 18789 encrypted through SSH to port 18789 on the DiskStation. As long as this terminal window is open, the tunnel works.
Then call it in the browser (insert your own token from step 1.6):
http://localhost:18789#token=2bbea678f.........................67003d38Use localhost, not 127.0.0.1. That is not a typo – technically it makes a difference for the recognition of the token. The token has to stand directly after the #, without a space.
If “channel: open failed: administratively prohibited” appears:
SSH port forwarding is disabled on the DiskStation. Enable it once (another terminal session, as root):
sudo -i
echo "AllowTcpForwarding yes" >> /etc/ssh/sshd_config
sed -i '85s/AllowTcpForwarding no/AllowTcpForwarding yes/' /etc/ssh/sshd_config
systemctl restart sshd
If systemctl is not available:
synosystemctl restart sshdThen restart the SSH tunnel and call it in the browser again.
If “pairing required” is shown:
The browser has to be paired once – exactly like Telegram in step 1.8. Show the open pairing codes:
sudo docker exec -it openclaw-gateway node /app/openclaw.mjs devices listNote the code from the “Pending → Request → Code” column and confirm it:
sudo docker exec -it openclaw-gateway node /app/openclaw.mjs devices approve YOUR_CODE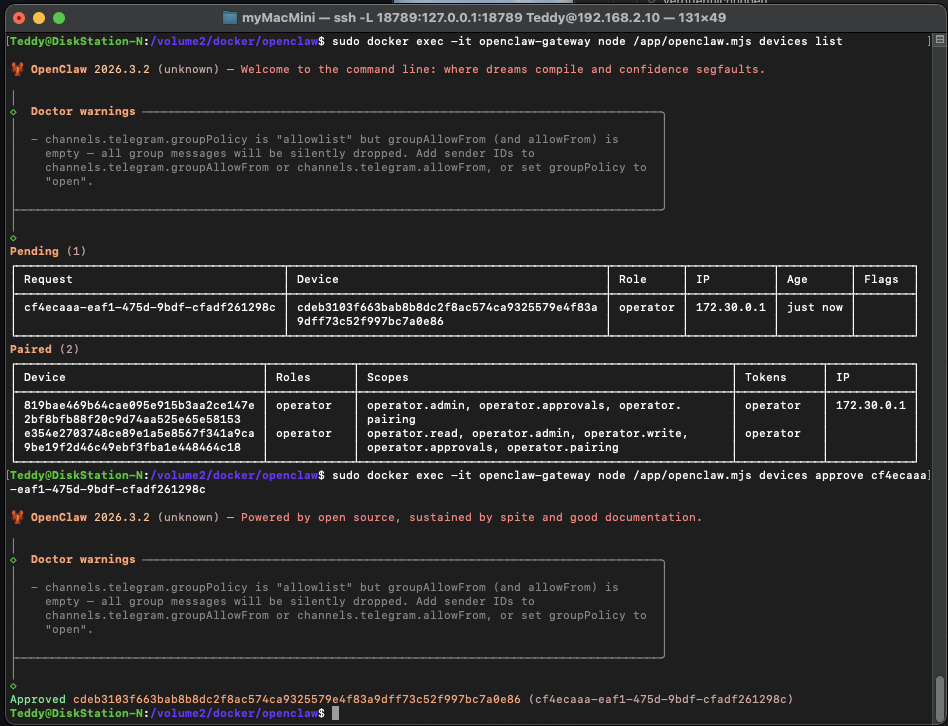
Optional B: Harden the network isolation
So far the container can theoretically reach every device in your home network – your router, other NAS devices, smart home systems. For an AI agent that sends API requests to the internet, that is an unnecessary risk.
Bernd: “I do not see why that should be necessary. The Fritzbox already does that.”
Tanja: “Your Fritzbox filters connections from the outside in. Connections from the container into your network it does not see at all – those run internally on the NAS. For that we need iptables rules directly on the DiskStation.”
Ulf: “iptables – is that like the referee rules?”
Tanja: “Perfect comparison! iptables is the rulebook that decides which data packets are allowed through and which are whistled off straight away.”
Ulf: “And DOCKER-USER?”
Tanja: “DOCKER-USER is the iptables chain that Docker takes into account specifically for user-defined filter rules before the container forwarding. We write our rules there so that Docker does not overwrite them.”
The additional iptables rules in this section reduce the risk that a compromised container reaches internal devices in the home network. They do not, however, replace VM isolation, patch management or a careful review of the container images in use.
Step B.1: Create the firewall script
The script works in three phases:
- Phase 1: Deletes its own rules, in case the script has already run once.
- Phase 2: Rebuilds the IPv4 rules.
- Phase 3: Adds the IPv6 rules.
The script is idempotent – you can run it as often as you like, it always rebuilds cleanly.
cat > /volume1/docker/openclaw/openclaw-firewall.sh << 'DATEIENDE'
#!/bin/bash
# =============================================================================
# openclaw-firewall.sh
# Network isolation script for OpenClaw on Synology DS1621+
# =============================================================================
# Compatible with Synology DSM iptables 1.8.x (no comment module available).
#
# Blocks outgoing traffic from the OpenClaw container to all private
# and reserved IPv4 networks. Internet access stays allowed.
# DNS runs through public servers (1.1.1.1 / 8.8.8.8, set in
# docker-compose.yml), because the router DNS is blocked by the rules.
#
# Idempotent: first deletes all of its own rules (by exact specification),
# then rebuilds the rules in a defined order.
# Can be run as often as you like.
#
# IPv6: blocks ULA (fc00::/7) and link-local (fe80::/10) globally for all
# Docker forward traffic, because the container has no fixed IPv6 prefix
# assigned to it. If you want to run other containers with IPv6 later,
# adjust these rules.
#
# Usage:
#   Set up as a boot task in the Synology Aufgabenplaner:
#   bash /volume1/docker/openclaw/openclaw-firewall.sh
# =============================================================================

sleep 30

DOCKER_SUBNET="172.30.0.0/24"   # Must match compose.yaml

# ─────────────────────────────────────────────────────────────────────────────
# Phase 1: remove all of its own rules (exact specification)
# ─────────────────────────────────────────────────────────────────────────────

# IPv4
iptables -D DOCKER-USER -m conntrack --ctstate ESTABLISHED,RELATED -j ACCEPT 2>/dev/null
iptables -D DOCKER-USER -s "$DOCKER_SUBNET" -d 192.168.0.0/16 -j DROP 2>/dev/null
iptables -D DOCKER-USER -s "$DOCKER_SUBNET" -d 10.0.0.0/8 -j DROP 2>/dev/null
iptables -D DOCKER-USER -s "$DOCKER_SUBNET" -d 172.16.0.0/12 -j DROP 2>/dev/null
iptables -D DOCKER-USER -s "$DOCKER_SUBNET" -d 169.254.0.0/16 -j DROP 2>/dev/null
iptables -D DOCKER-USER -s "$DOCKER_SUBNET" -d 100.64.0.0/10 -j DROP 2>/dev/null

# IPv6
ip6tables -D DOCKER-USER -m conntrack --ctstate ESTABLISHED,RELATED -j ACCEPT 2>/dev/null
ip6tables -D DOCKER-USER -d fc00::/7 -j DROP 2>/dev/null
ip6tables -D DOCKER-USER -d fe80::/10 -j DROP 2>/dev/null

# ─────────────────────────────────────────────────────────────────────────────
# Phase 2: build the IPv4 rules in DOCKER-USER
# ─────────────────────────────────────────────────────────────────────────────

# Position 1: let reply packets of allowed connections through
iptables -I DOCKER-USER 1 \
  -m conntrack --ctstate ESTABLISHED,RELATED -j ACCEPT

# Position 2-6: block private and reserved networks
iptables -I DOCKER-USER 2 \
  -s "$DOCKER_SUBNET" -d 192.168.0.0/16 -j DROP

iptables -I DOCKER-USER 3 \
  -s "$DOCKER_SUBNET" -d 10.0.0.0/8 -j DROP

iptables -I DOCKER-USER 4 \
  -s "$DOCKER_SUBNET" -d 172.16.0.0/12 -j DROP

iptables -I DOCKER-USER 5 \
  -s "$DOCKER_SUBNET" -d 169.254.0.0/16 -j DROP

iptables -I DOCKER-USER 6 \
  -s "$DOCKER_SUBNET" -d 100.64.0.0/10 -j DROP

# RETURN: only add it if none exists
if ! iptables -L DOCKER-USER -n 2>/dev/null | grep -q "RETURN"; then
  iptables -A DOCKER-USER -j RETURN
fi

# ─────────────────────────────────────────────────────────────────────────────
# Phase 3: IPv6 rules (if DOCKER-USER exists in ip6tables)
# ─────────────────────────────────────────────────────────────────────────────

if ip6tables -L DOCKER-USER -n >/dev/null 2>&1; then
  ip6tables -I DOCKER-USER 1 \
    -m conntrack --ctstate ESTABLISHED,RELATED -j ACCEPT

  ip6tables -I DOCKER-USER 2 \
    -d fc00::/7 -j DROP

  ip6tables -I DOCKER-USER 3 \
    -d fe80::/10 -j DROP

  if ! ip6tables -L DOCKER-USER -n 2>/dev/null | grep -q "RETURN"; then
    ip6tables -A DOCKER-USER -j RETURN
  fi
fi

# ─────────────────────────────────────────────────────────────────────────────
# Output
# ─────────────────────────────────────────────────────────────────────────────
logger "openclaw-firewall: DOCKER-USER Regeln aktiv fuer $DOCKER_SUBNET"

echo ""
echo "========================================"
echo " OpenClaw Netzwerk-Isolation aktiviert"
echo "========================================"
echo ""
echo "IPv4 DOCKER-USER:"
iptables -L DOCKER-USER -n -v --line-numbers
echo ""

if ip6tables -L DOCKER-USER -n >/dev/null 2>&1; then
  echo "IPv6 DOCKER-USER:"
  ip6tables -L DOCKER-USER -n -v --line-numbers
  echo ""
fi

echo "Erwartete Reihenfolge:"
echo "  1  ACCEPT     ctstate RELATED,ESTABLISHED"
echo "  2  DROP       172.30.0.0/24 -> 192.168.0.0/16"
echo "  3  DROP       172.30.0.0/24 -> 10.0.0.0/8"
echo "  4  DROP       172.30.0.0/24 -> 172.16.0.0/12"
echo "  5  DROP       172.30.0.0/24 -> 169.254.0.0/16"
echo "  6  DROP       172.30.0.0/24 -> 100.64.0.0/10"
echo "  7  RETURN"
DATEIENDE
Then make the script executable:
# Switch to root
sudo -i

chmod +x /volume1/docker/openclaw/openclaw-firewall.sh
Which networks are blocked?
| Range | Protocol | What is that? |
|---|---|---|
192.168.0.0/16 | IPv4 | Home networks (Fritzbox, etc.) |
10.0.0.0/8 | IPv4 | Company networks, VPNs |
172.16.0.0/12 | IPv4 | Further private networks |
169.254.0.0/16 | IPv4 | Link-local (mDNS devices, APIPA) |
100.64.0.0/10 | IPv4 | CGNAT (some providers/VPNs) |
fc00::/7 | IPv6 (global) | ULA (the IPv6 equivalent of private networks) |
fe80::/10 | IPv6 (global) | IPv6 link-local |
Note on IPv6: The IPv6 rules apply to all Docker forward traffic on the DiskStation, not only to OpenClaw. If you want to run other containers with IPv6 later, these rules have to be adjusted.
Step B.2: Set up the firewall as a boot task
The iptables rules are volatile – a restart deletes them. So that they are active automatically after every boot:
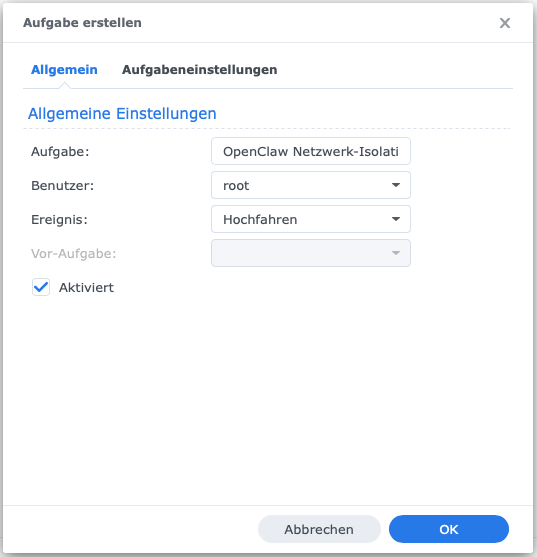
- Open: Control Panel → Dienste → Aufgabenplaner.
- Click Erstellen → Ausgelöste Aufgabe → Benutzerdefiniertes Skript.
- Reiter Allgemein:
- Aufgabe:
OpenClaw Netzwerk-Isolation - Benutzer:
root - Ereignis:
Hochfahren
- Aufgabe:
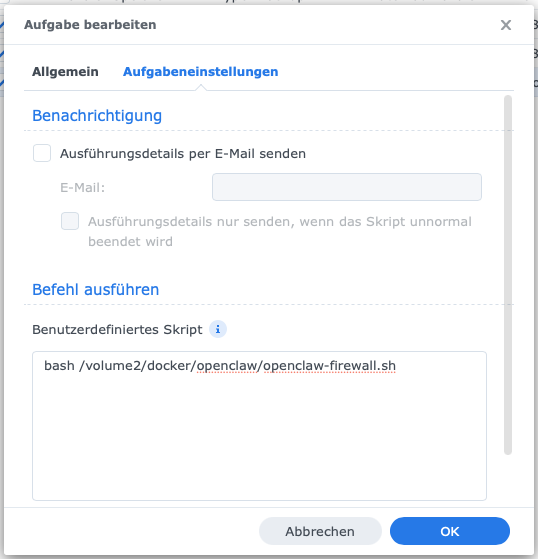
- Reiter Aufgabeneinstellungen: Enter in the text field:
bash /volume1/docker/openclaw/openclaw-firewall.sh- Click OK and confirm the warning.
Step B.3: Activate the firewall immediately
bash /volume1/docker/openclaw/openclaw-firewall.sh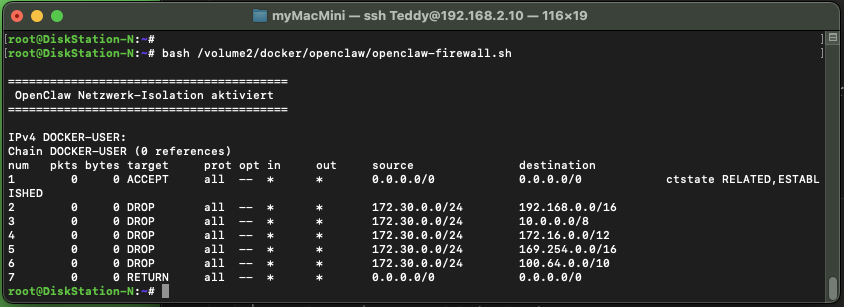
Expected result – check the rules:
iptables -L DOCKER-USER -n -v --line-numbersExpected output:
num   target     prot  source           destination
1     ACCEPT     all   0.0.0.0/0        0.0.0.0/0        ctstate RELATED,ESTABLISHED
2     DROP       all   172.30.0.0/24    192.168.0.0/16
3     DROP       all   172.30.0.0/24    10.0.0.0/8
4     DROP       all   172.30.0.0/24    172.16.0.0/12
5     DROP       all   172.30.0.0/24    169.254.0.0/16
6     DROP       all   172.30.0.0/24    100.64.0.0/10
7     RETURN     all   0.0.0.0/0        0.0.0.0/0
If the order is not right: run the script again – it cleans up first and then rebuilds cleanly.
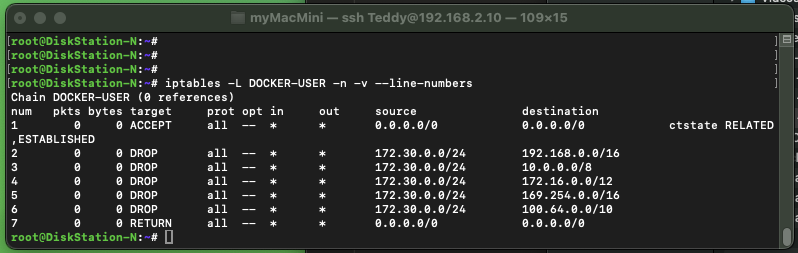
Testing the isolation:
# The internet has to work:
sudo docker exec openclaw-gateway node -e "fetch('https://api.telegram.org').then(r=>console.log('OK',r.status)).catch(e=>console.log('FEHLER',e.message))"

# The home network has to be blocked:
sudo docker exec openclaw-gateway node -e "fetch('http://<IP_of_your_router>',{signal:AbortSignal.timeout(3000)}).then(r=>console.log('OFFEN!',r.status)).catch(e=>console.log('BLOCKIERT (gut!)'))"

# Check the firewall rules:
sudo iptables -L DOCKER-USER -n -v --line-numbers
Expected result: the internet answers with OK 200, the home network reports BLOCKIERT (gut!).
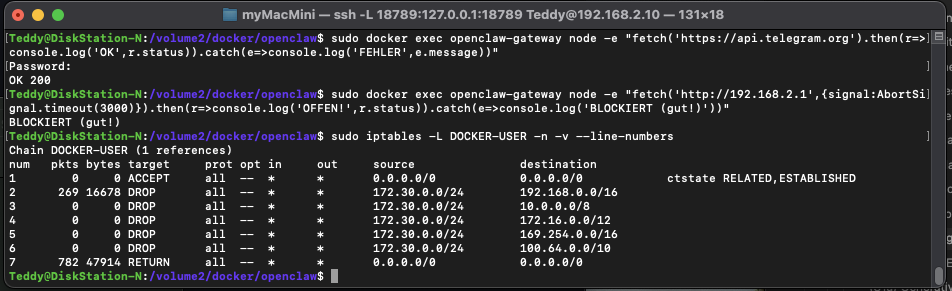
What this test does not cover: the NAS itself
Both tests above check traffic that passes through the NAS — out to the internet and into the home network. DOCKER-USER hangs off FORWARD and sees exactly that traffic. A packet to the NAS itself, that is to its own address in the home network, does not run through FORWARD but through INPUT. The chain never gets to see it. The container therefore still reaches everything that listens on the NAS: the DSM interface, databases, other containers with published ports — and the test above still dutifully reports BLOCKIERT (gut!), because it aims at the router.
Before you measure: take a port where something really listens. Otherwise you measure nothing:
sudo netstat -tln | head -40That is not a side note but the most common source of error in this test: if the connection attempt answers with ECONNREFUSED, that means “nobody is listening there” — not “blocked”. A firewall that drops produces a timeout. Anyone who tests against a closed port gets the same result before and after setting it up.
With an open port from the list:
sudo docker exec openclaw-gateway node -e "const s=require('net').connect(<PORT>,'<NAS-IP>');s.setTimeout(4000);s.on('connect',()=>{console.log('OFFEN - nicht blockiert');s.destroy()});s.on('timeout',()=>{console.log('TIMEOUT - blockiert');s.destroy()});s.on('error',e=>console.log(e.code))"If that reports OFFEN – nicht blockiert, the second half of the isolation is missing. Add it to the firewall script, after the rules for DOCKER-USER:
# Second half: traffic to the NAS ITSELF goes through INPUT, not through
# FORWARD - DOCKER-USER never sees it. Its own chain, so that INPUT stays clean.
NAS_CHAIN="OPENCLAW-IN"

iptables -N "$NAS_CHAIN" 2>/dev/null
iptables -F "$NAS_CHAIN"
iptables -A "$NAS_CHAIN" -m conntrack --ctstate ESTABLISHED,RELATED -j ACCEPT
iptables -A "$NAS_CHAIN" -p udp --dport 53 -j ACCEPT
iptables -A "$NAS_CHAIN" -p tcp --dport 53 -j ACCEPT
iptables -A "$NAS_CHAIN" -j DROP

if ! iptables -S 2>/dev/null | grep -qF -- "-A INPUT -s $DOCKER_SUBNET -j $NAS_CHAIN"; then
  iptables -I INPUT 1 -s "$DOCKER_SUBNET" -j "$NAS_CHAIN"
fi
After the next run of the script the same test reports TIMEOUT – blockiert. DNS deliberately stays open (port 53): if a container uses the host as its name resolver, it would otherwise no longer find anything. And as with the first chain: rules set by hand do not survive a restart — only in the script do they become permanent.
And finally the line that shows whether anything takes effect at all. All the rules in this section hang in DOCKER-USER, and whether this chain is jumped into is decided by Docker:
sudo iptables -L -n | grep "^Chain DOCKER-USER"If it says (1 references) or more, everything is in order. If it says (0 references), nobody jumps into the chain: every rule is still there, cleanly built — and without effect. That happens after a DSM update or when the Docker service restarts; the section Firewall rules missing after a DSM update further down describes what to do then. Take this one line into your routine, otherwise you will not notice the failure.
Optional C: Add a Playwright browser
So far OpenClaw communicates through APIs and text. With an embedded Playwright browser it can also load real web pages, scroll, fill in forms and use JavaScript rendering.
Ulf: “OpenClaw is supposed to surf by itself? Like a sweeper who suddenly plays up front?”
Tanja: “Exactly that! The LLM plans, Playwright executes. With it OpenClaw can read content from dynamic pages that are not accessible through simple HTTP requests.”
Bernd: “I just took the system Chromium. Did not run. Tried three times. Never worked.”
Tanja: “That is why you bring the browser binaries along with the container. Then it works reproducibly – every time.”
A Playwright browser in the Docker container brings its own browser binaries and dependencies with it. That avoids conflicts with system libraries and version incompatibilities.
Step C.1: Create the Dockerfile
Create /volume1/docker/openclaw/Dockerfile:
FROM ghcr.io/openclaw/openclaw:latest

USER root

# System libraries for Chromium / Playwright
RUN apt-get update && apt-get install -y \
    libnspr4 \
    libnss3 \
    libatk1.0-0 \
    libatk-bridge2.0-0 \
    libcups2 \
    libdrm2 \
    libxkbcommon0 \
    libxcomposite1 \
    libxdamage1 \
    libxfixes3 \
    libxrandr2 \
    libgbm1 \
    libasound2 \
    ca-certificates \
    wget \
    && rm -rf /var/lib/apt/lists/*

USER node
Then, in the compose.yaml, replace the image line for both services (openclaw-gateway and openclaw-cli):
# Before:
image: ghcr.io/openclaw/openclaw:latest

# After:
build:
  context: /volume1/docker/openclaw
  dockerfile: Dockerfile
Step C.2: Install Chromium
cd /volume1/docker/openclaw

sudo docker compose -p openclaw run --rm --entrypoint sh \
  -e PLAYWRIGHT_BROWSERS_PATH=/home/node/.openclaw/workspace/.browser \
  openclaw-cli -c 'mkdir -p /home/node/.openclaw/workspace/.browser && \
  node /app/node_modules/playwright-core/cli.js install chromium'
Expected result – check the installation:
sudo docker exec -it openclaw-gateway sh -c 'ls -la /home/node/.openclaw/workspace/.browser'You should see a folder such as chromium-1208. Then test the browser path:
sudo docker exec -it openclaw-gateway sh -c '/home/node/.openclaw/workspace/.browser/chromium-1208/chrome-linux64/chrome --version'A Chrome version number in the output means: Chromium is installed correctly.
The folder name (e.g. chromium-1208) depends on the Playwright version. Always check it with ls – it can change with updates.
Step C.3: Set the browser path in openclaw.json
Open /volume1/docker/openclaw/config/openclaw.json and insert the browser block:
"browser": {
  "enabled": true,
  "defaultProfile": "openclaw",
  "headless": true,
  "noSandbox": true,
  "executablePath": "/home/node/.openclaw/workspace/.browser/chromium-1208/chrome-linux64/chrome",
  "profiles": {
    "openclaw": {
      "cdpPort": 18800,
      "color": "#FF4500"
    }
  }
}
Step C.4: Testing
sudo docker exec -it openclaw-gateway sh -c '/home/node/.openclaw/workspace/.browser/chromium-1208/chrome-linux64/chrome --version'Then in OpenClaw (via Telegram or the web UI):
Use the browser profile "openclaw" and open https://example.com.If OpenClaw answers and describes the page content, everything is set up correctly.
Useful commands – the cheat sheet
Ulf: “Can I look all those commands up somewhere without reading the whole guide again?”
Tanja: “That is exactly what this table is for.”
| What | Command |
|---|---|
| Stop | Container Manager → Projekt → openclaw → Stoppen |
| Start | Container Manager → Projekt → openclaw → Starten |
| Logs | Container Manager → Projekt → openclaw → Logs |
| Stop (SSH) | cd /volume1/docker/openclaw && docker compose down |
| Start (SSH) | cd /volume1/docker/openclaw && docker compose up -d openclaw-gateway |
| Logs (SSH) | docker logs openclaw-gateway --tail 20 |
| Update | cd /volume1/docker/openclaw && docker compose pull && docker compose down && docker compose up -d openclaw-gateway |
| SSH tunnel (from the Mac) | ssh -L 18789:127.0.0.1:18789 your-username@your_NAS_IP |
| Check the firewall | sudo iptables -L DOCKER-USER -n -v --line-numbers |
| Reload the firewall | sudo bash /volume1/docker/openclaw/openclaw-firewall.sh |
Troubleshooting
Here are the most common problems and their solutions. Bernd has already experienced at least three of them personally.
The container does not start or ends immediately
Symptom: Container Manager reports “unerwartet beendet”, the logs show errors.
Check:
docker logs openclaw-gateway --tail 50| Error message | Cause | Solution |
|---|---|---|
Missing config | Onboarding not completed | Carry out step 1.6 |
non-loopback Control UI requires allowedOrigins | config set command missing | Catch up on the command at the end of step 1.6 |
EACCES: permission denied | Wrong folder permissions | sudo chown -R 1000:1000 /volume1/docker/openclaw |
pids_limit discarded | The Synology kernel does not support it | Harmless, ignore it |
The web interface is not reachable
Symptom: The browser shows an empty page, connection refused or “pairing required”.
Check:
docker ps --filter name=openclaw-gateway
docker logs openclaw-gateway --tail 50| Possible cause | Check command / solution |
|---|---|
| The container is not running | docker compose up -d openclaw-gateway |
| The SSH tunnel is not active | Open ssh -L 18789:127.0.0.1:18789 your-username@your_NAS_IP in the terminal |
| Port forwarding disabled | Error “administratively prohibited” → enable SSH forwarding (step Optional A) |
allowedOrigins not set | docker compose run --rm openclaw-cli config set gateway.controlUi.allowedOrigins '["http://localhost:18789"]' |
| The browser is not paired yet | devices list and devices approve (step Optional A) |
| Wrong URL | http://localhost:18789 – not 127.0.0.1, not the NAS IP |
Telegram does not answer
Symptom: The bot stays silent, no answer to messages.
Check:
docker logs openclaw-gateway --tail 20| Possible cause | Solution |
|---|---|
| Pairing not completed | Carry out step 1.8 |
| No internet | Run the following test (see below) |
| Wrong bot token | Enter the token again in the onboarding (configure) |
Internet test:
docker exec openclaw-gateway node -e "fetch('https://api.telegram.org').then(r=>console.log('OK',r.status)).catch(e=>console.log('FEHLER',e.message))"Firewall rules missing after a DSM update
Symptom: Access from the container into the home network is possible again.
Check:
sudo iptables -L DOCKER-USER -n -v --line-numbersIf the list is empty or incomplete:
sudo bash /volume1/docker/openclaw/openclaw-firewall.shAlso check whether the boot task is still active: Control Panel → Aufgabenplaner.
“Read-only file system”
Symptom: An error message from a skill or module that wants to write.
Temporary solution: Comment out this line in the compose.yaml and restart the project:
# read_only: true“non-loopback Control UI requires allowedOrigins”
The configuration step from step 1.6 was skipped. Catch up on it:
cd /volume1/docker/openclaw
docker compose run --rm openclaw-cli config set gateway.controlUi.allowedOrigins '["http://localhost:18789"]'
“Permission denied”
The folders belong to the wrong user. Fix it with:
sudo chown -R 1000:1000 /volume1/docker/openclawDNS / no internet
Check whether dns: 1.1.1.1 and dns: 8.8.8.8 are present in the compose.yaml. Then test:
docker exec openclaw-gateway node -e "fetch('https://api.telegram.org').then(r=>console.log('OK',r.status)).catch(e=>console.log('FEHLER',e.message))"“PIDs limit discarded” Warnung
Harmless. The Synology kernel does not support the pids_limit feature. The warning can be ignored.
Maintenance and updates
Update the container:
cd /volume1/docker/openclaw
docker compose pull
docker compose down
docker compose up -d openclaw-gateway
After DSM updates: check the firewall rules and reload them if necessary (see Troubleshooting above).
Change the configuration (model, API key, channels):
cd /volume1/docker/openclaw
docker compose run --rm openclaw-cli configure
Done!
Tanja: “That is it. OpenClaw is running, the firewall is active, Telegram is connected. You have a secured AI agent on your home network NAS.”
Ulf: “And Bernd? Does he still have his VM?”
Bernd: “My VM is running too, by the way. But then the RAM was gone and the DSM update then… erm. That is another story.”
Tanja: “…the VM was gone. I know, Bernd. I know.”
In this guide you have built the following:
- Enabled Container Manager and SSH on the DiskStation
- Created the folder structure for OpenClaw
- Created and validated
compose.yamlwith complete security settings - Configured OpenClaw through the interactive onboarding
- Connected and paired the Telegram bot
Added optionally:
- Made the web interface accessible through an SSH tunnel
- Set up the network isolation via iptables and saved it as a boot task
- Installed the Playwright browser
FOUNDIC.org is ad-free and has no paywall. If this guide helped you:  Treat us to a coffee