
A practical guide for everyone who no longer wants to run their website like a café in the fog but finally wants to see who shows up, stays, clicks, and disappears again.
Imagine you run a café. Every morning you unfold the chairs, polish the counter, put the cake in the light and have no idea whether ten people will come or two hundred. You don’t know whether they stay for the espresso, flee because of the Wi-Fi, or just pop in for a moment because it’s raining outside.
A website without web analytics feels exactly like that: you work, publish, optimise and stare into a room without windows.
Google Analytics 4, or GA4 for short, is one of the best-known free tools for opening that window. It shows which pages are being read, where visitors come from, how long they stay, and at what point they disappear. For personal projects and small commercial websites, the free version is generally more than sufficient.
To make this guide easier to follow, three characters will accompany you:
The classic office types: the competent IT colleague, the self-proclaimed expert, and the honest beginner. These three perspectives help you recognise typical pitfalls.
Tanja is the IT expert. She knows how it works, explains things patiently and clearly, and doesn’t let bad advice throw her off. If you have a question, Tanja has the answer.
Bernd is the self-proclaimed “expert” who always thinks he knows better and is usually wrong. His shortcuts and half-knowledge regularly cause problems. He represents all the dangerous myths and bad practices you should avoid.
Ulf is the learner, just like you. He asks the questions buzzing around in your head and sometimes needs an everyday analogy to understand IT. If Ulf doesn’t understand something, that’s completely fine that’s what Tanja is there for.
“And… action!”
Before We Start: What You Should Know
The office, Monday morning. Ulf is holding his coffee mug and staring at his screen.
Ulf: “I’ve got a WordPress site now. But I have no idea whether anyone is reading it. Is that normal?”
Tanja: “Completely normal and that’s exactly what Google Analytics 4 is for. You set it up once, and then you can see in real time who’s on your site, where visitors are coming from, and what they’re doing there.”
Bernd: “I just look at my server logs. That’s more than enough.”
Tanja: “Server logs show you raw data: IP addresses, HTTP status codes, bot traffic all in the same dusty filing box. GA4 analyses user behaviour. They’re two different tools for two different questions.”
Google Analytics 4 Is Not Universal Analytics
Anyone who used Google Analytics before 2023 knows Universal Analytics the system that ran until July 2023 and was then shut down. All historical data was permanently deleted in July 2024. GA4 is the successor, but it’s not a simple update.
The fundamental difference: Universal Analytics thought in sessions (how often was someone on the site?), GA4 thinks in events (what did someone actually do?).
Every click, every scroll, every video play, every form submission is an independent “event” in GA4. This sounds abstract, but makes the analysis considerably more precise: you no longer just see that someone was on a page you see whether they read 80% of the article before leaving.
Ulf: “That sounds like the difference between ‘was at the game’ and ‘played the decisive pass in minute 73’.”
Tanja: “Exactly. Universal Analytics was the spreadsheet with the final scores. GA4 is the complete match statistics.”
Bernd: “Everything used to be simpler. I still have the old interface.”
Tanja: “The old interface no longer exists. Universal Analytics was shut down, the data is gone. There’s only GA4 now.”
GA4 Is Free, But Not Without Cost
Google Analytics costs nothing for regular websites. But free it is not. The price doesn’t appear on an invoice it lies in the data flow: you are integrating a Google system that processes user-related signals and must be properly secured from a legal standpoint. Anyone unwilling to make that trade-off will find alternatives at the end of this article.
What You Need
- A Google account (ideally already registered with your domain in Google Search Console — this saves a verification step later)
- WordPress admin access (Administrator role)
- A calm head when the word “GDPR” comes up
Ulf: “I have a Google account. What’s Google Search Console? Sounds like a video game controller.”
Tanja: “No stress Search Console is optional. I’ll explain it briefly, but you can set up GA4 completely without it.”
Recommended, But Not Required: Google Search Console
Tanja pulls up a chair and opens a new browser tab.
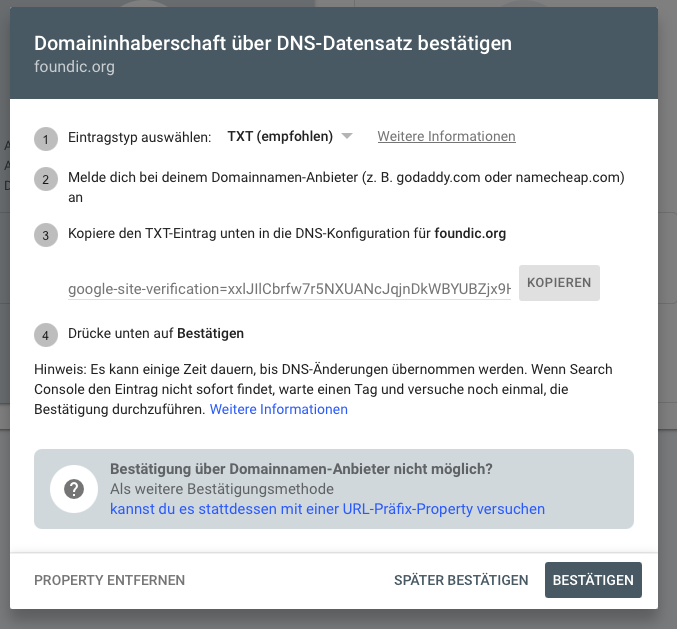
Google Search Console is not a prerequisite for GA4 this guide works without it. But anyone who has already set it up benefits twice: Site Kit automatically recognises domain ownership and skips the manual DNS verification. And later, GA4 data (what are visitors doing on the site?) can be combined with Search Console data (which keywords are driving traffic?) for joint analysis.
Tanja: “Think of two cameras: Search Console looks at the pavement in front of your café — who finds you via Google? GA4 looks inside the dining room what happens after someone walks in.”
Ulf: “Ah, and if I can connect both cameras, I see the complete picture?”
Tanja: “Exactly. Both perspectives together give you the full picture.”
Bernd: “Don’t need it. I can tell when people are on my site.”
Tanja: “No, you can’t. Not without an analytics tool.”
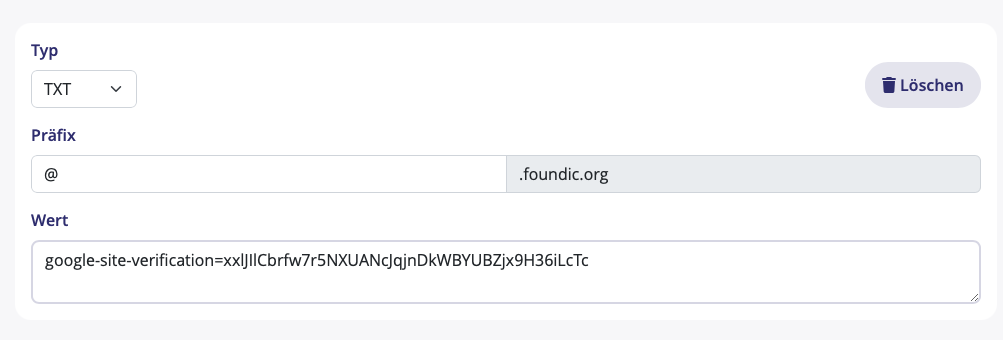
DNS verification works like this: Google issues a TXT record (a kind of digital name tag) that gets entered in the DNS settings at your hosting provider. With STRATO, it looks like this:
Phase 1: The Foundation — Creating a GA4 Property
Tanja opens analytics.google.com. Ulf moves closer.
Ulf: “Property what’s that? Sounds like real estate.”
Tanja: “The real estate comparison isn’t bad at all. The property is the plot of land where your website’s measurement data lands. The account is the property management above it. For a single website, you need: one account, one property, no administrative zoo.”
Bernd: “I have five properties under one account. For the overview.”
Tanja: “If you only have one website, you only need one property. More properties mean more administrative overhead, not more clarity.”
Step 1 – Create an Account
Open analytics.google.com and sign in with your Google account.
If no Analytics account exists yet: the “Start measuring” button appears on the welcome page. If an account already exists: gear icon bottom left → “Create account”.
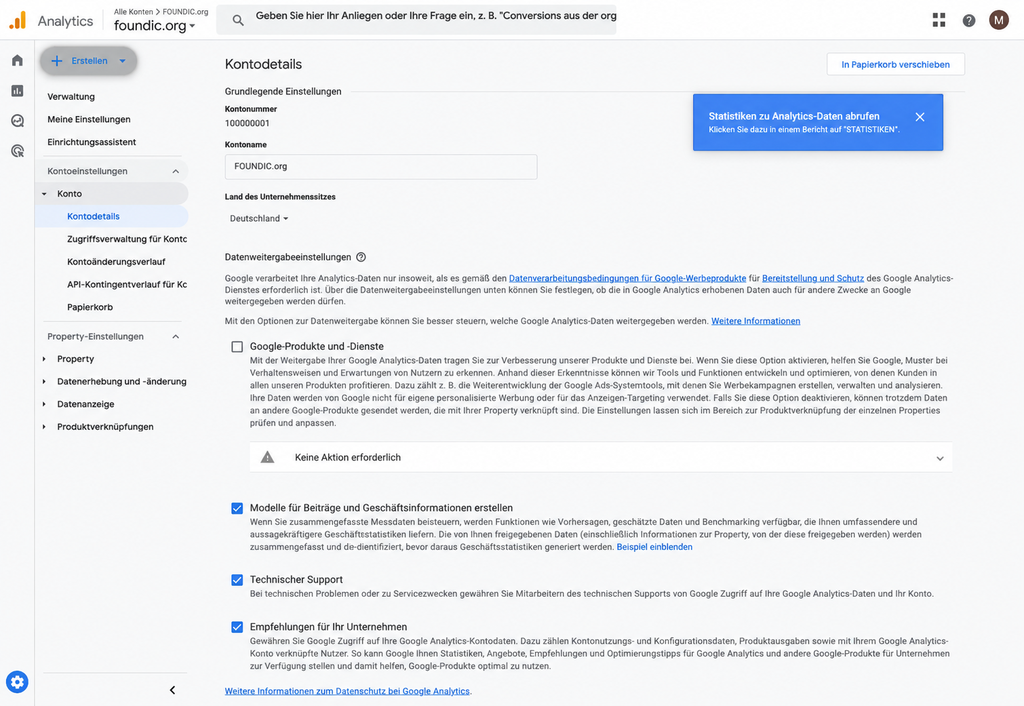
The setup wizard guides you through five steps. In the first, you set the account name. Then the data-sharing settings appear. It is recommended to deactivate the option “Google products and services”. This is the more privacy-friendly choice: Google is then not allowed to use the analytics data for its own purposes (e.g. advertising).
Ulf: “What happens if I leave it enabled?”
Tanja: “Then Google is allowed to use your user data for its own services for example to improve its advertising systems. For you as a small blog operator, this offers no advantage. Deactivate it.”
Bernd: “I always leave it enabled. You get better recommendations.”
Tanja: “That’s not true. The data sharing does not affect the quality of your own reports.”
→ Click “Next”.
Step 2 – Create a Property
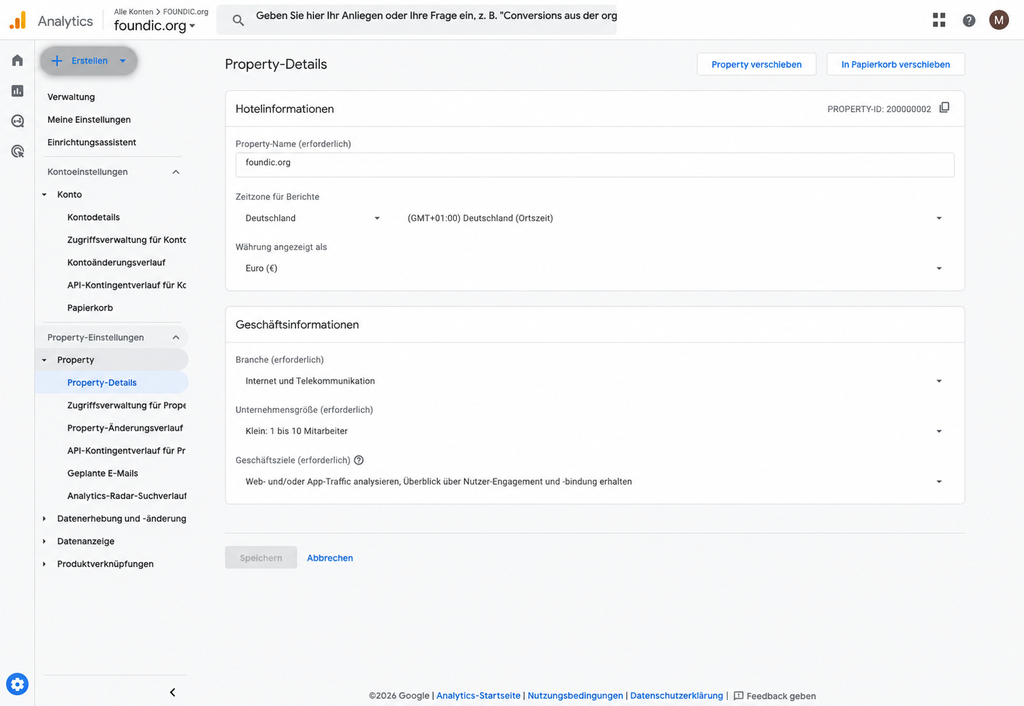
The actual property is created in the second step:
- Property name: foundic.org (or the name of your own website)
- Reporting time zone: United Kingdom → (GMT+00:00) or your local timezone
- Currency: Euro (€) or your local currency
Ulf: “Why set a timezone? GA4 is on the internet.”
Tanja: “Because otherwise GA4 might show you that you had lots of visitors at 3am when it was actually 9am local time. Without the correct timezone, your daily statistics become meaningless.”
→ Click “Next”.
- ✅ Analyse web and/or app traffic capture visitors and traffic sources
- ✅ Get an overview of user engagement and retention which articles are read for how long
Step 3 – Business Information & Goals
Step 3 asks for industry and company size. For an AI news blog: Internet and Telecommunications, Small: 1 to 10 employees.
In step 4, the business objectives, you choose what GA4 should primarily measure. For a content blog, two goals are relevant:
Bernd: “I select all goals. More is more.”
Tanja: “More here is just more fog. The goals determine which reports GA4 shows you first. If you select everything, you get a cockpit full of warning lights but no better orientation.”
→ Click “Create”.
A dialog with the Google Analytics Terms of Service now appears. Important: Select your country in the dropdown at the top of the dialog the GDPR data processing terms checkbox will then appear automatically. Activate this and click “I accept”.
Ulf: “What if I don’t select my country?”
Tanja: “Then the GDPR checkbox is missing. You would have no data processing agreement with Google which is legally problematic in Europe. Always select your country.”
Step 4 – Set Up a Web Data Stream
A data stream is the concrete connection between GA4 and the website. GA4 supports multiple streams per property web, Android app, iOS app. Here we select “Web”.
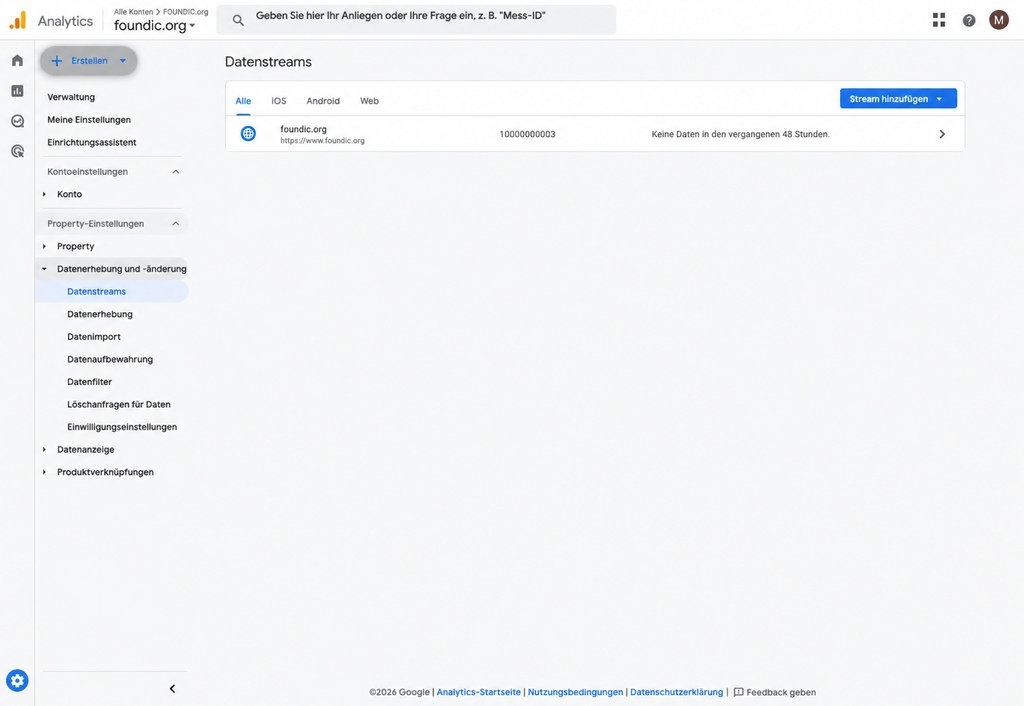
In the form, enter:
- Website URL: https:// + www.foundic.org
- Stream name: foundic.org
- Enhanced measurement: leave enabled
“Enhanced measurement” is one of GA4’s quietest superpowers: it automatically measures page views, scroll events, clicks on external links, and file downloads without needing to create any custom configurations.
Ulf: “Automatically? That almost sounds too good.”
Tanja: “It really is. GA4 recognises these standard actions without any additional setup. That’s one of the big advantages over the old system.”
Bernd: “I disable enhanced measurement. It slows down the page.”
Tanja: “That’s one of those statements that sounds technical but is still wrong. The GA4 code loads asynchronously; on a normal WordPress site, the impact on load time is not where your project fails.”
→ Click “Create and continue”.
The Most Important Information: The Measurement ID
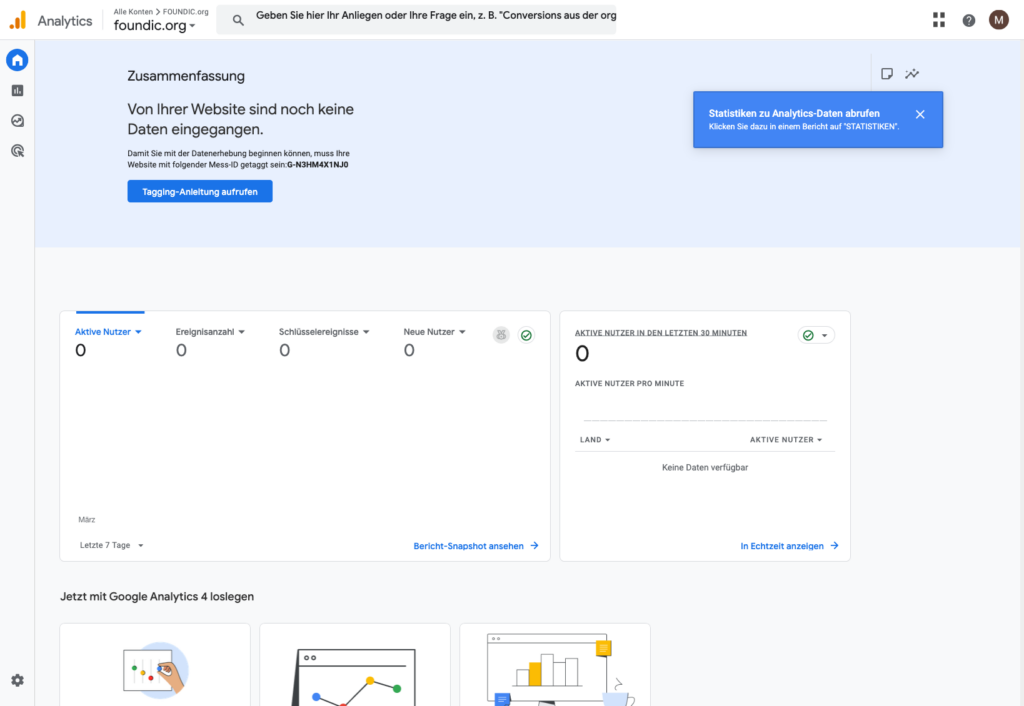
After creation, the stream detail view appears. Here you’ll find the Measurement ID the core of the entire setup:
| Field | Value (Example) |
|---|---|
| Stream name | foundic.org |
| Stream URL | https://www.foundic.org |
| Stream ID | 10000000003 |
| Measurement ID | G-A1B2C3D4E5 |
Note or save: The Measurement ID (format: G-XXXXXXXX) is the unique identifier for this GA4 installation. You’ll need it in WordPress shortly.
Ulf: “G-XXXXXXXX — that’s like a player number on a shirt. So GA4 knows which website is meant?”
Tanja: “Perfect comparison. Without this number, GA4 doesn’t know where the data belongs. Copy it now you’ll need it in a moment.”
Bernd: “I wrote my Measurement ID down somewhere. No idea where.”
Tanja: “You can always find it under GA4 → Admin → Data streams → click on your stream. But: write it down now.”
Privacy tip: Measure first, then tame the data appetite
After setting up the property, it’s worth taking a quick look at the GA4 settings. For a simple blog or small website, the following features are better left disabled:
- GA4 → Admin → Data collection → Google Signals: Disable — Google Signals enables cross-device user identification via logged-in Google accounts and is not required for most websites.
- GA4 → Admin → Data collection → Granular location and device data: Disable — reduces the granularity of collected device data.
- GA4 → Admin → Data sharing → Advertising features: Check whether advertising features are really needed; not necessary for pure analytics purposes.
Google itself points out that these features can be disabled regionally. Less is more here from a privacy perspective.
The GA4 property is set up. Now switch to WordPress.
Practical Check Phase 1
Open your GA4 account and note your Measurement ID. It starts with “G-“. Also check whether Google Signals is disabled in your GA4 settings. You’ll need both for the next step.
Phase 2: The Bridge – Connecting GA4 to WordPress
Ulf is now sitting at the WordPress dashboard. Tanja stands behind him.
Ulf: “I’ve got the Measurement ID now. How do I get it into WordPress? Do I have to enter code somewhere? I’ve never touched code before.”
Tanja: “For most users there’s a much simpler way. The plugin is called Site Kit by Google and you don’t need a single line of code.”
Bernd: “I just copy the tracking code directly into the theme. Two minutes.”
Tanja: “And with the next theme update, your tracking ends up in the digital ditch. Site Kit isn’t glamorous, but it’s built exactly for this: clean integration, central management, fewer things to break.”
There are several ways to integrate the GA4 tracking code into WordPress: manually via code in the theme, via Google Tag Manager (a separate tool for managing tracking scripts), or via a plugin. The easiest and recommended way for most WordPress users is the official plugin Site Kit by Google.
What Is Site Kit and Why Should You Use It?
Site Kit is Google’s official WordPress plugin. It does two things particularly well: it automatically integrates the GA4 tracking code on all pages without having to touch a single line of code. And it displays the most important analytics data directly in the WordPress dashboard, without having to open Google Analytics separately.
A word of warning: Site Kit is powerful, but no cure-all. Anyone running multiple tracking tools simultaneously (GA4 + GTM + Rank Math with analytics code enabled) risks double tracking every visit is then counted multiple times. We’ll come back to this.
Step 5 – Install Site Kit
In the WordPress admin dashboard: Plugins → Add new → Search field: “Site Kit”
The right plugin is called “Site Kit by Google” (developer: Google), has several million active installations, and is regularly updated.
→ Click “Install Now” → “Activate”
Ulf: “How do I know it’s the right plugin? There are so many.”
Tanja: “Developer: Google it says so directly below the plugin name. Plus: several million active installations. No fake plugin has those numbers.”
Step 6 – Connect Site Kit with Your Google Account
After activation, a new menu item “Site Kit” appears in the WordPress sidebar. Click it → “Start setup”.
On the setup page there is a checkbox: “Connect Google Analytics as part of your setup” — activate this. Then: “Sign in with Google”.
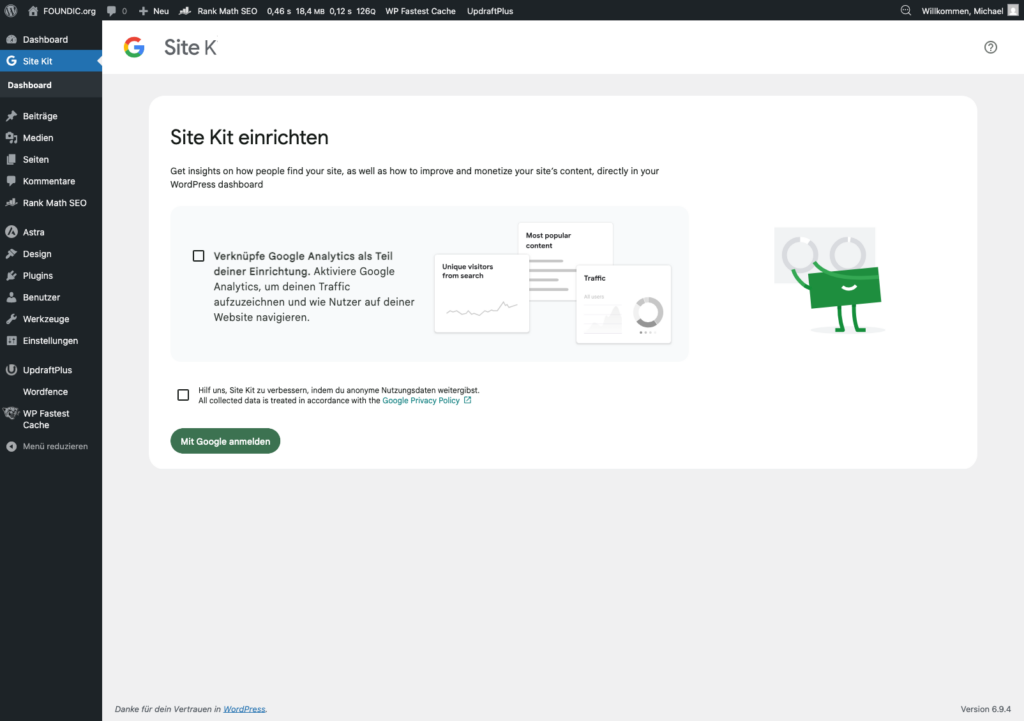
The Google OAuth flow opens a standardised process in which you authenticate once with Google and grant certain permissions:
- ✅ View and download Google Analytics data
- ✅ Retrieve Google Tag Manager containers
- ✅ Retrieve and manage Search Console data
- ✅ Manage sites and domains
→ “Select all” → “Continue”
Bernd: “I decline as many permissions as possible. Data minimisation.”
Tanja: “Data minimisation is good. Wrong minimisation is just sabotage with a clear conscience. Site Kit needs these permissions, otherwise the setup fails or features are missing later.”
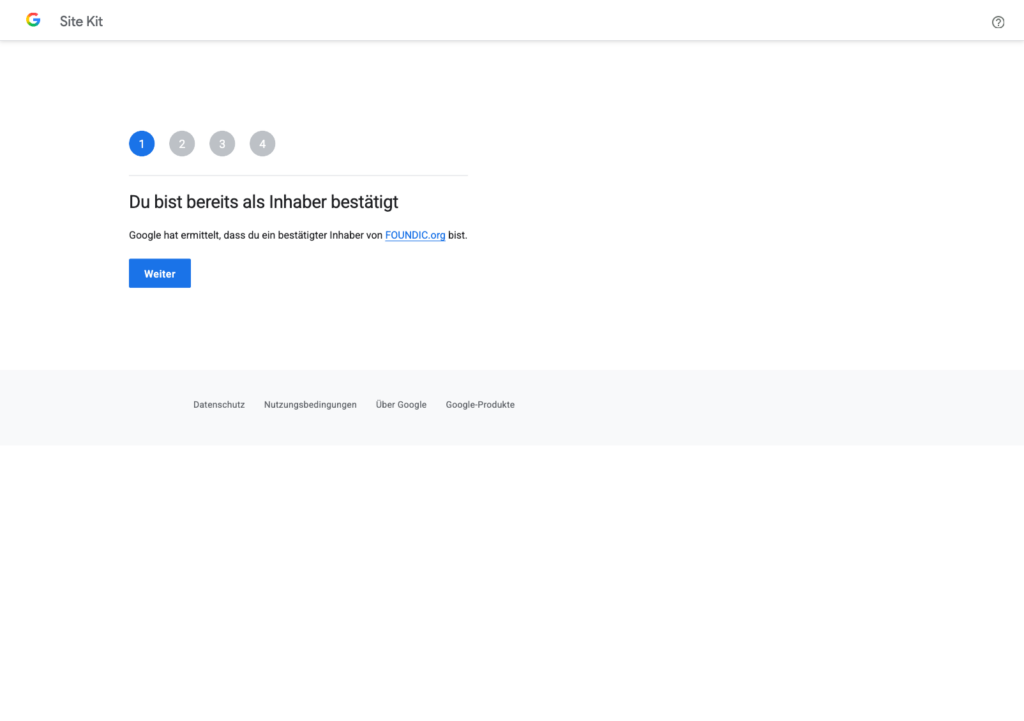
Anyone who has already registered their domain in Search Console will now see a reassuring message:
“You are already verified as the owner. FOUNDIC.org has already been added to Search Console.”
Site Kit has automatically recognised the ownership no manual DNS entry required.
Step 7 – Activate Google Analytics in Site Kit
Site Kit automatically recognises the GA4 property and displays it for confirmation:
| Field | Value |
|---|---|
| Account | FOUNDIC.org |
| Property | foundic.org (200000002) |
| Web data stream | foundic.org (G-A1B2C3D4E5) |
Everything pre-filled, everything correct. → Click “Complete setup”.
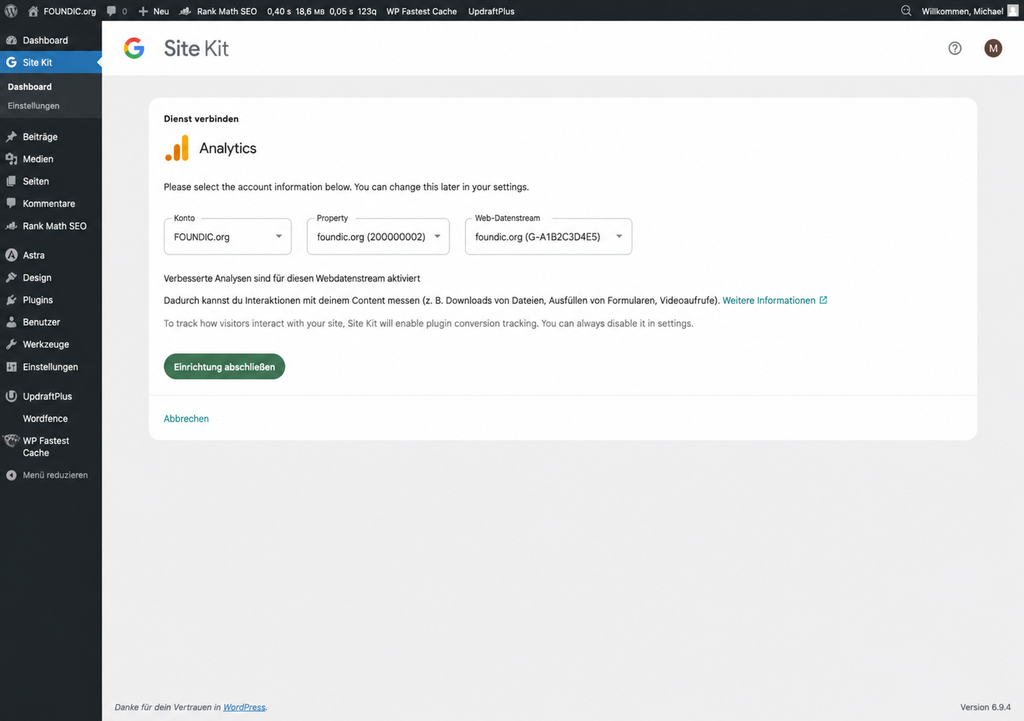
The result: “Congratulations on completing Analytics setup!”
Site Kit has now automatically integrated the GA4 tracking code on all pages of the WordPress website.
Ulf: “That’s it? Just click buttons and Google Analytics is active?”
Tanja: “Almost. Two things are still missing: the admin exclusion so your own page visits don’t skew the statistics and the cookie consent banner. You need that for GDPR compliance.”
Tip: Exclude logged-in users from tracking: Site Kit offers a setting that allows logged-in WordPress users to be excluded from Analytics tracking. This option can be found under Site Kit → Settings → Exclude Analytics → All logged-in users. This is not an automatic GA4 feature and must be activated manually recommended so that your own admin visits don’t skew the statistics.
Practical Check Phase 2
After installation, check: open Site Kit → Settings and activate “Exclude Analytics → All logged-in users”. Then visit your website while logged in and check whether GA4 still shows this visit in the real-time report. It should not appear.
Phase 3: The GDPR Requirement – Setting Up a Cookie Consent Banner
Bernd leans back.
Bernd: “Don’t need a cookie banner. Nobody does it properly anyway.”
Tanja: “Then you’re installing a measuring instrument and forgetting the brake pedal. For analytics cookies, you generally need prior consent in Europe. GDPR and the relevant national legislation aren’t design recommendations.”
Ulf: “TDDDG? What’s that?”
Tanja: “That’s Germany’s Telecommunications Digital Services Data Protection Act from 2024. It supplements the GDPR for the German legal context. Short version: for cookies that aren’t technically necessary and analytics cookies are not you need prior, explicit consent from the user.”
Why a Cookie Banner Is Not Optional
GA4 sets cookies and processes technical information such as browser and device data. IP addresses of EU users are not logged or stored according to Google they are only used briefly to derive approximate location data and then discarded. Nevertheless, processing of user-related data takes place, which includes a transfer to Google servers in the USA.
Under the GDPR (General Data Protection Regulation, EU 2018) and relevant national data protection law, prior, explicit consent from users is generally required for this type of data processing.
For the use of GA4, a cookie consent banner with a genuine opt-out option is therefore typically necessary. The precise legal assessment depends on the individual case if in doubt, legal advice is recommended. One thing is clear: a transparent consent setup is the right approach from both a data protection and a trust perspective.
Step 8 – Install the Complianz Plugin
The plugin of choice is Complianz – GDPR/CCPA Cookie Consent (Version 7.4.5, as of March 2026). It is free, available in multiple languages, specifically developed for European data protection, and automatically scans your website for cookies in use.
In WordPress admin: Plugins → Add new → Search field: “Complianz”
→ “Install Now” → “Activate”
Ulf: “Why Complianz and not some other cookie plugin?”
Tanja: “Complianz specialises in EU data protection, is free, and automatically scans your website for existing cookies. It also has a working integration with Site Kit via the WP Consent API which is technically important so that consent signals are passed on correctly.”
Bernd: “I’ll take the free plugin with the most stars.”
Tanja: “Star ratings tell you whether people like something. Not whether a consent signal passes correctly through the plugin chain. For data protection, architecture matters not applause.”
Important note – role separation and WP Consent API
With the Site Kit + Complianz combination, the division of responsibilities is crucial: Site Kit manages Consent Mode — Google’s mechanism for signal transmission to GA4. If Consent Mode is enabled in Site Kit, Complianz should function exclusively as a cookie banner and CMP (Consent Management Platform). Multiple parallel Consent Mode implementations can create conflicts.
According to Site Kit documentation, Site Kit automatically checks whether the free WP Consent API plugin is installed and actively prompts for installation if needed WP Consent API is the technical bridge through which Complianz passes its consent signals to Site Kit.
If Site Kit points to WP Consent API: Plugins → Add new → Search: “WP Consent API” → install and activate.
After setup, check these three points:
- Site Kit → Settings: Is Consent Mode active?
- Site Kit → Settings: Is WP Consent API recognised?
- Complianz → Settings → Integrations: Is Site Kit shown as correctly connected?
Step 8.1 – Wizard: Privacy Law & Visitors
The Complianz wizard guides you through 8 steps. In the first:
- Privacy law: European Union (GDPR) ✅
- Germany/Austria/Belgium/Spain: Yes
- Login access for visitors: No
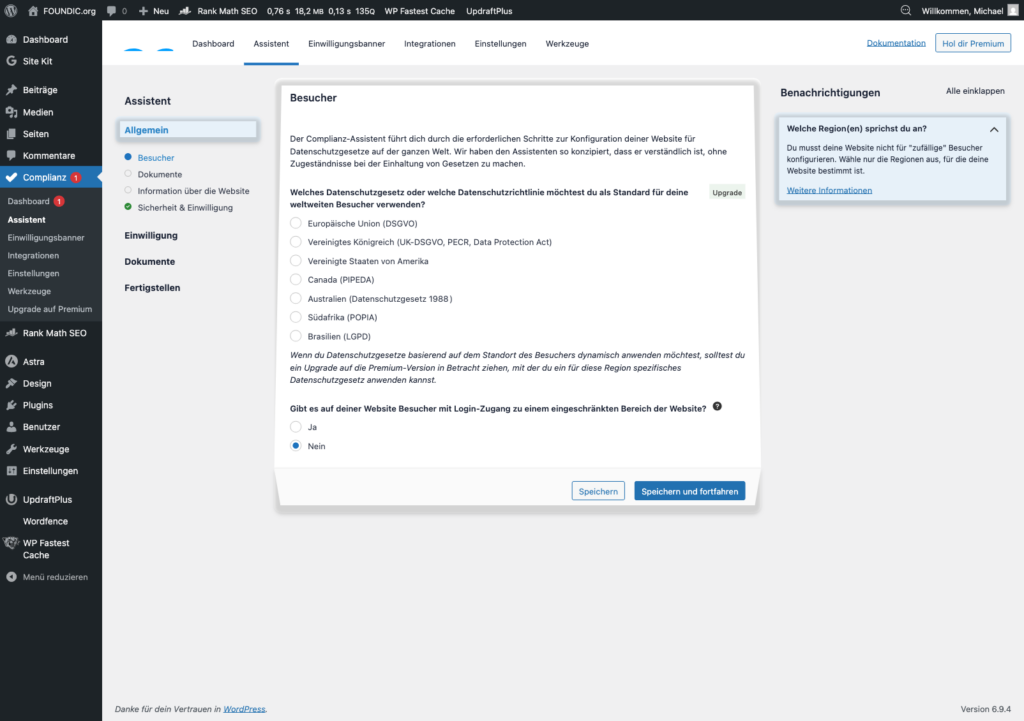
→ “Save and continue”
Ulf: “What happens if I select the wrong privacy law?”
Tanja: “Then Complianz generates the wrong legal documents and the banner doesn’t meet your local requirements. For a website targeting EU users: always select GDPR.”
Step 8.2 – Wizard: Documents
Complianz automatically generates legal documents:
- Cookie policy: Generated with Complianz ✅
- Privacy policy: Existing page → select existing privacy page from the dropdown
- Impressum / Legal notice: Existing page → select legal notice page
- Disclaimer: None
→ “Save and continue”
Step 8.3 – Wizard: Website Information
- Owner: Full name
- Country: Your country
- Privacy email: Contact email addressNote: The address is a required field for the automatically generated cookie policy. It can be added at any time under Complianz → Wizard → Website information.
Step 8.4 – Wizard: Website Scan
Complianz automatically scans the website for cookies in use. The result for foundic.org: “The scan found 17 cookie(s) on your domain.”
→ “Continue”
Ulf: “17 cookies? I haven’t configured anything.”
Tanja: “WordPress itself, embedded fonts, comment functionality all of this can generate cookies. Complianz finds them all and categorises them. That’s why the automatic scan is so valuable.”
Bernd: “I just write ‘We use cookies’ in the footer. That’s enough.”
Tanja: “No, it isn’t. GDPR requires informed consent before processing. A notice in the footer is not consent.”
Step 8.5 – Wizard: Statistics & GA4 Integration
- Do you create statistics? Yes, with Google Analytics ✅
- GDPR settings:
- ✅ I have accepted the Google data processing amendment
- ✅ Google is not allowed to use this data for other Google servicesNote on IP anonymisation: In GA4, IP anonymisation is always active by default no additional setting required.
→ “Save and continue”
Step 8.6 – Wizard: Services, Plugins & Finish
- Google Fonts: Yes → self-host: Yes (recommended) prevents unnecessary data transfer to Google
- WordPress comments: Yes (if the comment function is used)
- Plugin detection: Complianz automatically finds Site Kit and Google Analytics
In the last step of the wizard: - Show consent banner: Yes ✅
- Enable cookie and script blocker: Yes ✅
→ “Finish”
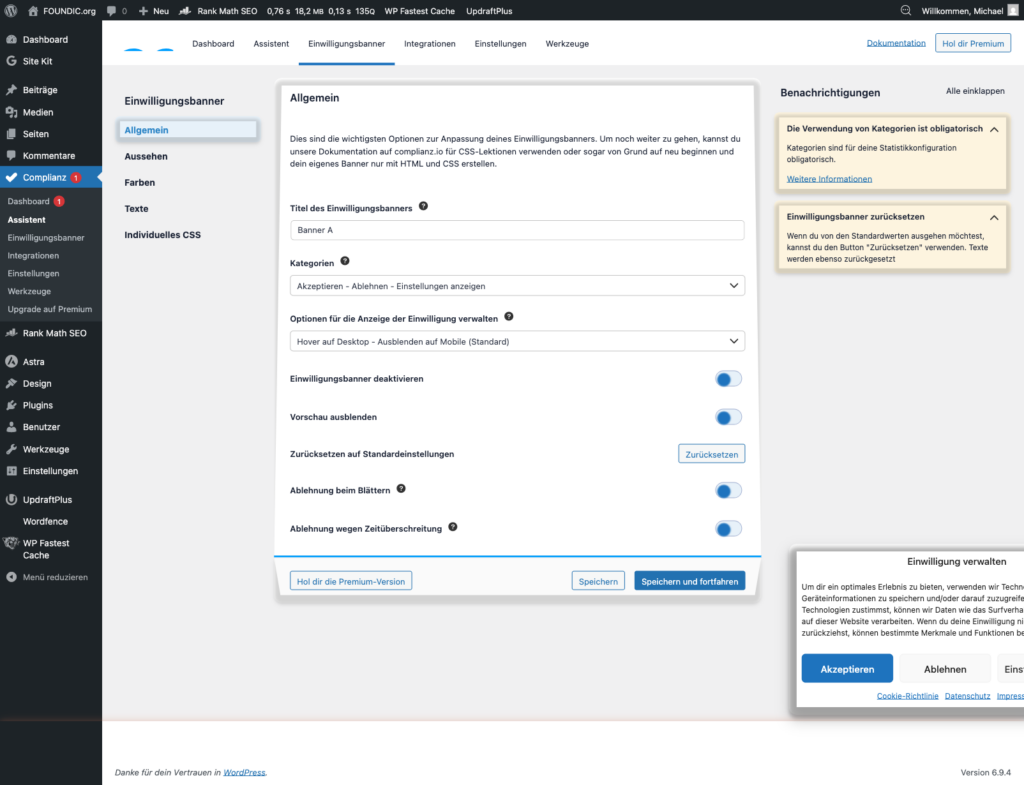
Result: The cookie consent banner is now live on the website. On first visit, it appears to every new user with genuine choices: Accept, Decline, Settings.
Ulf: “‘Enable cookie and script blocker’ what does that do exactly?”
Tanja: “That’s the real core of it. The script blocker prevents GA4 from loading before the user has consented. Without it, GA4 would start immediately on page load which would be unlawful. With the script blocker enabled, GA4 only starts after ‘Accept’.”
Basic vs. Advanced Consent Mode – which variant applies here?
This guide targets a conservative Basic Consent Mode configuration: Google Analytics only loads after the user has consented to the statistics category. GA4 tracking therefore only starts after “Accept” not before.
With Advanced Consent Mode, Google tags can load before consent and send so-called cookieless pings to Google upon refusal signals without an analytics cookie, but not without data protection relevance. Anyone using this variant should choose it consciously, verify it technically, and explain it transparently in their privacy policy.
Practical Check Phase 3
Open your website in a private browser window (without being logged in) and check: does the cookie banner appear? Can you decline it? Reload the page after declining and check in the browser developer tools (F12 → Network) whether a request to google-analytics.com is sent. It must not appear.
Phase 4: Privacy Policy & First Functional Test
Tanja types something on her laptop. Ulf watches her.
Ulf: “Complianz has set up a banner. Am I done now?”
Tanja: “Almost. The privacy policy still needs to be updated. Users have the right to know what you’re doing with their data this must be explicitly stated in the privacy policy.”
Bernd: “I have a privacy policy from three years ago. That’s probably still fine.”
Tanja: “If you’ve newly set up GA4, it needs to go in. A three-year-old privacy policy is like a street map before the new bypass was built: nicely folded, but wrong at the crucial point.”
Step 9 – Update the Privacy Policy
The website’s privacy policy must contain a complete section about Google Analytics. This should inform about:
- What is being measured (page views, dwell time, traffic sources)
- Who processes the data: Google Ireland Limited, Gordon House, 4 Barrow St, Dublin, D04 E5W5, Ireland
- Legal basis: Art. 6(1)(a) GDPR (consent)
- Measurement ID of the property
- IP anonymisation: active
- How users can object (via the cookie banner)
Complianz generates this text automatically:
- In WordPress admin, navigate to Pages and open the privacy page
- Insert the Gutenberg block “Complianz Privacy Statement” in the appropriate place it updates automatically with future changes
- Alternatively: manually copy the text generated by Complianz from Complianz → Documents → Privacy Statement
Ulf: “Complianz writes that automatically? Don’t I have to formulate it myself?”
Tanja: “Complianz generates a legally compliant text block based on your settings in the wizard. That’s a good starting point. If in doubt, a legal review is recommended Complianz is not a lawyer and cannot replace legal advice.”
Step 10 — Test Tracking: The Moment of Truth
- Open analytics.google.com → select property → “Reports” → “Realtime”
- Open a different browser or use an incognito window. Background: while Site Kit does offer the option under Settings → Exclude Analytics → All logged-in users to exclude logged-in WordPress users from tracking, a separate browser window is the safest method for the first test.
- Visit the website
- Click “Accept” in the cookie banner
- In the GA4 real-time report, after a few seconds: “1 user in the last 30 minutes”
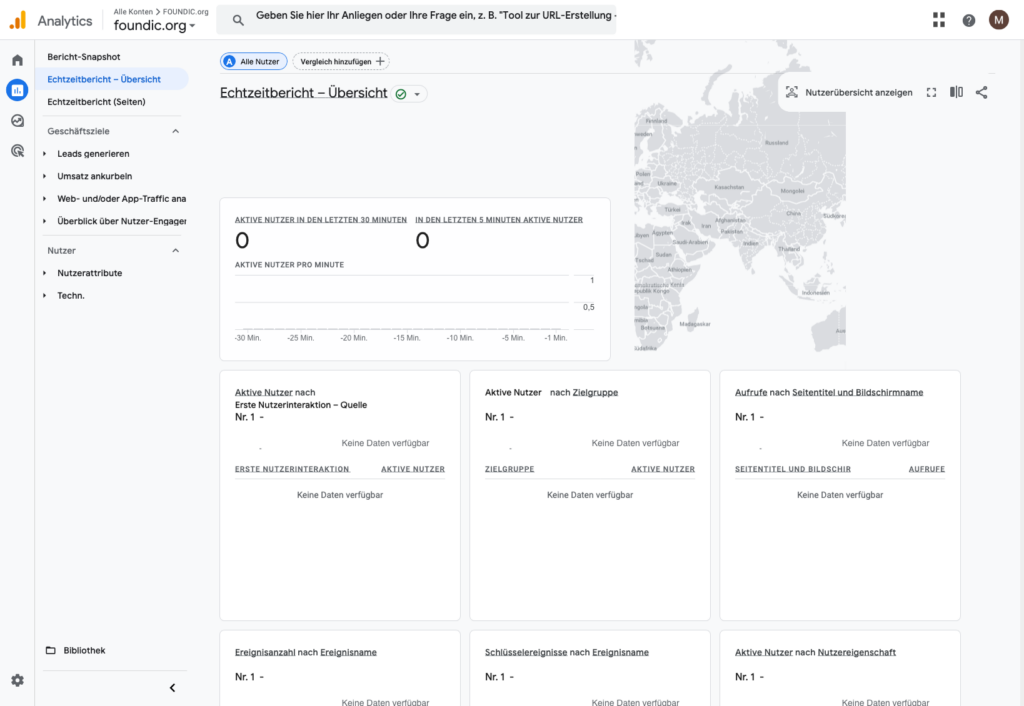
Ulf: “I can see myself in Google Analytics. That’s somehow strange.”
Tanja: “Welcome to web analytics. This real-time feedback shows you that everything is working.”
Second test: what happens when you decline?
- Delete cookies or open a new incognito window
- Visit the website
- Click “Decline” in the cookie banner
- Check in GA4 under Admin → DebugView or in the real-time report: no GA4 page view should appear
- Optional: open browser developer tools (F12 → “Network” tab) and check that no request to google-analytics.com is sent
If a GA4 event appears despite declining, there is a configuration error. Common causes: the cookie and script blocker in Complianz is not enabled, WP Consent API is missing, or a second plugin is loading GA4 without a consent check.
Bernd: “GA4 is still showing data after I declined. Is that normal?”
Tanja: “No, that’s an error. Either the Complianz script blocker isn’t active, or another plugin such as Rank Math with analytics code enabled is sending GA4 data without a consent check. That needs to be fixed.”
Practical Check Phase 4
Carry out both tests: accept once, decline once. Document the result in the GA4 real-time report. If the decline test shows a GA4 event, refer to the troubleshooting table at the end of this article.
Bonus: Rank Math Analytics – Google Data Directly in WordPress
Tanja points to the Rank Math menu item in the WordPress sidebar.
Tanja: “If you use Rank Math as your SEO plugin, there’s a handy bonus feature: you can display GA4 data and Search Console data combined directly in the WordPress dashboard. Without switching a single tab.”
Ulf: “Sounds good. Just enable it?”
Tanja: “Almost but there’s one critical trap I’ll show you in a moment.”
Anyone using the Rank Math SEO plugin can display GA4 data and Google Search Console data combined directly in the WordPress dashboard.
1. Activate the Analytics module:
Rank Math → Dashboard → “Modules” tab → activate the “Analytics” module
2. Connect with Google:
Click “Connect Google” → complete the OAuth flow
3. Configure data sources:
| Setting | Value |
|---|---|
| Search Console | sc-domain:foundic.org |
| Google Analytics Account | FOUNDIC.org (100000001) |
| Google Analytics Property | foundic.org (200000002) |
| Google Analytics Data Stream | foundic.org (10000000003) |
| Install Analytics code | OFF |
The last point is critical: “Install Analytics code” must remain deactivated. Site Kit already integrates the GA4 code. Double tracking systematically distorts data.
Ulf: “And if I don’t deactivate it?”
Tanja: “Then every page view is counted twice. Your visitor numbers appear twice as high as they really are. This distorts every decision you make based on that data.”
Bernd: “Double data means twice as much information.”
Tanja: “No. Double noise is still noise. You’re not seeing visitors you’re seeing ghosts with page views.”
→ “Save changes”
Practical Check Bonus
Open Rank Math → Analytics → Settings and check whether “Install Analytics code” is set to OFF. If you’ve just connected Rank Math, test again in the real-time report: one page view must only appear once.
What Now? Maintenance & Ongoing Operation
Ulf leans back and crosses his arms.
Ulf: “Done. I’m never touching this again.”
Tanja: “I understand the impulse. But a few maintenance tasks remain otherwise your clean setup can break down over time.”
Plugin updates: Update Site Kit, Complianz, and WP Consent API regularly. Consent technology doesn’t age dramatically, but it collects dust faster than you’d think.
Review the privacy policy: Every new external tool is a new guest in the engine room. If a service appears, the privacy policy needs to follow.
Keep an eye on Consent Mode v2: The division of roles remains central: Site Kit manages Consent Mode technically, Complianz delivers consent signals as CMP, WP Consent API is the bridge. The three control questions remain: Consent Mode active? WP Consent API recognised? Complianz integration connected?
Learn to accept data loss: Many users decline tracking cookies depending on target group, banner design, and trust in the brand, sometimes very many. GA4 data therefore doesn’t reflect the whole reality, but only a cross-section. Anyone needing more complete or independent data should look into server-side tracking or an alternative like Matomo in cookieless mode.
Ulf: “75 percent decline? That means I only see a quarter of my visitors?”
Tanja: “Roughly. That’s why GA4 numbers are important for trends and comparisons — but not absolute truths. You see the pattern, not the complete reality.”
Bernd: “I’ll just disable the decline button. Then everyone has to accept.”
Tanja: “That’s unlawful. A genuine opt-out option is mandatory. Anyone without a decline button risks fines.”
When Something Goes Wrong – Troubleshooting
| Problem | Possible cause | Solution |
|---|---|---|
| Real-time report shows 0 users during test | Test in logged-in WP admin browser | Use incognito window or different browser |
| Logged-in admins appear in GA4 data | Site Kit exclusion not enabled | Site Kit → Settings → Exclude Analytics → All logged-in users: activate |
| GA4 has shown no data for hours | Normal delay | GA4 reports have 24–48h delay; only the real-time report is immediate |
| Nothing appears in real-time report even though cookie was accepted | Cookie banner hasn’t released GA4 | Complianz → Settings → Services: check whether GA4 is assigned to the “Statistics” category |
| Consent signals not being forwarded to GA4 | WP Consent API missing | Install WP Consent API plugin; check in Complianz under Settings → Integrations |
| Data is being counted twice | Rank Math has “Install Analytics code” enabled | Rank Math → Analytics → Settings → “Install Analytics code” to OFF |
| Site Kit can’t find the property | Wrong Google account linked | Site Kit → Settings → disconnect Google account and reconnect |
| Cookie banner doesn’t appear on the website | Complianz not fully configured | Complete the Complianz wizard; check whether banner display is set to “Yes” |
| GA4 shows unusually high visitor numbers | Double tracking via multiple plugins | Check whether GTM, Rank Math, and Site Kit are all loading the GA4 code simultaneously |
| Privacy policy link missing in cookie banner | Complianz assigned wrong page | Complianz → Wizard → Documents → reassign privacy page |
Result: The Complete Setup at a Glance
| Component | Status | Details |
|---|---|---|
| GA4 Property | ✅ | Account and property created, timezone set, currency configured |
| Measurement ID | ✅ | Format G-XXXXXXXX, stored in the data stream |
| Site Kit by Google | ✅ | Installed, activated, GA4 code automatically on all pages |
| Admin exclusion | ✅ | Site Kit → Exclude Analytics → All logged-in users: activated |
| Cookie consent banner | ✅ | Complianz, GDPR-compliant, genuine choice for users |
| WP Consent API | ✅ (if needed) | Ensures correct consent signal forwarding between Site Kit and Complianz |
| Cookie policy | ✅ | Automatically generated by Complianz |
| Privacy policy | ✅ | GA4 section with all relevant information added |
| Tracking test | ✅ | GA4 real-time report confirmed, cookie banner live tested |
| Rank Math Analytics | ✅ (optional) | GA4 + Search Console in WP dashboard, no double tracking |
Outlook: Whose Data Is This, Anyway?
Ulf looks at his GA4 interface. Then at Tanja.
Ulf: “Tanja I’m just wondering: this data technically belongs to Google. Or to me?”
Tanja: “Formally to you. Practically, you’re transferring it to a US corporation with its own interests. That’s the trade-off behind ‘free’.”
Google Analytics 4 is impressively powerful, free, and sufficient for most websites. But the deeper you go into the topic, the louder one question becomes: whose data is this, anyway?
Formally, visitor data belongs to the website operator. In practice, however, you are transmitting it to a US corporation with its own interests. Data protection authorities in several EU countries have at times declared GA use unlawful. Activist Max Schrems and his organisation noyb have already announced legal action before the ECJ against the current legal basis the EU-US Data Privacy Framework. The ruling could overturn the situation again.
Ulf: “What happens to my data if the court rules against GA4?”
Tanja: “That’s exactly the right question. You might then have to shut down GA4 and switch to a privacy-compliant alternative. That’s why it’s worth knowing the alternatives.”
Bernd: “I’ll just keep using GA4. Until someone catches me.”
Tanja: “That’s not a data protection strategy.”
Alternatives:
- Matomo open source, self-hostable, 100% data ownership, no cookie consent required (in cookieless mode)
- Plausible Analytics EU-hosted, lightweight, cookie-free, no consent banner required
- Piwik PRO enterprise alternative, GDPR-centric, paid from €35/month as of February 2026
Setting up GA4 on WordPress is no longer a feat of bravery. The harder decision comes afterwards: how much do you want to know about your visitors and who do you give a seat at the table for that?
That question has no universal answer. But anyone who doesn’t ask it is doing analytics like Bernd: with plenty of opinion and not much measurement.
Ulf: “I’ll ask it.”
Tanja: “Then the most important step is already done.”
What can be done with these numbers is shown with a concrete example in „Buy Us a Coffee“ – How to Set Up a Ko-fi Donation Button in WordPress: A Step-by-Step Guide.
FOUNDIC.org is ad-free and has no paywall. If this guide helped you:  Treat us to a coffee