
Do you want to create your own website with WordPress? In this guide, I show you how I built foundic.org with self-hosted WordPress – without a website builder, without an agency, and with full control over content, data, and costs.
This guide is designed for everyone who:
- Wants to operate WordPress independently
- Values data protection (GDPR), security, and sustainability
- Wants to expand their website long-term (blog, projects, downloads, forms)
To make this guide more understandable, three people will accompany you:
The competent IT colleague, the self-proclaimed expert, and the honest beginner. These three perspectives help you recognize typical pitfalls and really understand WordPress.
Tanja is the IT expert in this story. She knows how WordPress works, explains patiently and in a structured way – and doesn’t let herself be thrown off by bad advice. If you have a question, Tanja has the answer.
Bernd is the self-proclaimed “expert” who knows everything better – and is usually wrong. His abbreviations and half-knowledge regularly lead to problems. He stands for all the dangerous myths and bad practices you should avoid.
Ulf is the learner, just like you. He asks the questions swirling in your head, and sometimes needs a comparison from everyday life to understand IT. If Ulf doesn’t understand something, that’s completely okay – that’s what Tanja is there for.
And… Action!
Tanja: “Okay, today we’re setting up a WordPress website. From zero to live.”
Bernd: “WordPress? That’s just this free blogging stuff, right? I can install it in five minutes.”
Ulf: “I heard that’s complicated. Don’t you need like… servers and databases?”
Tanja: “Exactly the right attitude, Ulf. Yes, we need some technical basics. But don’t panic – we’ll go through it step by step. And Bernd: if you’re done in five minutes, you’ve definitely missed something.”
1 Why WordPress?
Bernd: “Why not just use Wix? You can click something together and you’re done.”
Tanja: “Because with Wix.com you’re living in a rental apartment. With WordPress, you own the house.”
And that’s not a marketing slogan. WordPress is not without reason the most widely used content management system in the world. According to current market analyses, over 40% of all websites run on WordPress. It’s both beginner-friendly and scalable in the long term.
Compared to other content management systems like Joomla (more complex operation for beginners) or TYPO3 (better suited for large enterprise projects), WordPress stands out primarily with by far the largest community and the most extensive selection of plugins.
Ulf: “Plugins? What are those?”
Tanja: “Think of plugins as tools in your toolbox. You have a basic set – your website. And then you add tools: a spam filter, a backup tool, a search engine optimization kit. Each plugin serves a specific purpose.”
This extensibility is exactly what makes the difference. While website builders like Wix or Squarespace impress with their intuitive drag-and-drop interface, they quickly reach their limits when it comes to search engine optimization and custom functions. WordPress offers exactly the right mix of high flexibility and good usability.
WordPress.org is ideal if you:
- Want to maintain content easily yourself in the future
- Want to expand the website flexibly (subpages, forms, downloads)
- Want to stay independent of website builder providers
- Are looking for a professional and cost-effective solution
The advantages over subscription-based website builders are evident in three areas:
- Separation of content and design: Themes can be changed anytime – like changing wallpaper without having to buy new furniture
- Large plugin selection: SEO, security, performance, shop
- Full data ownership: Your own database, your own server
Bernd: “But with Wix I only pay 15 euros per month.”
Tanja: “Yes, as long as you stay with them. Try moving your content sometime. Good luck with that. With WordPress you pay for hosting – about 5 to 10 euros per month – and keep everything under control.”
That’s exactly the point: As an open-source CMS, WordPress runs on many hosts and can be easily moved if needed. In the long run, you essentially only have costs for hosting and domain.
Ulf: “Understood. But where do I actually start?”
Tanja: “Good question. I’ll show you 5 steps to keep you on track:”
- Choose the right WordPress platform
- Install WordPress manually
- Set up basic pages & design
- Structure and publish content
- Set up additional plugins and tools
2 Choosing the Right WordPress Platform
Ulf: “Wait. There are different versions of WordPress?”
Tanja: “Two main variants. WordPress.com and WordPress.org. The difference is huge.”
2.1 WordPress.com vs. WordPress.org
Free platforms like WordPress.com enable quick entry without technical knowledge. Advantages:
- Quick start without technical effort
- Hosting included
Disadvantages:
- Severely limited design and functionality options
- Little control over plugins, SEO, and data
- Risk: Account suspension or deletion possible
Bernd: “Sounds great. Easy, fast, free.”
Tanja: “Until WordPress.com takes your site offline because you violated some terms of service. Or until you realize you can’t install plugins. Then you’re trapped.”
In contrast, WordPress.org (self-hosted) offers: Advantages:
- The “real” WordPress with full control
- Free choice of themes, plugins, and settings
- You decide what happens
Disadvantages:
- Your own responsibility for updates, security, and backups
- Requires own web hosting (paid)
Conclusion: If you want to operate your website long-term or expand it, WordPress.org is by far the more sustainable solution.
Ulf: “Okay, I want control. But what is hosting?”
Tanja: “Hosting is the storage space where your website lives. Imagine your website is a house. Hosting is the land it stands on.”
2.2 Hosting Options
There are two hosting models:
Classic Web Hosting:
- Full control
- Inexpensive
- Technical responsibility lies with you
Managed WordPress Hosting:
- Updates, backups, security included
- Less technical effort
- Higher costs and sometimes limited configuration freedom
Bernd: “Managed sounds relaxing.”
Tanja: “Yes, but you pay three to five times as much. And for beginners, classic hosting is completely sufficient.”
I chose classic web hosting with STRATO because my domain was already there. It’s not necessarily the “best” host, but the most pragmatic solution for my purposes without the hassle of migrating.
3 Installing WordPress Manually
Ulf: “Manually? Isn’t there a ‘1-Click Installer’?”
Tanja: “There is. We’re not using it though.”
Bernd: “Why not? That’s much faster!”
Tanja: “Because then you don’t understand what’s happening. If something goes wrong later, you’re standing there and don’t know where to start. We’re doing it right – once, from scratch.”
I deliberately skip “1-Click installations” offered by some hosting providers to:
- Completely understand file permissions and structure
- Maintain maximum control over security and updates
- Be able to migrate easily later
Before you can install WordPress, you need a domain (your web address). You can buy the domain together with a hosting package from many providers.
Technical minimum requirements to choose the right package from your web host:
- PHP version: At least 7.4, better 8.2 or higher for maximum speed and security
- Database: MySQL version 8.0 or MariaDB version 10.6 or higher
- Memory (PHP Memory Limit): At least 256 MB so even extensive plugins run smoothly
Almost all modern web hosts meet these requirements. The following installation process (corresponds to the official WordPress standard):
- Create database: Create SQL database (e.g. MariaDB) in host control panel
- Download WordPress: Download current package from WordPress.org
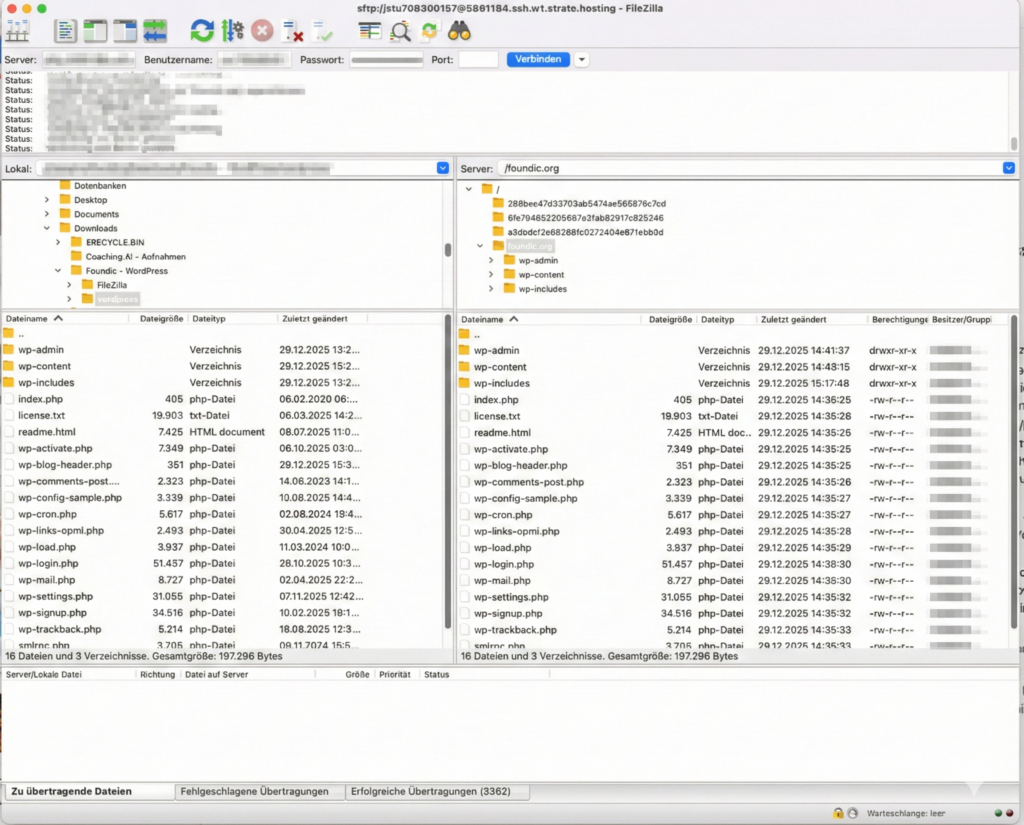
- Upload WordPress (FTP): Upload files to server with FileZilla
- Install WordPress: Follow installation wizard in browser
- Increase security: Install plugins like Wordfence
3.1 Creating a Database
Ulf: “Database? Sounds like IT basement stuff.”
Tanja: “A database is like a digital filing cabinet system. Your website stores all posts, comments, and settings there. Without a database, no WordPress website.”
Here’s how you do it:
- Log in to your hosting provider
- Create SQL database (e.g. MariaDB 10)
- Note the access credentials: Database name, Username, Password, Database Server / Host
Important: Write down these credentials. You’ll need them later during installation.

3.2 Download WordPress
Bernd: “Can’t I just download WordPress from somewhere?”
Tanja: “You can. But then you risk downloading a manipulated version. Always go to the official source.”
Here’s how you do it:
- Official source: WordPress.org
- Download the ZIP file via “Get WordPress”
- Unzip the ZIP file locally on your computer
Important: Only download from the official source to get clean original files and avoid manipulated files.
3.3 Uploading WordPress (FTP)
Ulf: “FTP? What’s that again?”
Tanja: “File Transfer Protocol. A way to push files from your computer to the server. Imagine you’re sending a moving truck with furniture from your house to another house. FTP is the moving truck.”
Here’s how you do it:
- Get FTP credentials from your hosting provider portal, e.g. under SFTP & SSH with STRATO
- Server / Host (must be “sftp://” in FileZilla before server)
- Port
- Username
- Password
- Activate SFTP access for secure upload
Install FTP client (e.g. FileZilla):
- Download FileZilla client for free (for macOS, Windows, or Linux)
- Create target directory: Create a new folder in the server’s root directory (e.g. /foundic/)
- So your domain can point directly to this directory later
- In FileZilla: Right-click → “Create directory”
- Upload all unzipped WordPress files: Drag and drop all unzipped WordPress files into the new folder
- Duration: approx. 3-10 minutes depending on connection
- Check structure: Your directory should now contain: /wp-admin/, /wp-content/, /wp-includes/, files like index.php, wp-login.php, wp-config-sample.php
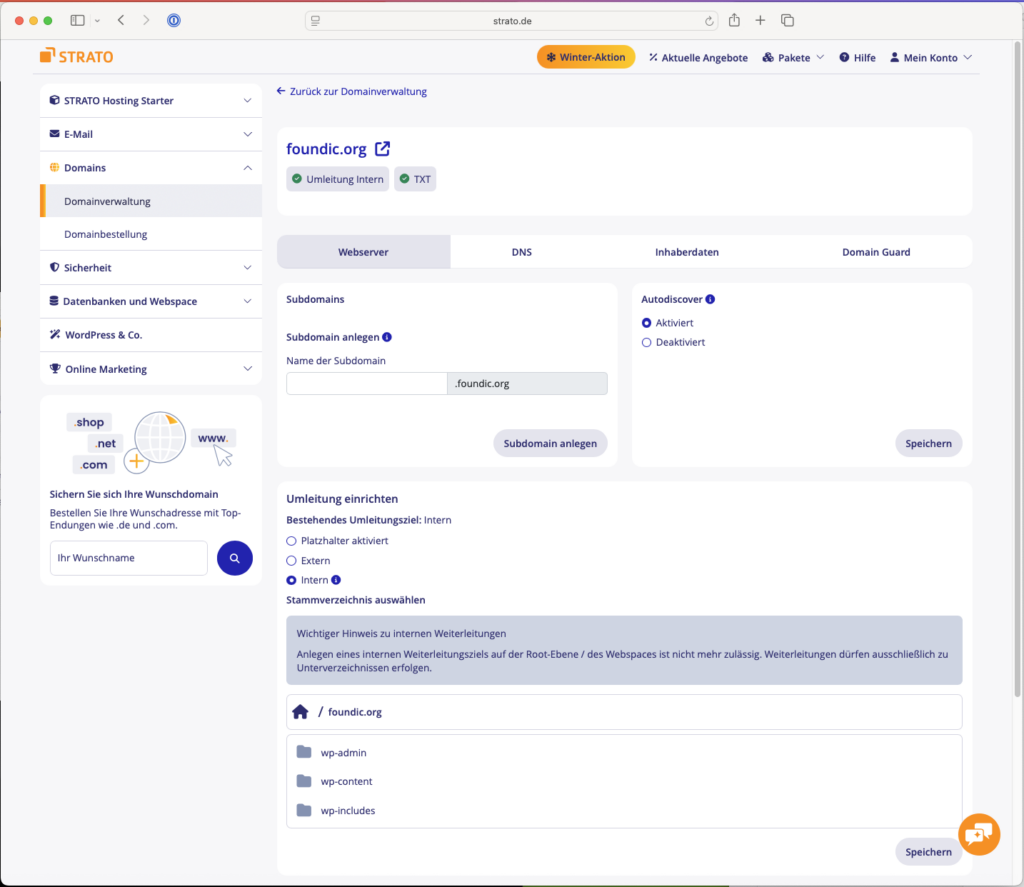
Connect domain: In domain management, set domain to root directory. With STRATO: Package management → Domains → Select domain → “Manage”. Under “Domain target” switch to “Internal”. Enter path: /foundic/ (your created folder). Save – your domain now points to your WordPress directory.
If the installation wizard gets stuck: You can manually rename the file wp-config-sample.php to wp-config.php and enter your database data directly there before uploading it via FTP.
3.4 Installing WordPress
Tanja: “Now comes the relaxing part. WordPress does the rest almost automatically.”
Bernd: “Couldn’t we have done that right away?”
Tanja: “Bernd, we just laid the foundation. Now comes the interior finishing.”
Here’s how you do it:
- Open your browser and go to your domain (e.g. https://foundic.org)
- The installation wizard starts automatically
- Select the language
- Enter the database credentials from Step 1
- Create a new WordPress admin user
- Security note: Use a new, strong password
- Log in for the first time via https://your-domain.de/wp-login.php
First settings after installation
Check updates: Dashboard → Updates: Check if WordPress and plugins are up to date
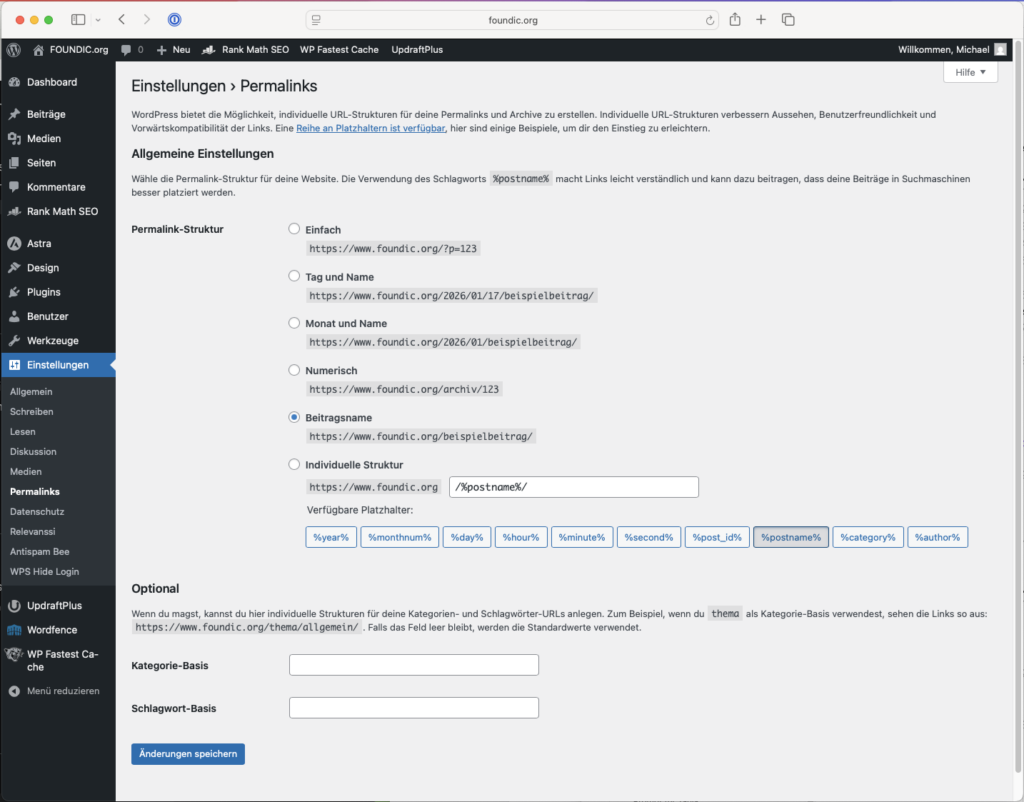
Optimize permalinks: Settings → Permalinks → Select “Post name”. Better readability for visitors. Improves SEO (search engine optimization)
Ulf: “Permalinks? What’s that?”
Tanja: “The URLs of your posts. By default it looks like this: your-site.de/?p=123. With permalinks it becomes: your-site.de/my-first-post. Much more readable, better for Google.”
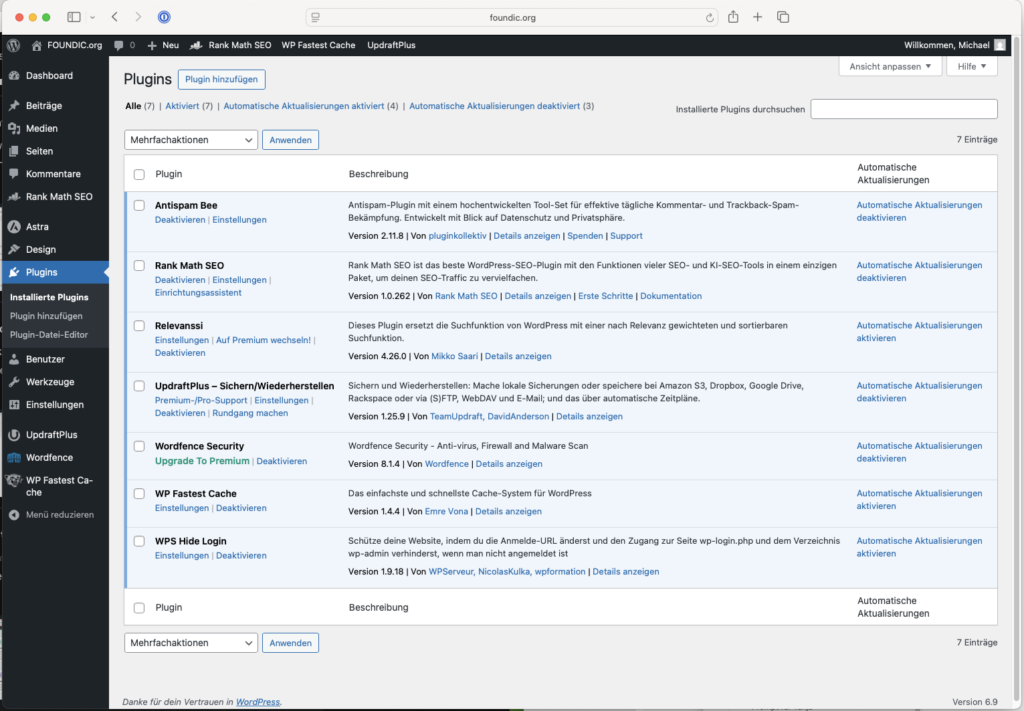
Remove unnecessary plugins: Plugins → Disable and delete: “Hello Dolly”, “Akismet” (if not needed). The fewer plugins, the faster and more secure.
Set public name: Users → Your profile → Enter nickname → Select as “Public name”
3.5 Increase Security
Bernd: “Security? Who wants to hack my website?”
Tanja: “Nobody personally. But there are automated bots that scan thousands of WordPress sites daily and try to log in. If you don’t take security precautions, you’re an easy target.”
Here’s how you do it:
Install “Wordfence Security” plugin:
- Install and activate plugin
- Free license at wordfence.com
- Set Brute-Force Protection in free version to 100%
Ulf: “Brute-Force? Sounds like a burglar.”
Tanja: “It is. Brute-Force means: A bot tries thousands of passwords until it gets in. Wordfence blocks such attempts.”
Install “UpdraftPlus” plugin for backups:
- Install and activate plugin
- Settings → Choose schedule and storage location (e.g. Google Drive)
Install “Antispam Bee” plugin: Privacy-friendly, local spam solution (no data transfer to USA)
My settings:
- Only allow comments in German and English
- Automatically delete spam after 30 days
- Activate spam counter in dashboard
Install “WPS Hide Login” plugin: Changes the standard login URL from /wp-login.php to a custom URL (e.g. /my-secret-login). Settings → General → WPS Hide Login
Bernd: “Why hide the login URL?”
Tanja: “Because every bot knows that WordPress sites are reachable under /wp-login.php. If you change the URL, most attacks go nowhere.”
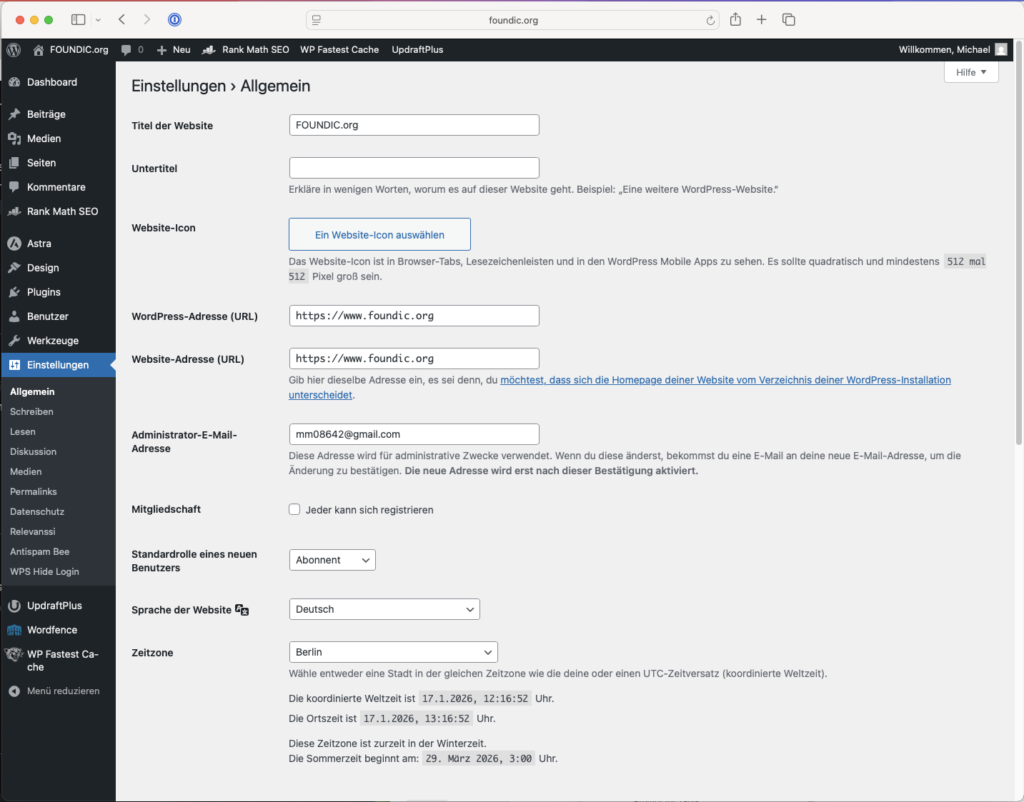
Check HTTPS: Settings → General: Make sure both URLs start with https://: WordPress address (URL), Website address (URL).
4 Setting Up Basic Pages & Design
Tanja: “Technology is in place. Now comes the look.”
Ulf: “Finally! I want it to look good.”
Bernd: “I’ll just take some random theme. They’re all the same anyway.”
Tanja: “Wrong. There are themes that are fast, clean, and customizable. And there are themes that are bloated with unnecessary code, slow down your site, and are a nightmare when you want to change something.”
I use the Astra theme because it’s fast and extremely customizable.
The first pages:
- Choose the design (theme): Install and configure Astra theme GDPR-compliant
- Create mandatory legal pages: Create imprint and privacy policy
- Remove “test data”: from WordPress
4.1 Choosing the Design (Theme)
Install theme: Design → Themes → Add theme → Search “Astra” → Install and activate
My Astra settings:
| Category | Setting | Value |
| Colors | Accent / Headings | #111827 (Noble Black) |
| Colors | Links | #2563EB (Modern Blue), #1D4ED8 (slightly stronger blue) |
| Background | Website background | #F5F6F7 (Light Gray) |
| Typography | Headings | Inter, Sans-Serif (Weight 800) |
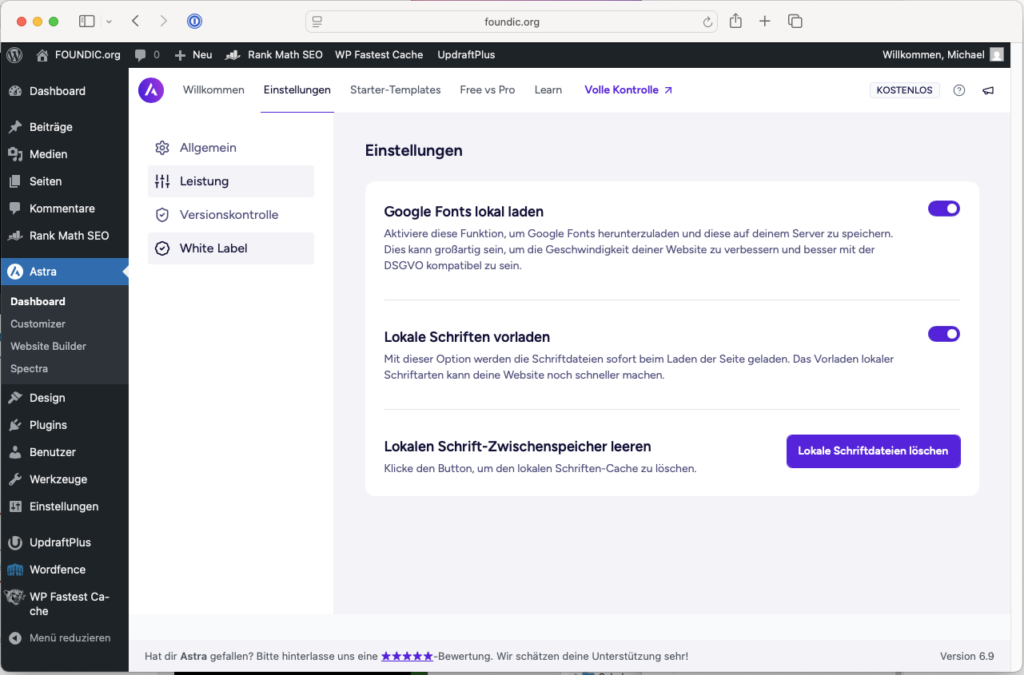
| Performance | Google Fonts | Load locally (Important for GDPR!) |
GDPR Warning on Google Fonts: If Google Fonts are loaded from the USA, the visitor’s IP address is transmitted (Munich Regional Court I, 01/20/2022, Ref. 3 O 17493/20). Check your site with the Google Fonts Checker like https://sicher3.de/google-fonts-checker/.
Necessary adjustments:
GDPR-compliant fonts: Astra → Dashboard → Settings → Performance → Activate “Load Google Fonts locally”
Ulf: “Why load locally?”
Tanja: “Because Google Fonts are loaded from Google servers by default. This transmits your visitors’ IP addresses to Google – a GDPR violation. If you load the fonts locally, the data stays with you.”
Container layout: Design → Customizer → Global → Container: “Box Layout”, 1200px / 1000px
Color scheme: Design → Customizer → Global → Colors. Accent: #111827 (Noble Black), Links: #2563EB (Modern Blue), #1D4ED8 (slightly stronger blue), Headings: #111827 (Noble Black), Website background: #F5F6F7 (Light Gray), Content background: #FFFFFF (White)
Typography: Design → Customizer → Global → Typography. Font for heading: Inter, Sans-Serif / 15px / 800. H1 font: 30px (from 64px). H2 font 27px (from 48px). H3 font 24px (from 24px). H4 font 21 px (from 20px)
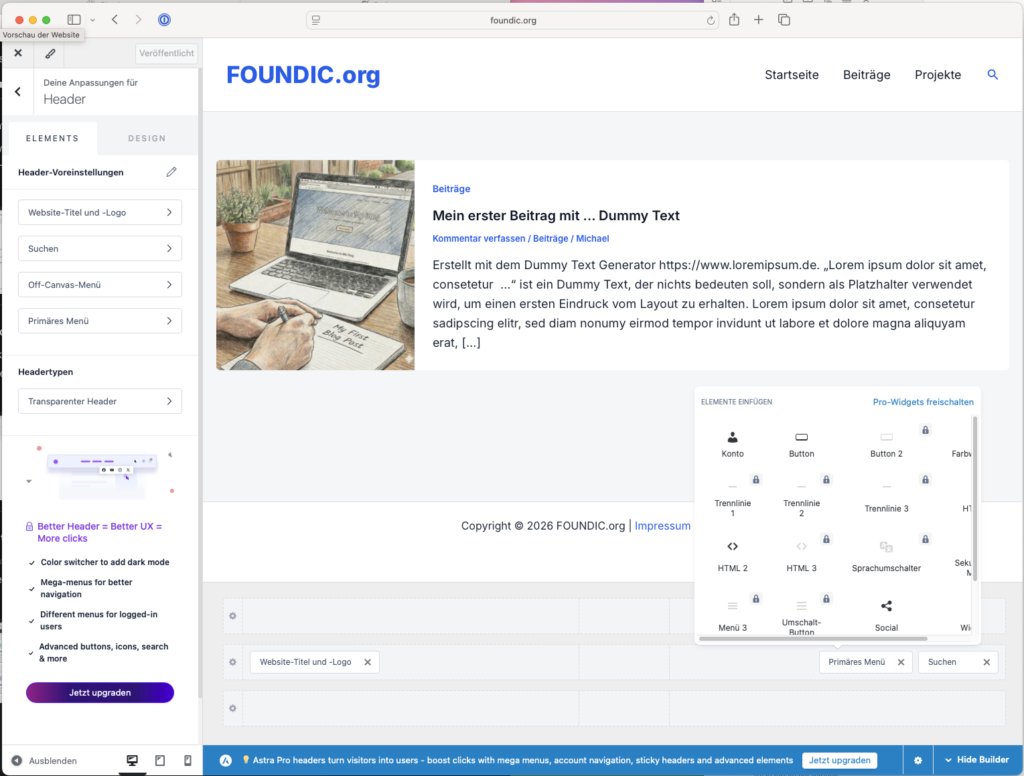
Customize header: Design → Customizer → Header. Website title: FOUNDIC.org. Title color: #2563EB (subtle blue), #1D4ED8 (slightly stronger blue). Border top: 1px, color #E0E0E0 (light gray). Astra logo can be removed and own logo added later.
Customize footer: Design → Customizer → Footer. Border top: 1px, color #E0E0E0 (light gray)
Additional CSS: The “fine-tuning” via CSS code:
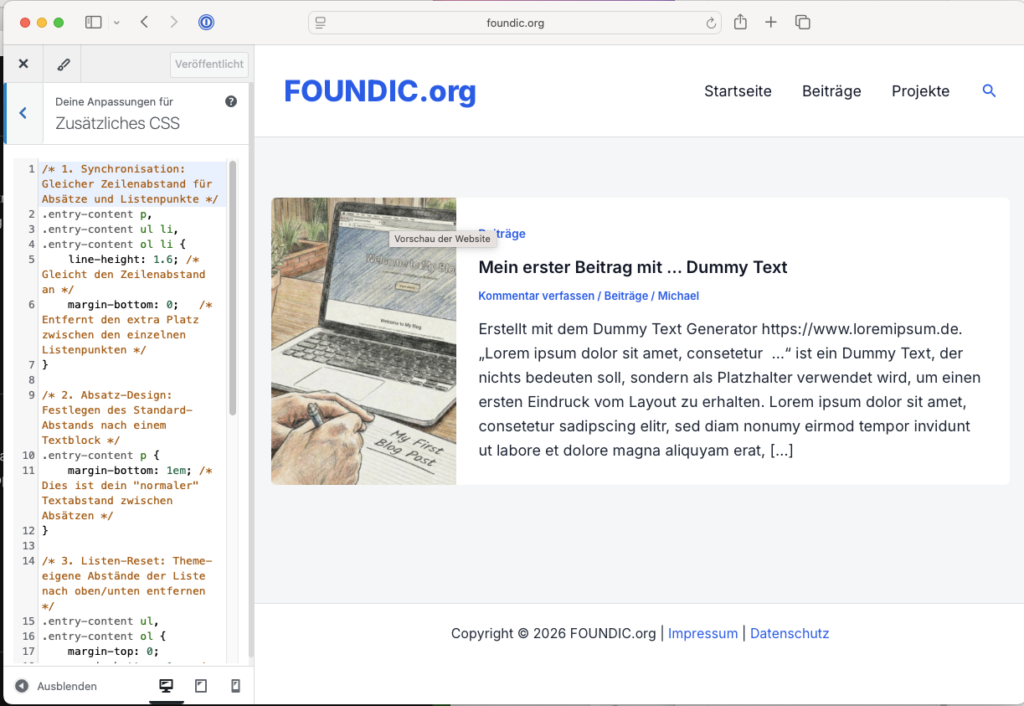
/* 1. Synchronization: Same line spacing for paragraphs and list items */
.entry-content p, .entry-content ul li, .entry-content ol li {
  line-height: 1.6; /* Aligns the line spacing */
  margin-bottom: 0; /* Removes extra space between individual list items */
}

/* 2. Paragraph design: Define standard spacing after a text block */
.entry-content p {
  margin-bottom: 1em; /* This is your "normal" text spacing between paragraphs */
}

/* 3. List reset: Remove theme's own spacing of the list above/below */
.entry-content ul, .entry-content ol {
  margin-top: 0;
  margin-bottom: 1em; /* Same spacing after the list as after a paragraph */
}

/* 4. Precision correction: Spacing BEFORE the list starts */
/* If a list follows a paragraph directly, the spacing is reduced so that optically it matches the spacing between two text paragraphs. */
.entry-content p + ul, .entry-content p + ol {
  margin-top: -0.5em; /* Reduces spacing to introductory text */
}

/* 5. Internal list spacing: Neutralize padding of list items */
.entry-content li {
  padding-bottom: 0;
  margin-top: 0;
}
Ulf: “Why so much CSS tinkering?”
Tanja: “Because WordPress themes often come with their own spacing that doesn’t always look harmonious. With this code we make sure lists and paragraphs look optically even – like in a professionally designed book.”
4.2 Creating Mandatory Legal Pages
Bernd: “Do you really need that?”
Tanja: “Yes. In Germany, an imprint is legally required. Without an imprint, you risk cease and desist letters. And those quickly cost several hundred euros.”
Every online presence in Germany needs an imprint and a privacy policy.
4.2.1 Creating an Imprint
Make sure your imprint contains the following information to be legally compliant:
- Full name and address (no PO Box)
- Quick contact option (email address and phone number)
- For companies: legal form, authorized representatives, registration number/court
- If applicable: VAT identification number (VAT ID)
- For journalistic content: Name of person responsible for content
I proceeded as follows:
- Created draft with https://www.e-recht24.de → Imprint Generator
- WordPress: Pages → Add page. Title: “Imprint”. Insert text and publish
4.2.2 Creating a Privacy Policy
Create a draft using a privacy policy generator like https://datenschutz-generator.de/
Mention all installed plugins (Wordfence, UpdraftPlus, Antispam Bee, WPS Hide Login)
Specify your hosting provider
WordPress: Pages → Add page. Title: “Privacy”. Insert text and publish
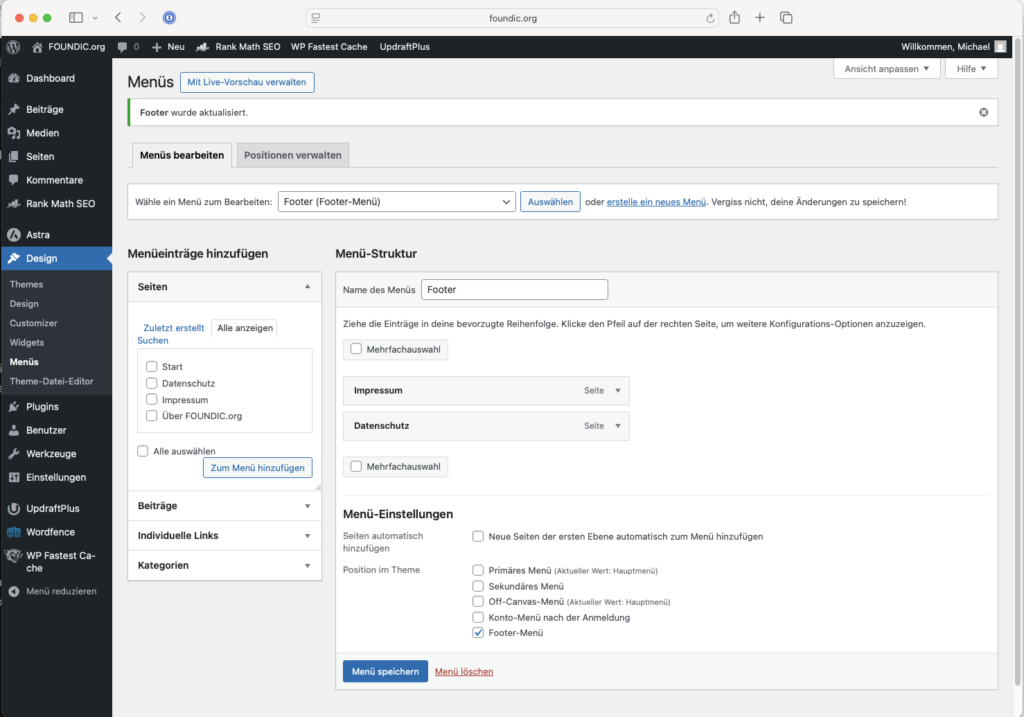
4.2.3 Footer Menu
Include imprint and privacy policy: Design → Menus → “Create new menu”. Name: “Footer”. Add pages: Imprint and Privacy. Position: Select “Footer Menu”. Save menu
Customize copyright line: Design → Customizer → Footer → Copyright. Replace “Powered by…” with:
<span style="font-size: 12pt;">Copyright [copyright] [current_year] [site_title] | <a href="/impressum/">Imprint</a> | <a href="/datenschutz/">Privacy</a></span>4.3 Remove “Test Data”
WordPress comes with sample content that should be deleted:
- Pages → Move all sample pages to trash
- Posts → Move all sample posts to trash
Bernd: “Why delete? Maybe I’ll need those.”
Tanja: “You won’t. They’re just placeholders. If you don’t delete them, they appear in your archive – and that looks unprofessional.”
5 Structuring and Publishing Content
Ulf: “Let’s go! I want to write articles!”
Tanja: “Hold on. Before you start writing, we need to clarify the structure. WordPress distinguishes between pages and posts. That’s important.”
Ulf: “What’s the difference?”
Tanja: “Pages are for static content – imprint, privacy, about us. You create them once and rarely change them. They stay in the same place, don’t appear chronologically, and have no date. Posts, on the other hand, are your blog. They appear chronologically on your homepage, are sorted into categories, and signal to Google: This site is alive, something is happening here.”
Ulf: “So pages are like shelves in a store, posts are like weekly sales?”
Tanja: “Perfect analogy. Exactly.”
This separation is a central advantage over many website builders – and critical for your SEO ranking. Search engines prefer fresh content, and posts provide exactly that.
My goal is for all posts to appear chronologically on the homepage and additionally be organized in categories.
Homepage setting: Settings → Reading → Select “Your latest posts” → Save changes
Checklist for installation:
- Create categories: Create “Editorial Posts” and “Project” categories
- Link menu correctly: Assign categories to menu and sort
- Your first post: Create post, categorize, and add images
- Install simple search: Set up search function in header, optionally Relevanssi plugin
5.1 Creating Categories
Posts → Categories → Create new categories:
- “Editorial Posts” (Slug form: posts)
- “Project” (Slug form: projects)
- Rename default “Uncategorized” category to “Homepage”
Ulf: “Slug form? What’s that?”
Tanja: “That’s the part that appears in the URL. From ‘Editorial Posts’ it becomes ‘posts’ in the URL. Looks cleaner and is better for SEO.”
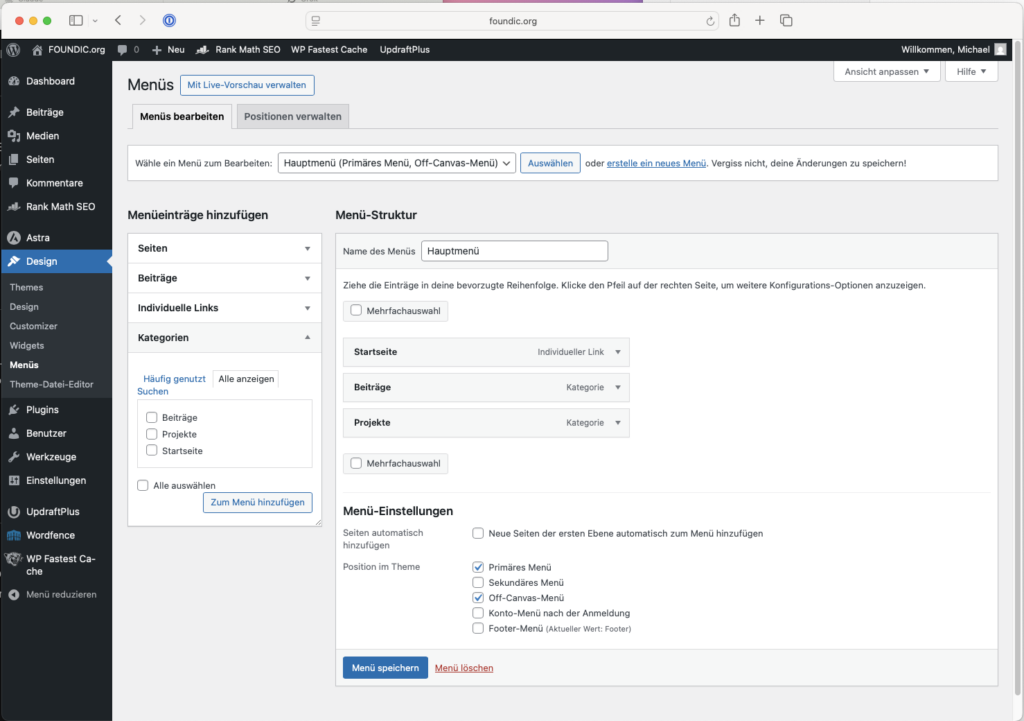
5.2 Linking Menu Correctly
Ulf: “I created categories. How do they get into the menu?”
Tanja: “Good question. WordPress doesn’t automatically add categories to the menu – you have to do it manually.”
Bernd: “Why not automatically? That would be convenient.”
Tanja: “Because maybe you don’t want all categories in the menu. You keep control.”
Design → Menus → Categories → “Show all”. Select categories and “Add to menu”. Use drag and drop to sort. Save menu
5.3 Your First Post
Ulf: “Okay, now I finally want to write!”
Tanja: “Let’s go. The post editor is called Gutenberg – named after the inventor of the printing press.”
Bernd: “Why so complicated? Just throw in text and you’re done.”
Tanja: “Almost. But you should pay attention to a few things so the post is properly categorized.”
Posts → Add post (in the post editor also called “Gutenberg”)
- Enter title
- Write text
- Select category (right sidebar further down)
- Optional: Set featured image (right sidebar → Featured image)
- Publish (see https://www.foundic.org/mein-erster-beitrag-mit-dummy-text/)

Customize post layout from grid to list: Design → Customizer → Content types → Blog/Archive → Blog layout: “List” for vertical arrangement
Display featured image additionally on individual page: Design → Customizer → Content types → Individual post → Structure → Activate “Featured image”
Bernd: “Why set the featured image twice?”
Tanja: “Once for the overview (your homepage) and once for the individual post. Some themes don’t automatically show the image in the post itself – then you need to enable it explicitly.”
5.4 Installing a Simple Search
Enable base search: Design → Customizer → Header. In header builder click on a “+”. Select and place magnifying glass (search). Publish
Advanced search with plugin Relevanssi (Optional): Install “Relevanssi – A Better Search” plugin. Settings → Indexing → “Build index”. The index is automatically updated with new posts. Search results are sorted by relevance and terms are highlighted.
Ulf: “Why do I need Relevanssi? The standard search works.”
Tanja: “The standard WordPress search is simple. It only finds exact terms. Relevanssi also searches for synonyms, weights headings higher, and highlights search terms. For visitors, that’s much more helpful.”
6 Setting Up Additional Plugins and Tools
Bernd: “I’ll just install all plugins that sound good.”
Tanja: “Please don’t. Every plugin is additional code that needs to be loaded. Too many plugins make your site slow and insecure. The rule of thumb is: as few as possible, but as many as necessary.”
For plugins, the rule of thumb is: as few as possible, but as many as necessary. Too many plugins can worsen security and performance.
Already installed plugins:
- Security: Wordfence Security (Brute-force protection)
- Backup: UpdraftPlus (Stores backups directly in Google Drive)
- Spam protection: Antispam Bee (Privacy-friendly, local)
- Login protection: WPS Hide Login (changes admin access URL)
I additionally recommend the following plugins:
WP Fastest Cache
Improves loading speed through caching
Installation: Install plugin → Activate → WP Fastest Cache → Settings → Activate “Cache System” → Submit
Ulf: “Caching? What does that do?”
Tanja: “Imagine you copy a document instead of rewriting it each time. Caching stores a finished version of your website and delivers it – instead of calculating it each time. That makes your site much faster.”
Rank Math SEO
Ulf: “SEO? That’s so you can be found on Google, right?”
Tanja: “Exactly. Rank Math helps you optimize your site for search engines – metadata, page structure, SEO signals. All in one place.”
Bernd: “I’ll just take Advanced Mode. Sounds more professional.”
Tanja: “Bernd, for once you’re right – Advanced Mode is ultimately important. But you must do the installation in easy mode, otherwise you’ll be missing features later. So: Setup in easy mode, then switch to Advanced.”
Technically and content-wise optimizes WordPress websites for search engines by centrally controlling metadata, page structure, and SEO signals.
Installation: Install plugin → Activate → Setup wizard. Mode “Easy”. Skip Google services. Important first setting: Rank Math SEO → Dashboard → top right “Advanced Mode”, so you have more options later in the editor to adjust Rank Math SEO per page and post.
The following plugins are on my to-do list for later:
- Cookie consent tool like Complianz or Borlabs, before I install Google Analytics & AdSense
- Table of contents plugin like Easy Table of Contents
- Image optimization plugin like Shortpixel Optimizer
- AI plugins like Jetpack AI or specialized SEO AI extensions
Bernd: “AI plugins? Will the AI write my articles?”
Tanja: “Partially. AI can help you optimize headings, generate meta descriptions, or edit texts. But the responsibility remains with you.”
7 Conclusion
Ulf: “That’s it? My website is live?”
Tanja: “Yes. You now have a fully functional WordPress website. With your own domain, your own design, security measures, and mandatory legal pages.”
Bernd: “I should have just used Wix.”
Tanja: “Bernd, you now have full control. You can install plugins, change themes, migrate your site whenever you want. With Wix you’d be in a golden cage.”
Ulf: “Honestly, I thought that would be much more complicated.”
Tanja: “That’s exactly the point. WordPress seems intimidating at first, but once you understand the basics, everything runs smoothly. And best of all: You’re not dependent on a provider.”
Do you have questions about the installation or are you stuck at a step? Or do you have suggestions for improvements to this guide or foundic.org? I look forward to your feedback in the comments!