
What you are building in this tutorial is not a Google Alert. It’s a fully autonomous AI editorial system that researches AI topics every day, writes complete articles, generates cover images with AI, and publishes them on WordPress.
The system automatically scans the internet for the most important developments in the field of artificial intelligence. The brain behind it all is n8n, a self-hosted automation tool that brings together various specialized AI agents to form a digital editorial team. This team filters the massive flood of information from RSS feeds, evaluates each result for relevance, and transforms the best articles into high-quality blog posts.
To make this guide easier to follow, three characters will accompany you:
The typical office archetypes: the competent IT colleague, the self-proclaimed expert, and the honest beginner. These three perspectives help you recognize common pitfalls.
Tanja is the IT expert. She knows how n8n works, explains patiently and clearly, and doesn’t get thrown off by bad advice. If you have a question, Tanja has the answer.
Bernd is the self-proclaimed “expert” who thinks he knows better – and is usually wrong. His shortcuts and half-knowledge regularly cause problems. He represents all the dangerous myths and bad practices you should avoid.
Ulf is the learner, just like you. He asks the questions swirling in your head and sometimes needs a real-world analogy to understand IT. If Ulf doesn’t get something, that’s completely fine – that’s what Tanja is there for.
“And… Action!”
Monday, 8:47 AM. The office.
Ulf stares at his screen. Three browser tabs. Reddit, Heise, The Verge. He’s searching for a topic for today’s AI News post.
Bernd walks past: “Still searching manually? I just ask ChatGPT.”
Tanja doesn’t look up: “ChatGPT doesn’t know what happened yesterday.”
Bernd: “Sure it does. Premium version.”
Tanja: “The knowledge cutoff is months ago. No current news.”
Ulf: “So what do you do?”
Tanja closes her laptop. “I built a system. It reads 22 news sources every two hours, selects the most relevant article, researches the topic in depth – and writes the complete post itself. Every day.”
Silence.
Ulf: “Every day automatically?”
Tanja: “With my approval. But yes. Automatically.”
Bernd: “I would have just set up a Google Alert.”
Tanja: “Try it.”
The key point: The system works as a “Human-in-the-Loop” construct – every article requires your explicit approval before going live. You stay in control. The AI does the research and writing, you decide what gets published.
The editorial team – five agents:
- Agent 1: Research (RSS feeds, every 2 hours)
- Agent 2: Individual editorial evaluation (GPT-4o-mini, every 4 hours)
- Agent 3: Content research & enrichment (GPT-4o-mini + Tavily, daily)
- Agent 4: Write article + cover image (Claude + Flux-2-Flex, daily)
- Agent 5: Publish to WordPress (daily, with manual approval)
2 Technical Description
2.1 System Architecture
Ulf: “Wait – the five agents talk to each other? Like in the office, through emails?”
Tanja: “Not directly. They communicate through the database. Think of the database as a large shared inbox. Agent 1 puts something in. Agent 2 picks it up, processes it, puts it back with a new status. And so on – down the pipeline.”
Bernd: “I would have just connected them directly.”
Tanja: “And if one crashes, everything else crashes too. The database acts as a buffer. If Agent 2 hangs, Agent 1 keeps running. Articles stay safely in the database until Agent 2 continues.”
The AI Newsroom follows a pipeline architecture: Five specialized n8n workflows run independently and communicate exclusively through a PostgreSQL database. This architecture was chosen deliberately: Each agent can fail, restart, or be paused without affecting the others.
[Internet / RSS-Feeds]
        ↓
  A1: Research         → ki_artikel (Status: NEW)
        ↓
  A2: Evaluation         → ki_artikel (Status: EVALUATED)
        ↓
  A3: Content research → ki_story   (Status: ENRICHED)
        ↓
  A4: article + image    → ki_artikel (Status: PUBLISH_READY)
        ↓
  A5: WordPress         → ki_artikel (Status: PUBLISHED)
        ↓
  [WordPress / foundic.org]
2.2 Database Schema
The database consists of three tables – think of them as three different drawers in a filing cabinet:
ki_artikelis the main table. Every ingested RSS article lands here and stays there until publication. The table stores raw data from the feed, KI-evaluationsscores, fertige WordPress-contente and den aktuellen workflow-Status. The fieldurl_normalizedprevents duplicates: Tracking parameters likeutm_source, thewww.-prefix and unnecessary trailing slashes are removed from URLs before an article is stored. This way Heise links with and without?utm_campaign=newsletterdon’t end up twice in the database.ki_storyis the creative repository. Here lies the enriched, deeply researched content – the background text created by Agent 3 and later the finished WordPress article written by Claude. Jede Story is genau einem Eintrag inki_artikelzugeordnet.ki_artikel_edgesis the connection lookup table. When Tavily finds related websites during research, this table documents the connection: Which article found which source? With which search term? At which ranking position? This gradually builds a small knowledge network of interlinked articles in the background.
2.3 The Five Agents in Detail
Agent 1 – Research (every 2 hours): 22 parallel RSS feed readers supply the system with fresh articles. Agent 1 reads all incoming entries, normalizes URLs (so the same article isn’t counted twice with tracking parameters), and inserts new articles into ki_artikel with status NEU – duplicates are automatically skipped via a database constraint.
Agent 2 – Editorial evaluation (every 4 hours): GPT-4o-mini evaluates each new article with a structured prompt: Is this AI-relevant? How innovative? How important for the German-speaking community? Articles below 6/10 stay in the database but are never further processed. Only those above the threshold advance to BEWERTET.
Agent 3 – Content research & enrichment (daily): Once an article passes the editorial filter, Agent 3 uses Tavily to research the topic in depth. It finds related articles, background information, and expert sources. All sources flow into ki_story as a rich research packet – the basis for the actual article.
Agent 4 – Writing + cover image (daily): Claude receives the research packet and writes a complete WordPress post in the style of the publication. Simultaneously, Flux-2-Flex generates a matching cover image. Together they form the finished article – ready for publication.
Agent 5 – Publish (daily, with human approval): The finished article lands in a review queue. Only after your explicit approval does it get published on WordPress with all metadata, tags, and the AI cover image.
2.4 Technologies & Costs
| Komponente | Technologie |
|---|---|
| Orchestrierung | n8n (self-hosted, Docker, Synology NAS) |
| database & Monitoring | PostgreSQL + Metabase |
| evaluation & research | GPT-4o-mini (OpenAI) + Tavily |
| article-Erstellung | Claude Sonnet (Anthropic) |
| imagegenerierung | Flux-2-Flex (Black Forest Labs) |
| Publikation | WordPress REST API |
With daily publication of one article, monthly API costs typically remain below €15. Breakdown: GPT-4o-mini for Agent 2 (evaluation) is barely measurable – about €0.001 per article. Tavily for research costs €0.003–0.01 per request. Claude for writing costs about €0.03–0.08 per article. AI image generation with Flux-2-Flex costs about €0.003–0.05 per image. The biggest cost driver is article writing with Claude – but even here, 30 articles per month remains well below €3.
3 Implementation in n8n
3.1 Database Setup
Tanja: “Before we build the agents, we need the foundation. The database.”
Bernd: “Can’t we start with Agent 1? The database can come later.”
Tanja: “If you build a house without a foundation, the walls collapse when the first floor is done. The database is the foundation. Without it, no agent knows where to read or write.”
Bernd: “I’d just start.”
Tanja: “I know.”
3.1.1 Create the Connection (Credentials)
Tanja: “Don’t panic – this sounds more complicated than it is. You only need to tell n8n once where the database is – then you can use it in every workflow. Think of it as saving a new contact in your phone: once saved, always available.”
- Log in to your n8n interface on the NAS a
- Go links auf Start from scratch -> Add first step -> „+” -> search for nach „Postgres” -> select „Execute a SQL query” aus -> Credential to connect with: „Create a new Credential”
How to connect n8n with a PostgreSQL database on a Synology DiskStation is described in detail at: https://foundic.org/n8n-selbst-hosten-synology-nas-docker-installation
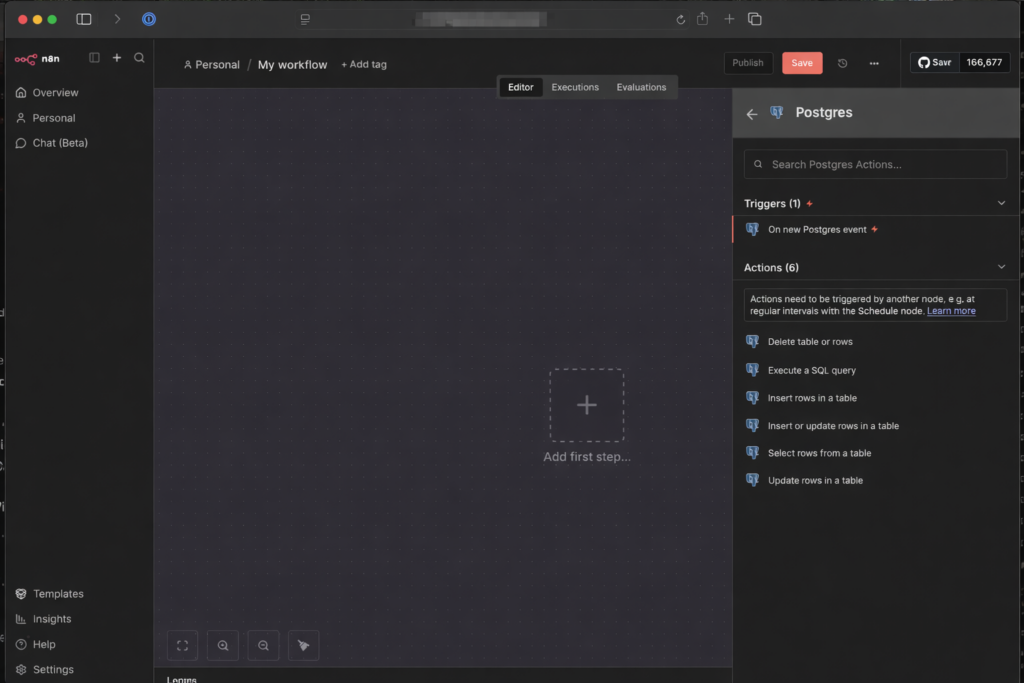
- Now enter the data that you can find in the Synology Container Manager under Container → postgres container → Details
- Host: IP address or container name (if in the same project)
- Database: Usually
postgresorn8n_db(depending on what was set asPOSTGRES_DBangegeben wurde) - User: The name you assigned (often
postgresoradmin) - Password: Dein festgelegtes Password
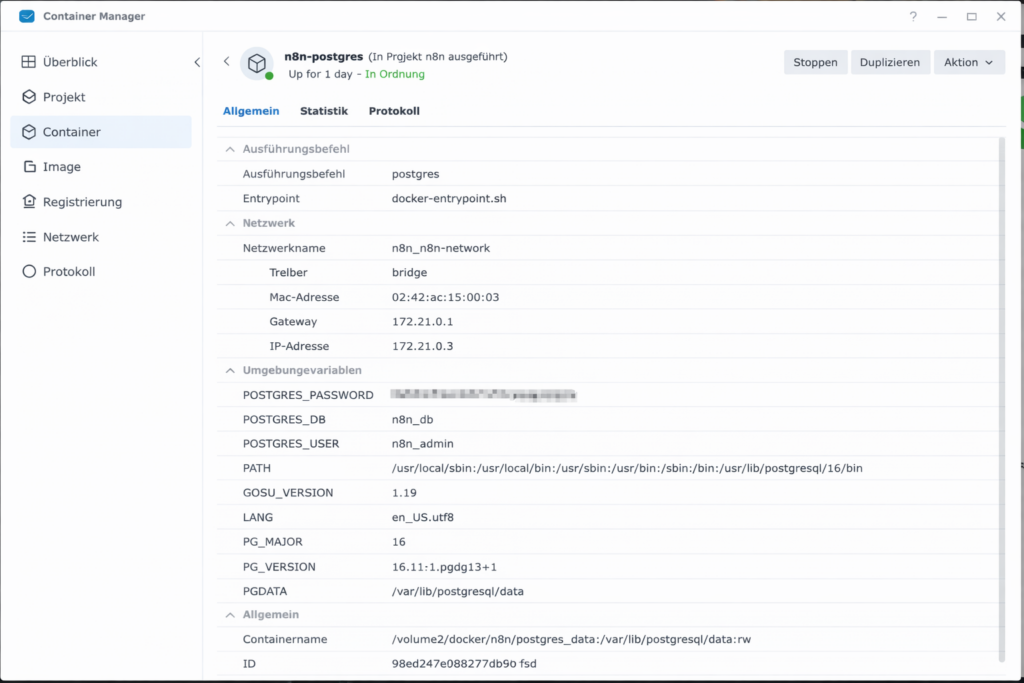
- Click on Save. When a green shield with “Connection tested successfully” appears at the top, steht the Leitung!
- Nenne ihn oben links in the workflow Overview:
Set-up Database
3.1.2: Create the First Tables in the Database
The ki_artikel table is the central digital memory of the system. Every RSS article the system processes lands here. Follow these steps to create it:
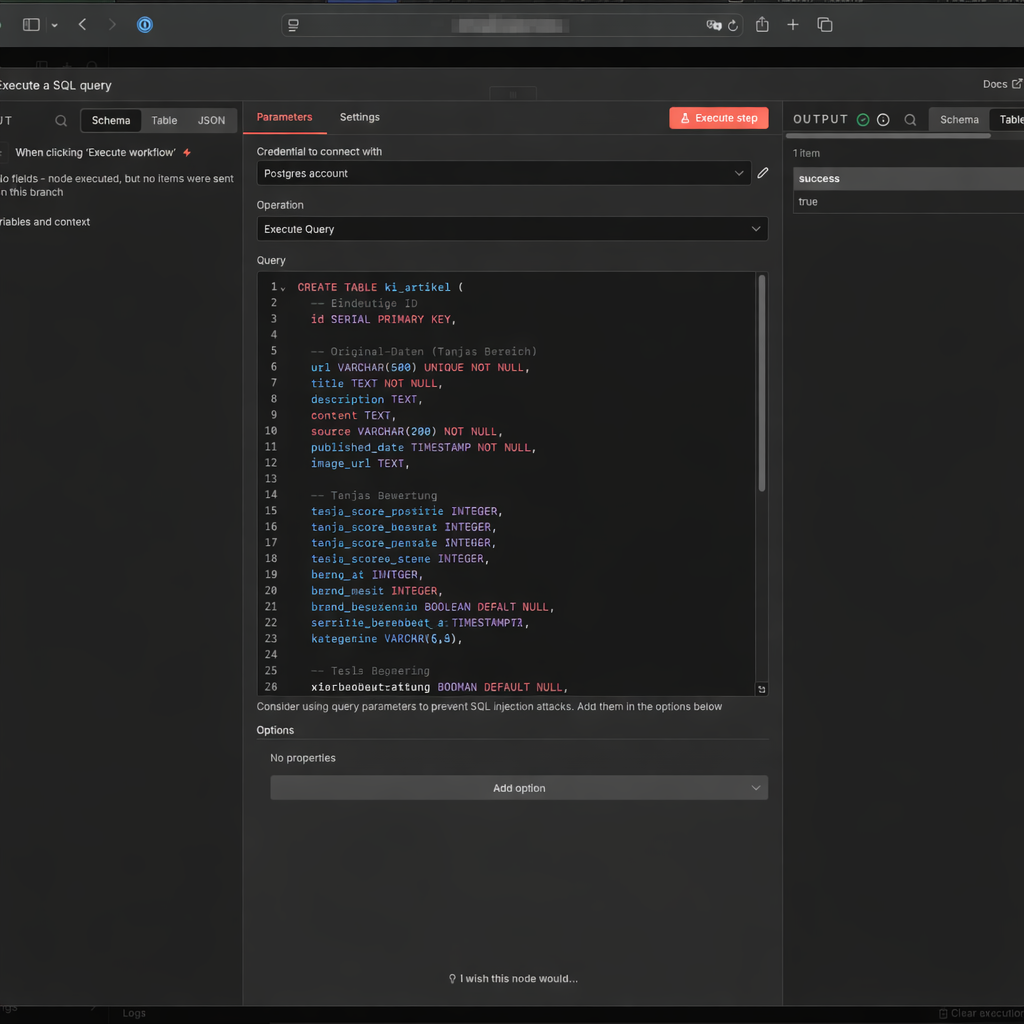
- Close the Credential window (click the X in the top right).
- Du befindest dich nun wieder in the window the Postgres-Node (Execute a SQL query), ggf. Doppel Click on “Execute a SQL query”
- Delete the 1 in the Query field completely.
- Copy the folgende SQL-Skript and add es there a:
CREATE TABLE ki_artikel (
  -- Eindeutige ID
  id SERIAL PRIMARY KEY,

  -- Original-Daten
  url VARCHAR(500) UNIQUE NOT NULL,
  title TEXT NOT NULL,
  description TEXT,
  content TEXT, -- für later
  source VARCHAR(200) NOT NULL, -- z.B. 'Heise'
  published_date TIMESTAMP,
  image_url TEXT,
  source_type TEXT  -- z.B. 'rss'
  first_seen_at TIMESTAMPTZ NOT NULL DEFAULT now()
  url_normalized TEXT

  -- workflow-Status
  status VARCHAR(50),

  -- evaluation
  score_relevanz INTEGER,
  score_bedeutung INTEGER,
  score_gesamt DECIMAL(3,1),
  subkategorie VARCHAR(80) DEFAULT NULL,
  bewertung_begruendung TEXT,

  -- Zeitstempel
  created_at TIMESTAMP DEFAULT CURRENT_TIMESTAMP
);

-- Index für schnelle Abfragen (Top-News)
CREATE INDEX idx_published_date ON ki_artikel(status, published_date DESC);
CREATE INDEX ki_artikel_url_normalized_idx ON ki_artikel(url_normalized);
Click Execute step.
Then create two more tables. The first connects articles with each other (for the Tavily knowledge graph):
CREATE TABLE IF NOT EXISTS ki_artikel_edges (
  id BIGSERIAL PRIMARY KEY,

  from_artikel_id BIGINT NOT NULL
    REFERENCES ki_artikel(id) ON DELETE CASCADE,

  to_artikel_id BIGINT NOT NULL
    REFERENCES ki_artikel(id) ON DELETE CASCADE,

  relation_type TEXT NOT NULL,     -- z.B. 'tavily_related'
  query TEXT,                      -- optional: Suchquery
  rank INT,                        -- Reihenfolge im Tavily Result
  score NUMERIC,                   -- optional: Tavily score/relevance
  retrieved_at TIMESTAMPTZ NOT NULL DEFAULT now(),

  UNIQUE (from_artikel_id, to_artikel_id, relation_type)
);

CREATE INDEX IF NOT EXISTS ki_artikel_edges_from_idx
  ON ki_artikel_edges(from_artikel_id);

CREATE INDEX IF NOT EXISTS ki_artikel_edges_to_idx
  ON ki_artikel_edges(to_artikel_id);

CREATE INDEX IF NOT EXISTS ki_artikel_edges_type_idx
  ON ki_artikel_edges(relation_type);
Table ki_story – the place where finished articles are drafted:
CREATE TABLE IF NOT EXISTS ki_story (
  id BIGSERIAL PRIMARY KEY,

  primary_artikel_id BIGINT NOT NULL
    REFERENCES ki_artikel(id) ON DELETE RESTRICT,

  content_enriched TEXT NOT NULL,
  enrichment_source TEXT,          -- 'direct' | 'search_llm'
  score_gesamt_enriched NUMERIC(4,2),
  tavily_link_count INTEGER,
  status TEXT NOT NULL DEFAULT 'DRAFT',
  created_at TIMESTAMPTZ NOT NULL DEFAULT now(),
  updated_at TIMESTAMPTZ NOT NULL DEFAULT now(),

  -- WordPress
  wp_title TEXT,
  wp_content TEXT,
  wp_excerpt TEXT,
  wp_tags TEXT,
  image_file_path TEXT,
  wordpress_post_id BIGINT,
  wordpress_url TEXT
);

CREATE INDEX IF NOT EXISTS ki_story_primary_idx
  ON ki_story(primary_artikel_id);
3.1.3: Workflow Status Logic
The status field in ki_artikel is the traffic light of your system. Every article goes through exactly these states:
NEU(Insert)BEWERTET(Evaluation complete)ANGEREICHERT(Background text complete)PUBLISH_READY(Article pulled / “reserved”)PUBLISHED(Published in WordPress)PUBLISH_BLOCKED(if anything fails for legal or technical reasons)
3.2 Agent 1: Research: RSS Feeds
Ulf: “RSS feeds – isn’t that twenty-year-old technology?”
Tanja: “Soccer has existed for 150 years and it’s still the most effective way to keep 22 people in controlled chaos. RSS is similar. Structured, reliable, machine-readable – and free. Every serious news source has it.”
Bernd: “I’d just use the Google News API.”
Tanja: “Which costs $0 for 100 requests per day, then $5 per 1,000 requests. For 22 sources checked every 2 hours, that’s about 1,056 requests per day.”
Bernd: “Oh.”
Tanja: “RSS is free and has no limits.”
3.2.1 Setting Up the Workspace
- Go back zur workflow-Overview and click on Create new workflow
- Nenne ihn oben links:
1 Agent: Research: RSS Feeds - Click on Add First Step and select Schedule Trigger
- Trigger Interval: Hours
- Stelle ihn first auf Manual (= Custom Cron) – with this the Trigger from firing constantly while building. You set the real schedule at the end a.
- Hours Between Triggers: 2
- Trigger at Minute: 0
3.2.2 Tapping the Sources (RSS Feed)
- Click on the + next to the Schedule Trigger
- Search for the node RSS Feed Read
- Node: rssFeedRead
- URL: RSS-Feed eintragen (z.B.
https://www.heise.de/rss/heise-atom.xml)
- Click on Test Step. Du solltest now a Liste with titlen and Links sehen
- You can add as many RSS Feed Reader nodes as you like in parallel to the workflow and connect them to the trigger. To do this, click on the output of the trigger and then on the input of the respective RSS Feed Reader.
3.2.3 Assign the Source to the RSS Feed
- Click on the + symbol at the output of your RSS nodes
- Search for the node Edit Fields (you need this node for each RSS feed)
- Setting: * Click on „Add Field“ -> „String“.
- Node: Edit Fields
- Field name:
source_name-> String - Wert (Value): z.B.
Heise - Include Other Input Fields: aktivieren
- Repeat: these two nodes for all your additional RSS feeds (RSS Feed -> Edit Fields -> Wert:
abc) that you want to read regularly.
3.2.4 Building the Archive in the Database
Now you tell n8n where the archive is – and how newspaper clippings get filed there. Think of this step as programming a new filing cabinet: label clearly, define which drawer, done.
- Click on the + at the output of your Edit Fields nodes
- Search for Postgres and select „Insert rows in a table”:
- Node: Insert rows in table
- Credential to connect with: your
n8n-postgresconnection from Step 3.1.1 - Operation: Insert
- Schema: From list: public
- Tabel: From list:
ki_artikel - Mapping Column Mode: Map Each Column Manually (Daten einsortieren)
- Now comes the most important part: You need to tell n8n which RSS field belongs to which database column. Click on Add Column and enter one after anothernder folgende Zuordnungen a:
| column (Column) | Wert (Value) – So machst du es: |
|---|---|
| id | Delete this row completely – the ID increments automatically |
| titel | Click in the Feld. Search for links in the menu unter „RSS Feed Read“ title and ziehe per drag&drop in title, or alternativ{{ $json.title }} |
| url | {{ $json.link }} |
| description | {{ $json.summary || $json.content || $json.contentSnippet || ” }} |
| source | {{ $json.source_name }} |
| published_date | {{ $json.isoDate }} |
| image_url | {{ $json.enclosure?.url || ” }} |
| status | NEU (von Hand eintippen, not from the menu) |
| source_type | rss (von Hand eintippen) |
| url_normalized | Expression (siehe Code unten) |
For url_normalized copy this JavaScript expression into the Value field:
{{
(() => {
  const raw = $json.link || $json.url || "";
  try {
    const u = new URL(raw.startsWith("http") ? raw : "https://" + raw);

    // Fragment entfernen
    u.hash = "";

    // Tracking-Parameter entfernen
    const dropExact = new Set([
      "fbclid","gclid","dclid","msclkid","igshid",
      "mc_cid","mc_eid","mkt_tok","yclid","cmpid"
    ]);

    for (const k of Array.from(u.searchParams.keys())) {
      const key = k.toLowerCase();
      if (key.startsWith("utm_") || dropExact.has(key)) {
        u.searchParams.delete(k);
      }
    }

    // Host & Protokoll normalisieren
    u.hostname = u.hostname.replace(/^www\./i, "").toLowerCase();
    u.protocol = "https:";

    // Trailing slash nur bei Root entfernen
    if (u.pathname === "/") u.pathname = "";

    u.search = u.searchParams.toString()
      ? "?" + u.searchParams.toString()
      : "";

    return u.toString();
  } catch (e) {
    return raw;
  }
})()
}}
Why the effort? Because the same Heise article can appear with five different tracking parameters in the URL. Without normalization, the system would consider it five different articles and try to process it five times. The URL normalization extracts only the essential part of the URL – clean, without tracking parameters – and that’s what gets saved in the database. Duplicates are then reliably detected and skipped.

- Delete alle anderen pre-filled „Values to Update”, with this only the oben definierten fields geschrieben werden.
- Ganz unten: Options → Add option → Skip on Conflict aktivieren. With this will a article, dessen URL already in the database liegt, einfach skipped rather than throwing an error.
- Testlauf: Click on den orangefarbenen Button „Execute workflow”. Was now passieren sollte: n8n zieht the news from the feeds (green numbers appear) and sends them to the Postgres node (next green number) and saves them on your NAS. Wenn du the Zahlen siehst – Congratulations, your first archive is live.
3.2.5 Publish the Workflow
Set the Schedule Trigger to 2 hours and activate the workflow via the toggle at the top right.

3.3 Agent 2: Individual editorial evaluation
Ulf: “Okay, we now have an archive full of articles, but how do we know which ones are worth reading?”
Tanja: “That’s what Agent 2 is for. It reads each new article, evaluates it with AI according to fixed criteria, and gives it a score. Only articles above the threshold pass through.”
Bernd: “I’d just read everything manually.”
Tanja: “With 22 RSS feeds, every 2 hours? Let’s say 500 articles per day. Go ahead.”
Bernd pauses. “Maybe the AI isn’t so bad.”
3.3.1 Starting the workflow
- Go back zur workflow-Overview and click on Create new workflow
- Nenne ihn oben links:
2 Agent: Individual editorial evaluation - Add a Schedule Trigger:
- Trigger Interval: Hours
Stelle sie for den Anfang auf Manual (= Custom (Cron)), so that we don’t constantly pull new data while building. Later we set it to “Every 4 hours” - Hours Between Triggers: 4
- Trigger at Minute: 0
- Trigger Interval: Hours
3.3.2 Read Record from Database
- Add a Postgres-Node „Execute a SQL query”:
- Credtial to connect with:
n8n-postgres - Query:
- Credtial to connect with:
SELECT id, title, description, url
FROM ki_artikel
WHERE status = 'NEU'
LIMIT 5;
Starting with LIMIT 5 – five articles are enough for testing. When the system is running stably, you can increase this value. The query only returns articles with status NEU – those not yet evaluated.
3.3.3 Add the Loop
The AI should evaluate each article individually – not all at once. For this we use the Loop Over Items node.
- Node: Loop Over Items
- Bartch Size: 1
- Done: bleibt leer
- Loop: next node
Stell es dir vor how a assembly line: article rein, bewerten, next article.
3.3.4 Basic LLM Chain
Bernd: “Wait, if we’re using AI, let’s do it properly. I’d use GPT-5 here.”
Tanja: “GPT-5 costs considerably more per request. For this task – evaluating a title and abstract against fixed criteria – GPT-4o-mini achieves identical results at a fraction of the cost. Cost efficiency is part of good system design.”
Bernd: “So the cheap version.”
Tanja: “The right version.”
Now comes the centrepiece of Agent 2. Why “Basic LLM Chain” and not an AI Agent? Because we don’t need autonomous decision-making here – we need a structured, reproducible evaluation. The Basic LLM Chain delivers exactly that: the same prompt, the same model, the same format – every time.
- Node: Basic LLM Chain
- Source for Prompt (User Message): Define below
- Prompt (User Message):
Rolle: Du bist eine kritische Analystin und KI-Trend-Scout.
Aufgabe: Bewerte den folgenden article nach seinem Nutzen für interessierte KI-Anwender, die KI im Alltag (privat & beruflich) besser einsetzen und futuree Entwicklungen verstehen wollen. Ordne den article zudem präzise den vorgegebene Subkategorien zu.

Input-Daten:
title: {{ $json.title }}
description: {{ $json.description }}

---

### 1. Strenge evaluations-Logik (Skala 0 bis 10):

KI-Anwendungsrelevanz (Nutzwert heute):
- 0–1: Kein KI-Bezug oder rein abstrakt / technical ohne Nutzenableitung.
- 2–4: KI wird erwähnt, aber ohne konkrete Nutzungsideen.
- 5–6: Liefert Beispiele, Tools, Produktivitäts- oder Alltagsbezug.
- 7–8: Klare, übertragbare Use-Cases (Arbeit, Lernen, Organisation, Kreativität).
- 9–10: Hoher Mehrwert: verchanges konkret, wie man KI sinnvoll nutzt.

KI-Entwicklungsbedeutung (Blick in die Zukunft):
- 0–1: Unbedeutend oder reine Randnotiz.
- 2–4: Allgemeine Entwicklung ohne Tiefgang.
- 5–6: Relevanter Trend (z. B. Copilots, Regulierung, KI im Alltag).
- 7–8: Wichtige Weichenstellung (z. B. neue Einsatzfelder, starke Verbreitung).
- 9–10: Paradigmenwechsel mit klaren Folgen für Nutzer:innen.

---

### 2. Subkategorien (Select EXAKT einen Namen aus dieser Liste):

1. Anwendungsfälle & Best Practices (Konkretisierung: Praxisbeispiele, Alltag/Beruf, Produktivitäts-Szenarien)
2. Prompting (Konkretisierung: Operative Assets: Gebrauchsfertige Vorlagen, konkrete Befehlsketten und „Copy & Paste“-Prompts für sofortige resultse)
3. Lernen & Skill-Aufbau (Konkretisierung: Methodisches Wissen: Tutorials, Lernpfade, Konzepte wie Chain-of-Thought, Methodik, Erklärungen zum „Mitdenken“)
4. Tools & Produkt-Updates (Konkretisierung: Software-Releases, neue Funktionen, UI-Änderungen)
5. Automatisierung & Agenten (Konkretisierung: n8n/Zapier workflows, Agent-Flows, APIs, Prozessautomatisierung)
6. KI-Kreativität (Konkretisierung: Fokus auf generative Medien-Erstellung: image, Video, Audio, Design jenseits reiner Text-Assistenz)
7. News & Entwicklungen (Konkretisierung: Markt- & Strategie-News, Trends, allgemeine Einordnung)
8. Modelle & Open Source (Konkretisierung: LLMs, Open-Source-Modelle, GitHub-Projekte, technicaler Deep Dive)
9. Hardware & Lokale KI (Konkretisierung: Gadgets, AI-PCs, Chips wie Nvidia/NPU, Local-AI-Setups)
10. Sicherheit & Privacy (Konkretisierung: Datenschutz, Security, sichere KI-Nutzung)
11. Ethik, Recht & Politik (Konkretisierung: AI Act, Regulierung, Governance, Deepfakes)
12. Kein KI-Fokus (Fokus: Default-category für alle contente ohne klaren KI-Nutzen oder KI-Bezug, allgemeine Technik-News oder Off-Topic)

WICHTIG: Wenn die Sub-category "Kein KI-Fokus" gewählt wird, dann must Anwendungsrelevanz <= 1 UND Entwicklungsbedeutung <= 1 sein.

---

### 3. output-Format & Validierung:
Erzeuge ausfinally ein valides JSON-Objekt ohne Markdown-Formatierung.

IMPORTANT: The "subkategorie" field MUST match exactly (character for character) one of the 12 names listed above. Do not change any special characters, do not invent new names und achte auf exakte Groß-/Kleinschreibung.

STRICT OUTPUT RULES:
- Enter GENAU EIN JSON-Objekt aus.
- Kein Text vor oder nach dem JSON.
- KEIN Komma nach der closeden }.
- Verwende ausfinally doppelte Anführungszeichen für JSON.

{
  "anwendungsrelevanz": Zahl,
  "entwicklungsbedeutung": Zahl,
  "subkategorie": "EXAKTER_NAME_AUS_LISTE",
  "begruendung": "Maximal 25 words. Begründung der category + Begründung der  Anwendungsrelevanz und Entwicklungsbedeutung."
}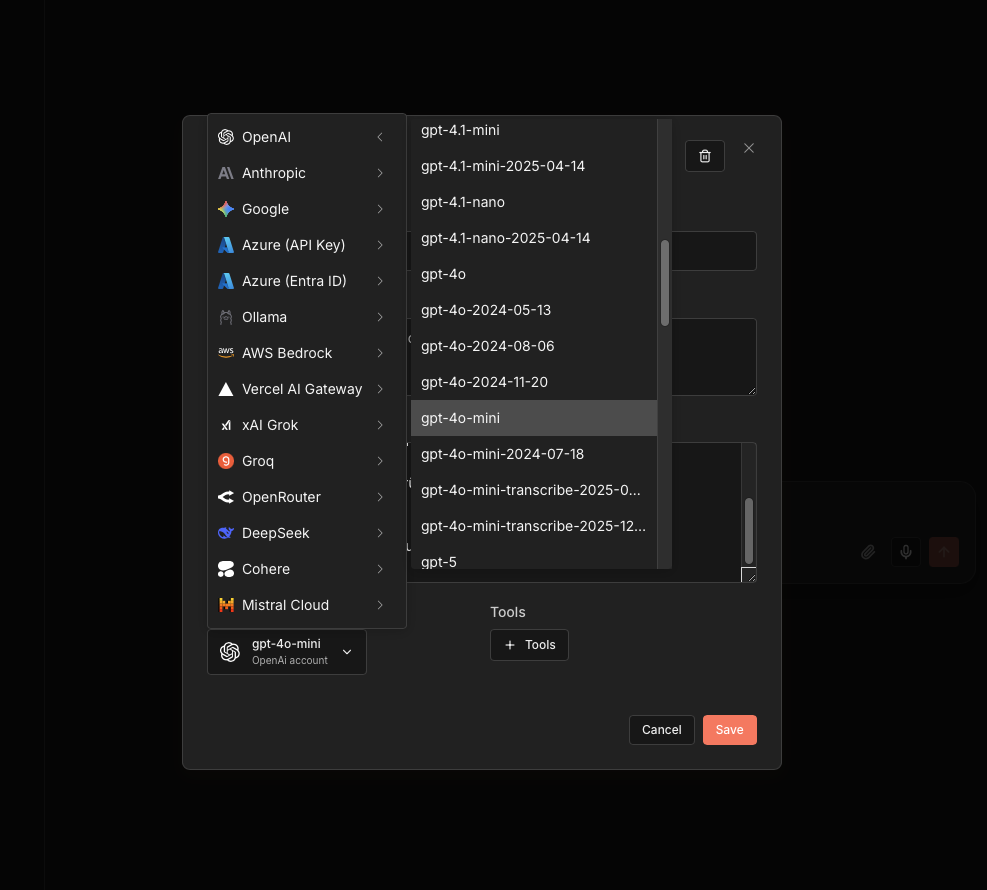
Connect the Basic LLM Chain with the OpenAI Chat Model:
- Node: OpenAI Chat Model
- Credential to connect with: OpenAI account
- Model:
gpt-4o-mini - Use Response API: active
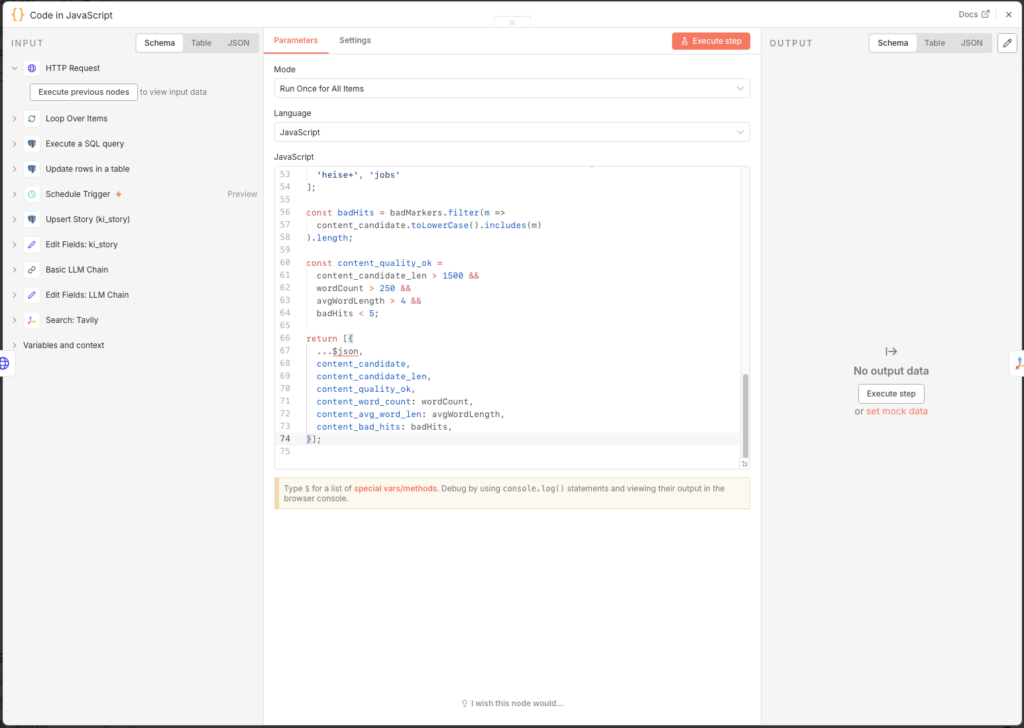
3.3.5 Code in JavaScript
GPT-4o-mini sometimes returns JSON with Markdown border wrappers (backticks, json-Tags). This code-Node cleans up the auf and berechnet den Gesamtscore:
- Node: Code in JavaScript
- Mode: Run Once for Each ITem
- Language: JavaScript
let raw = $json.text;
// Entfernt Backticks und säubert den Text
let clean = raw.replace(/```json/g, "").replace(/```/g, "").trim().replace(/,\s*$/, "");
let data = JSON.parse(clean);

// Falls die KI es in "output" verpackt hat
if (data.output) data = data.output;

// Nur EIN return-Block mit allen fieldsn:
return {
  anwendungsrelevanz: Number(data.anwendungsrelevanz),
  entwicklungsbedeutung: Number(data.entwicklungsbedeutung),
  subkategorie: data.subkategorie,
  begruendung: data.begruendung,
  // Hier passiert die importante Berechnung für DECIMAL(3,1)
  score_gesamt: (Number(data.anwendungsrelevanz)*6 + Number(data.entwicklungsbedeutung)*4)/10
};
The formula at the end is no magic: Application relevance counts six times, development significance four times. We divide this by 10 – fertig is a Score zwischen 0 and 10, saved als DECIMAL(3,1).
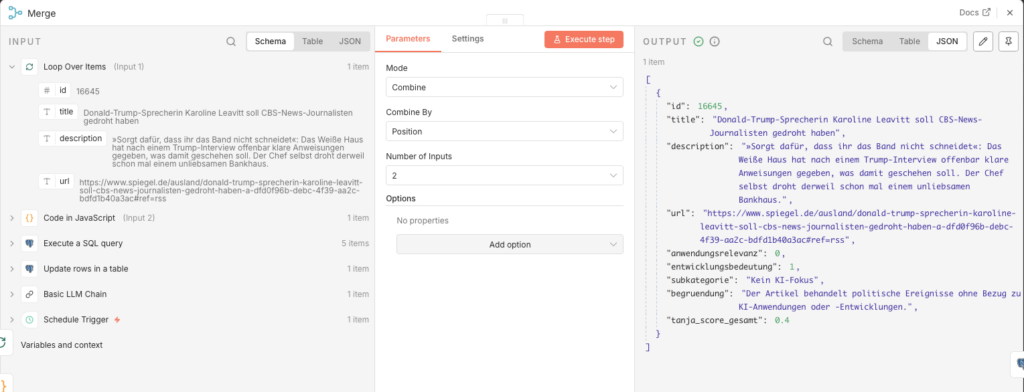
3.3.6 Merge Combine
Now we have a problem: The evaluation code only knows the AI results, but no longer the database ID of the article. Without the ID, we cannot update the record. Der Merge-Node resolves this: It merges the database fields (inkl. id) and the evaluation fields into a combined record.
- Node: Merge Combine
- Mode: Combine
- Combine by: Position
- Number of Inputs: 2
Connect the two inputs: output „loop” des Loop Over Items-Nodes → input 1 des Merge; Output of the Code node → input 2 des Merge.
3.3.7 Save to Database
- Add a Postgres-Node at the end:
- Node: Update rows in a table
- Credential to connect with:
n8n-postgres - Operation: Update
- Schema: public
- Table:
ki_artikel - Mapping Column Mode: Map Each Column Manually
- Columns to match on: id
| Feld | Value |
|---|---|
| id (using to match) | {{ $json.id }} |
| score_relevanz | {{ $json.anwendungsrelevanz }} |
| score_bedeutung | {{ $json.entwicklungsbedeutung }} |
| score_gesamt | {{ $json.score_gesamt }} |
| bewertung_begruendung | {{ $json.begruendung }} |
| status | BEWERTET |
| subkategorie | {{ $json.subkategorie }} |
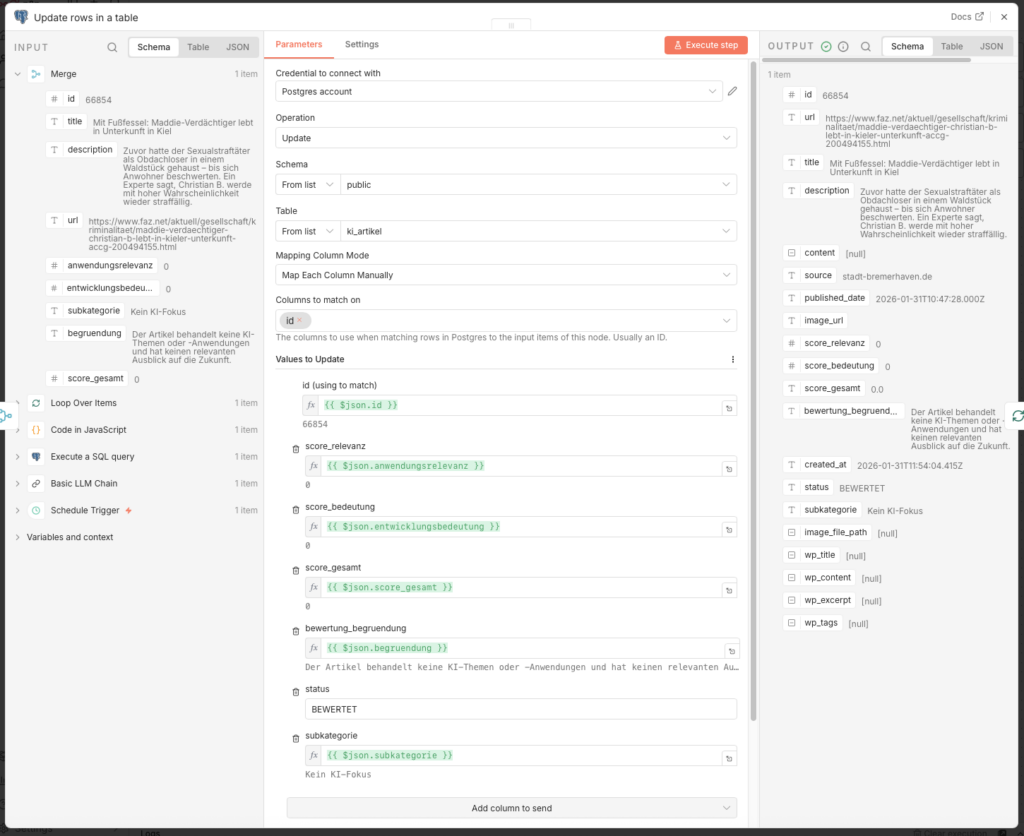
Connect the output of this node back to the Input of the Loop Over Items node – so runs the loop for alle retrieved article durch.
3.3.8 Publish the Workflow
Set the Schedule Trigger to 4 hours and enable the workflow via Publish.

3.4 Dashboard with Metabase (Optional)
Ulf: „Moment, I want to check what’s going on in my database. How can I look into it?”
Tanja: „Mit Metabase, which is a dashboard tool that connects directly to your PostgreSQL database. You can then ask questions like: ‘How many articles were rated today?’ and you get back a table or a chart.”
Bernd: “I just look directly in the database, via the terminal. More professional.”
Ulf: „Du hast letzte Woche accidentally deleted a table because you forgot a space.”
Bernd clears his throat.
You don’t necessarily need Metabase – the agents run without it too. But it is helpful if you want a quickellen overview, ask: Wie viele article wurden eingelesen? Wie verteilen sich the Scores? Welche categoryn dominieren?
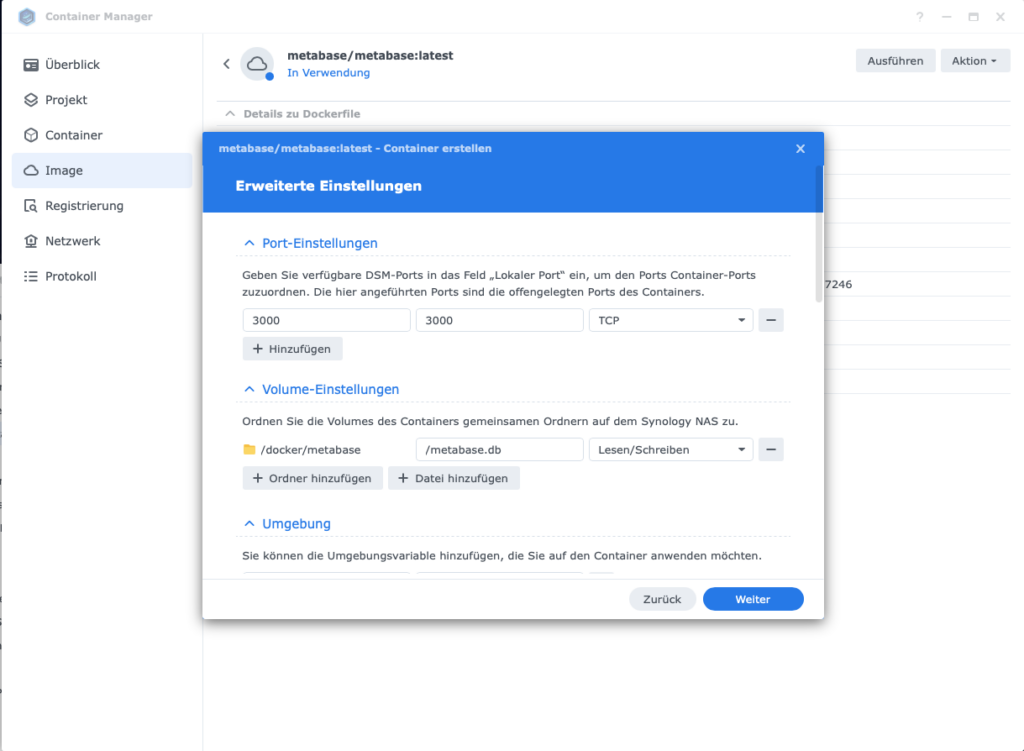
3.4.1 Prepare the Folder Structure
Metabase wants to store its own settings (which questions you asked, how your dashboard looks) somewhere. By default, it saves this inside des container. Wenn du den you delete or update the container, your dashboard is gone.

So that your dashboard persists, you should unter Volume-Settings (in the next Step) a folder on your NAS:
- Folder: Create the folder
docker/metabase.
3.4.2 Set Up Metabase
- Image Name:
metabase/metabase - Port: default 3000
Vorgehensweise:
- Load the Image in the Container Manager auf the Synology herunter

2. Run the image: metabase/metabase:latest → Execute
- Containername:
metabase-newsroom - Port: 3000
- Volume-Settings: + Folder add
- Folder
docker/metabaseselect (create it on the NAS beforehand) - Mount-Pfad:
/metabase.dbeintragen
- Folder
- Umgebungsvariable
GIT_COMMIT_SHA:unknowneintragen
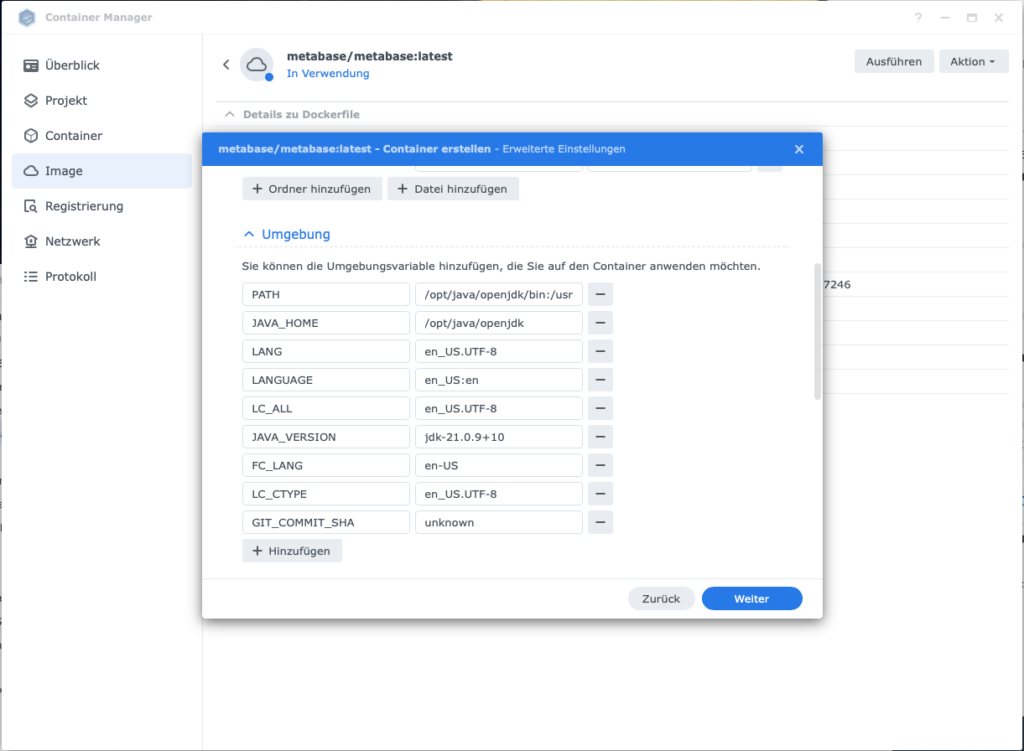
- Container start
Important: If the firewall on your Diskstation is active, create a rule for port 3000 (protocol TCP) – otherwise you cannot access Metabase via the browser.
Metabase runs unter http:// (not https://). Open http://<your-Synology-IP>:3000 in the Browser. On first launch, a setup wizard guides you through the databaseconnection:
- Database type: PostgreSQL
- Display name: z. B. „KI News database”
- Host: Container name of your Postgres instance (e.g.
n8n_db) - Port:
5432 - Database name:
postgres - Username: dein Postgres-Username
- Password: dein Postgres-Password

Your first SQL query can be created via + NEW -> >_ SQL-Abfrage. This query gives you a qrsten daily overview:
SELECT
    DATE(created_at) AS datum,
    -- 1) Wie viele RSS-Feeds wurden eingelesen?
    COUNT(*) AS eingelesen_gesamt,
    -- 2) Wie viele davon wurden bewertet?
    COUNT(*) FILTER (WHERE status = 'bewertet') AS bewertet,
    -- 3) Verteilung der Scores (Umwandlung in Zahlenwert mit ::float)
    COUNT(*) FILTER (WHERE score_gesamt::float BETWEEN 0 AND 2.9) AS "Score_0_bis_2",
    COUNT(*) FILTER (WHERE score_gesamt::float BETWEEN 3 AND 7.9) AS "Score_3_bis_7",
    COUNT(*) FILTER (WHERE score_gesamt::float >= 8) AS "Score_8_bis_10"
FROM ki_artikel
GROUP BY DATE(created_at)
ORDER BY datum DESC;
3.5 Agent 3: Content-research
Ulf: „We now have rated articles – what comes next?”
Tanja: „Now it gets interesting: Agent 3 takes the best articles – those with a score of 7.5 or higher, and researches them. It loads the original text, searches for related sources on the Web and has GPT-4o-mini write a structured background text from it.”
Ulf: „Moment, can the KI not einfach selbst in the Internet suchen? Why the detour via Tavily?”
Tanja: „Gute Frage. Let’s take a look.”
3.5.1 Starting the workflow
- Go back zur workflow-Overview and click on Create new workflow
- Nenne ihn oben links:
A3 Agent: Content-research - Add a Schedule Trigger:
- Trigger Interval: Hours
- Stelle first auf Manual to the Testen
- Hours Between Triggers: 23
- Trigger at Minute:
3.5.2 Read Record from Database
- Add a Postgres-Node:
- Node: Execute a SQL query
- Credential to connect with:
n8n-postgres - Query:
SELECT a.id, a.url, a.title, a.description
FROM ki_artikel a
LEFT JOIN ki_story s ON s.primary_artikel_id = a.id
WHERE a.score_gesamt >= 7.5
  AND s.id IS NULL
  AND (a.status IS NULL OR a.status <> 'ANGEREICHERT')
LIMIT 5;
Note: We only fetch articles with a total score of at least 7.5 – these are the truly relevant results worth a thorough research.. Das LIMIT 5 keeps the runtime manageable during initial testing.
Der LEFT JOIN mit WHERE s.id IS NULL is an elegant shortcut: Er findet alle article, for which there is still no story – exactly those that still need to be processed.
Also run these two index commands once directly in the database, um sie abzusichern:
CREATE UNIQUE INDEX IF NOT EXISTS ki_story_primary_uniq ON ki_story(primary_artikel_id);und
CREATE UNIQUE INDEX IF NOT EXISTS idx_ki_artikel_url_normalized ON ki_artikel(url_normalized);3.5.3 Loop einbauen
With this n8n jeden article einzeln abarbeitet, kommt als nexts the Loop-node:
- Node: Loop Over Items (Split In Batches)
- Batch Size: 1
- node-output Done: bleibt leer
- Konten-output Loop: next node
3.5.4 Fetch Website Content
We first try to load the full text directly from the source website – as a human would open and read the article.
- Add a HTTP Request-Node:
- Method: GET
- URL:
={{ $json.url }} - Add Options → Response Format: Text
- Send Headers: ON
| Header Name | Value |
|---|---|
| User-Agent | Mozilla/5.0 (Windows NT 10.0; Win64; x64) AppleWebKit/537.36 (KHTML, like Gecko) Chrome/120.0 Safari/537.36 |
| Accept | text/html |
| Accept-Language | de-DE,de;q=0.9,en;q=0.8 |
These headers are important: Many websites return better content if the request looks like a real browser call aussieht – statt how a nackter Bot.
- Add a Code Node (JavaScript) that converts the raw HTML into readable flowing text:
// n8n Code node (JavaScript)
// Erwartet HTML im Feld: $json.data (aus HTTP Request)
const html = ($json.data || '').toString();
// 1) Skripte/Styles entfernen
let cleaned = html
.replace(/<script\b[^<]*(?:(?!<\/script>)<[^<]*)*<\/script>/gi, ' ')
.replace(/<style\b[^<]*(?:(?!<\/style>)<[^<]*)*<\/style>/gi, ' ');
// 2) Häufige Layout-Blöcke grob entfernen (optional, aber hilfreich)
cleaned = cleaned
.replace(/<nav\b[^<]*(?:(?!<\/nav>)<[^<]*)*<\/nav>/gi, ' ')
.replace(/<header\b[^<]*(?:(?!<\/header>)<[^<]*)*<\/header>/gi, ' ')
.replace(/<footer\b[^<]*(?:(?!<\/footer>)<[^<]*)*<\/footer>/gi, ' ');
// 3) HTML-Tags -> Text (mit rownumbrüchen an sinnvollen Stellen)
cleaned = cleaned
.replace(/<\/(p|div|br|li|h1|h2|h3|h4|h5|section|article)>/gi, '\n')
.replace(/<[^>]+>/g, ' ');
// 4) HTML Entities (minimal)
cleaned = cleaned
.replace(/ /g, ' ')
.replace(/&/g, '&')
.replace(/"/g, '"')
.replace(/'/g, "'")
.replace(/</g, '<')
.replace(/>/g, '>');
// 5) Whitespace normalisieren
cleaned = cleaned
.replace(/\r/g, '')
.replace(/[ \t]+/g, ' ')
.replace(/\n{3,}/g, '\n\n')
.trim();
// 6) Optional: begrenzen (für DB/LLM)
const maxLen = 20000;
const content_candidate = cleaned.slice(0, maxLen);
const content_candidate_len = content_candidate.length;
// --- Qualitäts-Check ---
const words = content_candidate.split(/\s+/).filter(w => w.length > 3);
const wordCount = words.length;
const avgWordLength =
words.reduce((sum, w) => sum + w.length, 0) / (wordCount || 1);
const badMarkers = [
'cookie', 'zustimmen', 'abo', 'newsletter', 'anzeigen',
'karriere', 'impressum', 'datenschutz', 'suche', 'login',
'heise+', 'jobs'
];
const badHits = badMarkers.filter(m =>
content_candidate.toLowerCase().includes(m)
).length;
const content_quality_ok =
content_candidate_len > 1500 &&
wordCount > 250 &&
avgWordLength > 4 &&
badHits < 5;
return [{
...$json,
content_candidate,
content_candidate_len,
content_quality_ok,
content_word_count: wordCount,
content_avg_word_len: avgWordLength,
content_bad_hits: badHits,
}];
The result contains the flag content_quality_ok. A usable text requires at least 1,500 characters, 250 words, and must not be dominated by boilerplate terms like „Cookie” or „Impressum” dominiert sein. This flag serves as metadata; the Tavily-research runs in jedem Fall then – the Web-Kontext is the actuallye Basis for den LLM-Text.
3.5.5 Why Tavily Instead of OpenAI Web Search?
Ulf: „Quick question: can’t I just use GPT with internet access? Then I wouldn’t need Tavily gar not.”
Tanja: „Du kannst, but schau dir kurz the Kosten an.”
| Feature | Basic LLM Chain | AI Agent + Tavily | AI Agent + Serper/Brave | OpenAI Search-Preview |
|---|---|---|---|---|
| Internetzugriff | Nein | Ja (inkl. text excerpts) | Ja (only Links) | Ja (integriert) |
| Kosten pro Suche | – | 0 Cent (bis 1.000/Monat kostenlos) | 0,1 – 1,5 Cent | 3 – 10 Cent |
| Result quality | Nur if manually fed | Very good – content already processed | Gut – Rohlinks, no Textinhalt | Sehr gut |
| Kontrolle | Voll | Voll | Voll | Begrenzt |
| Setup-Aufwand | Minimal | Gering (1 API Key) | Gering (1 API Key) | Minimal |
Ulf: „Okay, I still don’t quite get it,” and points to the table. „Serper and Brave also provide search results. Why is Tavily better?”
Tanja: “Imagine: you send an intern to gather information about a topic. Serper and Brave return with a stack of newspaper URLs. Tavily returns with the extracted articlen. Already readable, readyits sortiert.”
Ulf furrows his brow. “So Tavily delivers the page content directly along with it?”
Tanja: „Genau. Serper and Brave geben dir only Links – you still have to visit each page yourself and extract the text. Tavily already delivers processed text excerpts. This gives GPT-4o-mini clean context instead of raw HTML junk. This saves tokens – and better input means better output.”
Bernd: „Klingt nach wenig Unterschied, I’d just use OpenAI’s built-in web search. Less hassle.”
Tanja: „Kostet dich 3 bis 10 Cent pro Suche, Tavily is bis tausend Suchen in the Monat kostenlos. Danach 1,5 Cent. That is 10 to 30x cheaper, at the same or better quality for our use case.”
Ulf: „Tausend Suchen reichen uns?”
Tanja: „Wir recherchieren daily for maximal a article, with bis zu 20 Tavily-Treffern pro Durchlauf. That’s roughly 600 searches per month. Fits easily within the free tier.”
Bernd taps briefly on his phone. “Okay, Tavily.”
Tanja: “Thanks.”
3.5.6 Set Up Tavily Search
- Create an account at app.tavily.com and copy your API key
- Add the node Search: Tavily.
- Create unter Credential to connect with a neues Credential with deinem API Key
- Configure the node:
- Query:
   {{
  (
    ($('Execute a SQL query').item.json.title || '') + ' ' +
    ($('Execute a SQL query').item.json.description || '')
  ).slice(0, 380)
}}- Configure the node:
- Add Options → Search Depth: Advanced
- Add Options → Max Results: 20
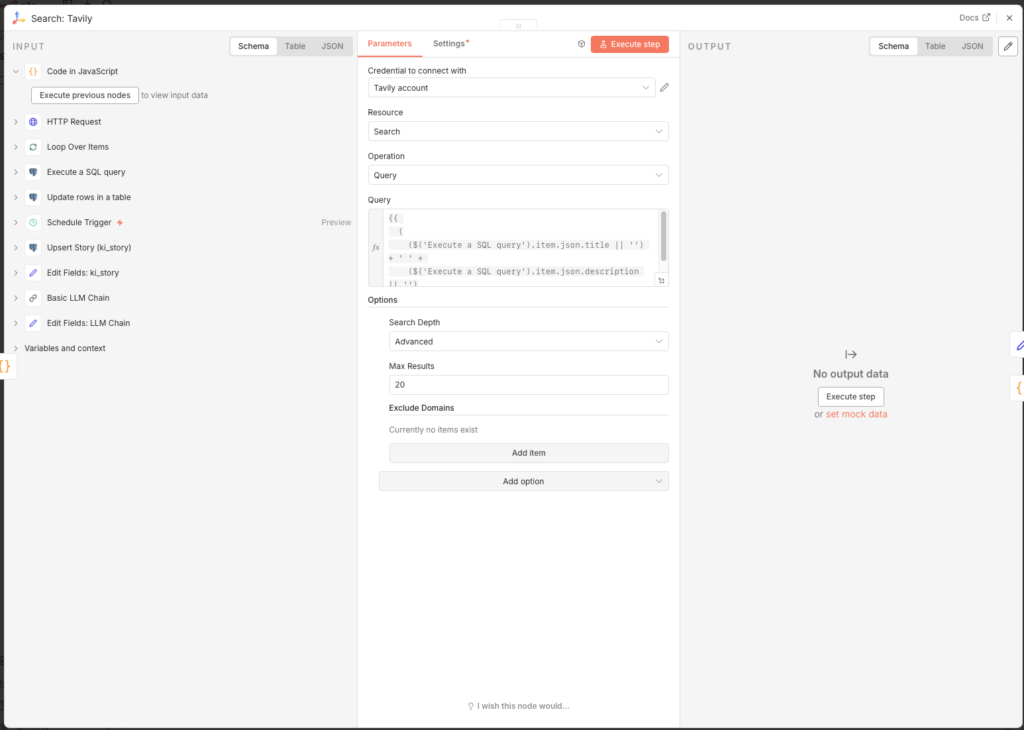
The query combines title and description of the article and truncates at 380 characters. Mit Advanced and 20 resultsen we get the maximum out of the Tavily free tier.
3.5.7 Filter Out Poor URLs
Tavily sometimes returns SEO junk pages, feed aggregators, or off-topic content. A code node filters these out before they pollute the database:
- Node: Code (JavaScript)
- Mode: Run Once for All Items
const input = $input.first().json;
const list = Array.isArray(input.results) ? input.results : [];

// --- Konfiguration ---
const BLOCKED_DOMAINS = [
  'feed-reader.net', 'rssingn.com', 'finanztrends.de',
  'it-daily.net', 'possible.fm', 'edu.ly',
];

const BAD_TITLE_PATTERNS = [
  'die besten', 'tools im vergleich', 'im vergleich', 'ranking', 'best of',
];

const MIN_CONTENT_LENGTH = 250;
const MIN_SCORE = 0.55;

function host(u) {
  try { return new URL(u).hostname.replace(/^www\./, ''); } catch { return ''; }
}

const kept = [];
for (const r of list) {
  const url = String(r.url || '').toLowerCase();
  const title = String(r.title || '').toLowerCase();
  const content = String(r.content || '').toLowerCase();
  const h = host(url);

  let reason = null;
  if (!url || !title) reason = 'missing url/title';
  else if (BLOCKED_DOMAINS.some(d => h.includes(d))) reason = 'blocked domain';
  else if (BAD_TITLE_PATTERNS.some(p => title.includes(p))) reason = 'seo/list title';
  else if (content.length < MIN_CONTENT_LENGTH) reason = 'too short content';
  else if (typeof r.score === 'number' && r.score < MIN_SCORE) reason = 'low score';

  if (!reason) kept.push({ ...r, _quality_flag: 'accepted' });
}

// Fallback: wenn alles rausfliegt, nimm Top 5 nach Score
const final = kept.length > 0
  ? kept
  : [...list].sort((a, b) => (b.score ?? 0) - (a.score ?? 0)).slice(0, 5)
      .map(r => ({ ...r, _quality_flag: 'fallback' }));

return final.map(r => ({
  json: {
    ...r,
    _debug: {
      input_count: list.length,
      kept_count: kept.length,
    }
  }
}));
The fallback at the end is important: Wenn all matches are filtered out, the code still takes the top 5 by score – this way the workflow never continues completely empty.
3.5.8 Save Tavily Results to the Database
The found sources are used in two ways: as context for the LLM (next step) and as own records in the database. For this we need three nodes in sequence.
Node 1: Prepare Tavily Results (Code in JavaScript)
This code normalisiert the URLs the Tavily-Treffer and bereitet the fields for the database vor – analog zur URL normalization from Agent 1:
function normalizeUrl(input) {
  try {
    const url = new URL(input.startsWith('http') ? input : 'https://' + input);
    url.hash = '';
    const dropKeys = new Set(['fbclid','gclid','mc_cid','mc_eid','msclkid','utm_source']);
    for (const k of Array.from(url.searchParams.keys())) {
      if (k.toLowerCase().startsWith('utm_') || dropKeys.has(k.toLowerCase()))
        url.searchParams.delete(k);
    }
    url.hostname = url.hostname.replace(/^www\./i, '').toLowerCase();
    url.protocol = 'https:';
    if (url.pathname === '/') url.pathname = '';
    return url.toString();
  } catch (e) { return input; }
}

function extractHost(input) {
  try { return new URL(input).hostname.replace(/^www\./i, '').toLowerCase(); }
  catch (e) { return 'unknown'; }
}

const fromId = $('Execute a SQL query').item?.json?.id ?? null;
const results = items.every(it => typeof it?.json?.url === 'string')
  ? items.map(it => it.json)
  : (Array.isArray(items?.[0]?.json?.results) ? items[0].json.results : []);

return results.filter(r => r?.url).slice(0, 10).map((r, idx) => {
  const norm = normalizeUrl(r.url);
  const host = extractHost(norm || r.url);
  return { json: {
    from_artikel_id: fromId,
    relation_type: 'tavily_related',
    query: items?.[0]?.json?.query ?? '',
    rank: idx + 1,
    score: r.score ?? null,
    url: r.url,
    url_normalized: norm,
    title: r.title ?? '(no title)',
    description: (r.content ?? '').slice(0, 800),
    source: host,
    source_type: 'tavily',
  }};
});
Node 2: Upsert Tavily Article (Postgres – Execute a SQL query)
Each result is stored as a separate record in ki_artikel. Durch ON CONFLICT will a already bekannter article not doppelt eingetragen, sondern only adds the missing fields:
INSERT INTO ki_artikel (
  url, url_normalized, title, description,
  source, published_date, image_url, source_type, status, first_seen_at
)
VALUES (
  '{{ ($json.url || "").replace(/'/g, "''") }}',
  '{{ ($json.url_normalized || "").replace(/'/g, "''") }}',
  '{{ ($json.title || "").replace(/'/g, "''") }}',
  '{{ ($json.description || "").replace(/'/g, "''") }}',
  '{{ ($json.source || "").replace(/'/g, "''") }}',
  NULL, NULL, 'tavily', 'ANGEREICHERT', now()
)
ON CONFLICT (url_normalized)
DO UPDATE SET
  title       = COALESCE(NULLIF(ki_artikel.title,''), EXCLUDED.title),
  description = COALESCE(NULLIF(ki_artikel.description,''), EXCLUDED.description),
  source      = COALESCE(NULLIF(ki_artikel.source,''), EXCLUDED.source),
  status      = COALESCE(NULLIF(ki_artikel.status,''), 'ANGEREICHERT')
RETURNING id;
Node 3: Upsert Tavily Edge (Postgres – Execute a SQL query)
The connection between the source article and the found Tavily result is saved in ki_artikel_edges:
INSERT INTO ki_artikel_edges (
  from_artikel_id, to_artikel_id, relation_type, query, rank, score, retrieved_at
)
VALUES (
  {{ $node["Prepare Tavily Results"].json.from_artikel_id }},
  {{ $node["Upsert Tavily Article"].json.id }},
  '{{ (($node["Prepare Tavily Results"].json.relation_type) || "tavily_related").replace(/'/g, "''") }}',
  '{{ (($node["Prepare Tavily Results"].json.query) || "").replace(/'/g, "''") }}',
  {{ $node["Prepare Tavily Results"].json.rank || 1 }},
  {{ $node["Prepare Tavily Results"].json.score ?? 'NULL' }},
  now()
)
ON CONFLICT (from_artikel_id, to_artikel_id, relation_type)
DO UPDATE SET
  rank         = EXCLUDED.rank,
  score        = EXCLUDED.score,
  query        = EXCLUDED.query,
  retrieved_at = now();
3.5.9 Prepare LLM Context
Parallel zur databasespeicherung bereitet a Edit Fields-Node den kombinierten Kontext for GPT-4o-mini auf:
- Node: Edit Fields
- Field Name:
llm_context - Type: String
- Value (Expression):
=RSS ARTICLE
Title: {{ $('Loop Over Items').item.json.title }}
Description: {{ $('Loop Over Items').item.json.description }}

WEB SEARCH CONTEXT
={{
  "RSS ARTICLE\nTitle: " +
  $('Loop Over Items').item.json.title +
  "\nDescription: " +
  $('Loop Over Items').item.json.description +
  "\n\nWEB SEARCH CONTEXT\n" +
  ($node["Search: Tavily"].json.results || [])
    .slice(0, 10)
    .map((r, i) => "[Source " + (i+1) + "]\n" + (r.content || ""))
    .join("\n\n")
}}
With this hat the KI both the original RSS article and up to 10 processed web page texts from Tavily as context.
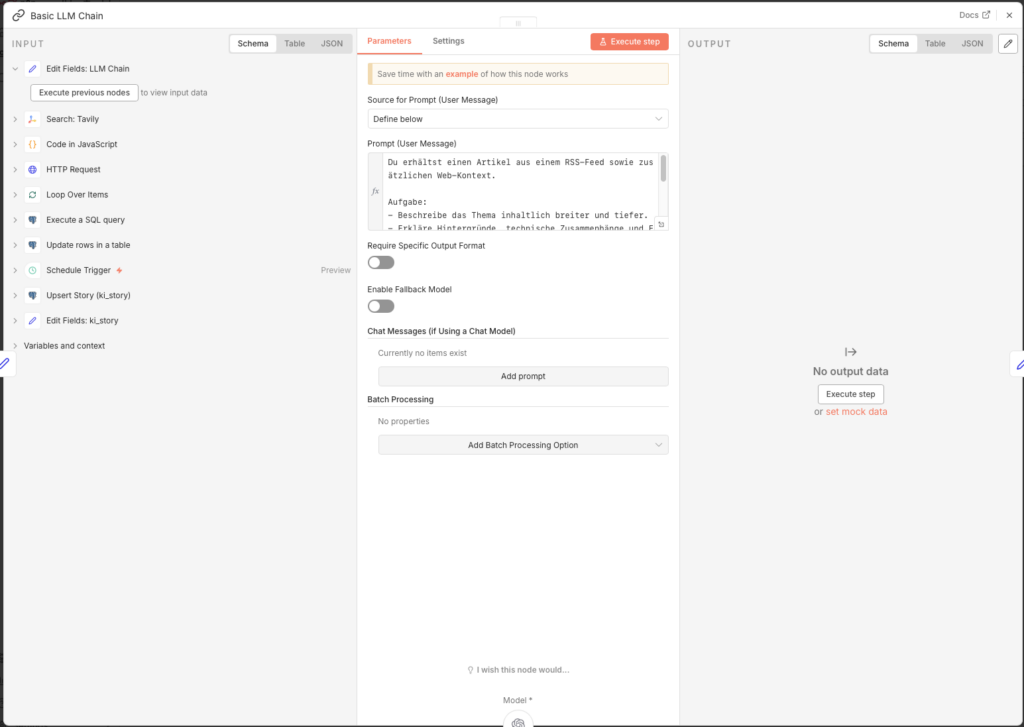
3.5.10 Create Background Text with GPT-4o-mini
- Node: Basic LLM Chain
- Source for Prompt: Define below
- Prompt (User Message):
Du erhältst einen article aus einem RSS-Feed sowie additionallyen Web-Kontext.

Aufgabe:
- Beschreibe das Thema inhaltlich breiter und tiefer.
- Erkläre Hintergründe, technicale Zusammenhänge und Einordnung.
- Struktur: 1) Kurzüberblick (3-4 Sätze) 2) Details (5-10 Bulletpoints) 3) Bedeutung/Implikationen (3 Bulletpoints).
- Keine sourcenangaben, keine Spekulationen.

TEXT:
{{ $json.llm_context }}
Den Basic LLM Chain with dem OpenAI Chat Model connect:
- Node: OpenAI Chat Model
- Credential to connect with: OpenAI account
- Model: gpt-4o-mini
3.5.11 Prepare Story Fields
Ein Edit Fields-Node combines the LLM result with metadata from the Loop:
- Node: Edit Fields (Name:
Edit Fields: ki_story)
| Name | Type | Value |
|---|---|---|
| id | Number | ={{ $('Loop Over Items').item.json.id }} |
| content_enriched | String | ={{ $json.text }} |
| enrichment_source | String | search_llm |
| tavily_link_count | String | ={{ $items("Code in JavaScript: schlechte url aussortieren").length }} |
| score_gesamt_enriched | Number | ={{ (Math.round(($('Loop Over Items').item.json.score_gesamt | 0) * 10) + ($items("Code in JavaScript: schlechte url aussortieren").length | 0)) / 10 }} |
Der score_gesamt_enriched combines the original evaluation score with the number of usable Tavily sources – je mehr gute sourcen were found, the score increases slightly.
3.5.12 Save Story to Database
- Node: Postgres – Execute a SQL query (Name:
Upsert Story (ki_story))
INSERT INTO ki_story (
  primary_artikel_id,
  content_enriched,
  enrichment_source,
  tavily_link_count,
  score_gesamt_enriched,
  status,
  updated_at
)
VALUES (
  {{ $json.id }},
  '{{ ($json.content_enriched || "").replace(/'/g, "''") }}',
  '{{ ($json.enrichment_source || "").replace(/'/g, "''") }}',
  {{ parseFloat($json.tavily_link_count) || 0 }},
  {{ parseFloat($json.score_gesamt_enriched) || 0 }},
  'ANGEREICHERT',
  now()
)
ON CONFLICT (primary_artikel_id)
DO UPDATE SET
  content_enriched      = EXCLUDED.content_enriched,
  enrichment_source     = EXCLUDED.enrichment_source,
  tavily_link_count     = EXCLUDED.tavily_link_count,
  score_gesamt_enriched = EXCLUDED.score_gesamt_enriched,
  updated_at            = now();
3.5.13 Update Status and Close Loop
Finally, will the Status des articles in ki_artikel auf ANGEREICHERT set, so that Agent 4 can process it in the next Step aufgreifen kann.
- Add a Postgres-Node:
- Node: Update rows in a table
- Credential to connect with:
n8n-postgres - Operation: Update
- Schema: public
- Table: ki_artikel
- Mapping Column Mode: Map Each Column Manually
- Columns to match on: id
| Feld | Value |
|---|---|
| id (using to match) | ={{ $('Loop Over Items').item.json.id }} |
| status | ANGEREICHERT |
- Connect the output of this node back to the input of „Loop Over Items”, so that all further articles from the database are processed in sequenceerden.
3.5.14 Publish the Workflow
Set the Schedule Trigger to 23 hours and enable the workflow via Publish. Agent 3 runs with this einmal daily, reichert alle article mit score_gesamt >= 7.5 an and passes them ready to Agent 4.

3.6 Agent 4: Create Article with Custom Image
Ulf: „Now it’s getting really exciting. Now the AI writes the article?”
Tanja: „Claude writes it, and Flux-2-Flex generates a cover image.”
Bernd looks up. „I simply copied my last article from another website and slightly rewrote it. Nobody noticed.”
Stille.
Tanja: “That is called copyright infringement.”
Bernd: „Aber …”
Tanja: „Nein.”
3.6.1 Legal Assessment
Vorab a brief personal assessment as a layperson, which is not legal advice:
Text: The AI may use facts and context, but must never reproduce sentences from the original article verbatim. Short quotes are permitted if they are labeled as such and provided with a source link. Claude is explicitly required in the prompt to reformulate everything from scratch.
imageer: The biggest copyright risk lies with images. Das image_url-Feld aus dem RSS-Feed darf not einfach als Featured Image directly – that would be the republication of a copyrighted images on your website. Stinstead we generate a custom image with Flux-2-Flex that is 100% our own.
3.6.2 Starting the workflow
- Go tor workflow-Overview and click on Create new workflow
- Nenne ihn:
A4 Agent: article create with eigenem image - Add a Schedule Trigger:
- Trigger Interval: Hours
- Hours Between Triggers: 23
- Trigger at Minute: 0
For setup, we first use the Manual Trigger, so that we we can start directly during testing.
3.6.3 Fetch the Best Story from the Database
Agent 4 reads from the ki_story table – there lies the enriched content from Agent 3. This SQL query is the most complex of the entire project: Es holt the beste Story and directly loads all associated Tavily URLs as an array, so with this Claude sie in the sourcenabschnitt verlinkt.
- Add a Postgres-Node:
- Node: Execute a SQL query
- Query:
SELECT
s.id AS story_id,
s.status,
s.score_gesamt_enriched,
s.content_enriched,
a.title AS original_title,
a.url AS original_url,
a.published_date AS original_published_at,
a.source AS original_source,
COALESCE((
SELECT ARRAY_AGG(x.url ORDER BY x.rank NULLS LAST, x.retrieved_at DESC, x.url)
FROM (
SELECT DISTINCT
a2.url,
e.rank,
e.retrieved_at
FROM ki_artikel_edges e
JOIN ki_artikel a2
ON a2.id = e.to_artikel_id
WHERE e.from_artikel_id = s.primary_artikel_id
AND e.relation_type = 'tavily_related'
AND a2.url_normalized IS DISTINCT FROM a.url_normalized
ORDER BY e.rank NULLS LAST, e.retrieved_at DESC, a2.url
LIMIT 10
) x
), ARRAY[]::text[]) AS tavily_urls
FROM ki_story s
JOIN ki_artikel a ON a.id = s.primary_artikel_id
WHERE s.status = 'ANGEREICHERT'
ORDER BY s.score_gesamt_enriched DESC
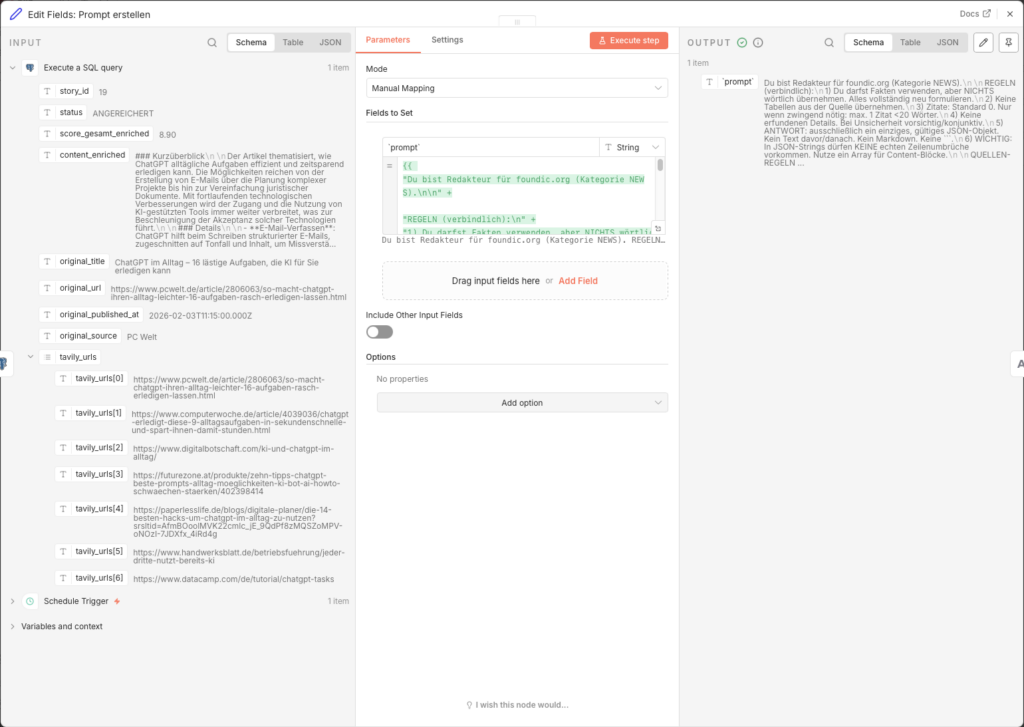
LIMIT 1;3.6.4 Build Article Prompt for Claude
Ein Edit Fields-Node baut den completelyen Prompt auf. Er is bewusst restriktiv: sechs verbindliche Redaktionsregeln verhindern Urheberrechtsverletzungen.
- Node: Edit Fields (Name:
Edit Fields: Prompt createn) - Add Field → Name:
`prompt`→ Type: String → Value (Expression):
={{
"Du bist Redakteur für foundic.org (category NEWS).\n\n" +

"REGELN (verbindlich):\n" +
"1) Du darfst Fakten verwenden, aber NICHTS reproduce verbatim. Alles completely neu formulieren.\n" +
"2) Keine tablen aus der source take over.\n" +
"3) Zitate: Standard 0. Nur wenn zwingend nötig: max. 1 Zitat <20 words.\n" +
"4) Keine erfundenen Details. Bei Unsicherheit vorsichtig/konjunktiv.\n" +
"5) ANTWORT: ausfinally ein einziges, gültiges JSON-Objekt. Kein Text davor/then. Kein Markdown. Keine ```.\n" +
"6) WICHTIG: In JSON-Strings dürfen KEINE echten rownumbrüche vorkommen. Nutze ein Array für Content-Blöcke.\n\n" +

"ARTIKELDATEN:\n" +
"ORIGINAL_TITEL: " + ($json.title ?? "") + "\n" +
"BESCHREIBUNG: " + ($json.description ?? "") + "\n" +
"INHALT (nur Kontext, NICHT take over): " + (($json.content ?? "").slice(0, 1500)) + "\n" +
"QUELLE: " + ($json.source ?? "") + "\n" +
"DATUM: " + ($json.published_date ?? "") + "\n" +
"URL: " + ($json.url ?? "") + "\n\n" +

"Pflichtregeln für wp_title:\n" +
"- wp_title ist eine kurze Umformulierung des ORIGINAL_TITEL (gleicher Sachverhalt).\n" +
"- wp_title contains mindestens 2 Kernbegriffe aus ORIGINAL_TITEL (z.B. Siemens/CES/Industrie).\n" +
"- max. 12 words.\n\n" +

"ERWARTETES JSON (Keys nie weglassen, fehlende Werte: \"\" oder []):\n" +
"{\n" +
"  \"wp_title\": \"...\",\n" +
"  \"wp_excerpt\": \"...\",\n" +
"  \"wp_content_blocks\": [\n" +
"    \"<h2>Worum geht’s?</h2>\",\n" +
"    \"<p>...</p>\",\n" +
"    \"<h2>Hintergrund & Einordnung</h2>\",\n" +
"    \"<p>...</p>\",\n" +
"    \"<p>...</p>\",\n" +
"    \"<h2>Was bedeutet das?</h2>\",\n" +
"    \"<ul><li>...</li><li>...</li><li>...</li></ul>\",\n" +
"    \"<h2>source</h2>\",\n" +
"    \"<p><a href=\\\"" + ($json.url ?? "") + "\\\">" + (($json.title ?? "").replace(/"/g, '\\"')) + "</a> (" + ($json.source ?? "") + ", " + ($json.published_date ?? "") + ")</p>\"\n" +
"  ],\n" +
"    \"<p><i>Dieser article wurde mit KI created und basiert auf den angegebenen sourcen sowie den Trainingsdaten des Sprachmodells.</i></p>\"\n" +
" ],\n" +
"  \"wp_tags\": [\"...\",\"...\",\"...\",\"...\",\"...\"]\n" +
"}\n"
}}
The prompt is deliberately restrictive: six binding editorial rules prevent Urheberrechtsverletzungen, the sourcen-Regeln ensure that Claude only links to high-quality media, and the JSON-outputformat erpossiblet the maschinelle Weiterverarbeitung without Nachbearbeitung.
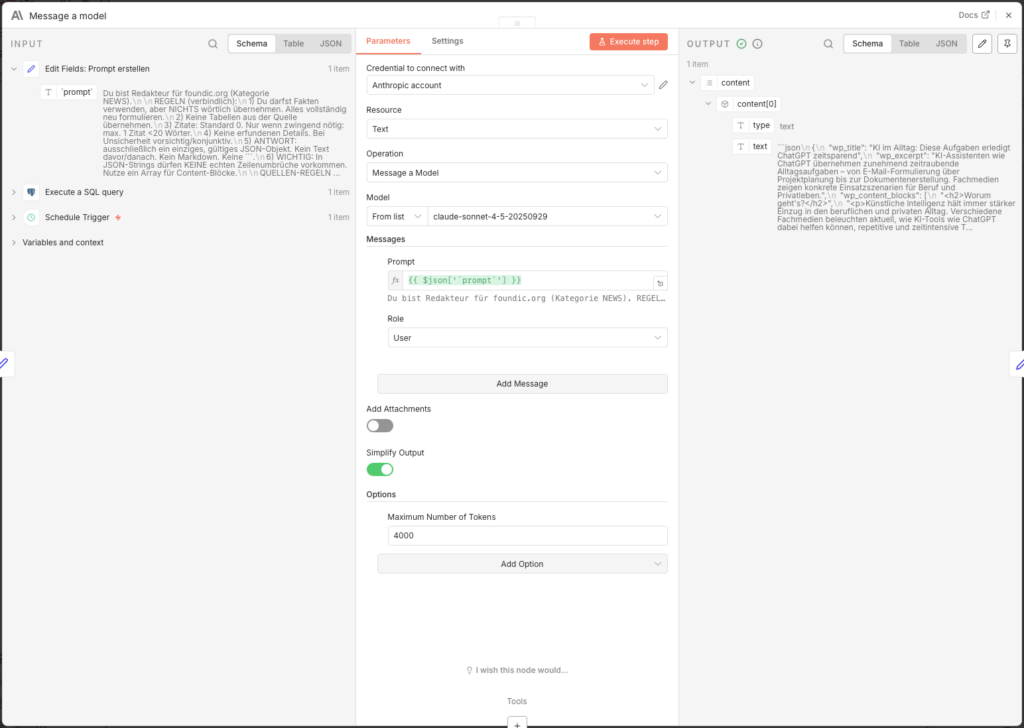
3.6.5 Write Article with Claude Sonnet
- Node: Message a model (Anthropic)
- Credential to connect with: Anthropic API Key (createn unter console.anthropic.com)
- Model: claude-sonnet-4-5-20250929
- Messages → Content:
={{ $json['prompt'] }} - Options → Maximum Number of Tokens: 4000
Increasing the token limit to 4,000 is important – without this setting the article will be cut offn abgeschnitten.
3.6.6 Parse Claude Output
Claude returns the answer as raw text. Ein Edit Fields-Node extracts from it the JSON-Objekt:
- Node: Edit Fields (Name:
Edit Fields1) - Add Field -> Name:
parsed-> Type: Object -> Value:
={{
  (() => {
    const raw =
      $json?.content?.[0]?.text ??
      $json?.content?.[0]?.content?.[0]?.text ??
      $json?.text ??
      "";

    const cleaned = raw.replace(/```(?:json)?/gi, "").trim();

    try {
      return JSON.parse(cleaned);
    } catch (e) {
      return { error: "JSON konnte nicht gelesen werden", raw: cleaned };
    }
  })()
}}
The code tries multiple possible paths in the Claude response object. If the parsing scheitert, gibt er a error object back – so the workflow does not stop silently, but leaves a readable note.
3.6.7 Prepare Fields for WordPress
Ein zweiter Edit Fields-Node „entpackt” the geparsten fields in eigenconstantlye, benannte Variablen:
- Node: Edit Fields (Name:
Edit Fields2)
| Name | Type | Value |
|---|---|---|
| wp_title | String | ={{ $json.parsed.wp_title }} |
| wp_content | String | ={{ $json.parsed.wp_content_blocks.join('\n\n') }} |
| wp_excerpt | String | ={{ $json.parsed.wp_excerpt }} |
| wp_tags | String | ={{ $json.parsed.wp_tags }} |
Die wp_content_blocks will durch join('\n\n') zu einem einzigen HTML string – exactly the format the WordPress REST API expects.
3.6.8 Build Image Prompt for Flux
Jetzt startt the imagegenerierungsprozess. Ein Edit Fields-Node baut den Flux-Prompt based on the fully written article:
- Node: Edit Fields (Name:
Edit Fields3) - Add Field → Name:
`prompt`→ Type: String → Value:
={{
"THEMA (kurz): " + ($json.wp_title ?? "") +
". KONTEXT (kurz): " + ($json.wp_excerpt ?? "") +
". " +
"Create auf Basis des obigen Blogtextes eine moderne, vektorbasierte Editorial-Illustration im Flat-Design, geeignet als ruhiges Coverbild für einen professionellen Tech- oder Wissensblog. " +
"Stil und Gestaltung: Editorial-Flat-Illustration (Flat Design 2.0), vektorbasiert, sauber und minimalistisch. " +
"Klare Linien, einfache geometrische Formen, ruhige Flaechen und harmonische Proportionen. " +
"Reduzierte, professionelle Farbpalette mit warmen, mutedn Toenen (Beige, Apricot, Orange) kombiniert mit zurueckhaltenden Blau- und Gruentoenen auf hellem Hintergrund. " +
"Weiches, flaechiges Licht mit sehr subtilen Schatten oder leichten Verlaeufen, keine realistische Lichtquelle. " +
"Abstrahierte, neutrale Figuren oder symbolische Objekte ohne individuelle Merkmale. " +
"Aufgeraeumte Komposition mit Fokus auf eine zentrale visuelle Metapher. " +
"Ruhige, sachliche imagewirkung mit redaktionellem Charakter. " +
"contentliche Vorgaben: Thema visuell abstrahieren, nicht woertlich oder erzählerisch. Keine konkrete Szene mit erkennbarem Ort oder realen Marken. " +
"Zwingende Verbote: Kein Text im image (keine Buchstaben, Woerter, Zahlen, Schriftzeichen). Keine Logos/Markenzeichen/firmenspezifischen Symbole. Keine Fotografie, kein photorealism. Keine 3D-Darstellung. Keine Comic- oder Cartoon-Optik. " +
"Technische Vorgaben: Quadratisches imageformat. Zeitgemaesser, konsistenter Stil fuer redaktionelle Online-contente. "
}}
The prompt uses wp_title and wp_excerpt from the newly created article as the content basis. The detailed style specifications (Flat Design 2.0, muted colors, no text, no photorealism) ensure a consistentes, consistent editorial look across all generated covers.
3.6.9 Request Image from Black Forest Labs
The BFL API works asynchronously – you submit a job, get a job number back and check later whether the image is ready. Like a bakery: place an order, take the ticket, pick it up later.
Step 1: Set Up API Key
Create auf bfl.ai a Account, load credits and copy your API key. Save it in n8n as a Custom Auth Credential:
- Go to n8n Main Menu → Credentials → New
- Type: Custom Auth
- Name: z. B.
BFL API Key - JSON:
{
  "headers": {
    "x-key": "bfl_DEIN_API_KEY_HIER"
  }
}
Step 2: image-Job start
- Node: HTTP Request (Name:
HTTP Request - URL image) - Method: POST
- URL:
https://api.bfl.ai/v1/flux-2-flex - Authentication: Generic Credential Type → Custom Auth → dein BFL-Credential
- Send Headers: ON
- Name:
Content-Type/ Value:application/json
- Name:
- Send Body: ON → Body Content Type: JSON → Specify Body: Using JSON
- JSON Body:
{
  "prompt": "={{ $json['`prompt`'] }}",
  "prompt_upsampling": true,
  "width": 1024,
  "height": 1024,
  "steps": 35,
  "guidance": 5,
  "output_format": "jpeg",
  "safety_tolerance": 2
}- Response Format: JSON
The 35 render steps provide a good balance between image quality and generation time (approx. 8–15 seconds).

3.6.10 Wait and Retrieve Image
Since the API works asynchronously, we need a poll loop: wait → check → done or nochmal warten.
Wait-Node:
- Node: Wait
- Resume: After Time Interval
- Wait Amount: 11 seconds
11 seconds is in the Praxis a gute Wartezeit for Flux-2-Flex. Zu kurz leads zu vielen unnecessarilyen Check-Requests, unnecessarily extends the workflow runtime.
Check-Node: - Node: HTTP Request (Name:
HTTP Request - Check URL image) - Method: GET
- URL:
={{ $('HTTP Request - URL image').item.json.polling_url }} - Response Format: JSON
IF-Node (fertig or weiter warten): - Node: IF
- Condition:
{{ $json.status }}is equal toReady- TRUE → weiter to the Download
- FALSE → back to the Wait node (Connection from the FALSE output back to “Wait”)
Achtung: BFL gibtReadywith capital R back – notREADY. Typos here will cause an infinite loop.
Download-Node:
- Node: HTTP Request (Name:
HTTP Request - Download URL image) - Method: GET
- URL:
={{ $json.result.sample }} - Response Format: File
The image now arrives as binary data in the fielddataand is ready to be saved.
3.6.11 Assign File Names
Ein Edit Fields-Node created a systematischen Filenamen in the Format YYYY-MM-DD_quelle_artikel-slug_img-01.jpg:
- Node: Edit Fields (Name:
Edit Fields5) - Include Other Input Fields: ON
- Add Field → Name:
filename→ Type: String → Value:
={{
  (String($('Execute a SQL query').item.json.original_published_at || '').substring(0,10) || '0000-00-00')
}}_{{
  String($('Execute a SQL query').item.json.original_source || 'unknown').toLowerCase().replace(/\s+/g, '-').replace(/[^a-z0-9-]/g,'')
}}_{{
  String($('Execute a SQL query').item.json.original_title || 'untitled')
    .toLowerCase()
    .normalize('NFD').replace(/[\u0300-\u036f]/g, '')
    .replace(/[^a-z0-9]+/g, '-')
    .replace(/^-+|-+$/g, '')
    .substring(0, 80)
}}_img-01.jpg
The result: 2026-01-20_heise-it_openai-stellt-neues-modell-vor_img-01.jpg. Each filename is unique, readable, and sortable by date.
3.6.12 Save Image to the Synology NAS
- Node: Read/Write Files from Disk
- Operation: Write File to Disk
- Binary Property:
data - File Path:
/data/wpmedia/raw/{{ $json.filename }}
With this n8n is allowed to write to this directory, the volume must be mounted in the Docker YAML. If this hasn’t been done yet, add in deinerdocker-compose.ymluntervolumes:
volumes:
  - /volume2/docker/n8n/app_data:/home/node/.n8n
  - /volume1/WordPress/media:/data/wpmedia    # ← diese row add
Then restart the container. Also, write permissions for the n8n process must be correct – if the node reports an error, this SSH command on the DiskStation helps
sudo chown -R 1000:1000 /volume1/WordPress/media/
sudo chmod -R 775 /volume1/WordPress/media/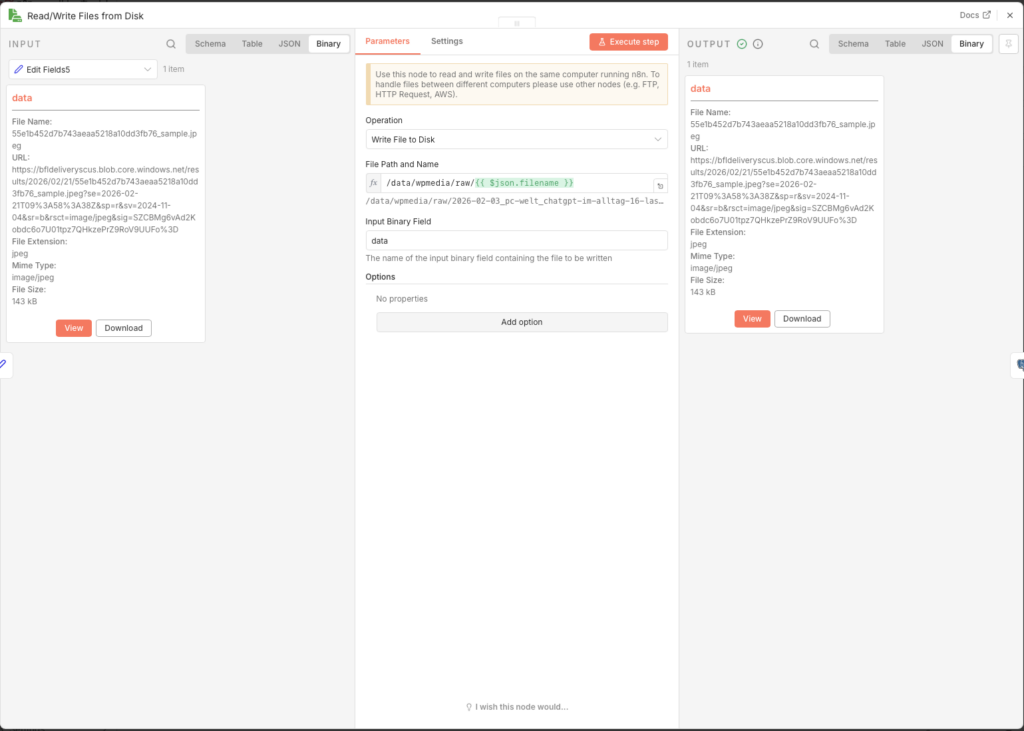
3.6.13 Update Story in Database
Finally, a Postgres node writes all generated content in the ki_story table and sets the status to PUBLISH_READY. Das is the Signal for Agent 5, dass dieser article zur publication bereit steht.
- Node: Update rows in a table
- Credential to connect with:
n8n-postgres - Operation: Update
- Schema: public
- Table: ki_story (not ki_artikel!)
- Mapping Column Mode: Map Each Column Manually
- Columns to match on: id
| Feld | Value |
|---|---|
| id (using to match) | ={{ $('Execute a SQL query').item.json.story_id }} |
| status | PUBLISH_READY |
| wp_title | ={{ $('Edit Fields2').item.json.wp_title }} |
| wp_content | ={{ $('Edit Fields2').item.json.wp_content }} |
| wp_excerpt | ={{ $('Edit Fields2').item.json.wp_excerpt }} |
| wp_tags | ={{ $('Edit Fields2').item.json.wp_tags }} |
| image_file_path | ={{ $json.fileName }} |
$json.fileName (with a capital N) is the automatically assigned filename from n8n for the saved file – er entspricht dem Wert aus Edit Fields5, will but direkt taken from the Read/Write node.
3.6.14 publish the workflow
Set the Schedule Trigger to 23 hours and enable the workflow via Publish. Agent 4 runs once dailyal, nimmt the beste angereicherte Story, produziert daraus a fertigen article with eigenem Coverbild and legt beides in the database ab.

3.7 Agent 5: Publish to WordPress
Tanja: „This is the last step: Agent 5 hands everything over to WordPress.”
Ulf: “And then is the article live?”
Tanja: „Nein. Er landet als draft. Du review it, give the green light, and only then does it go live.”
Bernd: “Why not publish directly? That saves a step.”
Tanja: „Weil, KI-article manchmal Fehler enthalten. Halluzinationen. Falsche Namen. Veraltete Zahlen. Ein kurzer menschlicher Blick verhindert, dass dein Blog Unsinn published, while you sleep.”
Bernd thinks for a moment. „I would have published it directly.”
Tanja: “I know.”
3.7.1 Preparation in WordPress
With this n8n article and imager to upload, an application password is needed. This is more secure than your normales Login – es can jederzeit widerrufen werden, without dass your main password changes.
- Logge dich in dein WordPress-Admin a
- Lege unter User → Neu add a neuen User an, z. B.
n8n-publisher - Assign it the role of Author or Editor – it doesn’t need admin rights
- Open the profile of the new user and scroll all the way down to Application Passwords
- Enter a Namen a (z. B.
n8n-Diskstation) and click on Neues Anwendungspassword add - Important: Copy the angezeigte Password sofort (z. B.
abcd efgh ijkl ...), es will only dieses a Mal angezeigt - Also note the category-ID of your target category. You can find it in WordPress under posts -> categoryn: Click on the desired category and read the ID from the URL (z. B.
...tag_ID=8)
3.7.2 Starting the workflow
- Go back zur workflow-Overview and click on Create new workflow
- Nenne ihn oben links:
A5 Agent: Publish to WordPress - Click on Add First Step and select Schedule Trigger
- Trigger Interval: Hours
- Hours Between Triggers: 23
- Trigger at Minute: 0
For setup, we first use the Manual Trigger, so that we test it directly.
3.7.3 Fetch Finished Article from the Database
- Node: Postgres – Execute a SQL query
- Credential to connect with:
n8n-postgres - Query:
SELECT
  id,
  wp_title,
  wp_content,
  wp_excerpt,
  wp_tags,
  image_file_path
FROM ki_story
WHERE status = 'PUBLISH_READY'
ORDER BY created_at DESC
LIMIT 1;
The PUBLISH_READY status is set automatically by Agent 4. You can also set it manually in Metabaseell vergeben or entfernen – the gibt dir full control over which articles enter the publication queue.

3.7.4 Load Image from the NAS
The image must be loaded as a binary file into n8n memory, before it can be transferred to WordPress.
- Node: Read/Write Files from Disk
- Operation: Read File(s) From Disk
- File(s) Selector:
={{ $json.image_file_path }}
Derimage_file_pathaus the database contains den completelyen Pfad inside des Docker-container, z. B./data/wpmedia/raw/2026-01-20_heise-it_openai-stellt-neues-modell-vor_img-01.jpg. Dieser Pfad must with dem in Agent 4 match the mounted volume.
3.7.5 Upload Image to the WordPress Media Library
WordPress needs the image first in the media library to assign it an internal ID – this ID is then used when creating the post as featured_media referenziert.
- Node: HTTP Request (Name:
HTTP Request) - Method: POST
- URL:
https://foundic.org/wp-json/wp/v2/media - Authentication: Generic Credential Type → Basic Auth
- Basic Auth Credential → New Credential:
- Username: dein n8n-Publisher-Username
- Password: the application password (not the normale Login-Password!)
- Send Headers: ON
| Header Name | Value |
|---|---|
| Content-Disposition | =attachment; filename="{{ $binary.data.fileName }}" |
| Content-Type | image/jpeg |
- Send Body: ON
- Body Content Type: n8n Binary File
- Input Data Field Name:
data
When the request is successful, WordPress returns a JSON object that includes, among other things, the fieldidcontains – the Medien-ID des uploadedn imagees. We need this ID in the next step.
3.7.6 Create WordPress Post
Now the post is actually created. Important: The status is deliberately set to draft – the article does not appear publicly immediately, but first lands as a draft in WordPress, where it is reviewed and approvedill kann.
- Node: HTTP Request (Name:
HTTP Request1) - Method: POST
- URL:
https://foundic.org/wp-json/wp/v2/posts - Authentication: Generic Credential Type → Basic Auth → dasselbe Credential how oben
- Send Body: ON
- Body Content Type: JSON
- Specify Body: Using Fields Below
Add the following body fields (via Add Parameter):
| Name | Value |
|---|---|
| title | ={{ $('Execute a SQL query').item.json.wp_title }} |
| content | ={{ $('Execute a SQL query').item.json.wp_content }} |
| excerpt | ={{ $('Execute a SQL query').item.json.wp_excerpt }} |
| featured_media | ={{ $json.id }} ← Medien-ID aus dem vorherigen HTTP Request |
| status | draft |
| categories | 8 ← deine category-ID aus Step 3.7.1 |
The field featured_media mit {{ $json.id }} references the image ID, the WordPress in the previous step returned – this automatically links the uploaded image as Coverbild des posts.

3.7.7 Update Status in the Database
After successful transfer to WordPress, the status in ki_story is set to PUBLISHED, with this the article it is not processed again in the next run.
- Node: Update rows in a table
- Credential to connect with:
n8n-postgres - Operation: Update
- Schema: public
- Table: ki_story
- Mapping Column Mode: Map Each Column Manually
- Columns to match on: id
| Feld | Value |
|---|---|
| id (using to match) | ={{ $('Execute a SQL query').item.json.id }} |
| status | PUBLISHED |
3.7.8 Human-in-the-Loop: Approval in WordPress
After Agent 5 has run, the article is available in WordPress as a draft. Now it’s your turn – and that’s a good thing:
- Logge dich in dein WordPress-Admin a
- Go to posts → drafts

- Open den neu createdn post and check title, Text, image and Tags
- Falls alles passt: Click on Publish
- Falls du Anpassungen want to: Bearbeite den post direkt in WordPress

Du kannst in Metabase jederzeit den aktuellen Status aller article einsehen and den status-Wert manuell anpassen – z. B. um a article back to ANGEREICHERT to set, if Agent 4 ihn neu bearbeiten soll.
3.7.9 publish the workflow
Set the Schedule Trigger to 23 hours and enable via Publish. The entire pipeline runs now automatically:

- Alle 2 hourn liest Agent 1 neue article aus 22 RSS-Feeds a
- Alle 4 hourn Agent 2 evaluates the new entries
- Alle 23 hourn reichert Agent 3 the besten article with Web-Kontext an
- Alle 23 hourn Agent 4 writes the finished article and generates the cover image
- Alle 23 hourn Agent 5 uploads the article as a draft to WordPress – and and waits for your approval or publication in WordPress.
4 Conclusion
Einige Wochen later. Same office. Same Monday.
Ulf opens seinen Laptop, not um Feeds zu durchklicken, sondern um a einzigen draft in WordPress for review. The article is fully written, has a cover image, sources, and Tags. Er liest ihn durch, nickt, clicks auf „Publish”.
Three minutes. Instead of an hour.
Bernd looks over: “Did you write all of that yourself?”
Ulf: “An AI wrote it, I just approved it.”
Bernd: “And that’s… okay?”
Tanja leans back: “That’s exactly the point.”
What You Built
Once you have set up and enabled all five agents, your Synology NAS a fully automated digital newsroom – around the clock, without you having to scroll through feeds every morning or research manually. Multiple news sources (RSS feeds) are continuously monitored, jede Meldung bewertet, the relevantesten Treffer tiefenresearches, a kompletter WordPress-article geschrieben and a eigenes Coverbild generiert. What previously would have taken hours of editorial routine work, runs heute in the background – and landet als draft in deinem WordPress, wartet auf deinen letzten Blick and a Klick.
This is no toy project. You have built a serious piece of software architecture here: a relationale database with Statusmaschine, a Pipeline-System with five independently running agents, quality checks on multiple levels, URL-Normalisierung zur Duplikatsvermeidung and a Wissensgraphen aus verlinkten articlen. Und the alles without a einzige row Server-Code schreiben zu must.
What the System Actually Does – and What It Doesn’t
Es lohnt sich, honest about this: The system writes good, structured, legally compliant articles. Aber es does not write great articles. Claude produziert solid editorial journalismus – korrekt, gut aufgebaut, with sourcen. Was fehlt, is the menschliche Perspektive: the unexpectse Analogie, the pointierte Meinung, the Erfahrungswert aus zehn Jahren in the Thema. The system produces a very good first draft – but it is still a draft.
That is precisely why the human-in-the-loop step is no annoying obstacle, but the heart of the concept. The newsroom handles the routine work. You exercise judgment.
What You Can Do Now
The system is built to scale. A few obvious next steps:
- Mehr sourcen – du kannst beliebig viele weitere RSS-Feeds in Agent 1 einbinden, without touching the rest of the system. Englischsprachige sourcen how TechCrunch, The Verge or MIT Technology Review wouldn the internationale Perspektive deutlich verbessern.
- Feinere evaluation – the Scoring-Prompt in Agent 2 can be adjusted at any time. If you notice that certain subcategories appear too often or too rarely, simply adjust the descriptions or the thresholds.
- Mehrsprachigkeit – Claude wribt problemlos auf Englisch, if du den Prompt in Agent 4 entsprechend anpasst. This way, the same workflow could be used for a second blog in a different language.
- Tags automatically anreichern – the von Claude generierten
wp_tagscould additionally be matched against a fixed tag taxonomy in WordPress werden, with this no Tippvarianten entstehen. - Benachrichtigungen – a additionallyer n8n-workflow cane dich per E-Mail or Telegram benachrichtigen, sobald a neuer article als draft in WordPress bereitliegt.
The Bigger Picture
Dieses Project zeigt exemplarisch, wohin the Reise with KI-Automatisierung geht: not darum, Menschen zu ersetzen, sondern darum, extend your own leverage. A single person can maintain a publication frequenz maintain, which previously would have required a small editorial team – at operating costs of under 5 euros per month.
n8n is actually the real secret. Not because it is better than Zapier or Make in every individual function, but because it is self-hosted runs. Your workflows, your data, your infrastructure – on your own hardware, without monthly platform fees, without vendor lock-in, without privacy concerns when processing article content.
If you have built this system, you have du not only a Newsroom gebaut. Du hast verstanden, how Multi-Agenten-Systeme funktionieren, how man KI-Outputs in echte workflows einbettet and how man Automatisierung so gestaltet, dass sie skalierbar, wartbar and kontrollierbar bleibt. These are skills that go far beyond this project alone.