
What you are building in this tutorial is not a Google Alert. It’s a fully autonomous AI editorial system that researches AI topics every day, writes complete articles, generates cover images with AI, and publishes them on WordPress – with you retaining final approval.
The system automatically scours 22 sources for the most important AI developments. It filters irrelevant content, researches selected topics in depth, drafts complete articles with Claude, generates cover images with Flux-2-Flex – and only publishes after your approval. Fully automatically, every day.
To make this guide easier to follow, three characters will accompany you: The typical office archetypes: the competent IT colleague, the self-proclaimed expert, and the honest beginner. These three perspectives help you recognize common pitfalls.
Tanja is the IT expert. She knows how n8n works, explains patiently and clearly, and doesn’t get thrown off by bad advice. If you have a question, Tanja has the answer.
Bernd is the self-proclaimed “expert” who thinks he knows better – and is usually wrong. His shortcuts and half-knowledge regularly cause problems. He represents all the dangerous myths and bad practices you should avoid.
Ulf is the learner, just like you. He asks the questions swirling in your head and sometimes needs a real-world analogy to understand IT. If Ulf doesn’t get something, that’s completely fine – that’s what Tanja is there for.
“And… Action!”
Monday, 8:47 AM. The office.
Ulf stares at his screen. Three browser tabs. Reddit, Heise, The Verge. He’s searching for a topic for today’s AI News post.
Bernd walks past: “Still searching manually? I just ask ChatGPT.”
Tanja doesn’t look up: “ChatGPT doesn’t know what happened yesterday.”
Bernd: “Sure it does. Premium version.”
Tanja: “The knowledge cutoff is months ago. No current news.”
Ulf: “So what do you do?”
Tanja closes her laptop. “I built a system. It reads 22 news sources every two hours, selects the most relevant article, researches the topic in depth – and writes the complete post itself. Every day.”
Silence.
Ulf: “Every day automatically?”
Tanja: “With my approval. But yes. Automatically.”
Bernd: “I would have just set up a Google Alert.”
Tanja: “Try it.”
The key point: The system works as a “Human-in-the-Loop” construct – every article requires your explicit approval before going live. You stay in control. The AI does the research and writing, you decide what gets published.
The editorial team – five agents:
- Agent 1: Recherche (RSS-Feeds, alle 2 Stunden)
- Agent 2: Redaktionelle Einzelbewertung (GPT-4o-mini, alle 4 Stunden)
- Agent 3: Content-Recherche & Anreicherung (GPT-4o-mini + Tavily, täglich)
- Agent 4: Artikel schreiben + Coverbild createn (Claude + Flux-2-Flex, täglich)
- Agent 5: Veröffentlichen auf WordPress (täglich, with menschlicher Freigabe)
2 Technische Beschreibung
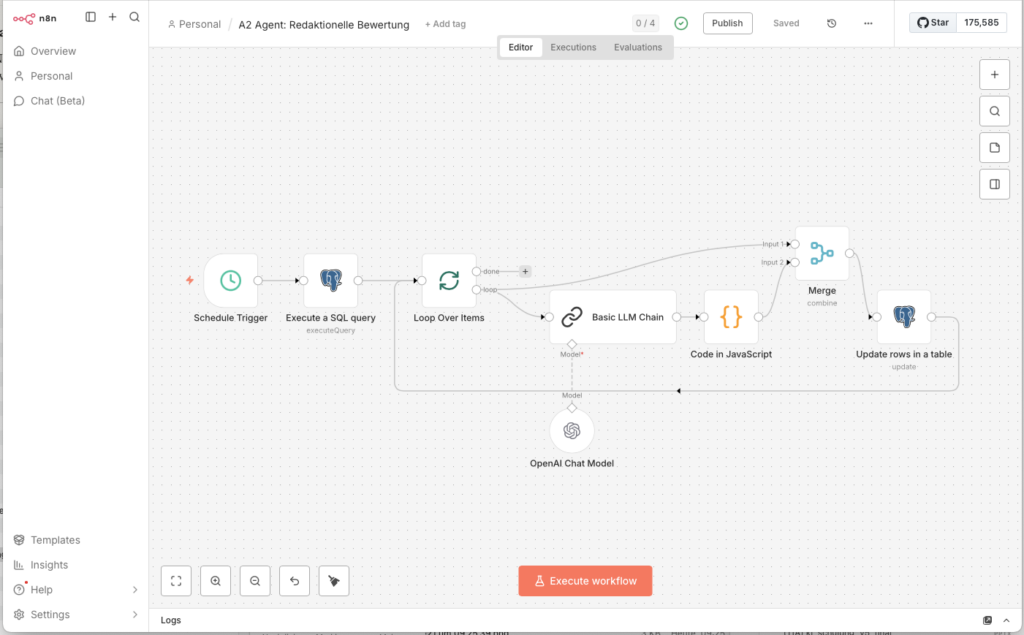
2.1 Systemarchitektur
Ulf: “Wait – the five agents talk to each other? Like in the office, through emails?”
Tanja: “Not directly. They communicate through the database. Think of the database as a large shared inbox. Agent 1 puts something in. Agent 2 picks it up, processes it, puts it back with a new status. And so on – down the pipeline.”
Bernd: “I would have just connected them directly.”
Tanja: “And if one crashes, everything else crashes too. The database acts as a buffer. If Agent 2 hangs, Agent 1 keeps running. Articles stay safely in the database until Agent 2 continues.”
The AI Newsroom follows a pipeline architecture: Five specialized n8n workflows run independently and communicate exclusively through a PostgreSQL database. This architecture was chosen deliberately: Each agent can fail, restart, or be paused without affecting the others.
[Internet / RSS-Feeds]
        ↓
  A1: Recherche         → ki_artikel (Status: NEU)
        ↓
  A2: Bewertung         → ki_artikel (Status: BEWERTET)
        ↓
  A3: Content-Recherche → ki_story   (Status: ANGEREICHERT)
        ↓
  A4: Artikel + Bild    → ki_artikel (Status: PUBLISH_READY)
        ↓
  A5: WordPress         → ki_artikel (Status: PUBLISHED)
        ↓
  [WordPress / foundic.org]
2.2 Datenbankschema
The database consists of three tables – think of them as three different drawers in a filing cabinet:
ki_artikelis the große Hauptschublade. Hier landet jeder eingelesene RSS-Artikel and bleibt there bis zur Veröffentlichung. Die Tabelle speichert Rohdaten aus dem Feed, KI-Bewertungsscores, fertige WordPress-Inhalte and den aktuellen Workflow-Status. Das Feldurl_normalizedverhindert Duplikate: Tracking-Parameter howutm_source, thewww.-Präfix and überflüssige Trailing Slashes will aus URLs entfernt, bevor a Artikel eingetragen wird. So landen Heise-Links with and ohne?utm_campaign=newsletternot doppelt in the Datenbank.ki_storyis the Kreativschublade. Hier liegt the angereicherte, tiefenrecherchierte Inhalt – the von Agent 3 erstellte Hintergrundtext and später the von Claude verfasste fertige WordPress-Artikel. Jede Story is genau einem Eintrag inki_artikelzugeordnet.ki_artikel_edgesis the Connectionsschublade. Wenn Tavily at the Recherche verwandte Webseiten findet, dokumentiert diese Tabelle the Connection: Welcher Artikel hat welche Quelle gefunden? Mit welchem Suchbegriff? Auf welchem Ranking-Platz? So entsteht in the Hintergrand a kleines Wissensnetz aus verlinkten Artikeln.
2.3 Die fünf Agenten in the Detail
Agent 1 – Research (every 2 hours): 22 parallel RSS feed readers supply the system with fresh articles. Agent 1 reads all incoming entries, normalizes URLs (so the same article isn’t counted twice with tracking parameters), and inserts new articles into ki_artikel with status NEU – duplicates are automatically skipped via a database constraint.
Agent 2 – Editorial evaluation (every 4 hours): GPT-4o-mini evaluates each new article with a structured prompt: Is this AI-relevant? How innovative? How important for the German-speaking community? Articles below 6/10 stay in the database but are never further processed. Only those above the threshold advance to BEWERTET.
Agent 3 – Content research & enrichment (daily): Once an article passes the editorial filter, Agent 3 uses Tavily to research the topic in depth. It finds related articles, background information, and expert sources. All sources flow into ki_story as a rich research packet – the basis for the actual article.
Agent 4 – Writing + cover image (daily): Claude receives the research packet and writes a complete WordPress post in the style of the publication. Simultaneously, Flux-2-Flex generates a matching cover image. Together they form the finished article – ready for publication.
Agent 5 – Publish (daily, with human approval): The finished article lands in a review queue. Only after your explicit approval does it get published on WordPress with all metadata, tags, and the AI cover image.
2.4 Technologien & Kosten
| Komponente | Technologie |
|---|---|
| Orchestrierung | n8n (self-hosted, Docker, Synology NAS) |
| Datenbank & Monitoring | PostgreSQL + Metabase |
| Bewertung & Recherche | GPT-4o-mini (OpenAI) + Tavily |
| Artikel-Erstellung | Claude Sonnet (Anthropic) |
| Bildgenerierung | Flux-2-Flex (Black Forest Labs) |
| Publikation | WordPress REST API |
With daily publication of one article, monthly API costs typically remain below €15. Breakdown: GPT-4o-mini for Agent 2 (evaluation) is barely measurable – about €0.001 per article. Tavily for research costs €0.003–0.01 per request. Claude for writing costs about €0.03–0.08 per article. AI image generation with Flux-2-Flex costs about €0.003–0.05 per image. The biggest cost driver is article writing with Claude – but even here, 30 articles per month remains well below €3.
3 Umsetzung in n8n
3.1 Datenbank-Setup
Tanja: “Before we build the agents, we need the foundation. The database.”
Bernd: “Can’t we start with Agent 1? The database can come later.”
Tanja: “If you build a house without a foundation, the walls collapse when the first floor is done. The database is the foundation. Without it, no agent knows where to read or write.”
Bernd: “I’d just start.”
Tanja: “I know.”
3.1.1 Die Connection hcreaten (Credentials)
Tanja: “Don’t panic – this sounds more complicated than it is. You only need to tell n8n once where the database is – then you can use it in every workflow. Think of it as saving a new contact in your phone: once saved, always available.”
- Logge dich in deine n8n-Oberfläche auf the NAS a
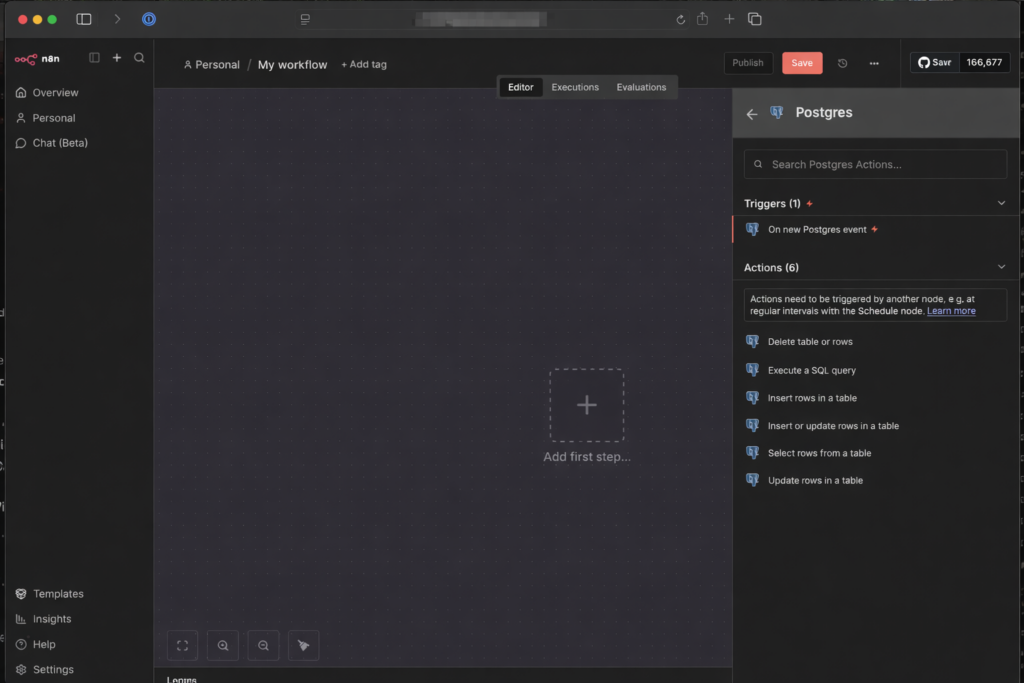
- Gehe links auf Start from scratch -> Add first step -> „+” -> suche nach „Postgres” -> select „Execute a SQL query” aus -> Credential to connect with: „Create a new Credential”
How to connect n8n with a PostgreSQL database on a Synology DiskStation is described in detail at: https://foundic.org/n8n-selbst-hosten-synology-nas-docker-installation
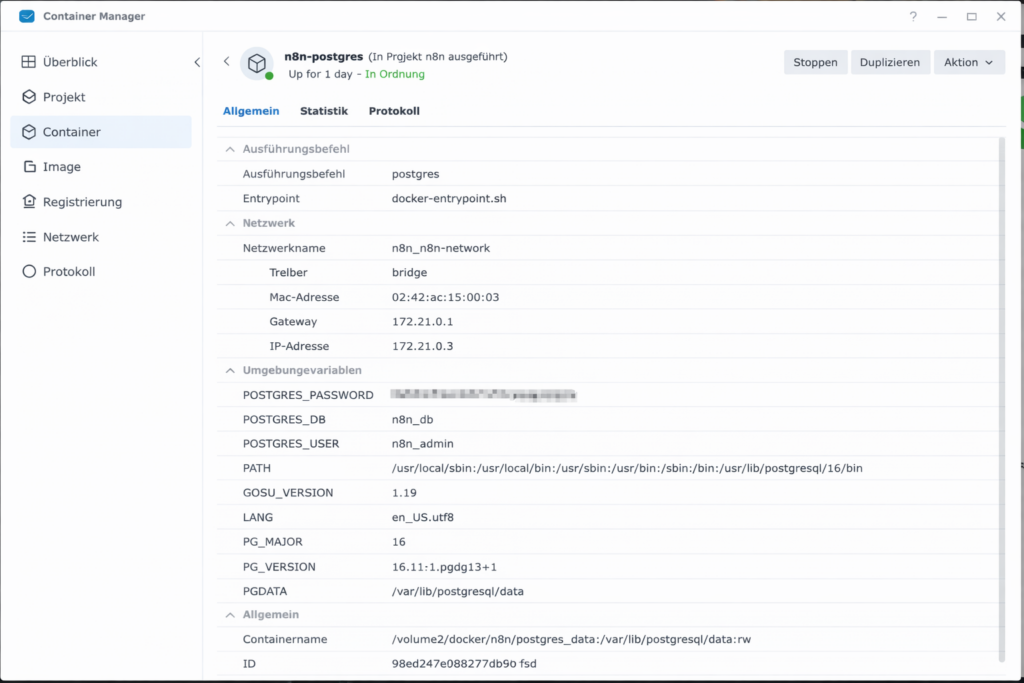
- Jetzt musst du the Daten eingeben, the du in the Synology Container Manager findest unter Container -> postgres container -> Details
- Host: IP-Adresse or Containername (if in the gleichen Project)
- Database: Meistens
postgresodern8n_db(je nachdem, what at the Installation alsPOSTGRES_DBangegeben wurde) - User: Der Name, den du vergeben hast (oft
postgresoderadmin) - Password: Dein festgelegtes Password
- Click on Save. Wenn oben a grünes Schild with „Connection tested successfully“ erscheint, steht the Leitung!
- Nenne ihn oben links in the Workflow Overview:
Set-up Database
3.1.2: Erste Tabellen in the Datenbank createn
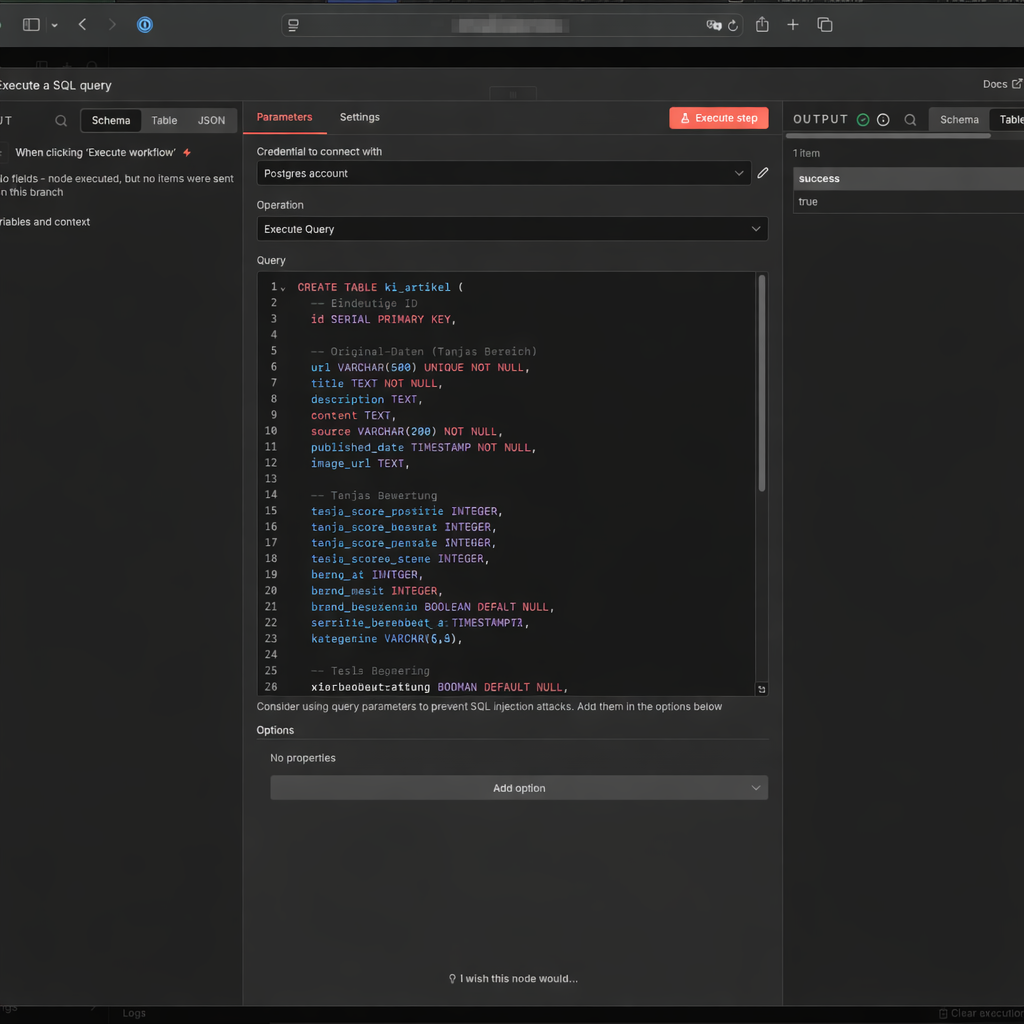
The ki_artikel table is the central digital memory of the system. Every RSS article the system processes lands here. Follow these steps to create it:
- Schließe the Credential-Fenster (oben rechts auf the X klicken).
- Du befindest dich nun wieder in the Fenster the Postgres-Node (Execute a SQL query), ggf. Doppel Click on “Execute a SQL query”
- Lösche the 1 in the Feld Query komplett heraus.
- Copy the folgende SQL-Skript and add es there a:
CREATE TABLE ki_artikel (
  -- Eindeutige ID
  id SERIAL PRIMARY KEY,

  -- Original-Daten
  url VARCHAR(500) UNIQUE NOT NULL,
  title TEXT NOT NULL,
  description TEXT,
  content TEXT, -- für später
  source VARCHAR(200) NOT NULL, -- z.B. 'Heise'
  published_date TIMESTAMP,
  image_url TEXT,
  source_type TEXT  -- z.B. 'rss'
  first_seen_at TIMESTAMPTZ NOT NULL DEFAULT now()
  url_normalized TEXT

  -- Workflow-Status
  status VARCHAR(50),

  -- Bewertung
  score_relevanz INTEGER,
  score_bedeutung INTEGER,
  score_gesamt DECIMAL(3,1),
  subkategorie VARCHAR(80) DEFAULT NULL,
  bewertung_begruendung TEXT,

  -- Zeitstempel
  created_at TIMESTAMP DEFAULT CURRENT_TIMESTAMP
);

-- Index für schnelle Abfragen (Top-News)
CREATE INDEX idx_published_date ON ki_artikel(status, published_date DESC);
CREATE INDEX ki_artikel_url_normalized_idx ON ki_artikel(url_normalized);
Click Execute step.
Then create two more tables. The first connects articles with each other (for the Tavily knowledge graph):
CREATE TABLE IF NOT EXISTS ki_artikel_edges (
  id BIGSERIAL PRIMARY KEY,

  from_artikel_id BIGINT NOT NULL
    REFERENCES ki_artikel(id) ON DELETE CASCADE,

  to_artikel_id BIGINT NOT NULL
    REFERENCES ki_artikel(id) ON DELETE CASCADE,

  relation_type TEXT NOT NULL,     -- z.B. 'tavily_related'
  query TEXT,                      -- optional: Suchquery
  rank INT,                        -- Reihenfolge im Tavily Result
  score NUMERIC,                   -- optional: Tavily score/relevance
  retrieved_at TIMESTAMPTZ NOT NULL DEFAULT now(),

  UNIQUE (from_artikel_id, to_artikel_id, relation_type)
);

CREATE INDEX IF NOT EXISTS ki_artikel_edges_from_idx
  ON ki_artikel_edges(from_artikel_id);

CREATE INDEX IF NOT EXISTS ki_artikel_edges_to_idx
  ON ki_artikel_edges(to_artikel_id);

CREATE INDEX IF NOT EXISTS ki_artikel_edges_type_idx
  ON ki_artikel_edges(relation_type);
Table ki_story – the place where finished articles are drafted:
CREATE TABLE IF NOT EXISTS ki_story (
  id BIGSERIAL PRIMARY KEY,

  primary_artikel_id BIGINT NOT NULL
    REFERENCES ki_artikel(id) ON DELETE RESTRICT,

  content_enriched TEXT NOT NULL,
  enrichment_source TEXT,          -- 'direct' | 'search_llm'
  score_gesamt_enriched NUMERIC(4,2),
  tavily_link_count INTEGER,
  status TEXT NOT NULL DEFAULT 'DRAFT',
  created_at TIMESTAMPTZ NOT NULL DEFAULT now(),
  updated_at TIMESTAMPTZ NOT NULL DEFAULT now(),

  -- WordPress
  wp_title TEXT,
  wp_content TEXT,
  wp_excerpt TEXT,
  wp_tags TEXT,
  image_file_path TEXT,
  wordpress_post_id BIGINT,
  wordpress_url TEXT
);

CREATE INDEX IF NOT EXISTS ki_story_primary_idx
  ON ki_story(primary_artikel_id);
3.1.3: Workflow-Status Logik
The status field in ki_artikel is the traffic light of your system. Every article goes through exactly these states:
NEU(Insert)BEWERTET(Bewertung fertig)ANGEREICHERT(Hintergrundtext fertig)PUBLISH_READY(Artikel gezogen/„reserviert“)PUBLISHED(WordPress veröffentlicht)PUBLISH_BLOCKED(if irgendwas rechtlich/technisch not passt)
3.2 Agent 1: Recherche über RSS Feeds
Ulf: “RSS feeds – isn’t that twenty-year-old technology?”
Tanja: “Soccer has existed for 150 years and it’s still the most effective way to keep 22 people in controlled chaos. RSS is similar. Structured, reliable, machine-readable – and free. Every serious news source has it.”
Bernd: “I’d just use the Google News API.”
Tanja: “Which costs $0 for 100 requests per day, then $5 per 1,000 requests. For 22 sources checked every 2 hours, that’s about 1,056 requests per day.”
Bernd: “Oh.”
Tanja: “RSS is free and has no limits.”
3.2.1 Den Arbeitsplatz einrichten
- Go torück zur Workflow-Overview and click on Create new workflow
- Nenne ihn oben links:
1 Agent: Recherche über RSS Feeds - Click on Add First Step and wähle Schedule Trigger
- Trigger Interval: Hours
- Stelle ihn zunächst auf Manual (= Custom Cron) – dawith the Trigger beim Bauen not ständig feuert. Den echten Takt stellst du am Ende a.
- Hours Between Triggers: 2
- Trigger at Minute: 0
3.2.2 Die Quellen anzapfen (RSS-Feed)
- Click on the + hinter dem Schedule-Trigger
- Suche nach the Node RSS Feed Read
- Node: rssFeedRead
- URL: RSS-Feed eintragen (z.B.
https://www.heise.de/rss/heise-atom.xml)
- Click on Test Step. Du solltest now a Liste with Titeln and Links sehen
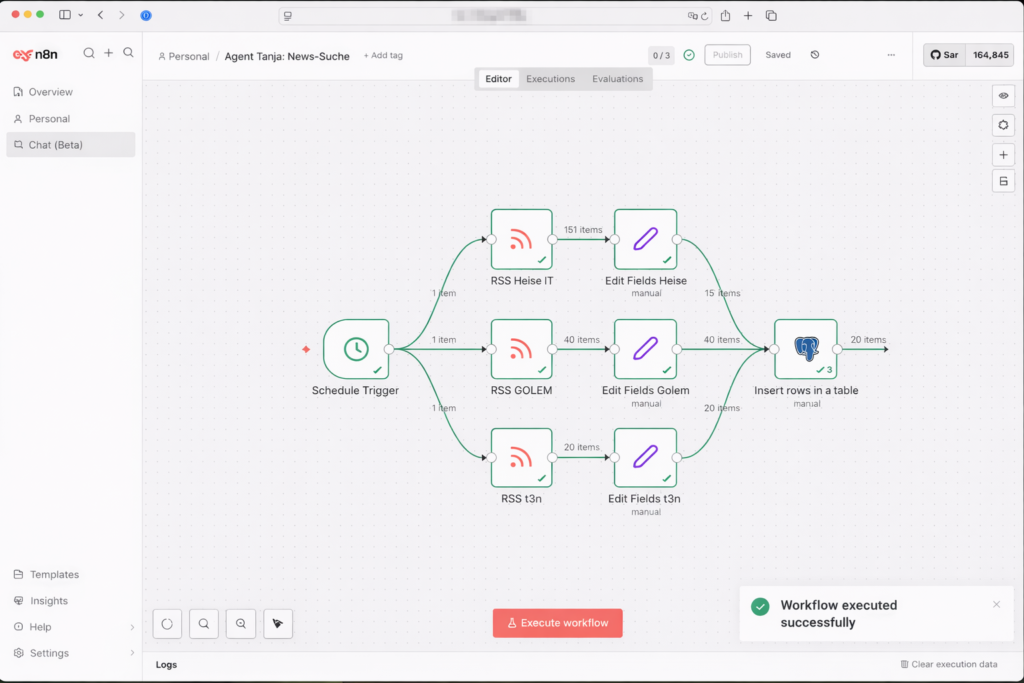
- Du kannst beliebig viele RSS Feed Reader parallel in den Workflow setzen and with dem Trigger connectn. Klicke dazu auf den Ausgangspunkt des Triggers and then auf den Eingangspunkt des jeweiligen RSS Feed Readers.
3.2.3 RSS Feed the Quelle zuordnen
- Click on the + Symbol am Ausgang deiner RSS-Nodes
- Suche nach the Node Edit Fields (Brauchst diesen Node for jeden RSS-Feed)
- Setting: * Click on „Add Field“ -> „String“.
- Node: Edit Fields
- Name des Feldes:
source_name-> String - Wert (Value): z.B.
Heise - Include Other Input Fields: aktivieren
- Wiederholung: diese zwei Knoten for alle Deine weitere RSS-Feeds (RSS Feed -> Edit Fields -> Wert:
abc) the Du regelmäßig auslesen möchtest.
3.2.4 Archiv in Datenbank aufbauen
Now you tell n8n where the archive is – and how newspaper clippings get filed there. Think of this step as programming a new filing cabinet: label clearly, define which drawer, done.
- Click on the + am Ausgang deiner Edit Fields-Nodes
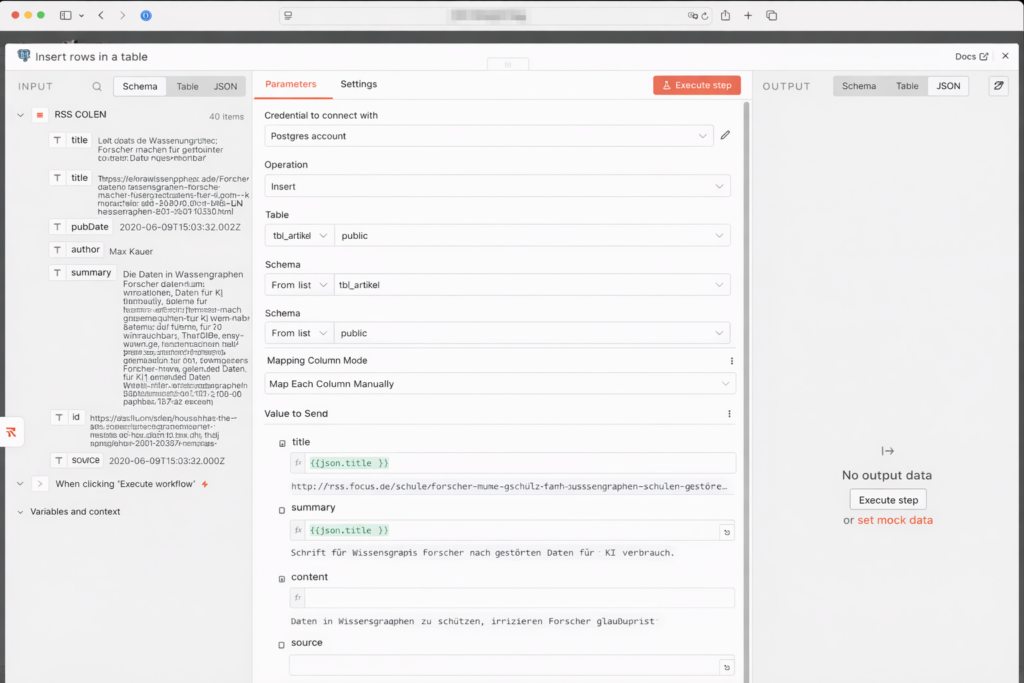
- Suche nach Postgres and select „Insert rows in a table” aus:
- Node: Insert rows in table
- Credential to connect with: deine
n8n-postgres-Connection aus Step 3.1.1 - Operation: Insert
- Schema: From list: public
- Tabel: From list:
ki_artikel - Mapping Column Mode: Map Each Column Manually (Daten einsortieren)
- Jetzt kommt the wichtigste Teil: Du musst n8n sagen, welches RSS-Feld in welche Datenbankspalte gehört. Click on Add Column and enter nacheinander folgende Zuordnungen a:
| Spalte (Column) | Wert (Value) – So machst du es: |
|---|---|
| id | Diese Zeile komplett löschen – the ID zählt automatisch hoch |
| titel | Klicke in the Feld. Suche links in the Menü unter „RSS Feed Read“ title and ziehe per drag&drop in title, or alternativ{{ $json.title }} |
| url | {{ $json.link }} |
| description | {{ $json.summary || $json.content || $json.contentSnippet || ” }} |
| source | {{ $json.source_name }} |
| published_date | {{ $json.isoDate }} |
| image_url | {{ $json.enclosure?.url || ” }} |
| status | NEU (von Hand eintippen, not aus dem Menü wählen) |
| source_type | rss (von Hand eintippen) |
| url_normalized | Expression (siehe Code unten) |
For url_normalized copy this JavaScript expression into the Value field:
{{
(() => {
  const raw = $json.link || $json.url || "";
  try {
    const u = new URL(raw.startsWith("http") ? raw : "https://" + raw);

    // Fragment entfernen
    u.hash = "";

    // Tracking-Parameter entfernen
    const dropExact = new Set([
      "fbclid","gclid","dclid","msclkid","igshid",
      "mc_cid","mc_eid","mkt_tok","yclid","cmpid"
    ]);

    for (const k of Array.from(u.searchParams.keys())) {
      const key = k.toLowerCase();
      if (key.startsWith("utm_") || dropExact.has(key)) {
        u.searchParams.delete(k);
      }
    }

    // Host & Protokoll normalisieren
    u.hostname = u.hostname.replace(/^www\./i, "").toLowerCase();
    u.protocol = "https:";

    // Trailing slash nur bei Root entfernen
    if (u.pathname === "/") u.pathname = "";

    u.search = u.searchParams.toString()
      ? "?" + u.searchParams.toString()
      : "";

    return u.toString();
  } catch (e) {
    return raw;
  }
})()
}}
Why the effort? Because the same Heise article can appear with five different tracking parameters in the URL. Without normalization, the system would consider it five different articles and try to process it five times. The URL normalization extracts only the essential part of the URL – clean, without tracking parameters – and that’s what gets saved in the database. Duplicates are then reliably detected and skipped.
- Lösche alle anderen vorausgefüllten „Values to Update”, dawith only the oben definierten Felder geschrieben werden.
- Ganz unten: Options → Add option → Skip on Conflict aktivieren. Dawith will a Artikel, dessen URL bereits in the Datenbank liegt, einfach übersprungen statt a Fehler zu werfen.
- Testlauf: Click on den orangefarbenen Button „Execute Workflow”. Was now passieren sollte: n8n zieht the News aus den Feeds (grüne Zahlen erscheinen), schickt sie zur Postgres-Node (nächste grüne Zahl) and speichert sie auf deiner NAS. Wenn du the Zahlen siehst – Glückwunsch, dein erstes Archiv lebt.
3.2.5 Workflow veröffentlichen
Set the Schedule Trigger to 2 hours and activate the workflow via the toggle at the top right.
3.3 Agent 2: Redaktionelle Einzelbewertung
Ulf: “Okay, we now have an archive full of articles, but how do we know which ones are worth reading?”
Tanja: “That’s what Agent 2 is for. It reads each new article, evaluates it with AI according to fixed criteria, and gives it a score. Only articles above the threshold pass through.”
Bernd: “I’d just read everything manually.”
Tanja: “With 22 RSS feeds, every 2 hours? Let’s say 500 articles per day. Go ahead.”
Bernd pauses. “Maybe the AI isn’t so bad.”
3.3.1 Den Workflow startn
- Go torück zur Workflow-Overview and click on Create new workflow
- Nenne ihn oben links:
2 Agent: Redaktionelle Einzelbewertung - Add a Schedule Trigger hinzu:
- Trigger Interval: Hours
Stelle sie for den Anfang auf Manual (= Custom (Cron)), dawith wir beim Bauen not ständig neue Daten ziehen. Später stellen wir sie auf „Alle 4 Stunden“ - Hours Between Triggers: 4
- Trigger at Minute: 0
- Trigger Interval: Hours
3.3.2 Datensatz aus Datenbank auslesen
- Add a Postgres-Node „Execute a SQL query” hinzu:
- Credtial to connect with:
n8n-postgres - Query:
- Credtial to connect with:
SELECT id, title, description, url
FROM ki_artikel
WHERE status = 'NEU'
LIMIT 5;
Starting with LIMIT 5 – five articles are enough for testing. When the system is running stably, you can increase this value. The query only returns articles with status NEU – those not yet evaluated.
3.3.3 Loop einbauen
The AI should evaluate each article individually – not all at once. For this we use the Loop Over Items node.
- Node: Loop Over Items
- Bartch Size: 1
- Done: bleibt leer
- Loop: nächster Knoten
Stell es dir vor how a Fließband: Artikel rein, bewerten, nächster Artikel.
3.3.4 Basic LLM Chain
Bernd: “Wait, if we’re using AI, let’s do it properly. I’d use GPT-5 here.”
Tanja: “GPT-5 costs considerably more per request. For this task – evaluating a title and abstract against fixed criteria – GPT-4o-mini achieves identical results at a fraction of the cost. Cost efficiency is part of good system design.”
Bernd: “So the cheap version.”
Tanja: “The right version.”
Now comes the centrepiece of Agent 2. Why “Basic LLM Chain” and not an AI Agent? Because we don’t need autonomous decision-making here – we need a structured, reproducible evaluation. The Basic LLM Chain delivers exactly that: the same prompt, the same model, the same format – every time.
- Node: Basic LLM Chain
- Source for Prompt (User Message): Define below
- Prompt (User Message):
Rolle: Du bist eine kritische Analystin und KI-Trend-Scout.
Aufgabe: Bewerte den folgenden Artikel nach seinem Nutzen für interessierte KI-Anwender, die KI im Alltag (privat & beruflich) besser einsetzen und zukünftige Entwicklungen verstehen wollen. Ordne den Artikel zudem präzise den vorgegebene Subkategorien zu.

Input-Daten:
Titel: {{ $json.title }}
Beschreibung: {{ $json.description }}

---

### 1. Strenge Bewertungs-Logik (Skala 0 bis 10):

KI-Anwendungsrelevanz (Nutzwert heute):
- 0–1: Kein KI-Bezug oder rein abstrakt / technisch ohne Nutzenableitung.
- 2–4: KI wird erwähnt, aber ohne konkrete Nutzungsideen.
- 5–6: Liefert Beispiele, Tools, Produktivitäts- oder Alltagsbezug.
- 7–8: Klare, übertragbare Use-Cases (Arbeit, Lernen, Organisation, Kreativität).
- 9–10: Hoher Mehrwert: verändert konkret, wie man KI sinnvoll nutzt.

KI-Entwicklungsbedeutung (Blick in die Zukunft):
- 0–1: Unbedeutend oder reine Randnotiz.
- 2–4: Allgemeine Entwicklung ohne Tiefgang.
- 5–6: Relevanter Trend (z. B. Copilots, Regulierung, KI im Alltag).
- 7–8: Wichtige Weichenstellung (z. B. neue Einsatzfelder, starke Verbreitung).
- 9–10: Paradigmenwechsel mit klaren Folgen für Nutzer:innen.

---

### 2. Subkategorien (Wähle EXAKT einen Namen aus dieser Liste):

1. Anwendungsfälle & Best Practices (Konkretisierung: Praxisbeispiele, Alltag/Beruf, Produktivitäts-Szenarien)
2. Prompting (Konkretisierung: Operative Assets: Gebrauchsfertige Vorlagen, konkrete Befehlsketten und „Copy & Paste“-Prompts für sofortige Ergebnisse)
3. Lernen & Skill-Aufbau (Konkretisierung: Methodisches Wissen: Tutorials, Lernpfade, Konzepte wie Chain-of-Thought, Methodik, Erklärungen zum „Mitdenken“)
4. Tools & Produkt-Updates (Konkretisierung: Software-Releases, neue Funktionen, UI-Änderungen)
5. Automatisierung & Agenten (Konkretisierung: n8n/Zapier Workflows, Agent-Flows, APIs, Prozessautomatisierung)
6. KI-Kreativität (Konkretisierung: Fokus auf generative Medien-Erstellung: Bild, Video, Audio, Design jenseits reiner Text-Assistenz)
7. News & Entwicklungen (Konkretisierung: Markt- & Strategie-News, Trends, allgemeine Einordnung)
8. Modelle & Open Source (Konkretisierung: LLMs, Open-Source-Modelle, GitHub-Projekte, technischer Deep Dive)
9. Hardware & Lokale KI (Konkretisierung: Gadgets, AI-PCs, Chips wie Nvidia/NPU, Local-AI-Setups)
10. Sicherheit & Privacy (Konkretisierung: Datenschutz, Security, sichere KI-Nutzung)
11. Ethik, Recht & Politik (Konkretisierung: AI Act, Regulierung, Governance, Deepfakes)
12. Kein KI-Fokus (Fokus: Default-Kategorie für alle Inhalte ohne klaren KI-Nutzen oder KI-Bezug, allgemeine Technik-News oder Off-Topic)

WICHTIG: Wenn die Sub-Kategorie "Kein KI-Fokus" gewählt wird, dann müssen Anwendungsrelevanz <= 1 UND Entwicklungsbedeutung <= 1 sein.

---

### 3. Ausgabe-Format & Validierung:
Erzeuge ausschließlich ein valides JSON-Objekt ohne Markdown-Formatierung.

WICHTIG: Das Feld "subkategorie" MUSS buchstabengetreu mit einem der oben genannten 12 Namen übereinstimmen. Ändere keine Sonderzeichen, erfinde keine neuen Namen und achte auf exakte Groß-/Kleinschreibung.

STRICT OUTPUT RULES:
- Gib GENAU EIN JSON-Objekt aus.
- Kein Text vor oder nach dem JSON.
- KEIN Komma nach der schließenden }.
- Verwende ausschließlich doppelte Anführungszeichen für JSON.

{
  "anwendungsrelevanz": Zahl,
  "entwicklungsbedeutung": Zahl,
  "subkategorie": "EXAKTER_NAME_AUS_LISTE",
  "begruendung": "Maximal 25 Wörter. Begründung der Kategorie + Begründung der  Anwendungsrelevanz und Entwicklungsbedeutung."
}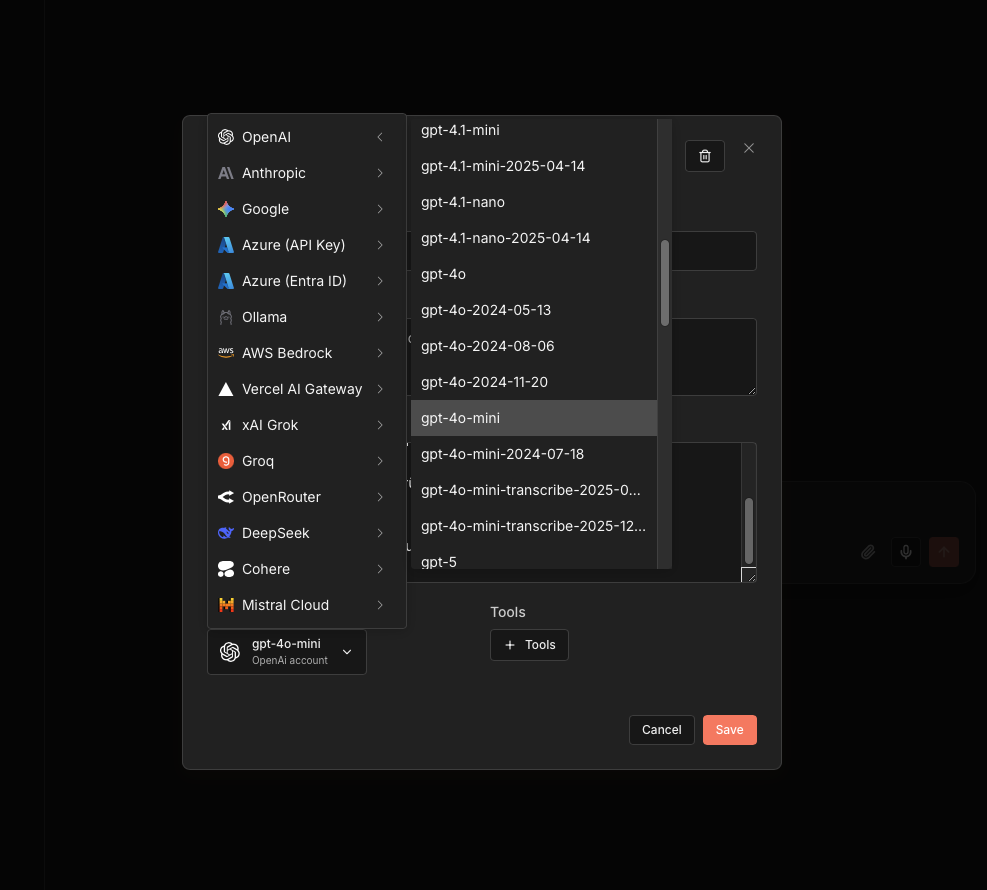
Connect the Basic LLM Chain with the OpenAI Chat Model:
- Node: OpenAI Chat Model
- Credential to connect with: OpenAI account
- Model:
gpt-4o-mini - Use Response API: active
3.3.5 Code in JavaScript
GPT-4o-mini liefert manchmal JSON with Markdown-Umrandung zurück (Backticks, json-Tags). Dieser Code-Node räumt the auf and berechnet den Gesamtscore:
- Node: Code in JavaScript
- Mode: Run Once for Each ITem
- Language: JavaScript
let raw = $json.text;
// Entfernt Backticks und säubert den Text
let clean = raw.replace(/```json/g, "").replace(/```/g, "").trim().replace(/,\s*$/, "");
let data = JSON.parse(clean);

// Falls die KI es in "output" verpackt hat
if (data.output) data = data.output;

// Nur EIN return-Block mit allen Feldern:
return {
  anwendungsrelevanz: Number(data.anwendungsrelevanz),
  entwicklungsbedeutung: Number(data.entwicklungsbedeutung),
  subkategorie: data.subkategorie,
  begruendung: data.begruendung,
  // Hier passiert die wichtige Berechnung für DECIMAL(3,1)
  score_gesamt: (Number(data.anwendungsrelevanz)*6 + Number(data.entwicklungsbedeutung)*4)/10
};
Die Formel am Ende is no Magie: Anwendungsrelevanz zählt sechsfach, Entwicklungsbedeutung vierfach. Das teilen wir durch 10 – fertig is a Score zwischen 0 and 10, gespeichert als DECIMAL(3,1).
3.3.6 Merge Combine
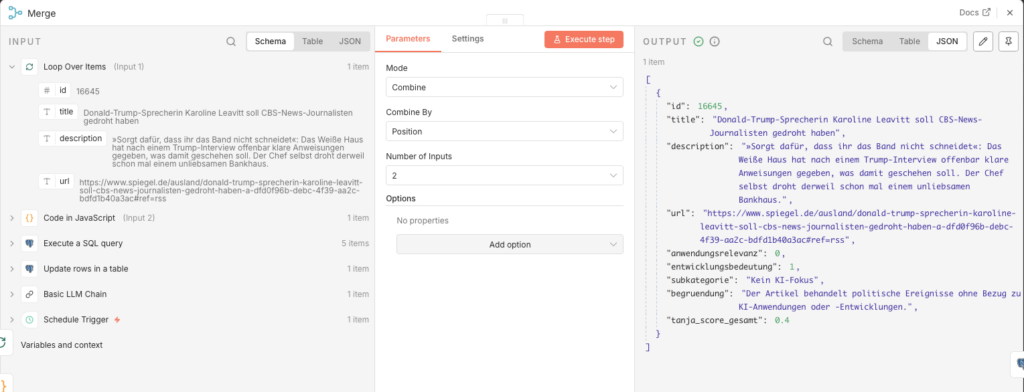
Jetzt haben wir a Problem: Der Bewertungs-Code kennt only the KI-Ergebnisse, but not mehr the Datenbank-ID des Artikels. Ohne the ID can wir den Datensatz not aktualisieren. Der Merge-Node löst the: Er fügt the Datenbankfelder (inkl. id) and the Bewertungsfelder zu einem gemeinsamen Datensatz zusammen.
- Node: Merge Combine
- Mode: Combine
- Combine by: Position
- Number of Inputs: 2
Connect the zwei Eingänge: Ausgang „loop” des Loop Over Items-Nodes → Eingang 1 des Merge; Ausgang des Code-Nodes → Eingang 2 des Merge.
3.3.7 In Datenbank speichern
- Add a Postgres-Node am Ende hinzu:
- Node: Update rows in a table
- Credential to connect with:
n8n-postgres - Operation: Update
- Schema: public
- Table:
ki_artikel - Mapping Column Mode: Map Each Column Manually
- Columns to match on: id
| Feld | Value |
|---|---|
| id (using to match) | {{ $json.id }} |
| score_relevanz | {{ $json.anwendungsrelevanz }} |
| score_bedeutung | {{ $json.entwicklungsbedeutung }} |
| score_gesamt | {{ $json.score_gesamt }} |
| bewertung_begruendung | {{ $json.begruendung }} |
| status | BEWERTET |
| subkategorie | {{ $json.subkategorie }} |
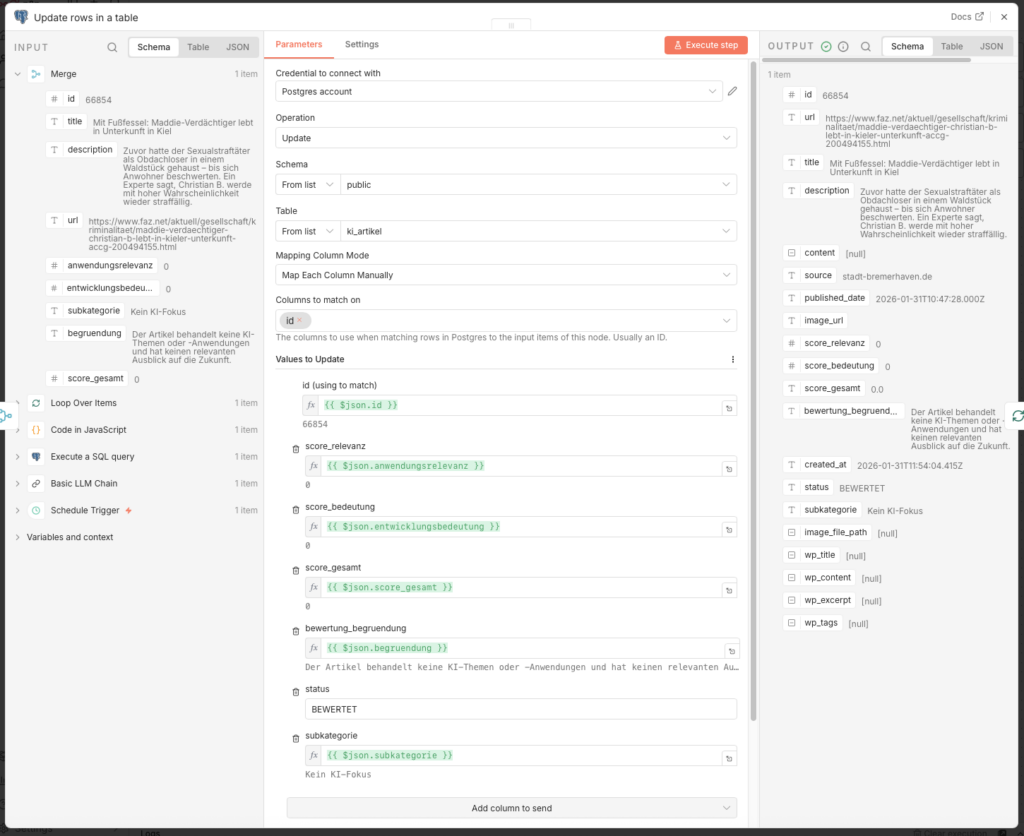
Connect den Ausgang dieses Nodes zurück with dem Eingang des Loop Over Items-Nodes – so läuft the Schleife for alle abgerufenen Artikel durch.
3.3.8 Workflow veröffentlichen
Stelle den Schedule Trigger auf 4 Stunden and enable den Workflow über Publish.
3.4 Dashboard with Metabase (Optional)
Ulf: „Moment, ich will mal sehen, what da in meiner Datenbank passiert. Wie schaue ich da rein?”
Tanja: „Mit Metabase, the is a Dashboard-Tool, the sich direkt an deine PostgreSQL-Datenbank hängt. Du kannst then Fragen stellen how: ‚Wie viele Artikel wurden heute bewertet?’ and bekommst a Tabelle or a Diagramm zurück.”
Bernd: „Ich guck einfach direkt in the Datenbank, with dem Terminal. Ist professioneller.”
Ulf: „Du hast letzte Woche a Tabelle aus Versehen gelöscht, because du a Leerzeichen vergessen hast.”
Bernd hustet.
Metabase brauchst du not zwingend – the Agenten laufen also ohne. Aber es is hilfreich, if du a schnellen Überblick willst: Wie viele Artikel wurden eingelesen? Wie verteilen sich the Scores? Welche Kategorien dominieren?
3.4.1 Folderstruktur vorbereiten
Metabase möchte seine eigenen Settings (welche Fragen du gestellt hast, how dein Dashboard aussieht) irgendwo speichern. Standardmäßig macht es the innerhalb des Containers. Wenn du den Container löschst or updatest, is dein Dashboard weg.
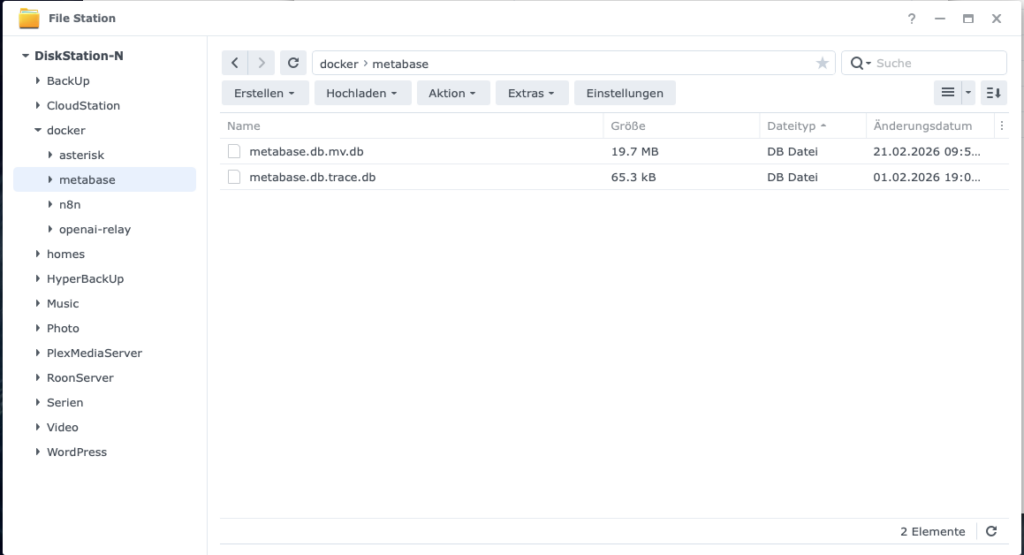
Dawith dein Dashboard “ewig” lebt, solltest du unter Volume-Settings (in the nächsten Step) a Folder auf deiner NAS verknüpfen:
- Folder: Create auf deiner NAS a Folder
docker/metabase.
3.4.2 Metabase einrichten
- Image Name:
metabase/metabase - Port: standardmäßig 3000
Vorgehensweise:
- Load the Image in the Container Manager auf the Synology herunter
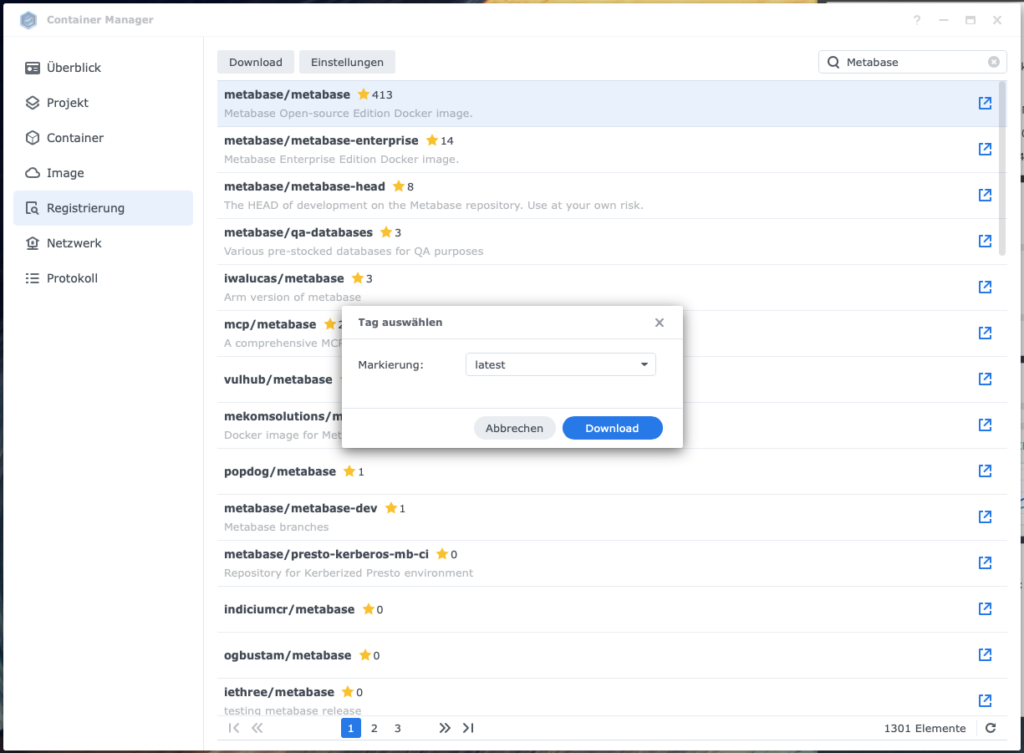
2. Führe the Image aus: metabase/metabase:latest → Ausführen
- Containername:
metabase-newsroom - Port: 3000
- Volume-Settings: + Folder hinzufügen
- Folder
docker/metabaseauswählen (vorher auf the NAS createn) - Mount-Pfad:
/metabase.dbeintragen
- Folder
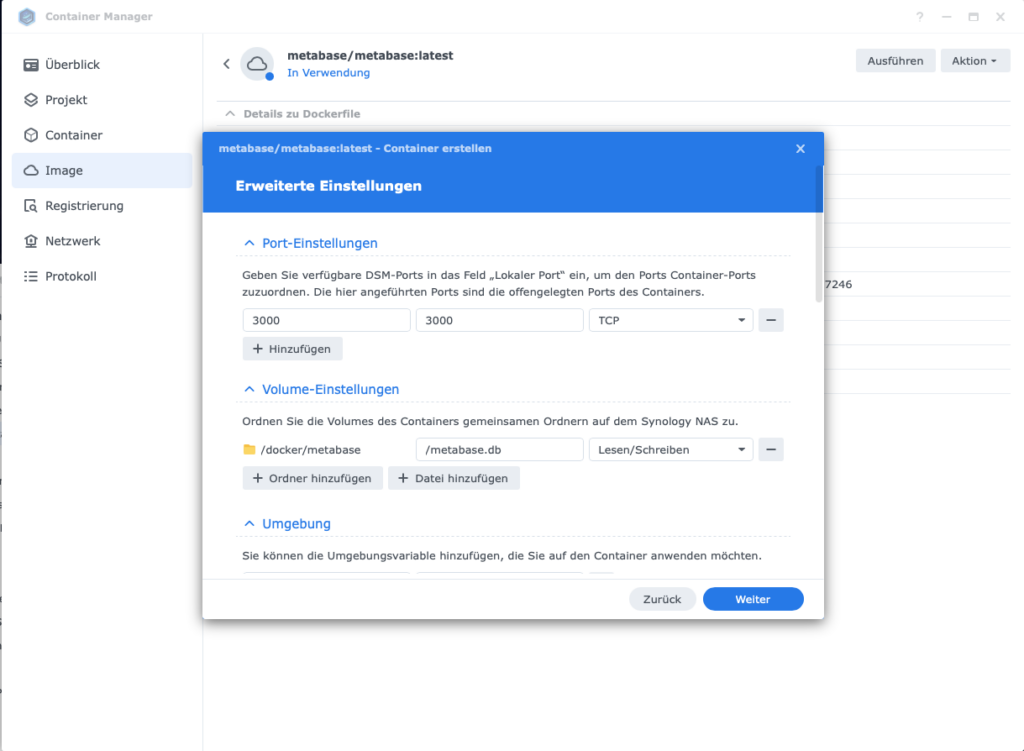
- Umgebungsvariable
GIT_COMMIT_SHA:unknowneintragen
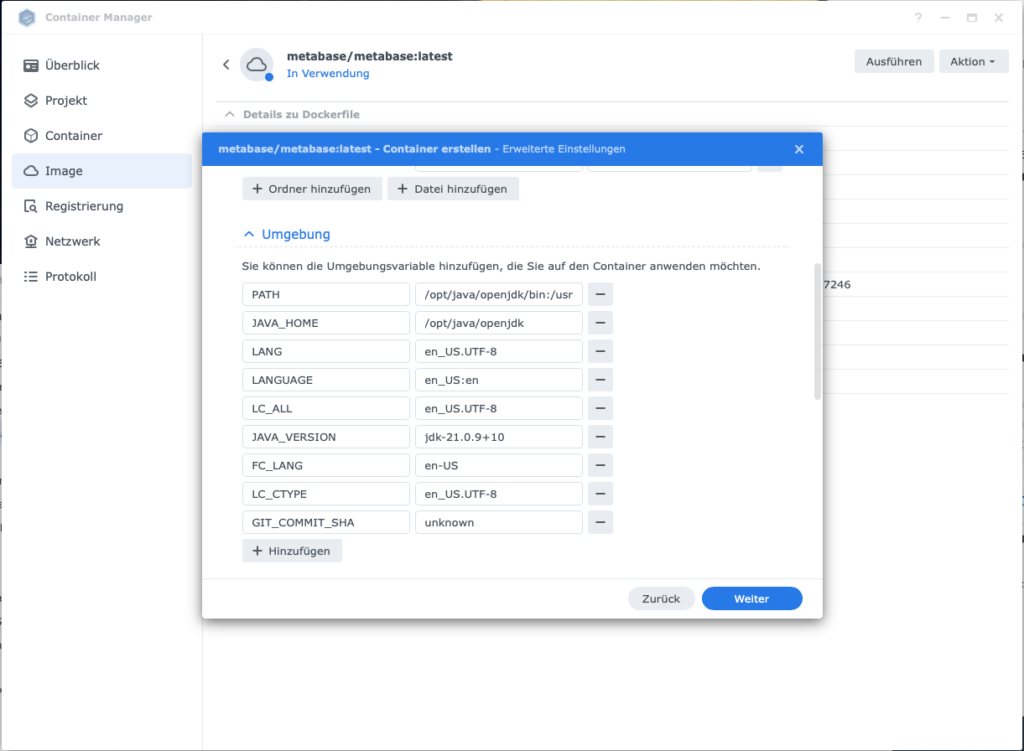
- Container startn
Important: Falls the Firewall auf deiner Diskstation aktiv ist, lege a Regel for Port 3000 (Protokoll TCP) an – sonst kommst du über den Browser not auf Metabase.
Metabase läuft unter http:// (not https://). Öffne http://<deine-Synology-IP>:3000 in the Browser. Beim ersten Start führt dich a Setup durch the Datenbankconnection:
- Database type: PostgreSQL
- Display name: z. B. „KI News Datenbank”
- Host: Containername deiner Postgres-Instanz (z. B.
n8n_db) - Port:
5432 - Database name:
postgres - Username: dein Postgres-Username
- Password: dein Postgres-Password

Deine erste SQL-Auswertung erstellst du über + NEU -> >_ SQL-Abfrage. Diese Query gibt dir a ersten Tagesüberblick:
SELECT
    DATE(created_at) AS datum,
    -- 1) Wie viele RSS-Feeds wurden eingelesen?
    COUNT(*) AS eingelesen_gesamt,
    -- 2) Wie viele davon wurden bewertet?
    COUNT(*) FILTER (WHERE status = 'bewertet') AS bewertet,
    -- 3) Verteilung der Scores (Umwandlung in Zahlenwert mit ::float)
    COUNT(*) FILTER (WHERE score_gesamt::float BETWEEN 0 AND 2.9) AS "Score_0_bis_2",
    COUNT(*) FILTER (WHERE score_gesamt::float BETWEEN 3 AND 7.9) AS "Score_3_bis_7",
    COUNT(*) FILTER (WHERE score_gesamt::float >= 8) AS "Score_8_bis_10"
FROM ki_artikel
GROUP BY DATE(created_at)
ORDER BY datum DESC;
3.5 Agent 3: Content-Recherche
Ulf: „Wir haben now bewertete Artikel, what kommt now?”
Tanja: „Jetzt will es interessant, Agent 3 nimmt the besten Artikel – the with Score 7,5 or höher – and recherchiert dazu. Er lädt den Originaltext, sucht verwandte Quellen in the Web and lässt GPT-4o-mini daraus a strukturierten Hintergrundtext schreiben.”
Ulf: „Moment, can the KI not einfach selbst in the Internet suchen? Warum the Umweg über Tavily?”
Tanja: „Gute Frage. Schauen wir uns the an.”
3.5.1 Den Workflow startn
- Go torück zur Workflow-Overview and click on Create new workflow
- Nenne ihn oben links:
A3 Agent: Content-Recherche - Add a Schedule Trigger hinzu:
- Trigger Interval: Hours
- Stelle zunächst auf Manual to the Testen
- Hours Between Triggers: 23
- Trigger at Minute:
3.5.2 Datensatz aus Datenbank auslesen
- Add a Postgres-Node hinzu:
- Node: Execute a SQL query
- Credential to connect with:
n8n-postgres - Query:
SELECT a.id, a.url, a.title, a.description
FROM ki_artikel a
LEFT JOIN ki_story s ON s.primary_artikel_id = a.id
WHERE a.score_gesamt >= 7.5
  AND s.id IS NULL
  AND (a.status IS NULL OR a.status <> 'ANGEREICHERT')
LIMIT 5;
Note: Wir holen only Artikel with einem Gesamtscore von mindestens 7.5 – the are the wirklich relevanten Treffer, the a aufwendige Recherche wert sind. Das LIMIT 5 hält the Laufzeit beim ersten Testen überschaubar.
Der LEFT JOIN mit WHERE s.id IS NULL is a elegante Abkürzung: Er findet alle Artikel, zu denen es still no Story gibt – so genau the, the still bearbeitet will müssen.
Führe außerdem diese zwei Index-Befehle einmalig direkt in the Datenbank aus, um sie abzusichern:
CREATE UNIQUE INDEX IF NOT EXISTS ki_story_primary_uniq ON ki_story(primary_artikel_id);und
CREATE UNIQUE INDEX IF NOT EXISTS idx_ki_artikel_url_normalized ON ki_artikel(url_normalized);3.5.3 Loop einbauen
Dawith n8n jeden Artikel einzeln abarbeitet, kommt als nächstes the Loop-Knoten:
- Node: Loop Over Items (Split In Batches)
- Batch Size: 1
- Knoten-Ausgang Done: bleibt leer
- Konten-Ausgang Loop: nächster Knoten
3.5.4 Website-Inhalt abrufen
Wir versuchen zunächst, den Volltext direkt von the Quellwebsite zu laden – als würde a Mensch den Artikel öffnen and lesen.
- Add a HTTP Request-Node hinzu:
- Method: GET
- URL:
={{ $json.url }} - Add Options → Response Format: Text
- Send Headers: ON
| Header Name | Value |
|---|---|
| User-Agent | Mozilla/5.0 (Windows NT 10.0; Win64; x64) AppleWebKit/537.36 (KHTML, like Gecko) Chrome/120.0 Safari/537.36 |
| Accept | text/html |
| Accept-Language | de-DE,de;q=0.9,en;q=0.8 |
Diese Header are wichtig: Viele Websites liefern schönere Inhalte, if the Anfrage how a echter Browser-Aufruf aussieht – statt how a nackter Bot.
- Add a Code Node (JavaScript) hinzu, the the rohe HTML in brauchbaren Fließtext verwandelt:
// n8n Code node (JavaScript)
// Erwartet HTML im Feld: $json.data (aus HTTP Request)
const html = ($json.data || '').toString();
// 1) Skripte/Styles entfernen
let cleaned = html
.replace(/<script\b[^<]*(?:(?!<\/script>)<[^<]*)*<\/script>/gi, ' ')
.replace(/<style\b[^<]*(?:(?!<\/style>)<[^<]*)*<\/style>/gi, ' ');
// 2) Häufige Layout-Blöcke grob entfernen (optional, aber hilfreich)
cleaned = cleaned
.replace(/<nav\b[^<]*(?:(?!<\/nav>)<[^<]*)*<\/nav>/gi, ' ')
.replace(/<header\b[^<]*(?:(?!<\/header>)<[^<]*)*<\/header>/gi, ' ')
.replace(/<footer\b[^<]*(?:(?!<\/footer>)<[^<]*)*<\/footer>/gi, ' ');
// 3) HTML-Tags -> Text (mit Zeilenumbrüchen an sinnvollen Stellen)
cleaned = cleaned
.replace(/<\/(p|div|br|li|h1|h2|h3|h4|h5|section|article)>/gi, '\n')
.replace(/<[^>]+>/g, ' ');
// 4) HTML Entities (minimal)
cleaned = cleaned
.replace(/ /g, ' ')
.replace(/&/g, '&')
.replace(/"/g, '"')
.replace(/'/g, "'")
.replace(/</g, '<')
.replace(/>/g, '>');
// 5) Whitespace normalisieren
cleaned = cleaned
.replace(/\r/g, '')
.replace(/[ \t]+/g, ' ')
.replace(/\n{3,}/g, '\n\n')
.trim();
// 6) Optional: begrenzen (für DB/LLM)
const maxLen = 20000;
const content_candidate = cleaned.slice(0, maxLen);
const content_candidate_len = content_candidate.length;
// --- Qualitäts-Check ---
const words = content_candidate.split(/\s+/).filter(w => w.length > 3);
const wordCount = words.length;
const avgWordLength =
words.reduce((sum, w) => sum + w.length, 0) / (wordCount || 1);
const badMarkers = [
'cookie', 'zustimmen', 'abo', 'newsletter', 'anzeigen',
'karriere', 'impressum', 'datenschutz', 'suche', 'login',
'heise+', 'jobs'
];
const badHits = badMarkers.filter(m =>
content_candidate.toLowerCase().includes(m)
).length;
const content_quality_ok =
content_candidate_len > 1500 &&
wordCount > 250 &&
avgWordLength > 4 &&
badHits < 5;
return [{
...$json,
content_candidate,
content_candidate_len,
content_quality_ok,
content_word_count: wordCount,
content_avg_word_len: avgWordLength,
content_bad_hits: badHits,
}];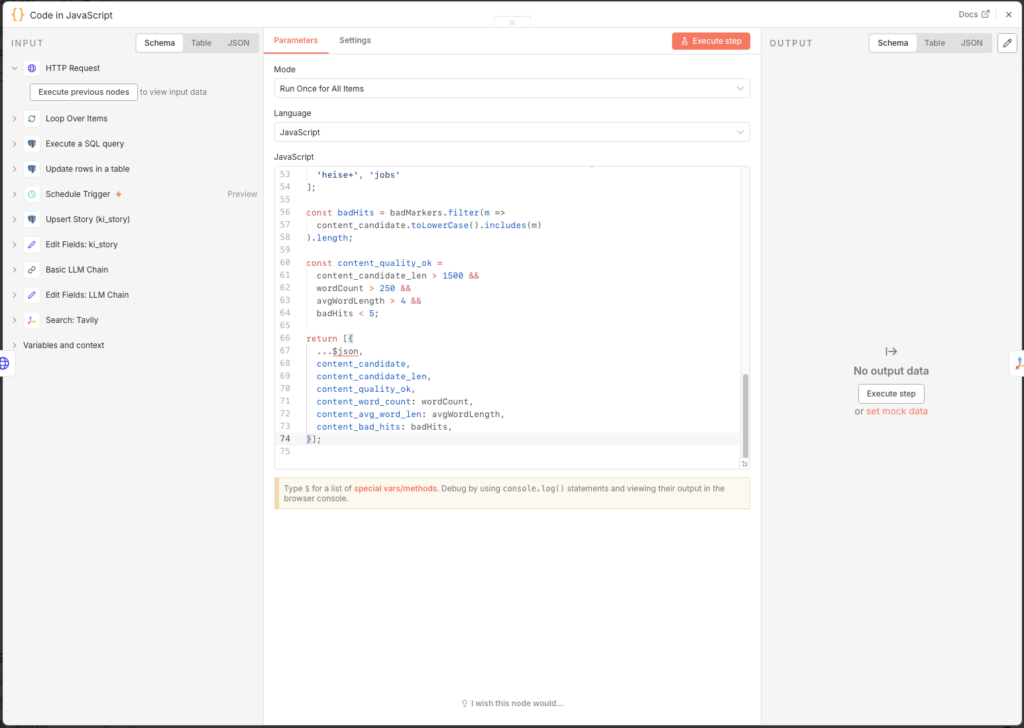
Das Ergebnis enthält the Flag content_quality_ok. Ein brauchbarer Text braucht mindestens 1.500 Zeichen, 250 Wörter and darf not von Boilerplate-Begriffen how „Cookie” or „Impressum” dominiert sein. Das Flag dient als Metainformation; the Tavily-Recherche läuft in jedem Fall danach – the Web-Kontext is the eigentliche Basis for den LLM-Text.
3.5.5 Warum Tavily statt OpenAI-Websuche?
Ulf: „Kurze Frage, can ich not einfach GPT with Internetzugang nehmen? Dann brauche ich Tavily gar not.”
Tanja: „Du kannst, but schau dir kurz the Kosten an.”
| Feature | Basic LLM Chain | AI Agent + Tavily | AI Agent + Serper/Brave | OpenAI Search-Preview |
|---|---|---|---|---|
| Internetzugriff | Nein | Ja (inkl. Textauszüge) | Ja (only Links) | Ja (integriert) |
| Kosten pro Suche | – | 0 Cent (bis 1.000/Monat kostenlos) | 0,1 – 1,5 Cent | 3 – 10 Cent |
| Ergebnis-Qualität | Nur if manuell gefüttert | Sehr gut – Inhalt bereits aufbereitet | Gut – Rohlinks, no Textinhalt | Sehr gut |
| Kontrolle | Voll | Voll | Voll | Begrenzt |
| Setup-Aufwand | Minimal | Gering (1 API Key) | Gering (1 API Key) | Minimal |
Ulf: „Okay, ich versteh the still not ganz,” and zeigt auf the Tabelle. „Serper and Brave liefern also Suchergebnisse. Warum is Tavily besser?”
Tanja: „Stell dir vor, du schickst a Praktikanten los, um Informationen über a Thema zu sammeln. Serper and Brave kommen zurück with einem Stapel Zeitungsadressen. Tavily kommt zurück with den ausgeschnittenen Artikeln. Bereits lesbar, bereits sortiert.”
Ulf runzelt the Stirn. „Also liefert Tavily den Inhalt the Seiten gleich mit?”
Tanja: „Genau. Serper and Brave geben dir only Links – du musst jede Seite still selbst aufrufen and den Text extrahieren. Tavily liefert bereits aufbereitete Textauszüge. GPT-4o-mini bekommt so sauberen Kontext statt rohem HTML-Müll. Das spart Token – and bessere Eingabe bedeutet bessere Ausgabe.”
Bernd: „Klingt nach wenig Unterschied, ich würde einfach OpenAIs eingebaute Websuche nehmen. Weniger Gedöns.”
Tanja: „Kostet dich 3 bis 10 Cent pro Suche, Tavily is bis tausend Suchen in the Monat kostenlos. Danach 1,5 Cent. Das is Faktor 10 bis 30 günstiger, at gleicher or besserer Qualität for unseren Anwendungsfall.”
Ulf: „Tausend Suchen reichen uns?”
Tanja: „Wir recherchieren täglich for maximal a Artikel, with bis zu 20 Tavily-Treffern pro Durchlauf. Das are rand 600 Suchen in the Monat. Passt locker ins kostenlose Kontingent.”
Bernd tippt kurz auf seinem Handy. „Okay, Tavily.”
Tanja: „Danke”.
3.5.6 Tavily Search einrichten
- Create dir a Account auf app.tavily.com and copy deinen API Key
- Add in n8n den Node Search: Tavily hinzu
- Create unter Credential to connect with a neues Credential with deinem API Key
- Configure den Node:
- Query:
   {{
  (
    ($('Execute a SQL query').item.json.title || '') + ' ' +
    ($('Execute a SQL query').item.json.description || '')
  ).slice(0, 380)
}}- Configure den Node:
- Add Options → Search Depth: Advanced
- Add Options → Max Results: 20
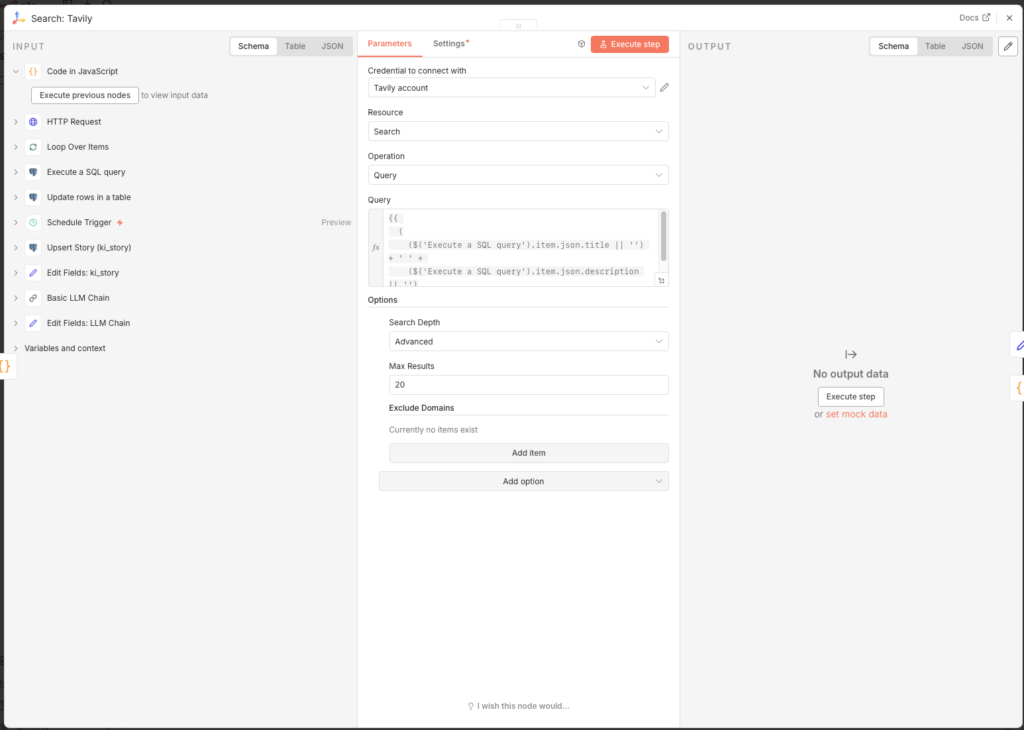
Die Query kombiniert Titel and Beschreibung des Artikels and schneidet at 380 Zeichen ab. Mit Advanced and 20 Ergebnissen holen wir the Maximum aus dem Tavily-Free-Kontingent.
3.5.7 Schlechte URLs aussortieren
Tavily liefert manchmal SEO-Schrottseiten, Feed-Aggregatoren or themenfremd. Ein Code-Node filtert diese heraus, bevor sie the Datenbank verschmutzen:
- Node: Code (JavaScript)
- Mode: Run Once for All Items
const input = $input.first().json;
const list = Array.isArray(input.results) ? input.results : [];

// --- Konfiguration ---
const BLOCKED_DOMAINS = [
  'feed-reader.net', 'rssingn.com', 'finanztrends.de',
  'it-daily.net', 'possible.fm', 'edu.ly',
];

const BAD_TITLE_PATTERNS = [
  'die besten', 'tools im vergleich', 'im vergleich', 'ranking', 'best of',
];

const MIN_CONTENT_LENGTH = 250;
const MIN_SCORE = 0.55;

function host(u) {
  try { return new URL(u).hostname.replace(/^www\./, ''); } catch { return ''; }
}

const kept = [];
for (const r of list) {
  const url = String(r.url || '').toLowerCase();
  const title = String(r.title || '').toLowerCase();
  const content = String(r.content || '').toLowerCase();
  const h = host(url);

  let reason = null;
  if (!url || !title) reason = 'missing url/title';
  else if (BLOCKED_DOMAINS.some(d => h.includes(d))) reason = 'blocked domain';
  else if (BAD_TITLE_PATTERNS.some(p => title.includes(p))) reason = 'seo/list title';
  else if (content.length < MIN_CONTENT_LENGTH) reason = 'too short content';
  else if (typeof r.score === 'number' && r.score < MIN_SCORE) reason = 'low score';

  if (!reason) kept.push({ ...r, _quality_flag: 'accepted' });
}

// Fallback: wenn alles rausfliegt, nimm Top 5 nach Score
const final = kept.length > 0
  ? kept
  : [...list].sort((a, b) => (b.score ?? 0) - (a.score ?? 0)).slice(0, 5)
      .map(r => ({ ...r, _quality_flag: 'fallback' }));

return final.map(r => ({
  json: {
    ...r,
    _debug: {
      input_count: list.length,
      kept_count: kept.length,
    }
  }
}));
Der Fallback am Ende is wichtig: Wenn alle Treffer rausgefiltert würden, nimmt the Code trotzdem the Top 5 nach Score – dawith the Workflow never komplett leer weiterläuft.
3.5.8 Tavily-Treffer in the Datenbank speichern
Die gefundenen Quellen will doppelt verwertet: als Kontext for the LLM (nächster Step) and als eigene Datensätze in the Datenbank. Dafor brauchen wir drei Nodes hintereinander.
Node 1: Prepare Tavily Results (Code in JavaScript)
Dieser Code normalisiert the URLs the Tavily-Treffer and bereitet the Felder for the Datenbank vor – analog zur URL-Normalisierung aus Agent 1:
function normalizeUrl(input) {
  try {
    const url = new URL(input.startsWith('http') ? input : 'https://' + input);
    url.hash = '';
    const dropKeys = new Set(['fbclid','gclid','mc_cid','mc_eid','msclkid','utm_source']);
    for (const k of Array.from(url.searchParams.keys())) {
      if (k.toLowerCase().startsWith('utm_') || dropKeys.has(k.toLowerCase()))
        url.searchParams.delete(k);
    }
    url.hostname = url.hostname.replace(/^www\./i, '').toLowerCase();
    url.protocol = 'https:';
    if (url.pathname === '/') url.pathname = '';
    return url.toString();
  } catch (e) { return input; }
}

function extractHost(input) {
  try { return new URL(input).hostname.replace(/^www\./i, '').toLowerCase(); }
  catch (e) { return 'unknown'; }
}

const fromId = $('Execute a SQL query').item?.json?.id ?? null;
const results = items.every(it => typeof it?.json?.url === 'string')
  ? items.map(it => it.json)
  : (Array.isArray(items?.[0]?.json?.results) ? items[0].json.results : []);

return results.filter(r => r?.url).slice(0, 10).map((r, idx) => {
  const norm = normalizeUrl(r.url);
  const host = extractHost(norm || r.url);
  return { json: {
    from_artikel_id: fromId,
    relation_type: 'tavily_related',
    query: items?.[0]?.json?.query ?? '',
    rank: idx + 1,
    score: r.score ?? null,
    url: r.url,
    url_normalized: norm,
    title: r.title ?? '(no title)',
    description: (r.content ?? '').slice(0, 800),
    source: host,
    source_type: 'tavily',
  }};
});
Node 2: Upsert Tavily Article (Postgres – Execute a SQL query)
Jeder gefundene Treffer landet als eigener Datensatz in ki_artikel. Durch ON CONFLICT will a bereits bekannter Artikel not doppelt eingetragen, sondern only fehlende Felder ergänzt:
INSERT INTO ki_artikel (
  url, url_normalized, title, description,
  source, published_date, image_url, source_type, status, first_seen_at
)
VALUES (
  '{{ ($json.url || "").replace(/'/g, "''") }}',
  '{{ ($json.url_normalized || "").replace(/'/g, "''") }}',
  '{{ ($json.title || "").replace(/'/g, "''") }}',
  '{{ ($json.description || "").replace(/'/g, "''") }}',
  '{{ ($json.source || "").replace(/'/g, "''") }}',
  NULL, NULL, 'tavily', 'ANGEREICHERT', now()
)
ON CONFLICT (url_normalized)
DO UPDATE SET
  title       = COALESCE(NULLIF(ki_artikel.title,''), EXCLUDED.title),
  description = COALESCE(NULLIF(ki_artikel.description,''), EXCLUDED.description),
  source      = COALESCE(NULLIF(ki_artikel.source,''), EXCLUDED.source),
  status      = COALESCE(NULLIF(ki_artikel.status,''), 'ANGEREICHERT')
RETURNING id;
Node 3: Upsert Tavily Edge (Postgres – Execute a SQL query)
Die Connection zwischen dem Ausgangsartikel and dem gefundenen Tavily-Treffer will in ki_artikel_edges gesichert:
INSERT INTO ki_artikel_edges (
  from_artikel_id, to_artikel_id, relation_type, query, rank, score, retrieved_at
)
VALUES (
  {{ $node["Prepare Tavily Results"].json.from_artikel_id }},
  {{ $node["Upsert Tavily Article"].json.id }},
  '{{ (($node["Prepare Tavily Results"].json.relation_type) || "tavily_related").replace(/'/g, "''") }}',
  '{{ (($node["Prepare Tavily Results"].json.query) || "").replace(/'/g, "''") }}',
  {{ $node["Prepare Tavily Results"].json.rank || 1 }},
  {{ $node["Prepare Tavily Results"].json.score ?? 'NULL' }},
  now()
)
ON CONFLICT (from_artikel_id, to_artikel_id, relation_type)
DO UPDATE SET
  rank         = EXCLUDED.rank,
  score        = EXCLUDED.score,
  query        = EXCLUDED.query,
  retrieved_at = now();
3.5.9 LLM-Kontext aufbereiten
Parallel zur Datenbankspeicherung bereitet a Edit Fields-Node den kombinierten Kontext for GPT-4o-mini auf:
- Node: Edit Fields
- Field Name:
llm_context - Type: String
- Value (Expression):
=RSS ARTICLE
Title: {{ $('Loop Over Items').item.json.title }}
Description: {{ $('Loop Over Items').item.json.description }}

WEB SEARCH CONTEXT
={{
  "RSS ARTICLE\nTitle: " +
  $('Loop Over Items').item.json.title +
  "\nDescription: " +
  $('Loop Over Items').item.json.description +
  "\n\nWEB SEARCH CONTEXT\n" +
  ($node["Search: Tavily"].json.results || [])
    .slice(0, 10)
    .map((r, i) => "[Source " + (i+1) + "]\n" + (r.content || ""))
    .join("\n\n")
}}
Dawith hat the KI sowohl den Original-RSS-Artikel als also bis zu 10 aufbereitete Webseitentexte aus Tavily als Kontext.
3.5.10 Hintergrundtext with GPT-4o-mini createn
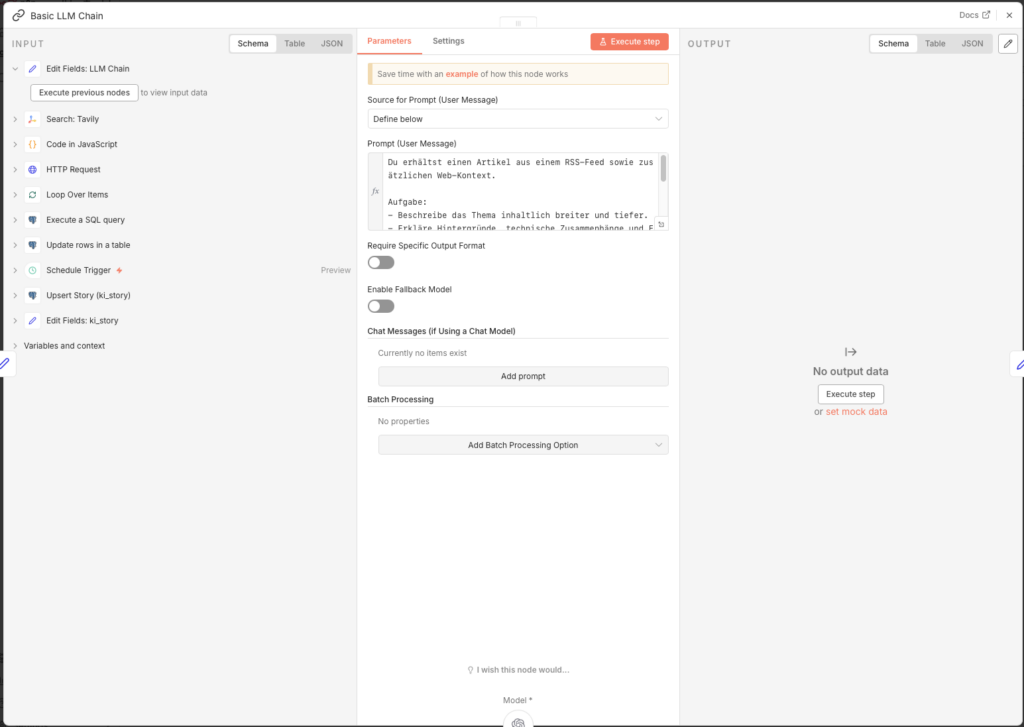
- Node: Basic LLM Chain
- Source for Prompt: Define below
- Prompt (User Message):
Du erhältst einen Artikel aus einem RSS-Feed sowie zusätzlichen Web-Kontext.

Aufgabe:
- Beschreibe das Thema inhaltlich breiter und tiefer.
- Erkläre Hintergründe, technische Zusammenhänge und Einordnung.
- Struktur: 1) Kurzüberblick (3-4 Sätze) 2) Details (5-10 Bulletpoints) 3) Bedeutung/Implikationen (3 Bulletpoints).
- Keine Quellenangaben, keine Spekulationen.

TEXT:
{{ $json.llm_context }}
Den Basic LLM Chain with dem OpenAI Chat Model connectn:
- Node: OpenAI Chat Model
- Credential to connect with: OpenAI account
- Model: gpt-4o-mini
3.5.11 Story-Felder aufbereiten
Ein Edit Fields-Node fasst the LLM-Ergebnis zusammen with Metadaten aus dem Loop:
- Node: Edit Fields (Name:
Edit Fields: ki_story)
| Name | Type | Value |
|---|---|---|
| id | Number | ={{ $('Loop Over Items').item.json.id }} |
| content_enriched | String | ={{ $json.text }} |
| enrichment_source | String | search_llm |
| tavily_link_count | String | ={{ $items("Code in JavaScript: schlechte url aussortieren").length }} |
| score_gesamt_enriched | Number | ={{ (Math.round(($('Loop Over Items').item.json.score_gesamt | 0) * 10) + ($items("Code in JavaScript: schlechte url aussortieren").length | 0)) / 10 }} |
Der score_gesamt_enriched kombiniert den ursprünglichen Bewertungsscore with the Anzahl brauchbarer Tavily-Quellen – je mehr gute Quellen gefunden wurden, desto höher steigt the Score leicht an.
3.5.12 Story in Datenbank speichern
- Node: Postgres – Execute a SQL query (Name:
Upsert Story (ki_story))
INSERT INTO ki_story (
  primary_artikel_id,
  content_enriched,
  enrichment_source,
  tavily_link_count,
  score_gesamt_enriched,
  status,
  updated_at
)
VALUES (
  {{ $json.id }},
  '{{ ($json.content_enriched || "").replace(/'/g, "''") }}',
  '{{ ($json.enrichment_source || "").replace(/'/g, "''") }}',
  {{ parseFloat($json.tavily_link_count) || 0 }},
  {{ parseFloat($json.score_gesamt_enriched) || 0 }},
  'ANGEREICHERT',
  now()
)
ON CONFLICT (primary_artikel_id)
DO UPDATE SET
  content_enriched      = EXCLUDED.content_enriched,
  enrichment_source     = EXCLUDED.enrichment_source,
  tavily_link_count     = EXCLUDED.tavily_link_count,
  score_gesamt_enriched = EXCLUDED.score_gesamt_enriched,
  updated_at            = now();
3.5.13 Status aktualisieren and Loop schließen
Zum Abschluss will the Status des Artikels in ki_artikel auf ANGEREICHERT gesetzt, dawith Agent 4 ihn in the nächsten Step aufgreifen kann.
- Add a Postgres-Node hinzu:
- Node: Update rows in a table
- Credential to connect with:
n8n-postgres - Operation: Update
- Schema: public
- Table: ki_artikel
- Mapping Column Mode: Map Each Column Manually
- Columns to match on: id
| Feld | Value |
|---|---|
| id (using to match) | ={{ $('Loop Over Items').item.json.id }} |
| status | ANGEREICHERT |
- Connect den Ausgang dieses Nodes zurück with dem Eingang von „Loop Over Items”, dawith alle weiteren Artikel aus the Datenbank the Reihe nach abgearbeitet werden.
3.5.14 Workflow veröffentlichen
Stelle den Schedule Trigger auf 23 Stunden and enable den Workflow über Publish. Agent 3 läuft dawith einmal täglich, reichert alle Artikel mit score_gesamt >= 7.5 an and übergibt sie bereit an Agent 4.
3.6 Agent 4: Artikel createn with eigenem Bild
Ulf: „Jetzt will es richtig spannend. Jetzt schreibt the KI den Artikel?”
Tanja: „Claude schreibt ihn, and Flux-2-Flex malt dazu a Coverbild.”
Bernd schaut auf. „Ich habe meinen letzten Artikel einfach von einer anderen Website kopiert and a bisschen umgeschrieben. Hat keiner gemerkt.”
Stille.
Tanja: „Das, nennt sich Urheberrechtsverletzung.”
Bernd: „Aber …”
Tanja: „Nein.”
3.6.1 Rechtliche Einschätzung
Vorab a kurze persönliche Einschätzung als Laie, the is no Rechtsberatung:
Text: Die KI darf Fakten and Kontext verwenden, but niemals Sätze aus dem Originalartikel wörtlich übernehmen. Kurze Zitate are erlaubt, if sie als solche gekennzeichnet and with Quellenlink versehen sind. Claude will in the Prompt explizit angewiesen, alles vollständig neu zu formulieren.
Bilder: Das größte Abmahnrisiko liegt at Bildern. Das image_url-Feld aus dem RSS-Feed darf not einfach als Featured Image übernommen will – the wäre the Neuveröffentlichung eines urheberrechtlich geschützten Bildes auf deiner Website. Stattdessen generieren wir with Flux-2-Flex a eigenes Bild, the zu 100 % uns gehört.
3.6.2 Den Workflow startn
- Go tor Workflow-Overview and click on Create new workflow
- Nenne ihn:
A4 Agent: Artikel createn with eigenem Bild - Add a Schedule Trigger hinzu:
- Trigger Interval: Hours
- Hours Between Triggers: 23
- Trigger at Minute: 0
Für den Aufbau nutzen wir zunächst den Manual Trigger, dawith wir beim Testen direkt startn können.
3.6.3 Die beste Story aus the Datenbank holen
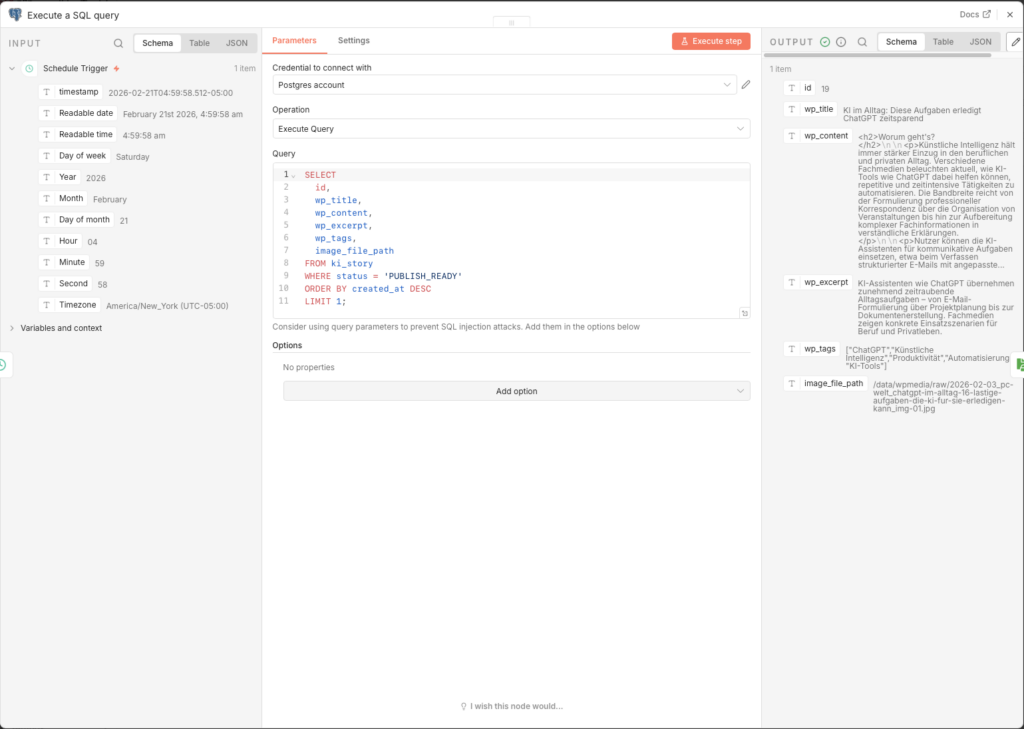
Agent 4 liest aus the ki_story-Tabelle – there liegt the angereicherte Inhalt aus Agent 3. Das SQL-Query is the komplexeste des gesamten Projects: Es holt the beste Story and lädt direkt alle zugehörigen Tavily-URLs als Array mit, dawith Claude sie in the Quellenabschnitt verlinkt.
- Add a Postgres-Node hinzu:
- Node: Execute a SQL query
- Query:
SELECT
s.id AS story_id,
s.status,
s.score_gesamt_enriched,
s.content_enriched,
a.title AS original_title,
a.url AS original_url,
a.published_date AS original_published_at,
a.source AS original_source,
COALESCE((
SELECT ARRAY_AGG(x.url ORDER BY x.rank NULLS LAST, x.retrieved_at DESC, x.url)
FROM (
SELECT DISTINCT
a2.url,
e.rank,
e.retrieved_at
FROM ki_artikel_edges e
JOIN ki_artikel a2
ON a2.id = e.to_artikel_id
WHERE e.from_artikel_id = s.primary_artikel_id
AND e.relation_type = 'tavily_related'
AND a2.url_normalized IS DISTINCT FROM a.url_normalized
ORDER BY e.rank NULLS LAST, e.retrieved_at DESC, a2.url
LIMIT 10
) x
), ARRAY[]::text[]) AS tavily_urls
FROM ki_story s
JOIN ki_artikel a ON a.id = s.primary_artikel_id
WHERE s.status = 'ANGEREICHERT'
ORDER BY s.score_gesamt_enriched DESC
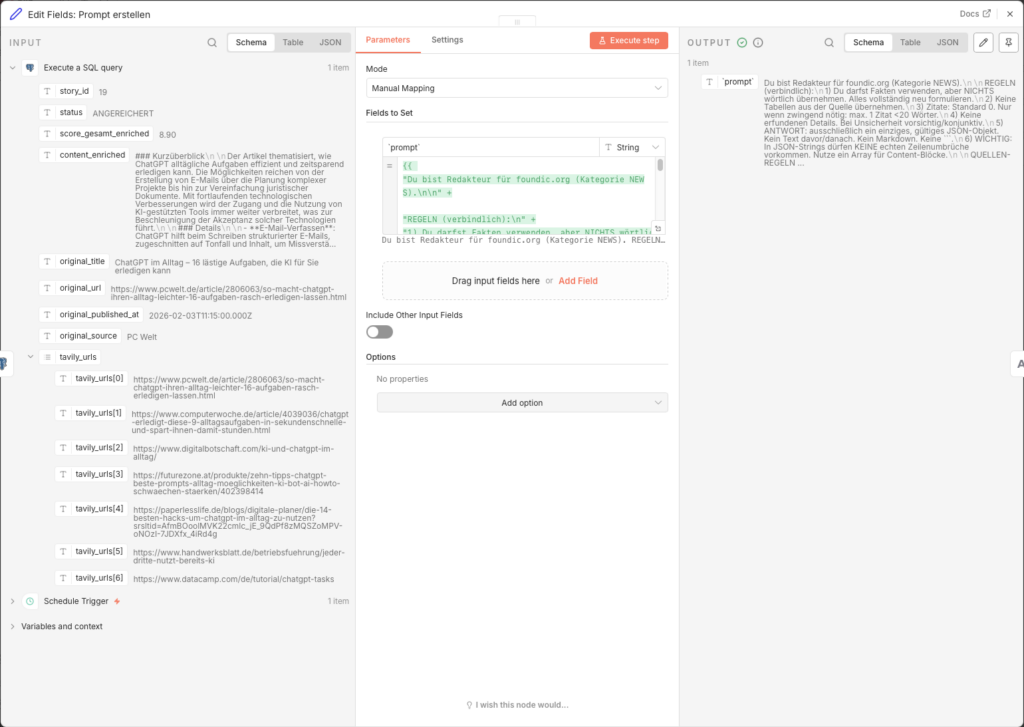
LIMIT 1;3.6.4 Artikel-Prompt for Claude aufbauen
Ein Edit Fields-Node baut den vollständigen Prompt auf. Er is bewusst restriktiv: sechs verbindliche Redaktionsregeln verhindern Urheberrechtsverletzungen.
- Node: Edit Fields (Name:
Edit Fields: Prompt createn) - Add Field → Name:
`prompt`→ Type: String → Value (Expression):
={{
"Du bist Redakteur für foundic.org (Kategorie NEWS).\n\n" +

"REGELN (verbindlich):\n" +
"1) Du darfst Fakten verwenden, aber NICHTS wörtlich übernehmen. Alles vollständig neu formulieren.\n" +
"2) Keine Tabellen aus der Quelle übernehmen.\n" +
"3) Zitate: Standard 0. Nur wenn zwingend nötig: max. 1 Zitat <20 Wörter.\n" +
"4) Keine erfundenen Details. Bei Unsicherheit vorsichtig/konjunktiv.\n" +
"5) ANTWORT: ausschließlich ein einziges, gültiges JSON-Objekt. Kein Text davor/danach. Kein Markdown. Keine ```.\n" +
"6) WICHTIG: In JSON-Strings dürfen KEINE echten Zeilenumbrüche vorkommen. Nutze ein Array für Content-Blöcke.\n\n" +

"ARTIKELDATEN:\n" +
"ORIGINAL_TITEL: " + ($json.title ?? "") + "\n" +
"BESCHREIBUNG: " + ($json.description ?? "") + "\n" +
"INHALT (nur Kontext, NICHT übernehmen): " + (($json.content ?? "").slice(0, 1500)) + "\n" +
"QUELLE: " + ($json.source ?? "") + "\n" +
"DATUM: " + ($json.published_date ?? "") + "\n" +
"URL: " + ($json.url ?? "") + "\n\n" +

"Pflichtregeln für wp_title:\n" +
"- wp_title ist eine kurze Umformulierung des ORIGINAL_TITEL (gleicher Sachverhalt).\n" +
"- wp_title enthält mindestens 2 Kernbegriffe aus ORIGINAL_TITEL (z.B. Siemens/CES/Industrie).\n" +
"- max. 12 Wörter.\n\n" +

"ERWARTETES JSON (Keys nie weglassen, fehlende Werte: \"\" oder []):\n" +
"{\n" +
"  \"wp_title\": \"...\",\n" +
"  \"wp_excerpt\": \"...\",\n" +
"  \"wp_content_blocks\": [\n" +
"    \"<h2>Worum geht’s?</h2>\",\n" +
"    \"<p>...</p>\",\n" +
"    \"<h2>Hintergrund & Einordnung</h2>\",\n" +
"    \"<p>...</p>\",\n" +
"    \"<p>...</p>\",\n" +
"    \"<h2>Was bedeutet das?</h2>\",\n" +
"    \"<ul><li>...</li><li>...</li><li>...</li></ul>\",\n" +
"    \"<h2>Quelle</h2>\",\n" +
"    \"<p><a href=\\\"" + ($json.url ?? "") + "\\\">" + (($json.title ?? "").replace(/"/g, '\\"')) + "</a> (" + ($json.source ?? "") + ", " + ($json.published_date ?? "") + ")</p>\"\n" +
"  ],\n" +
"    \"<p><i>Dieser Artikel wurde mit KI erstellt und basiert auf den angegebenen Quellen sowie den Trainingsdaten des Sprachmodells.</i></p>\"\n" +
" ],\n" +
"  \"wp_tags\": [\"...\",\"...\",\"...\",\"...\",\"...\"]\n" +
"}\n"
}}
Der Prompt is bewusst restriktiv aufgebaut: sechs verbindliche Redaktionsregeln verhindern Urheberrechtsverletzungen, the Quellen-Regeln sorgen dafür, dass Claude only hochwertige Medien verlinkt, and the JSON-Ausgabeformat ermöglicht the maschinelle Weiterverarbeitung without Nachbearbeitung.
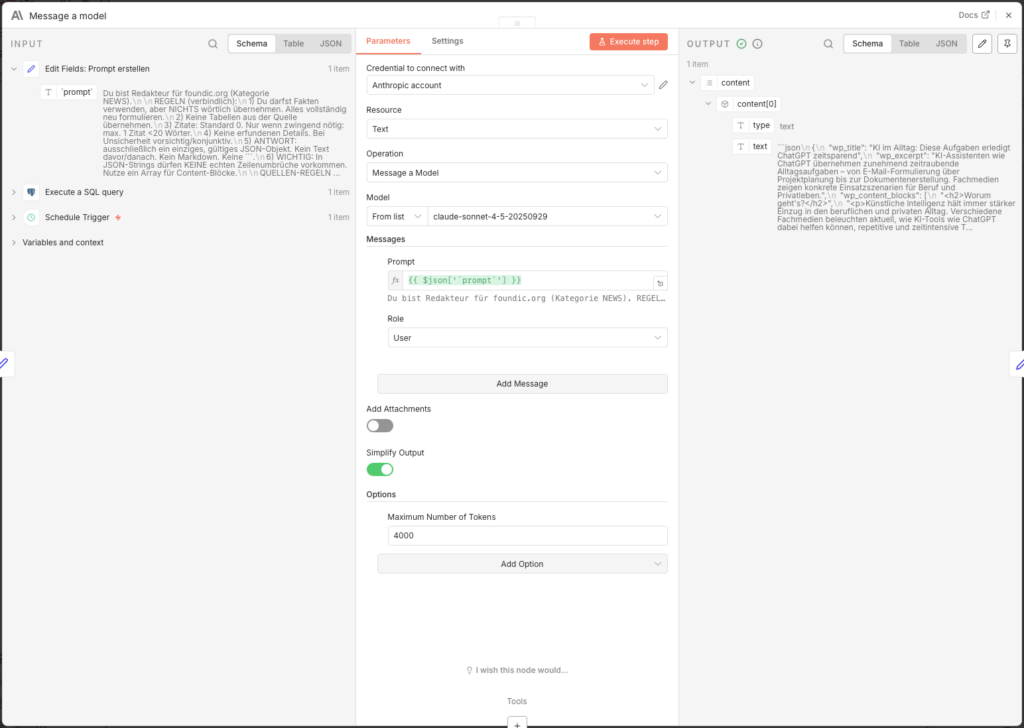
3.6.5 Artikel with Claude Sonnet schreiben
- Node: Message a model (Anthropic)
- Credential to connect with: Anthropic API Key (createn unter console.anthropic.com)
- Model: claude-sonnet-4-5-20250929
- Messages → Content:
={{ $json['prompt'] }} - Options → Maximum Number of Tokens: 4000
Das Token-Liwith auf 4000 hochzusetzen is wichtig – without diese Setting will the Artikel mittendrin abgeschnitten.
3.6.6 Claude-Output parsen
Claude liefert the Antwort als Rohtext zurück. Ein Edit Fields-Node extrahiert daraus the JSON-Objekt:
- Node: Edit Fields (Name:
Edit Fields1) - Add Field -> Name:
parsed-> Type: Object -> Value:
={{
  (() => {
    const raw =
      $json?.content?.[0]?.text ??
      $json?.content?.[0]?.content?.[0]?.text ??
      $json?.text ??
      "";

    const cleaned = raw.replace(/```(?:json)?/gi, "").trim();

    try {
      return JSON.parse(cleaned);
    } catch (e) {
      return { error: "JSON konnte nicht gelesen werden", raw: cleaned };
    }
  })()
}}
Der Code probiert mehrere mögliche Pfade in the Claude-Response-Objekt durch. Falls the Parsing scheitert, gibt er a Fehlerobjekt zurück – so bricht the Workflow not kommentarlos ab, sondern hinterlässt a lesbaren Hinweis.
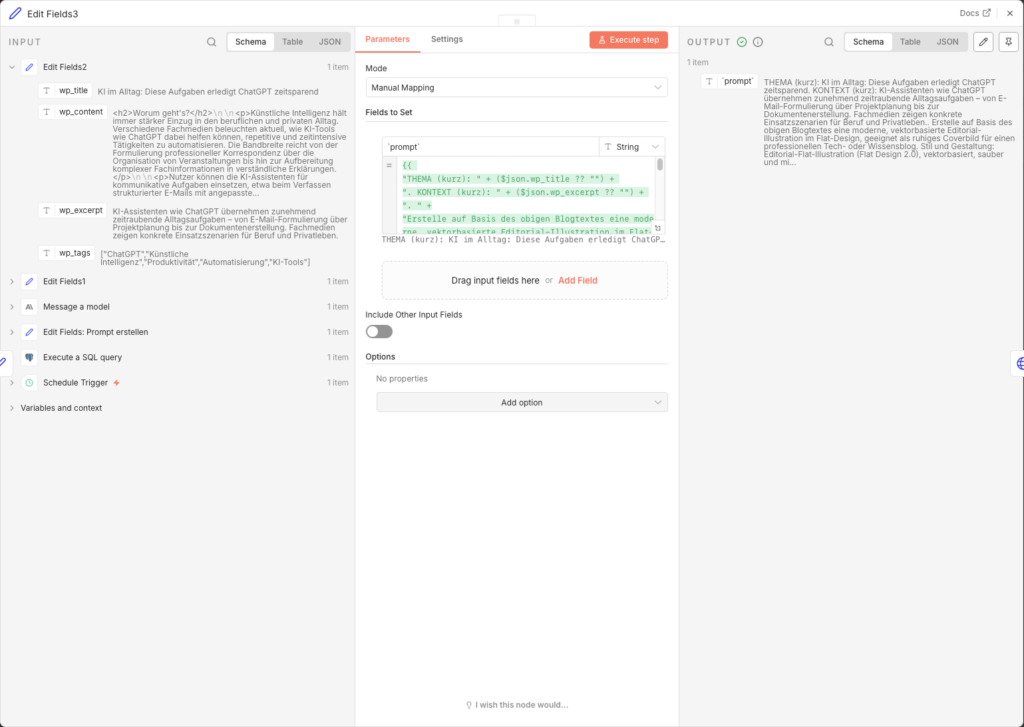
3.6.7 Felder for WordPress aufbereiten
Ein zweiter Edit Fields-Node „entpackt” the geparsten Felder in eigenständige, benannte Variablen:
- Node: Edit Fields (Name:
Edit Fields2)
| Name | Type | Value |
|---|---|---|
| wp_title | String | ={{ $json.parsed.wp_title }} |
| wp_content | String | ={{ $json.parsed.wp_content_blocks.join('\n\n') }} |
| wp_excerpt | String | ={{ $json.parsed.wp_excerpt }} |
| wp_tags | String | ={{ $json.parsed.wp_tags }} |
Die wp_content_blocks will durch join('\n\n') zu einem einzigen HTML-String zusammengefügt – genau the Format, the the WordPress REST API erwartet.
3.6.8 Bildprompt for Flux aufbauen
Jetzt startt the Bildgenerierungsprozess. Ein Edit Fields-Node baut den Flux-Prompt auf Basis des fertig geschriebenen Artikels:
- Node: Edit Fields (Name:
Edit Fields3) - Add Field → Name:
`prompt`→ Type: String → Value:
={{
"THEMA (kurz): " + ($json.wp_title ?? "") +
". KONTEXT (kurz): " + ($json.wp_excerpt ?? "") +
". " +
"Erstelle auf Basis des obigen Blogtextes eine moderne, vektorbasierte Editorial-Illustration im Flat-Design, geeignet als ruhiges Coverbild für einen professionellen Tech- oder Wissensblog. " +
"Stil und Gestaltung: Editorial-Flat-Illustration (Flat Design 2.0), vektorbasiert, sauber und minimalistisch. " +
"Klare Linien, einfache geometrische Formen, ruhige Flaechen und harmonische Proportionen. " +
"Reduzierte, professionelle Farbpalette mit warmen, gedämpften Toenen (Beige, Apricot, Orange) kombiniert mit zurueckhaltenden Blau- und Gruentoenen auf hellem Hintergrund. " +
"Weiches, flaechiges Licht mit sehr subtilen Schatten oder leichten Verlaeufen, keine realistische Lichtquelle. " +
"Abstrahierte, neutrale Figuren oder symbolische Objekte ohne individuelle Merkmale. " +
"Aufgeraeumte Komposition mit Fokus auf eine zentrale visuelle Metapher. " +
"Ruhige, sachliche Bildwirkung mit redaktionellem Charakter. " +
"Inhaltliche Vorgaben: Thema visuell abstrahieren, nicht woertlich oder erzählerisch. Keine konkrete Szene mit erkennbarem Ort oder realen Marken. " +
"Zwingende Verbote: Kein Text im Bild (keine Buchstaben, Woerter, Zahlen, Schriftzeichen). Keine Logos/Markenzeichen/firmenspezifischen Symbole. Keine Fotografie, kein Fotorealismus. Keine 3D-Darstellung. Keine Comic- oder Cartoon-Optik. " +
"Technische Vorgaben: Quadratisches Bildformat. Zeitgemaesser, konsistenter Stil fuer redaktionelle Online-Inhalte. "
}}
Der Prompt nutzt wp_title und wp_excerpt aus dem gerade erstellten Artikel als inhaltliche Basis. Die detaillierten Stil-Vorgaben (Flat Design 2.0, gedämpfte Farben, no Text, no Fotorealismus) sorgen for a konsistentes, redaktionelles Bildlook über alle generierten Cover hinweg.
3.6.9 Bild at Black Forest Labs anfordern
Die BFL-API arbeitet asynchron – du stellst a Auftrag, bekommst a Auftragsnummer zurück and fragst später nach, ob the Bild fertig ist. Wie a Bäckerei: Bestellung aufgeben, Zettelchen nehmen, später abholen.
Step 1: API Key einrichten
Create auf bfl.ai a Account, load Guthaben auf and copy deinen API Key. Save ihn in n8n als Custom Auth Credential:
- Go to n8n Hauptmenü → Credentials → New
- Type: Custom Auth
- Name: z. B.
BFL API Key - JSON:
{
  "headers": {
    "x-key": "bfl_DEIN_API_KEY_HIER"
  }
}
Step 2: Bild-Job startn
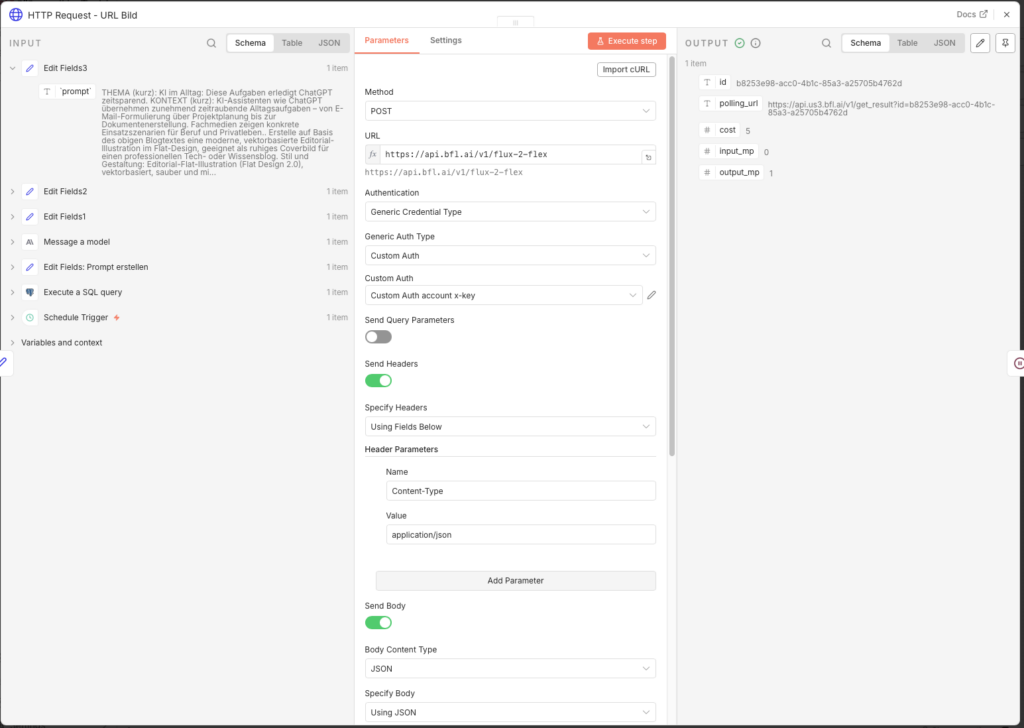
- Node: HTTP Request (Name:
HTTP Request - URL Bild) - Method: POST
- URL:
https://api.bfl.ai/v1/flux-2-flex - Authentication: Generic Credential Type → Custom Auth → dein BFL-Credential
- Send Headers: ON
- Name:
Content-Type/ Value:application/json
- Name:
- Send Body: ON → Body Content Type: JSON → Specify Body: Using JSON
- JSON Body:
{
  "prompt": "={{ $json['`prompt`'] }}",
  "prompt_upsampling": true,
  "width": 1024,
  "height": 1024,
  "steps": 35,
  "guidance": 5,
  "output_format": "jpeg",
  "safety_tolerance": 2
}- Response Format: JSON
Die 35 Render-Steps liefern a gute Balance zwischen Bildqualität and Generierungszeit (ca. 8–15 Sekunden).
3.6.10 Warten and Bild abrufen
Da the API asynchron arbeitet, brauchen wir a Poll-Schleife: warten -> nachfragen -> fertig or nochmal warten.
Wait-Node:
- Node: Wait
- Resume: After Time Interval
- Wait Amount: 11 Sekunden
11 Sekunden is in the Praxis a gute Wartezeit for Flux-2-Flex. Zu kurz führt zu vielen unnötigen Check-Requests, zu lang verlängert the Workflow-Laufzeit unnötig.
Check-Node: - Node: HTTP Request (Name:
HTTP Request - Check URL Bild) - Method: GET
- URL:
={{ $('HTTP Request - URL Bild').item.json.polling_url }} - Response Format: JSON
IF-Node (fertig or weiter warten): - Node: IF
- Condition:
{{ $json.status }}is equal toReady- TRUE → weiter to the Download
- FALSE → zurück to the Wait-Node (Connection from the FALSE-Ausgang zurück zu „Wait”)
Achtung: BFL gibtReadywith großem R zurück – notREADY. Tippfehler here führen zu einer Endlosschleife.
Download-Node:
- Node: HTTP Request (Name:
HTTP Request - Download URL Bild) - Method: GET
- URL:
={{ $json.result.sample }} - Response Format: File
Das Bild landet now als Binary-Daten in the Felddataand is bereit to the Speichern.
3.6.11 Filenamen vergeben
Ein Edit Fields-Node erstellt a systematischen Filenamen in the Format YYYY-MM-DD_quelle_artikel-slug_img-01.jpg:
- Node: Edit Fields (Name:
Edit Fields5) - Include Other Input Fields: ON
- Add Field → Name:
filename→ Type: String → Value:
={{
  (String($('Execute a SQL query').item.json.original_published_at || '').substring(0,10) || '0000-00-00')
}}_{{
  String($('Execute a SQL query').item.json.original_source || 'unknown').toLowerCase().replace(/\s+/g, '-').replace(/[^a-z0-9-]/g,'')
}}_{{
  String($('Execute a SQL query').item.json.original_title || 'untitled')
    .toLowerCase()
    .normalize('NFD').replace(/[\u0300-\u036f]/g, '')
    .replace(/[^a-z0-9]+/g, '-')
    .replace(/^-+|-+$/g, '')
    .substring(0, 80)
}}_img-01.jpg
Das Result: 2026-01-20_heise-it_openai-stellt-neues-modell-vor_img-01.jpg. Jeder Filename is eindeutig, lesbar and sortierbar nach Datum.
3.6.12 Bild auf the Synology NAS speichern
- Node: Read/Write Files from Disk
- Operation: Write File to Disk
- Binary Property:
data - File Path:
/data/wpmedia/raw/{{ $json.filename }}
Dawith n8n auf dieses Directory schreiben darf, must the Volume in the Docker-YAML gemountet sein. Falls still not geschehen, ergänze in deinerdocker-compose.ymluntervolumes:
volumes:
  - /volume2/docker/n8n/app_data:/home/node/.n8n
  - /volume1/WordPress/media:/data/wpmedia    # ← diese Zeile hinzufügen
Danach den Container neu startn. Außerdem must the Schreibrechte for den n8n-Prozess stimmen – falls the Node a Fehler meldet, hilft dieser SSH-Befehl auf the DiskStation
sudo chown -R 1000:1000 /volume1/WordPress/media/
sudo chmod -R 775 /volume1/WordPress/media/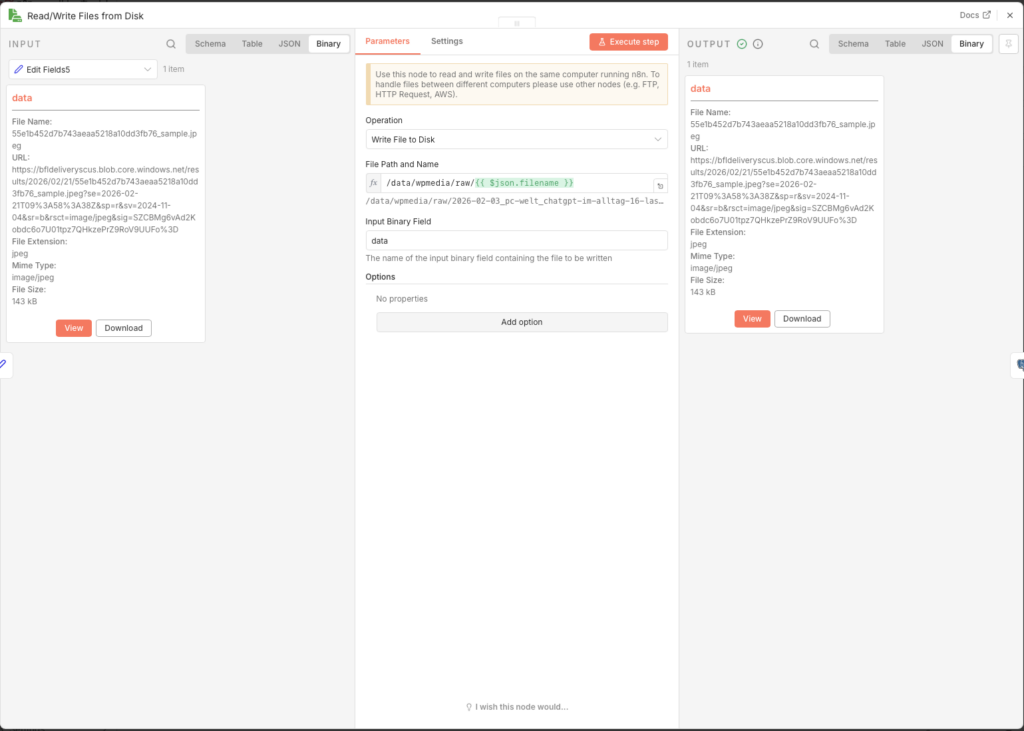
3.6.13 Story in Datenbank aktualisieren
Zum Abschluss schreibt a Postgres-Node alle erzeugten Inhalte in the ki_story-Tabelle zurück and setzt den Status auf PUBLISH_READY. Das is the Signal for Agent 5, dass dieser Artikel zur Veröffentlichung bereit steht.
- Node: Update rows in a table
- Credential to connect with:
n8n-postgres - Operation: Update
- Schema: public
- Table: ki_story (not ki_artikel!)
- Mapping Column Mode: Map Each Column Manually
- Columns to match on: id
| Feld | Value |
|---|---|
| id (using to match) | ={{ $('Execute a SQL query').item.json.story_id }} |
| status | PUBLISH_READY |
| wp_title | ={{ $('Edit Fields2').item.json.wp_title }} |
| wp_content | ={{ $('Edit Fields2').item.json.wp_content }} |
| wp_excerpt | ={{ $('Edit Fields2').item.json.wp_excerpt }} |
| wp_tags | ={{ $('Edit Fields2').item.json.wp_tags }} |
| image_file_path | ={{ $json.fileName }} |
$json.fileName (with großem N) is the automatisch von n8n vergebene Name the gespeicherten File – er entspricht dem Wert aus Edit Fields5, will but direkt aus dem Read/Write-Node übernommen.
3.6.14 Workflow veröffentlichen
Stelle den Schedule Trigger auf 23 Stunden and enable den Workflow über Publish. Agent 4 läuft täglich einmal, nimmt the beste angereicherte Story, produziert daraus a fertigen Artikel with eigenem Coverbild and legt beides in the Datenbank ab.
3.7 Agent 5: Veröffentlichen auf WordPress
Tanja: „Das is the letzte Step, Agent 5 übergibt alles an WordPress.”
Ulf: „Und then is the Artikel live?”
Tanja: „Nein. Er landet als Entwurf. Du schaust drüber, gibst grünes Licht, and erst then geht er online.”
Bernd: „Warum not direkt veröffentlichen?” Dann spart man sich den Step.”
Tanja: „Weil, KI-Artikel manchmal Fehler enthalten. Halluzinationen. Falsche Namen. Veraltete Zahlen. Ein kurzer menschlicher Blick verhindert, dass dein Blog Unsinn veröffentlicht, während du schläfst.”
Bernd überlegt. „Ich hätte the direkt veröffentlicht.”
Tanja: „Das weiß ich.”
3.7.1 Vorbereitung in WordPress
Dawith n8n Artikel and Bilder hochladen darf, braucht es a Anwendungspassword. Das is sicherer als dein normales Login – es can jederzeit widerrufen werden, without dass sich dein Hauptpassword ändert.
- Logge dich in dein WordPress-Admin a
- Lege unter User → Neu hinzufügen a neuen User an, z. B.
n8n-publisher - Weise ihm the Rolle Autor oder Redakteur zu – er braucht no Admin-Rechte
- Open the Profil des neuen Users and scrolle ganz nach unten zu Anwendungspasswörter
- Enter a Namen a (z. B.
n8n-Diskstation) and click on Neues Anwendungspassword hinzufügen - Important: Copy the angezeigte Password sofort (z. B.
abcd efgh ijkl ...), es will only dieses a Mal angezeigt - Notiere außerdem the Kategorie-ID deiner Ziel-Kategorie. Diese findest du in WordPress unter Beiträge -> Kategorien: Klicke the gewünschte Kategorie an and lies the ID aus the URL ab (z. B.
...tag_ID=8)
3.7.2 Den Workflow startn
- Go torück zur Workflow-Overview and click on Create new workflow
- Nenne ihn oben links:
A5 Agent: Veröffentlichen auf WordPress - Click on Add First Step and wähle Schedule Trigger
- Trigger Interval: Hours
- Hours Between Triggers: 23
- Trigger at Minute: 0
Für den Aufbau nutzen wir zunächst den Manual Trigger, dawith wir direkt testen können.
3.7.3 Fertigen Artikel aus the Datenbank holen
- Node: Postgres – Execute a SQL query
- Credential to connect with:
n8n-postgres - Query:
SELECT
  id,
  wp_title,
  wp_content,
  wp_excerpt,
  wp_tags,
  image_file_path
FROM ki_story
WHERE status = 'PUBLISH_READY'
ORDER BY created_at DESC
LIMIT 1;
Der Status PUBLISH_READY will von Agent 4 automatisch gesetzt. Du kannst ihn in Metabase also manuell vergeben or entfernen – the gibt dir volle Kontrolle darüber, welche Artikel in the Veröffentlichungswarteschlange kommen.
3.7.4 Bild von the NAS laden
Das Bild must als Binary-File in den n8n-Arbeitsspeicher geladen werden, bevor es an WordPress übertragen will kann.
- Node: Read/Write Files from Disk
- Operation: Read File(s) From Disk
- File(s) Selector:
={{ $json.image_file_path }}
Derimage_file_pathaus the Datenbank enthält den vollständigen Pfad innerhalb des Docker-Containers, z. B./data/wpmedia/raw/2026-01-20_heise-it_openai-stellt-neues-modell-vor_img-01.jpg. Dieser Pfad must with dem in Agent 4 gemounteten Volume übereinstimmen.
3.7.5 Bild in the WordPress-Mediathek hochladen
WordPress braucht the Bild zuerst in the Mediathek, um ihm a interne ID zuzuweisen – diese ID will then beim Createn des Beitrags als featured_media referenziert.
- Node: HTTP Request (Name:
HTTP Request) - Method: POST
- URL:
https://foundic.org/wp-json/wp/v2/media - Authentication: Generic Credential Type → Basic Auth
- Basic Auth Credential → New Credential:
- Username: dein n8n-Publisher-Username
- Password: the Anwendungspassword (not the normale Login-Password!)
- Send Headers: ON
| Header Name | Value |
|---|---|
| Content-Disposition | =attachment; filename="{{ $binary.data.fileName }}" |
| Content-Type | image/jpeg |
- Send Body: ON
- Body Content Type: n8n Binary File
- Input Data Field Name:
data
Wenn the Request erfolgreich ist, gibt WordPress a JSON-Objekt zurück, the u. a. the Feldidenthält – the Medien-ID des hochgeladenen Bildes. Diese ID brauchen wir in the nächsten Step.
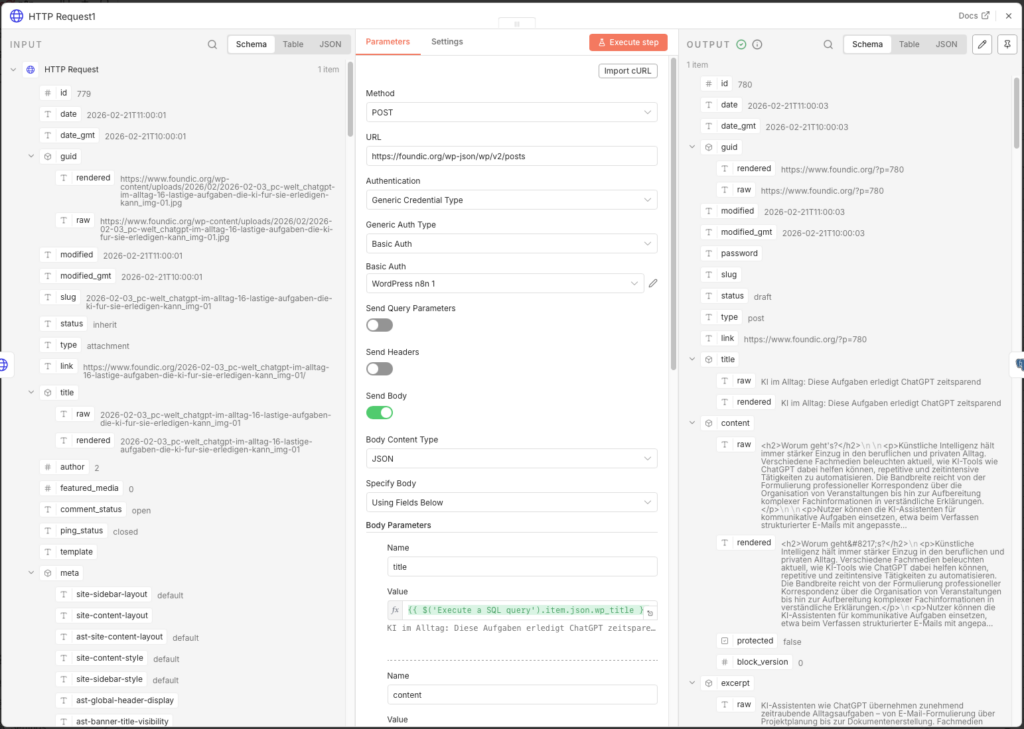
3.7.6 WordPress-Beitrag createn
Jetzt will the eigentliche Beitrag angelegt. Important: Der Status is bewusst auf draft gesetzt – the Artikel erscheint not sofort öffentlich, sondern landet zunächst als Entwurf in WordPress, where er prüft and freigeben will kann.
- Node: HTTP Request (Name:
HTTP Request1) - Method: POST
- URL:
https://foundic.org/wp-json/wp/v2/posts - Authentication: Generic Credential Type → Basic Auth → dasselbe Credential how oben
- Send Body: ON
- Body Content Type: JSON
- Specify Body: Using Fields Below
Add folgende Body-Felder hinzu (über Add Parameter):
| Name | Value |
|---|---|
| title | ={{ $('Execute a SQL query').item.json.wp_title }} |
| content | ={{ $('Execute a SQL query').item.json.wp_content }} |
| excerpt | ={{ $('Execute a SQL query').item.json.wp_excerpt }} |
| featured_media | ={{ $json.id }} ← Medien-ID aus dem vorherigen HTTP Request |
| status | draft |
| categories | 8 ← deine Kategorie-ID aus Step 3.7.1 |
Das Feld featured_media mit {{ $json.id }} referenziert the Bild-ID, the WordPress in the vorherigen Step zurückgegeben hat – the verknüpft the hochgeladene Bild automatisch als Coverbild des Beitrags.
3.7.7 Status in the Datenbank aktualisieren
Nach erfolgreicher Übergabe an WordPress will the Status in ki_story auf PUBLISHED gesetzt, dawith the Artikel beim nächsten Durchlauf not erneut verarbeitet wird.
- Node: Update rows in a table
- Credential to connect with:
n8n-postgres - Operation: Update
- Schema: public
- Table: ki_story
- Mapping Column Mode: Map Each Column Manually
- Columns to match on: id
| Feld | Value |
|---|---|
| id (using to match) | ={{ $('Execute a SQL query').item.json.id }} |
| status | PUBLISHED |
3.7.8 Der Human-in-the-Loop: Freigabe in WordPress
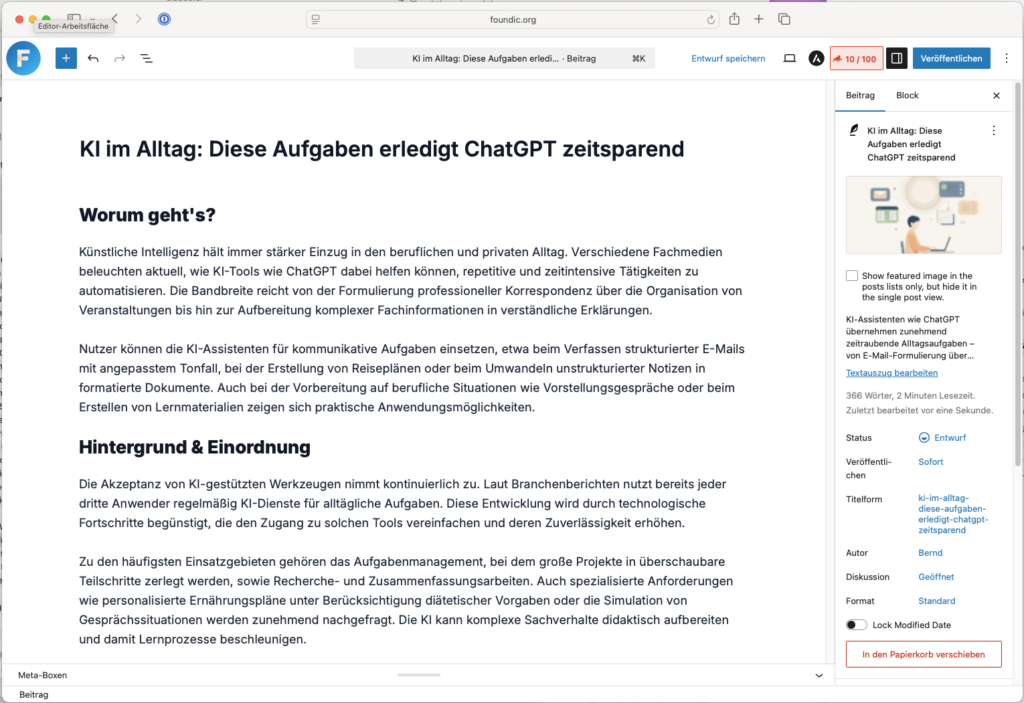
Nachdem Agent 5 gelaufen ist, liegt the Artikel als Entwurf in WordPress. Jetzt bis du dran – and the is gut so:
- Logge dich in dein WordPress-Admin a
- Go to Beiträge → Entwürfe
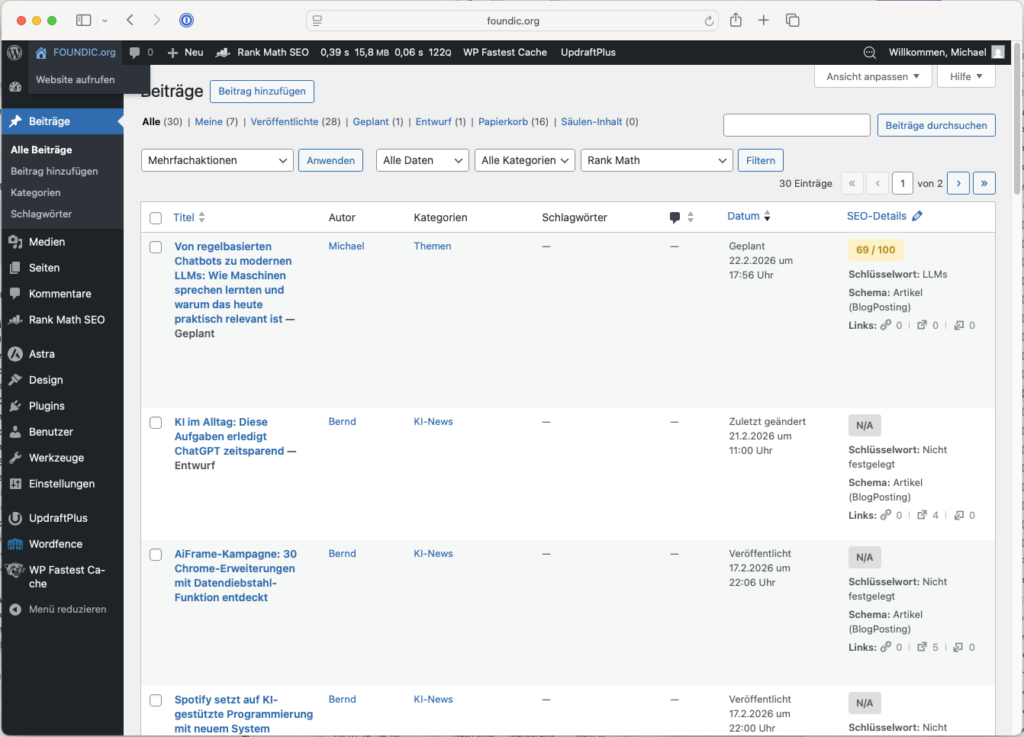
- Open den neu erstellten Beitrag and check Titel, Text, Bild and Tags
- Falls alles passt: Click on Veröffentlichen
- Falls du Anpassungen möchtest: Bearbeite den Beitrag direkt in WordPress
Du kannst in Metabase jederzeit den aktuellen Status aller Artikel einsehen and den status-Wert manuell anpassen – z. B. um a Artikel zurück auf ANGEREICHERT zu setzen, if Agent 4 ihn neu bearbeiten soll.
3.7.9 Workflow veröffentlichen
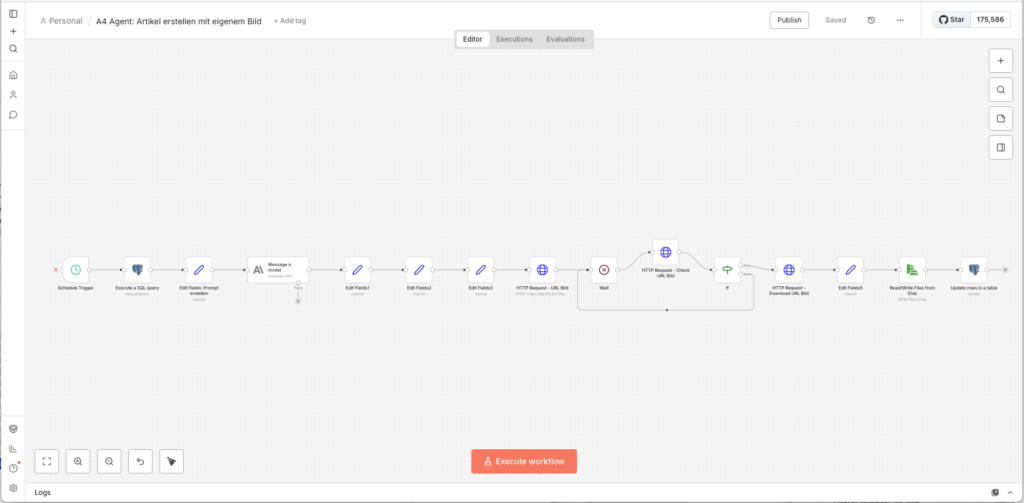
Stelle den Schedule Trigger auf 23 Stunden and enable über Publish. Die gesamte Pipeline läuft now automatisch:
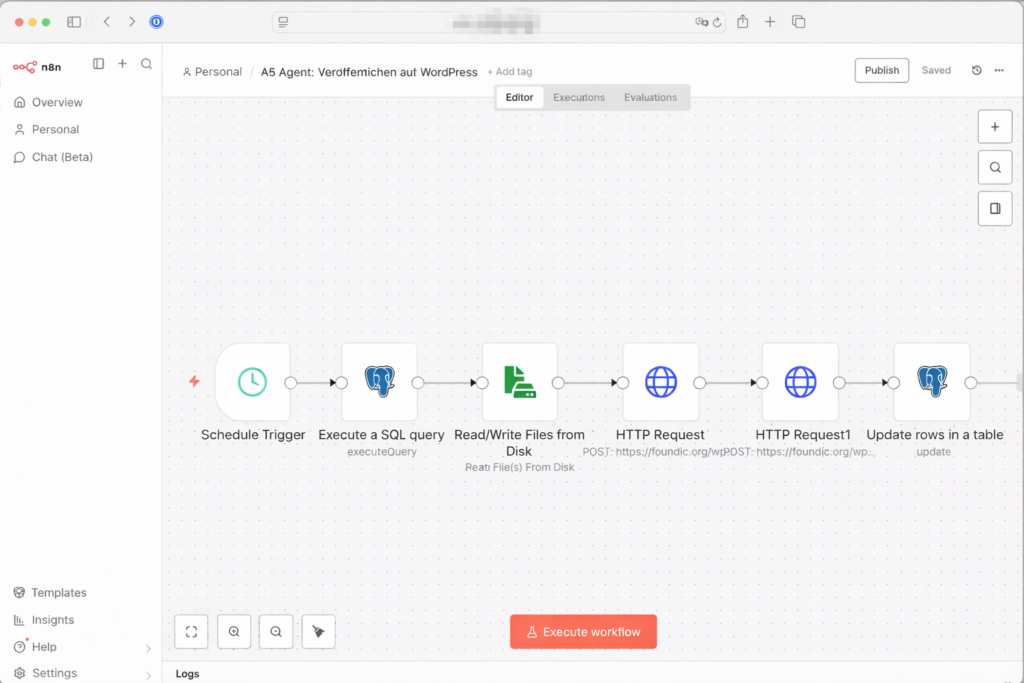
- Alle 2 Stunden liest Agent 1 neue Artikel aus 22 RSS-Feeds a
- Alle 4 Stunden bewertet Agent 2 the neuen Einträge
- Alle 23 Stunden reichert Agent 3 the besten Artikel with Web-Kontext an
- Alle 23 Stunden schreibt Agent 4 den fertigen Artikel and generiert the Coverbild
- Alle 23 Stunden lädt Agent 5 den Artikel als Entwurf in WordPress hoch – and wartet auf deine Freigabe bzw. Veröffentlichung in WordPress.
4 Conclusion
Einige Wochen später. Gleiches Büro. Gleicher Montag.
Ulf öffnet seinen Laptop, not um Feeds zu durchklicken, sondern um a einzigen Entwurf in WordPress zu prüfen. Der Artikel is fertig geschrieben, hat a Coverbild, Quellen and Tags. Er liest ihn durch, nickt, klickt auf „Veröffentlichen”.
Drei Minuten. Statt einer Stunde.
Bernd schaut herüber: „Hast du the alles selbst geschrieben?”
Ulf: „Eine KI hat es geschrieben, ich hab es only freigegeben.”
Bernd: „Und the ist… okay so?”
Tanja lehnt sich zurück: „Das is genau the Punkt.”
Was du gebaut hast
Wenn du alle fünf Agenten eingerichtet and aktiviert hast, läuft auf deiner Synology NAS a vollautomatischer digitaler Newsroom – rand um the Uhr, without dass du jeden Morgen Feeds durchklicken or manuell recherchieren musst. MEehrere Nachrichtenquellen (RSS-Feeds) will kontinuierlich beobachtet, jede Meldung bewertet, the relevantesten Treffer tiefenrecherchiert, a kompletter WordPress-Artikel geschrieben and a eigenes Coverbild generiert. Was früher Stunden an redaktioneller Routinearbeit gekostet hätte, läuft heute in the Hintergrand – and landet als Entwurf in deinem WordPress, wartet auf deinen letzten Blick and a Klick.
Das is no Spielzeugprojekt. Du hast daat a ernsthaftes Stück Software-Architektur gebaut: a relationale Datenbank with Statusmaschine, a Pipeline-System with fünf unabhängig laufenden Agenten, Qualitätsprüfungen auf mehreren Ebenen, URL-Normalisierung zur Duplikatsvermeidung and a Wissensgraphen aus verlinkten Artikeln. Und the alles without a einzige Zeile Server-Code schreiben zu müssen.
Was the System wirklich leistet – and what not
Es lohnt sich, ehrlich zu sein: Das System schreibt gute, strukturierte, rechtskonforme Artikel. Aber es schreibt no großartigen Artikel. Claude produziert soliden Redaktionsjournalismus – korrekt, gut aufgebaut, with Quellen. Was fehlt, is the menschliche Perspektive: the unerwartete Analogie, the pointierte Meinung, the Erfahrungswert aus zehn Jahren in the Thema. Das System is a very guter erster Entwurf – but a Entwurf.
Genau deshalb is the Human-in-the-Loop-Step no lästiges Hindernis, sondern the Herzstück des Konzepts. Der Newsroom übernimmt the Fleißarbeit. Du übernimmst the Urteilsvermögen.
Was du now tun kannst
Das System is so gebaut, dass es wächst. Ein paar naheliegende nächste Stepe:
- Mehr Quellen – du kannst beliebig viele weitere RSS-Feeds in Agent 1 einbinden, without den Rest des Systems anzufassen. Englischsprachige Quellen how TechCrunch, The Verge or MIT Technology Review würden the internationale Perspektive deutlich verbessern.
- Feinere Bewertung – the Scoring-Prompt in Agent 2 lässt sich jederzeit anpassen. Wenn du merkst, dass bestimmte Subkategorien zu oft or zu selten auftauchen, justiere einfach the Beschreibungen or the Schwellenwerte.
- Mehrsprachigkeit – Claude schreibt problemlos auf Englisch, if du den Prompt in Agent 4 entsprechend anpasst. Dawith ließe sich derselbe Workflow for a zweiten Blog in einer anderen Sprache nutzen.
- Tags automatisch anreichern – the von Claude generierten
wp_tagskönnten zusätzlich gegen a feste Tag-Taxonomie in WordPress abgeglichen werden, dawith no Tippvarianten entstehen. - Benachrichtigungen – a zusätzlicher n8n-Workflow könnte dich per E-Mail or Telegram benachrichtigen, sobald a neuer Artikel als Entwurf in WordPress bereitliegt.
Das größere Bild
Dieses Project zeigt exemplarisch, wohin the Reise with KI-Automatisierung geht: not darum, Menschen zu ersetzen, sondern darum, den eigenen Hebel zu verlängern. Eine einzelne Person can with diesem Setup a Publikationsfrequenz aufrechterhalten, the früher a kleines Redaktionsteam erfordert hätte – and the zu Betriebskosten von unter 5 Euro in the Monat.
n8n is daat the eigentliche Geheimnis. Nicht because es besser wäre als Zapier or Make in jeder einzelnen Funktion, sondern because es self-hosted läuft. Deine Workflows, deine Daten, deine Infrastruktur – auf deiner eigenen Hardware, without monatliche Plattformgebühren, without Vendor-Lock-in, without Datenschutzbedenken beim Verarbeiten von Artikelinhalten.
Wenn du dieses System aufgebaut hast, hast du not only a Newsroom gebaut. Du hast verstanden, how Multi-Agenten-Systeme funktionieren, how man KI-Outputs in echte Workflows einbettet and how man Automatisierung so gestaltet, dass sie skalierbar, wartbar and kontrollierbar bleibt. Das are Fähigkeiten, the weit über dieses a Project hinaus nützlich sein werden.