What you’re building in this tutorial is not an answering machine. It’s an AI phone assistant that automatically answers calls, conducts a structured conversation – asking for the caller’s name, their request, and its urgency – and then sends you a complete email summary. All in natural language, in German.
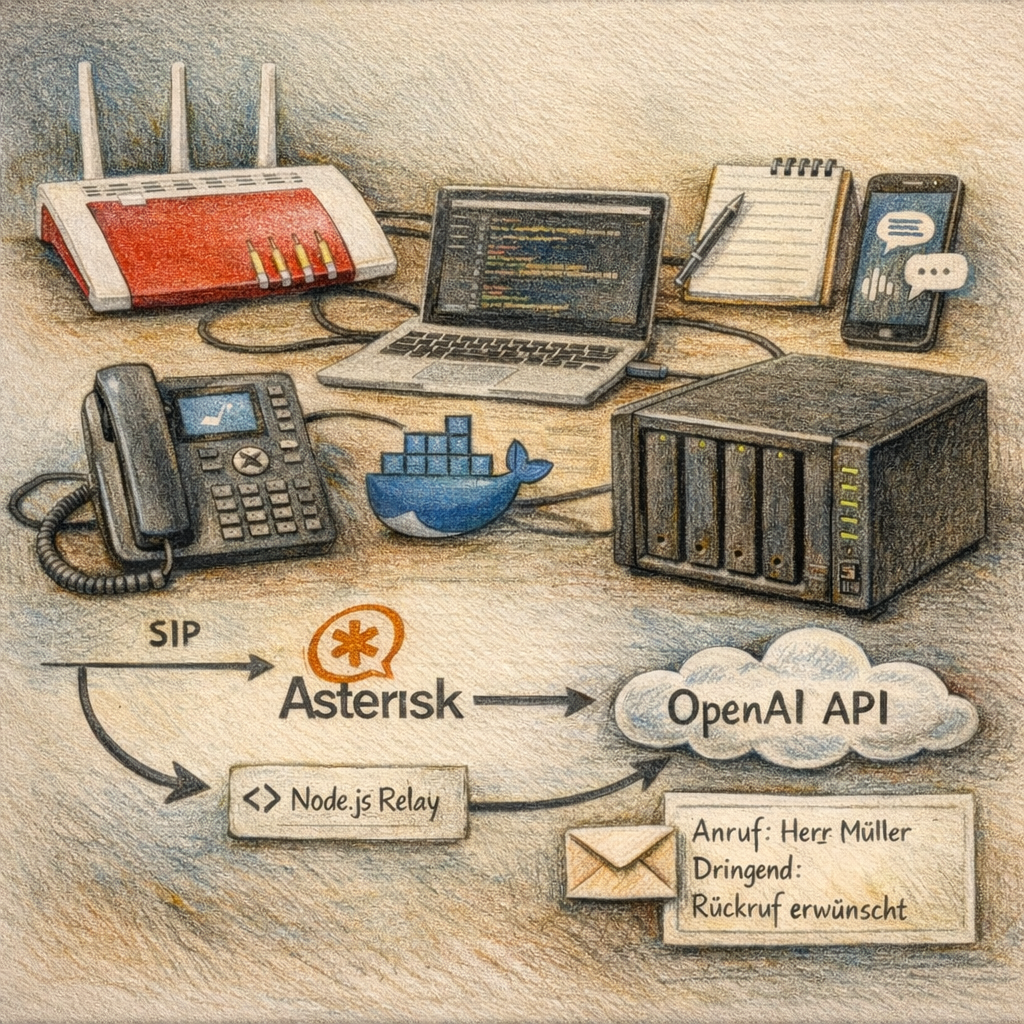
The whole thing runs on your Synology NAS at home, with no cloud dependencies for the infrastructure. The Fritz!Box 7590 serves as the phone gateway, Asterisk in a Docker container as the telephony server, and the OpenAI Realtime API as the AI brain. Automation is handled by n8n.
Sounds complex? In some places it is – but this guide walks you through it step by step. With basic SSH knowledge and some patience, the result is reproducible.
To make this guide easier to follow, three characters will accompany you:
The typical office archetypes: the competent IT colleague, the self-proclaimed expert, and the honest beginner. These three perspectives help you recognize common pitfalls.
Tanja is the IT expert. She knows how it works, explains patiently and clearly, and doesn’t get thrown off by bad advice. If you have a question, Tanja has the answer.
Bernd is the self-proclaimed “expert” who thinks he knows better – and is usually wrong. His shortcuts and half-knowledge regularly cause problems. He represents all the dangerous myths and bad practices you should avoid.
Ulf is the learner, just like you. He asks the questions swirling in your head and sometimes needs a real-world analogy to understand IT. If Ulf doesn’t get something, that’s completely fine – that’s what Tanja is there for.
“And… Action!”
Thursday evening. Office. Ulf stares at his phone.
Ulf: “Another missed call notification. No message. No number. Nothing.”
Bernd without looking up: “Call back.”
Ulf: “I don’t know the number. And when I call back, it’s busy. Or no one answers. Or — — –“
Bernd: “I solved that. Answering machine. Classic. ‘Leave a message after the beep.’ Done.”
Tanja puts down her pen. “And how many people still leave messages on an answering machine these days?”
Bernd thinks. “Well… Grandma.”
Tanja: “Exactly.”
1 Technical Overview
1.1 What Does This Project Do?
Ulf asks: “So the AI picks up the phone and talks to the caller?”
Tanja: “Exactly. It greets them, asks for their name, listens to their request, clarifies how urgent it is, and says goodbye. All in natural German.”
Ulf: “And then?”
Tanja: “Then you get an email with the complete call summary. Who called, what they wanted, how urgent it was.”
Bernd leans forward: “I would have just put a cheap answering machine there.”
Tanja: “You did. It didn’t record anything because the beep was too quiet.”
Bernd says nothing more.
The AI assistant handles calls on your landline number fully automatically. It greets the caller in a friendly manner, asks for their name and request, clarifies the urgency, and says goodbye in natural German – without robotic pauses. A few seconds after hanging up, a complete summary lands in your inbox.
1.2 Why This Architecture?
Ulf: “Wait, can’t the Fritz!Box just talk directly to OpenAI? Why do we need three systems in between?”
Tanja: “Good question. The Fritz!Box speaks SIP – that’s the classic telephony protocol. OpenAI speaks WebSocket – that’s a modern streaming protocol. The two don’t understand each other directly. We need a translator.”
Ulf: “Asterisk?”
Tanja: “Asterisk is the translator on the telephony side. And the Node.js relay is the bridge to OpenAI. Together they form the connection channel.”
Ulf: “That’s like soccer – the Fritz!Box is the goalkeeper who punts the ball. Asterisk is the defensive midfielder who controls it. And the relay is the playmaker who passes it to OpenAI.”
Brief silence.
Tanja: “That is… surprisingly accurate.”
The Fritz!Box is a pure phone gateway – it doesn’t understand WebSocket, which OpenAI requires for the Realtime API. Asterisk therefore plays the role of intermediary: it receives the classic SIP/RTP phone signal and passes it to the Node.js relay. The relay in turn opens a WebSocket connection to OpenAI and streams audio bidirectionally.
The complete signal path:
Telefon → FritzBox (SIP) → Asterisk (Docker) → [ARI/Node.js Relay] → WebSocket → api.openai.com:443OpenAI handles the complete conversational intelligence: speech recognition, AI responses, and text-to-speech in a single model with very low latency. After the conversation, the relay sends the transcript via webhook to n8n, which creates a formatted email from it.
1.3 Technology Stack
| Component | Role |
|---|---|
| Fritz!Box 7590 | Phone gateway: receives landline call, forwards via SIP |
| Asterisk 20 (Docker) | Telephony server: SIP registration, call control via ARI |
| Node.js Relay (Docker) | Bridge: converts RTP audio to WebSocket stream for OpenAI |
| OpenAI Realtime API | AI brain: speech recognition, dialog, text-to-speech in real time |
| n8n (Docker) | Automation: receives webhook, creates and sends email |
| Synology NAS | Host: runs all Docker containers, always on |
1.4 Prerequisites
Before you start – an honest check. You’ll need:
Hardware:
- Synology NAS with Intel CPU (e.g. DS1621xs+, DS1621+, DS923+, DS720+ or similar) – ARM processors are too weak for Docker workloads like this
- At least 4 GB RAM on the NAS (8 GB recommended if n8n runs in parallel)
- DSM 7.0 or newer
- Fritz!Box with an active landline number (tested with Fritz!Box 7590)
Software & Services: - Docker or Container Manager on Synology already set up
- n8n already running as a Docker container
- OpenAI account with payment method and API key
- Optional: Cloudflare tunnel for external access to n8n webhooks
Knowledge: - Basic SSH skills – meaning: ability to type commands into a terminal
- Basic understanding of Docker and compose.yaml
- No programming knowledge required – you’ll be editing existing configuration files
1.5 Costs
Ulf: “What does all this cost?”
Bernd: “I already have a ChatGPT Plus subscription – does that count?”
Tanja: “Unfortunately not. The Plus subscription is for the chat interface. The Realtime API runs through the developer platform. It has its own billing. No subscription, no monthly fee. You pay by the minute, exactly what you use.”
| Model | Cost per minute (approx.) |
|---|---|
| gpt-4o-realtime-preview | ~$0.12–0.24 |
Tanja: “A typical conversation lasts one to three minutes. That’s $0.12 to $0.75 per call. With $10 in starting credit, you’re set for many weeks if you use this for occasional home calls.”
Ulf: “And when the credit runs out?”
Tanja: “Then nothing works. That’s why you set a Spending Alert and a monthly cost limit in the OpenAI console – so you get notified in time before the account is empty.”
Bernd: “I’d just skip the limit. It doesn’t cost that much.”
Tanja: “If someone calls your webhook automatically – intentionally or by accident – you’ll have an unpleasant surprise at the end of the month. The limit isn’t a brake, it’s a fuse.”
1.6 Call Flow Overview
Before we build, the bird’s-eye view: here’s how a complete call travels through the system.
- Call arrives on the Fritz!Box landline number
- Fritz!Box forwards the call via SIP to Asterisk
- Asterisk answers the call and hands it to the Node.js relay (via ARI)
- The relay opens a WebSocket connection to
wss://api.openai.com/v1/realtimeand streams audio bidirectionally - OpenAI conducts the complete conversation with the caller
- After the call ends, the relay sends the transcript via HTTP POST to n8n
- n8n creates a formatted email with caller number, name, request, urgency, and complete conversation transcript
2 Implementation
2.1 Preparation: Create OpenAI API Key
Ulf: “Where do I get this API key? Is it somewhere in my account settings?”
Tanja: “Almost. You need the developer platform. That’s a separate OpenAI site. platform.openai.com, not chat.openai.com.” Tanja types the address. “That’s where you create the key and load credit.”
Ulf: “And is that linked to my regular account?”
Tanja: “Same email, but separate billing. What you spend there is billed independently of everything else.”
The OpenAI Realtime API is the AI brain of your phone assistant. It enables real-time voice conversations: speech recognition, response generation, and text-to-speech run in a single model with very low latency. Without an API key, nothing works.
Get the key at platform.openai.com/account/api-keys. Important: This is the developer platform – an existing ChatGPT subscription is not helpful here.
- In your project: API Keys → Create new secret key
- Name the key meaningfully, e.g.
AI-Phone-Assistant - Copy the key immediately and save it in your password manager – keys are only shown in full once
- Go to Billing → Add payment method
- Add starting credit (e.g. $10 for initial tests)

2.2 Preparation: Set Up IP Phone in Fritz!Box
For Asterisk to receive calls from the Fritz!Box, it needs to register there like a normal phone. We set up a virtual IP phone for this – the Fritz!Box treats it just like a real cordless phone, forwards calls to it, and hands them over via the SIP protocol.
Ulf: “Why a virtual phone? Can’t Asterisk just plug in directly?”
Tanja: “Imagine you want to get into an office building. You need a badge. The virtual IP phone is Asterisk’s badge with the Fritz!Box.”
- Log in to your Fritz!Box 7590 interface (usually
http://fritz.box) - Navigate to Telephony → Telephony devices
- Click Set up new device
- Select Phone (with or without answering machine) and click “Next”
- Select LAN/WLAN (IP phone) and give it a name (e.g.
Asterisk_AI)
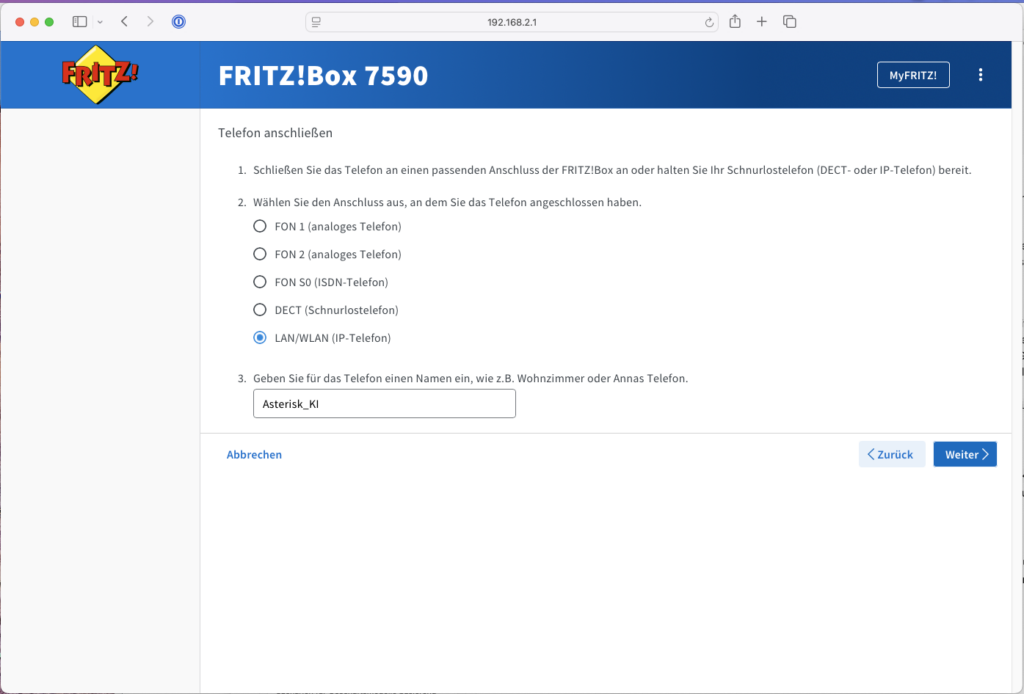
- IMPORTANT (credentials): In the next step you assign a username and password. Write these down carefully!
- Username:
KI_ASSISTANT_USER(must be at least 8 characters) - Password: `YOUR_SECURE_PASSWORD
- Registrar (SIP server):
fritz.boxor your Fritz!Box IP
- Username:
- Select the phone number the AI assistant should respond to – your landline number
- Confirm the setup (you may need to verify this via a phone code or button press on the Fritz!Box).
2.3 Preparation: Synology NAS
Tanja: “Before we build containers, let’s set up the folder structure. It’s like the toolbox before you start assembling. Skip it and you’ll spend time searching afterward.”
Bernd raises his hand: “I always start right away. No time for preparation.”
Tanja: “Last week you spent two hours looking for where you put the compose.yaml.”
Bernd is silent.
We’ll now set up the folder structure and the .env file that will securely store all API keys and credentials later.
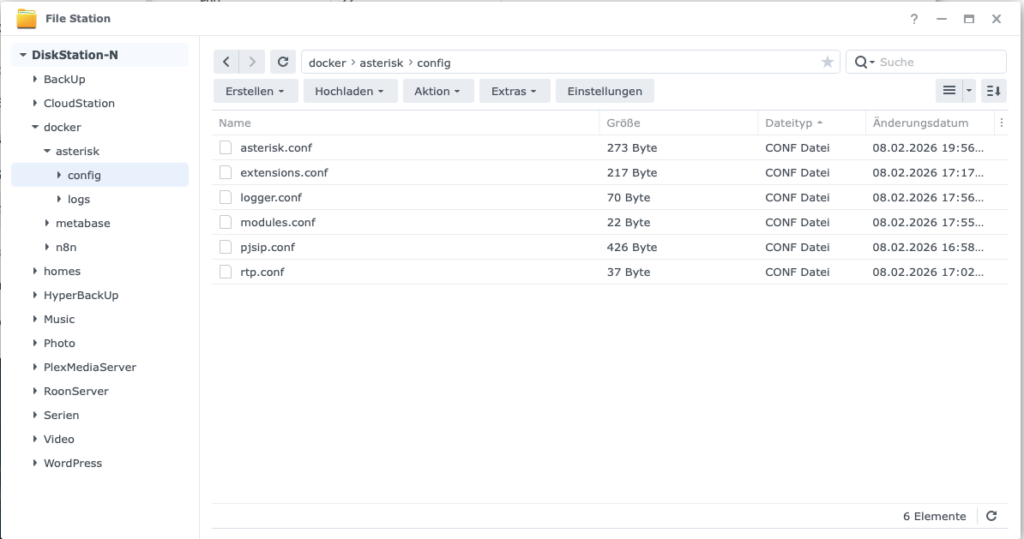
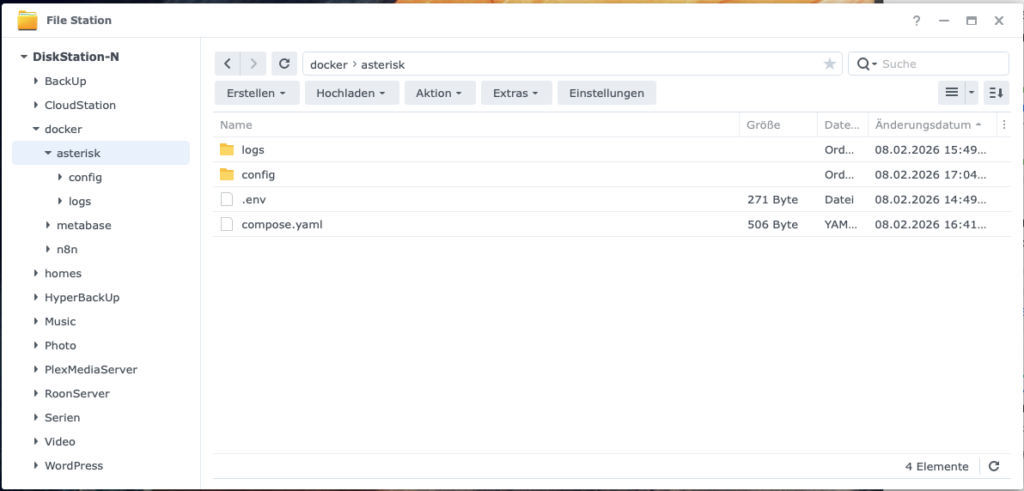
- Create the following directories on the NAS:
/volume1/docker/asterisk/config/– this is where all SIP and dialplan files will go laterlogs/– so we can see what’s happening during calls
- Create the file
/volume1/docker/asterisk/.env - Open a text editor on your PC (TextEdit, VS Code, or Notepad++) and paste the following content:
# OpenAI
OPENAI_API_KEY=DEIN_OPENAI_API_KEY

# Wird später gebraucht:
OPENAI_REALTIME_MODEL=gpt-realtime
N8N_WEBHOOK_BASE_URL=https://n8n.DEINE_DOMAIN.de- Set permissions: Right-click the
asteriskfolder → Properties → Permissions → Only your admin user should have read access.
Why .env? Because it lets you cleanly reference credentials in the compose.yaml without making them visible directly in YAML files or screenshots. That’s best practice – not paranoia.
2.4 Choosing the Right Model – Quality vs. Cost
Currently three Realtime models are available:
| Model | Status | Audio Input / 1M Token | Audio Output / 1M Token | Approx. cost per call (3 min) |
|---|---|---|---|---|
gpt-realtime | GA – production-ready | $32 | $64 | ~$0.12 |
gpt-realtime-mini | GA – cost-efficient | $10 | $20 | ~$0.04 |
gpt-4o-realtime-preview | Preview – predecessor | $40 | $80 | ~$0.15 |
The cost per call are estimates based on approximately 2 minutes of user audio and 1 minute of AI response. Longer conversations or detailed system prompts increase the price accordingly.
For this project I recommend gpt-realtime. It is the first generally available Realtime model, was specifically optimized for production voice agents, and offers noticeably better speech quality and more reliable instruction following compared to gpt-realtime-preview – at 20% lower cost. Particularly useful: gpt-realtime supports not only WebRTC and WebSocket but also native SIP connections – exactly the protocol that Asterisk and the Fritz!Box speak.
Those who want to save costs and don’t expect highly complex conversations can try gpt-realtime-mini. For occasional home calls, the quality difference in daily use is barely noticeable – and the cost per call drops to a fraction.
3 Set Up Asterisk as a Docker Container and Connect to Fritz!Box
Ulf: “So now we’re building Asterisk?”
Tanja: “Now we build Asterisk. But we do it in two steps. First configure, then start, then test. Only when the test gives the green light do we continue.”
Bernd: “I would start everything at once. Saves time.”
Tanja: “And when something doesn’t work, you won’t know where.”
Bernd: “True, happened to me before.”
Asterisk runs as a Docker container on your Synology. It plays a central role: it registers with the Fritz!Box like an IP phone, accepts incoming calls, and passes them to the OpenAI bridge. Everything that follows builds on this connection – which is why we explicitly test it before continuing.
3.1 Docker Setup: The compose.yaml
The compose.yaml is your blueprint. Instead of typing cryptic commands into the console, you define once here which files are mounted into the container and how it should behave.
- Open a text editor (e.g. TextEdit, VS Code, or Notepad++) and create a new file named
compose.yaml - Copy the following block into it:
Note: In my case n8n is already running, so we only add the Asterisk part here. For how to install n8n see https://www.foundic.org/n8n-selbst-hosten-synology-nas-docker-installation
version: "3.8"

services:
  asterisk:
    image: andrius/asterisk:20
    container_name: asterisk_ki
    restart: unless-stopped
    network_mode: "host"
    healthcheck:
      disable: true
    volumes:
      # === Config-Dateien (read-only) ===
      - /volume1/docker/asterisk/config/pjsip.conf:/etc/asterisk/pjsip.conf:ro
      - /volume1/docker/asterisk/config/extensions.conf:/etc/asterisk/extensions.conf:ro
      - /volume1/docker/asterisk/config/modules.conf:/etc/asterisk/modules.conf:ro
      - /volume1/docker/asterisk/config/logger.conf:/etc/asterisk/logger.conf:ro
      - /volume1/docker/asterisk/config/rtp.conf:/etc/asterisk/rtp.conf:ro
      - /volume1/docker/asterisk/config/ari.conf:/etc/asterisk/ari.conf:ro
      - /volume1/docker/asterisk/config/http.conf:/etc/asterisk/http.conf:ro
      # === Logs (read-write) ===
      - /volume1/docker/asterisk/logs:/var/log/asterisk:rw
    environment:
      - TZ=Europe/Berlin
      - ASTERISK_UID=0
- ASTERISK_GID=0- Copy the finished file to
/volume1/docker/asterisk/
Why network_mode: "host"?
Ulf points to the compose.yaml: “Wait, what does this network_mode: host mean here? Sounds kind of dangerous.”
Tanja: “It’s not, but the explanation takes a minute.”
Bernd: “I know that, NAT. Set that up once in our office. Didn’t work.”
Tanja: “That’s exactly the problem. Imagine the Docker container is an employee sitting in a sealed glass booth. He can make calls out, but when someone calls back, the call lands at the glass booth door, and the container hears nothing. That’s called one-way audio: you hear the other side, but they can’t hear you. Or vice versa.”
Ulf: “That sounds like soccer when the goalkeeper’s headset is broken. The coach is yelling but the keeper can’t hear anything.”
Tanja: “Perfect analogy. With network_mode: host we tear down the glass booth. The container then behaves as if it were directly the DiskStation – same IP, same ports, no NAT in between. Asterisk and the Fritz!Box can hear each other fine.”
Ulf: “And that’s secure?”
Tanja: “For this use case: yes. Asterisk only listens on the ports we allow it. The tradeoff is made consciously.”
Bernd nods slowly. “I would have just opened all ports.”
Tanja: “That would not be secure.”
Important: Port 5060 must be free. With network_mode: "host", Asterisk can only communicate SIP cleanly if nothing else on the DiskStation is already listening on port 5060 (UDP/TCP). If the port is in use, Asterisk will start – but the SIP registration will silently fail, or calls will drop unexpectedly.
We don’t define the RTP port range in the compose.yaml, but in the rtp.conf – that’s the right place for it.
3.2 Docker Setup: Asterisk Container Configuration
Ulf: “Six files? For a phone server?”
Tanja: “Each one does exactly one thing. Imagine setting up a new workshop. You have one cabinet for tools, one for screws, one for manuals. You could throw everything in one drawer.”
Bernd: “That’s what I do.”
Ulf: “… but then you won’t know where anything is when something doesn’t work.” Tanja counts on her fingers: “pjsip.conf: how Asterisk talks to the Fritz!Box. rtp.conf: which ports are reserved for audio. extensions.conf: what happens when an incoming call arrives. modules.conf: which Asterisk functions are loaded. logger.conf: what gets written to the log. asterisk.conf: global base settings.”
Ulf: “So six labeled drawers.”
Tanja: “Exactly. If audio doesn’t work later, you look in rtp.conf. If Asterisk doesn’t register with the Fritz!Box, you look in pjsip.conf. You don’t have to search through one huge file – you immediately know where the problem is.”
Bernd: “I would have put everything in one file.”
Tanja: “I know. Just start at the top. One file at a time.”
We create these six files in the directory /volume1/docker/asterisk/config/:
pjsip.conf→ SIP registration with Fritz!Boxrtp.conf→ RTP port range (Real-time Transport Protocol for audio data)extensions.conf→ Minimal dialplan (what happens when a call comes in)modules.conf→ which Asterisk modules are loadedlogger.conf→ where log messages goasterisk.conf→ global Asterisk settings
3.2.1 pjsip.conf – SIP to Fritz!Box
PJSIP is the modern SIP stack of Asterisk and is cleanly supported by the Fritz!Box. This file defines how Asterisk logs in to the Fritz!Box and accepts calls.
File: /volume1/docker/asterisk/config/pjsip.conf
[global]
type=global
user_agent=Asterisk PBX

; ===== UDP TRANSPORT =====
[transport-udp]
type=transport
protocol=udp
bind=0.0.0.0

; ===== FRITZBOX AUTHENTICATION =====
[fritzbox-auth]
type=auth
auth_type=userpass
username=KI_FRITZBOX_USER
password=DEIN_SICHERES_FRITZBOX_PASSWORT

; ===== OUTBOUND REGISTRATION =====
[fritzbox-reg]
type=registration
transport=transport-udp
outbound_auth=fritzbox-auth
server_uri=sip:fritz.box
client_uri=sip:KI_FRITZBOX_USER@fritz.box
retry_interval=60
expiration=3600

; ===== AOR (Address of Record) =====
[fritzbox-aor]
type=aor
max_contacts=1
remove_existing=yes

; ===== IDENTIFY - Erkennt FritzBox =====
[fritzbox-identify]
type=identify
endpoint=fritzbox
match=DEINE_FRITZBOX_IP

; ===== ENDPOINT (für ein- UND ausgehende Anrufe) =====
[fritzbox]
type=endpoint
transport=transport-udp
context=from-fritzbox
aors=fritzbox-aor
auth=fritzbox-auth
outbound_auth=fritzbox-auth
disallow=all
allow=alaw
allow=ulaw
direct_media=no
force_rport=yes
rewrite_contact=yes
rtp_symmetric=yes
from_user=KI_FRITZBOX_USER
from_domain=fritz.box
You must replace these placeholders:
KI_FRITZBOX_USER→ Username from Fritz!Box (Step 2.2)YOUR_SECURE_FRITZBOX_PASSWORD→ SIP password from Fritz!BoxYOUR_FRITZBOX_IP→ e.g.192.168.0.1
3.2.2 rtp.conf – Audio Ports
We define the RTP port range explicitly so audio runs predictably. RTP is the protocol that transmits the actual audio stream – without a defined port range, Asterisk could use any ports, making firewalls and NAT even more chaotic.
File: /volume1/docker/asterisk/config/rtp.conf
[general]
rtpstart=20000
rtpend=20255
Firewall note: If the firewall on the DiskStation is active, create rules for port 5060 (UDP) and the range 20000–20255 (UDP).
3.2.3 extensions.conf – Minimal Dialplan
Ulf: “What does the dialplan do?”
Tanja: “Imagine Asterisk is a reception desk. The dialplan is the work instruction: when someone calls, what happens? Where does the call get forwarded?” She types briefly. “Right now we just say: answer, wait briefly, hand off to the OpenAI bridge.”
File: /volume1/docker/asterisk/config/extensions.conf
[general]
static=yes
writeprotect=no

[from-fritzbox]
; Eingehender Anruf von FritzBox → an OpenAI Relay weiterleiten
exten => s,1,NoOp(Eingehender Anruf von FritzBox - CID=${CALLERID(all)})
 same => n,Answer()
 same => n,Wait(0.5)
 same => n,NoOp(Uebergabe an OpenAI Realtime via Stasis...)
 same => n,Stasis(asterisk_to_openai_rt)
 same => n,Hangup()

; Catch-all für alle Nummern, die die FritzBox sendet
exten => _X.,1,Goto(from-fritzbox,s,1)
A few notes in case you need to debug later:
exten => _X.,1catches any dialed number – the Fritz!Box often passes concrete MSN numbers, and this way you always land in the dialplanNoOp(...)writes to the log which number Asterisk actually sees – enormously helpful for troubleshootingWait(0.5)defuses race conditions at audio startup in some setups
3.2.4 modules.conf, logger.conf and asterisk.conf
These three files are the engine room. Unspectacular, but without them Asterisk won’t start cleanly.
File: /volume1/docker/asterisk/config/modules.conf
[modules]
autoload=yes

; Sicherheitshalber kritische ARI-Module explizit laden
load = res_http_websocket.so
load = res_ari.so
load = res_ari_channels.so
load = res_ari_bridges.so
load = res_ari_events.so
load = res_stasis.so
load = res_stasis_answer.so
load = res_stasis_playback.so
load = res_stasis_recording.so
load = res_stasis_snoop.so
load = chan_rtp.so
Asterisk has hundreds of modules. autoload=yes loads all of them automatically – the critical ARI modules are also explicitly named so Asterisk definitely finds them.
File: /volume1/docker/asterisk/config/logger.conf
[general]
dateformat=%F %T

[logfiles]
console => notice,warning,error,verbose(5)
messages => notice,warning,error,verbose(5)
File: /volume1/docker/asterisk/config/asterisk.conf
[directories]
astetcdir => /etc/asterisk
astvarlibdir => /var/lib/asterisk
astdbdir => /var/lib/asterisk
astmoddir => /usr/lib/asterisk/modules
astspooldir => /var/spool/asterisk
astrundir => /var/run/asterisk
astlogdir => /var/log/asterisk

[options]
verbose = 3
debug = 0
Why so minimal? So Asterisk starts reliably and we can see the important messages directly on the console. File logs can be added later as needed.
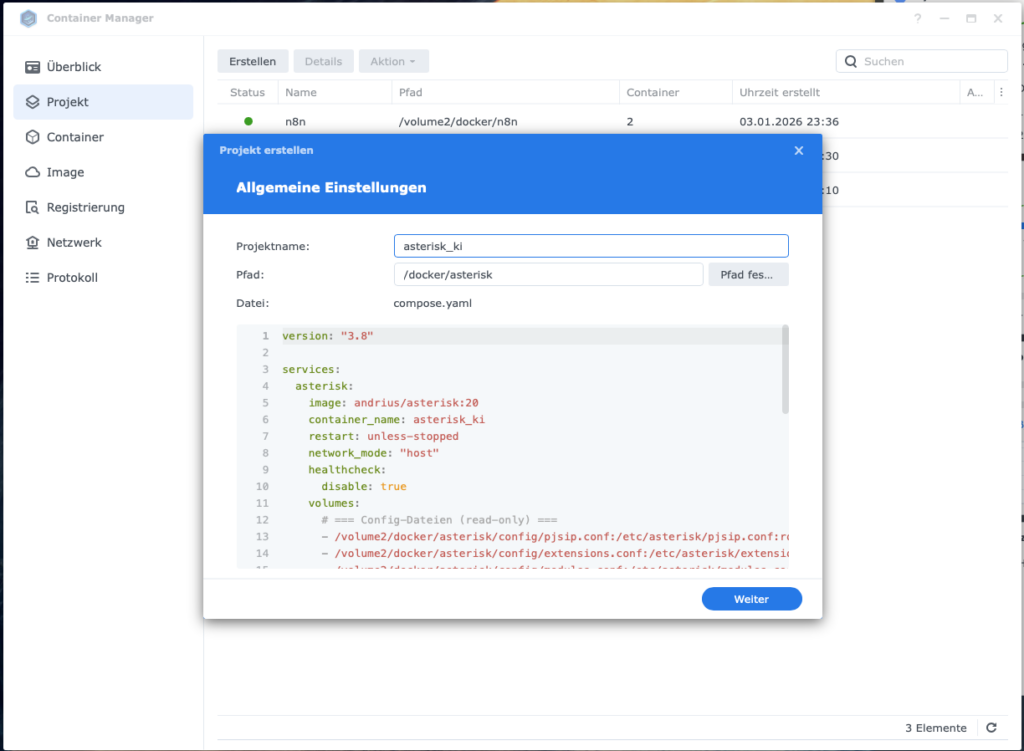
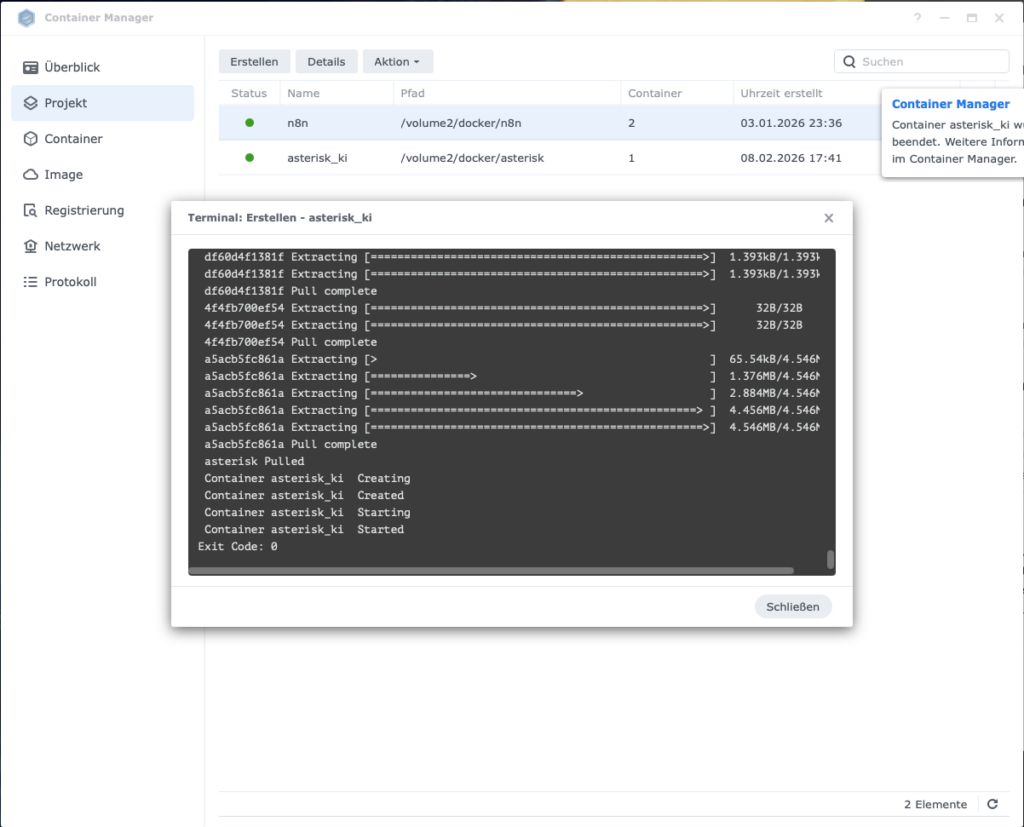
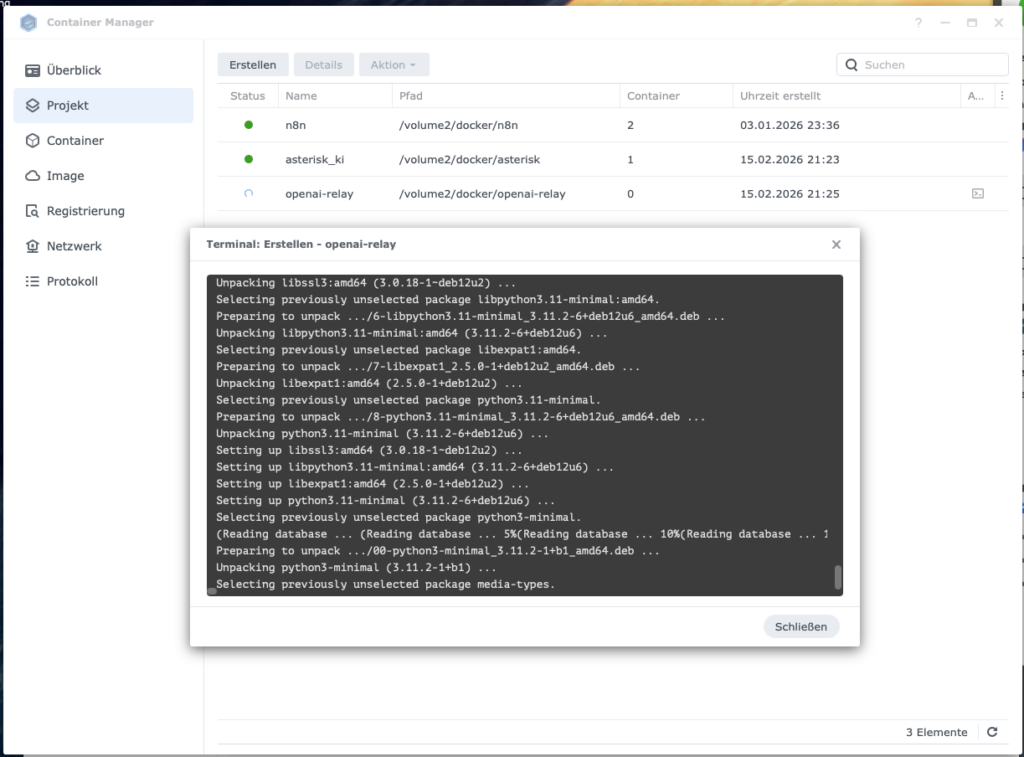
3.3 Start Asterisk in Docker
All files are in place. Now we start the container – through the Container Manager on the DiskStation.
- Open Container Manager
- DSM → Container Manager
- Create new project
- Left: Project
- Create
- Project name:
asterisk_ki - Select compose.yml
- From existing compose.yml
- Select path:
/volume1/docker/asterisk/compose.yml - Next
- Start project
- Create & start (or “Finish” → “Start”)
Firewall reminder: If the firewall on the Synology is active, create rules now: port 5060 (UDP) and port 20000–20255 (UDP).
3.4 Verify Asterisk Is Registered with Fritz!Box
Ulf: “And now just call and see if it works?”
Tanja: “No, first we verify that Asterisk has registered. Only then do we test the call. Anyone who skips this step will spend an hour groping in the dark afterward.”
Bernd: “I would have just called.”
Tanja: “I know.”
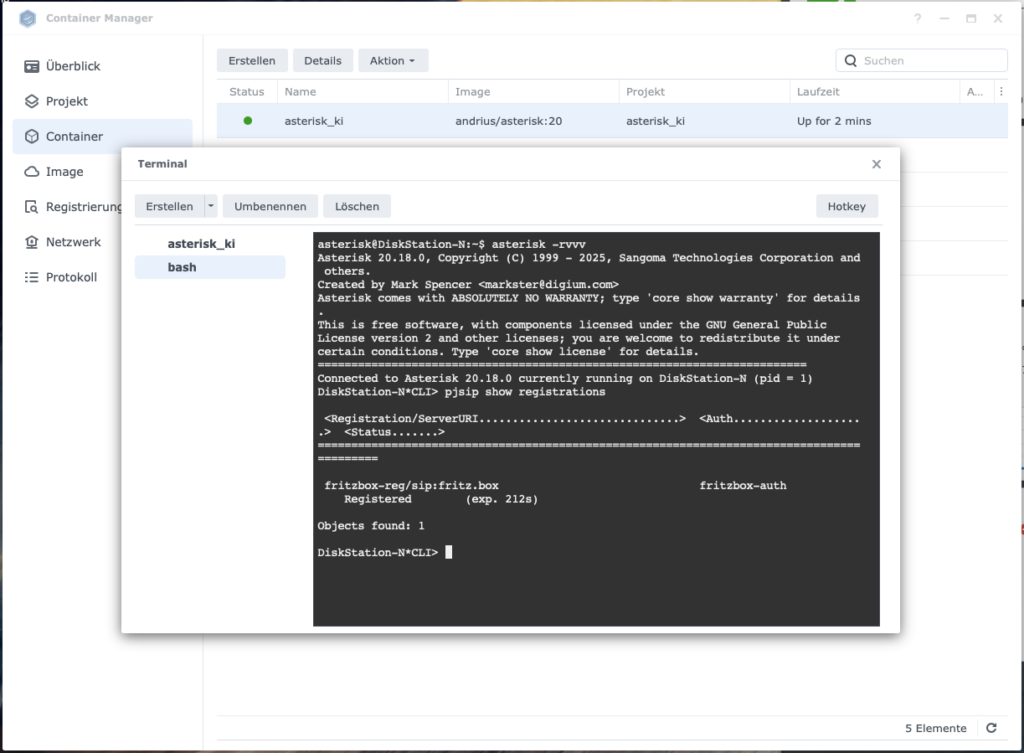
We now look directly into the Asterisk console. There are two ways to do this:
Method 1 – via Container Manager:
- Open Container Manager → select container
asterisk_ki - Tab Terminal → Create → select
bash - Enter command:
asterisk -rvvv - Once the prompt
asterisk*CLI>appears, enter:pjsip show registrations
Method 2 – via SSH: - Enable SSH on DiskStation: Control Panel → Terminal & SNMP → Enable SSH service
- Open terminal and log in:
ssh YOUR_DSM_USER@YOUR_DISKSTATION_IP - Enter Asterisk CLI:
docker exec -it asterisk_ki asterisk -rvvv - Show registration:
pjsip show registrations
The result should look like this:
<Registration/ServerURI..............................>  <Auth..........>  <Status.......>
==========================================================================================
 fb-trunk/sip:192.168.178.1                              fb-auth           Registered
The word Registered is your green light. Anything else – Failed, Rejected, no output at all – means: check credentials, review Fritz!Box configuration again, then continue.
4 The OpenAI Bridge: Set Up WebSocket Relay and Activate AI Conversations
Ulf: “Asterisk is running, Fritz!Box shows ‘Registered’ – what’s next?”
Tanja: “Now we build the most exciting part. The relay. The second Docker container that connects Asterisk and OpenAI.”
Bernd: “I would put it all in one container.”
Tanja: “Then you have a container that does everything and where you can’t debug anything individually. Two containers, two responsibilities – that’s cleaner.”
Bernd: “Sounds like more work.”
Tanja: “Sounds like fewer headaches.”
The relay translates two fundamentally different worlds: on one side the classic RTP audio protocol from Asterisk, on the other the WebSocket stream that OpenAI expects. Once this bridge is in place, OpenAI takes over the complete conversation – speech recognition, response generation, and text-to-speech in real time.
4.1 Asterisk-to-OpenAI-Realtime (WebSocket Bridge)
We extend the folder structure to include the openai-relay container:
/volume2/docker/
├── asterisk/
│   ├── compose.yaml
│   ├── config/
│   │   ├── pjsip.conf
│   │   ├── extensions.conf
│   │   ├── ari.conf
│   │   ├── http.conf
│   │   ├── modules.conf
│   │   ├── logger.conf
│   │   └── rtp.conf
│   └── logs/
└── openai-relay/
    ├── compose.yaml
    ├── Dockerfile
    └── config.conf
Three new files in the openai-relay directory: the Dockerfile, the compose.yaml, and the config.conf. Let’s look at all three.
4.2 The Dockerfile
The Dockerfile builds the Docker image directly from a public repository – you don’t need to manually clone or maintain any code.
Create the file /volume1/docker/openai-relay/Dockerfile:
FROM node:20-slim

RUN apt-get update && apt-get install -y git && rm -rf /var/lib/apt/lists/*

WORKDIR /app

# Community Edition klonen
RUN git clone https://github.com/infinitocloud/asterisk_to_openai_rt_community.git .

RUN npm install

ENV NODE_ENV=production

CMD ["node", "index.js"]
4.3 The compose.yaml for openai-relay
Since Asterisk runs in network_mode: host, the relay must do the same – otherwise it can’t reach the RTP audio ports.
Create the file /volume1/docker/openai-relay/compose.yaml:
version: "3.8"

services:
  openai-relay:
    build: .
    container_name: openai-relay
    restart: unless-stopped
    network_mode: "host"
    volumes:
      # config.conf wird in den Container gemountet
      - /volume1/docker/openai-relay/config.conf:/app/config.conf:ro
    environment:
      - TZ=Europe/Berlin
      - NODE_ENV=production
    depends_on: []
    # Hinweis: asterisk_ki muss ZUERST gestartet werden,
    # da openai-relay sich per ARI verbindet.
    # Da die Container in separaten compose-Dateien sind,
    # manuell sicherstellen: erst asterisk_ki, dann openai-relay.
4.4 Asterisk Core Configuration: ari.conf and http.conf
Ulf: “What is ARI?”
Tanja: “ARI stands for Asterisk REST Interface. It’s the interface through which the Node.js relay communicates with Asterisk. Without ARI, the relay can’t take over a call.”
Ulf: “That sounds like the coach’s phone to the bench. The coach can give instructions to the substitute without stepping onto the field.”
Tanja: “Exactly.”
These two files are the link between Asterisk and the relay. Especially important: type=user in the ari.conf – this is often the reason ARI connections fail silently.
File: /volume1/docker/asterisk/config/ari.conf
[general]
enabled=yes
pretty=yes
allowed_origins=*

[ari_user]
type=user
read_only=no
password=dein_ari_passwort
You must replace these placeholders:
- ARI_USERNAME=ari_user → freely chosen username
- ARI_PASSWORD=your_ari_password → freely chosen password (remember it, needed again shortly)
File: /volume1/docker/asterisk/config/http.conf
[general]
enabled=yes
bindaddr=127.0.0.1
bindport=8088
127.0.0.1 instead of 0.0.0.0: Since both containers run on the Synology’s host network, the HTTP port doesn’t need to be open to the outside. This is a simple, effective security measure.
4.5 The config.conf – Control Center of the Relay
This file is the heart of the openai-relay container. Here you enter which OpenAI key the relay uses, how it logs in to Asterisk, and what the AI should say during the conversation.
Create the file /volume1/docker/openai-relay/config.conf:
# OpenAI Realtime API Key
OPENAI_API_KEY=OpenAI_Projekt_API_Key

# ARI Credentials (muessen mit ari.conf uebereinstimmen)
ARI_URL=http://127.0.0.1:8088
ARI_USERNAME=ari_user
ARI_PASSWORD=dein_ari_passwort

# Anruf Limit von 5 Minuten
CALL_DURATION_LIMIT_SECONDS=300

# System-Prompt fuer den Assistenten
SYSTEM_PROMPT=Du bist ein professioneller deutschsprachiger Telefonassistent. Fuehre das Gespraech in dieser Reihenfolge: 1) Begruesse den Anrufer freundlich und sage dass gerade niemand erreichbar ist und du die KI Telefon-Assistentin bist. 2) Frage nach dem Namen des Anrufers falls nicht bereits genannt. 3) Frage worum es geht und hoere aufmerksam zu. 4) Frage wie dringend das Anliegen ist. 5) Fasse das Anliegen kurz zusammen und bestaetige dass du die Nachricht weiterleiten wirst. 6) Verabschiede dich freundlich. Antworte immer auf Deutsch, kurz und praezise. Vermeide lange Monologe.

# Logging
LOG_LEVEL=info
Replace these placeholders:
- OpenAI_Project_API_Key → your OpenAI API key from Step 2.1
- ARI_USERNAME=ari_user → the values from
ari.conf - ARI_PASSWORD=your_ari_password → the values from
ari.conf
You can freely customize the SYSTEM_PROMPT. This is the personality of your AI assistant. Keep it concrete and structured: the clearer the sequence, the more reliably the model works.
4.6 Change the AI Voice
OpenAI offers various voices for the Realtime API. The default is alloy – but you can switch to other voices like echo, fable, onyx, nova, or shimmer.
To change the voice, first copy the configuration file from the running container to the NAS:
sudo docker cp openai-relay:/app/config.js /volume2/docker/openai-relay/config.jsIn this config.js, after the second entry, insert the following line:
OPENAI_VOICE: process.env.OPENAI_VOICE || 'alloy',For the container to find this file, extend the compose.yaml with the second volume entry:
volumes:
- /volume2/docker/openai-relay/config.conf:/app/config.conf:ro
- /volume2/docker/openai-relay/config.js:/app/config.js:ro
And add to the config.conf:
OPENAI_VOICE=alloyThen restart the container. The new voice is now active.
4.7 Prepare Webhook for n8n Workflow
Currently transcripts are only logged to the console and are lost after hanging up. Now we extend the system so that after each conversation, a transcript is automatically sent to n8n.
Ulf: “Wait, we have to change code in finished files?”
Tanja: “We first copy the files out, change them, and then mount them as a volume into the container. The container stays untouched. We control its behavior from the outside.”
Ulf: “That’s like soccer. The player is unchanged, but the coach gives him new instructions from outside.”
Tanja: “Exactly.”
Step 1: The following JavaScript files need to be copied out of the container so we can customize and mount them as volumes.
sudo docker cp openai-relay:/app/config.js /volume1/docker/openai-relay/config.js
sudo docker cp openai-relay:/app/asterisk.js /volume1/docker/openai-relay/asterisk.js
sudo docker cp openai-relay:/app/openai.js /volume1/docker/openai-relay/openai.js
Step 2: In /volume1/docker/openai-relay/config.js, find INITIAL_MESSAGE: and insert directly above it:
OPENAI_VOICE: process.env.OPENAI_VOICE || 'alloy',
N8N_WEBHOOK_URL: process.env.N8N_WEBHOOK_URL || '',
INITIAL_MESSAGE: process.env.INITIAL_MESSAGE || 'Hi',
Step 3: Extend config.conf
Add to the end of /volume1/docker/openai-relay/config.conf:
OPENAI_VOICE=alloy
N8N_WEBHOOK_URL=https://n8n.civicgem.org/webhook/NEUE_WEBHOOK_ID
Note: The NEW_WEBHOOK_ID is defined in the next step when building the n8n workflow. For now enter a placeholder and replace it afterward.
Step 4: Update compose.yaml
Extend the volumes in /volume1/docker/openai-relay/compose.yaml:
volumes:
      - /volume2/docker/openai-relay/config.conf:/app/config.conf:ro
      - /volume2/docker/openai-relay/config.js:/app/config.js:ro
      - /volume2/docker/openai-relay/asterisk.js:/app/asterisk.js:ro
      - /volume2/docker/openai-relay/openai.js:/app/openai.js:ro
Currently transcripts are only logged to the console and are lost after the call. We need to extend openai.js so that transcripts are collected during the conversation and sent via HTTP POST to n8n after the call ends.
Step 5: Extend openai.js – collect transcript
Find in /volume1/docker/openai-relay/openai.js this line (approx. line 88):
let lastUserItemId = null;Insert directly below:
let transcriptLog = [];Then find this block (approx. lines 164-168):
if (role === 'User') {
              logOpenAI`User command transcription for ${channelId}: ${response.transcript}`, 'info');
            } else {
              logOpenAI(`Assistant transcription for ${channelId}: ${response.transcript}`, 'info');
            }
Replace it with:
            if (role === 'User') {
              logOpenAI(`User command transcription for ${channelId}: ${response.transcript}`, 'info');
              transcriptLog.push({ role: 'user', text: response.transcript, time: new Date().toISOString() });
            } else {
              logOpenAI(`Assistant transcription for ${channelId}: ${response.transcript}`, 'info');
              transcriptLog.push({ role: 'assistant', text: response.transcript, time: new Date().toISOString() });
            }
Then find (approx. line 167)
            logOpenAI`User command transcription for ${channelId}: ${response.transcript}`, 'info');
          }
          break;
        case 'response.audio.done':
Replace the single line:
logOpenAI(`User command transcription for ${channelId}: ${response.transcript}`, 'info');with:
            logOpenAI(`User command transcription for ${channelId}: ${response.transcript}`, 'info');
            transcriptLog.push({ role: 'user', text: response.transcript, time: new Date().toISOString() });
Finally: Find sipMap.set(channelId, channelData); inside connectWebSocket (approx. line 246) and insert directly before:
channelData.transcriptLog = transcriptLog;Find this block (approx. line 180):
        case 'conversation.item.input_audio_transcription.completed':
          if (response.transcript) {
            logger.debug(`User transcript completed - Full message: ${JSON.stringify(response, null, 2)}`);
            logOpenAI(`User command transcription for ${channelId}: ${response.transcript}`, 'info');
          }
          break;
Replace with:
        case 'conversation.item.input_audio_transcription.completed':
          if (response.transcript) {
            logger.debug(`User transcript completed - Full message: ${JSON.stringify(response, null, 2)}`);
            logOpenAI(`User command transcription for ${channelId}: ${response.transcript}`, 'info');
            transcriptLog.push({ role: 'user', text: response.transcript, time: new Date().toISOString() });
          }
          break;
Find line (approx. line 224):
            input_audio_transcription: {
              model: 'whisper-1',
              language: 'en'
            },
Find language: en and replace with de for German language
language: 'de'Step 6: Extend asterisk.js – send transcript to n8n
Extend /docker/openai-relay/asterisk.js – send collected transcripts to n8n after the call ends.
Change 1: Insert after the last require line at the very top:
const http = require('http');
const https = require('https');
Change 2: Find in the cleanupChannel function this line:
    } catch (e) {
      logger.error(`Cleanup error for ${channelId}: ${e.message}`);
    } finally {
      cleanupPromises.delete(channelId);
      cleanupPromises.delete(`ws_${channelId}`);
    }
Insert directly before (i.e. before } finally {):
      // Send transcript to n8n webhook
      if (config.N8N_WEBHOOK_URL && channelData.transcriptLog && channelData.transcriptLog.length > 0) {
        try {
          const payload = JSON.stringify({
            channelId: channelId,
            callerName: channelData.channel?.caller?.name || 'Unbekannt',
            callerNumber: channelData.channel?.caller?.number || 'Unbekannt',
            callStart: channelData.transcriptLog[0]?.time || new Date().toISOString(),
            callEnd: new Date().toISOString(),
            transcript: channelData.transcriptLog
          });
          const url = new URL(config.N8N_WEBHOOK_URL);
          const client = url.protocol === 'https:' ? https : http;
          const req = client.request(url, {
            method: 'POST',
            headers: { 'Content-Type': 'application/json', 'Content-Length': Buffer.byteLength(payload) }
          }, (res) => {
            logger.info(`n8n webhook response for ${channelId}: ${res.statusCode}`);
          });
          req.on('error', (e) => logger.error(`n8n webhook error for ${channelId}: ${e.message}`));
          req.write(payload);
          req.end();
          logger.info(`Transcript sent to n8n for ${channelId} (${channelData.transcriptLog.length} entries)`);
        } catch (e) {
          logger.error(`Failed to send transcript to n8n for ${channelId}: ${e.message}`);
        }
      }
4.8 Open Cloudflare for Webhooks
Ulf: “I use Cloudflare with Zero Trust for n8n. Do I need to adjust anything there?”
Tanja: “Yes. Zero Trust blocks all incoming requests that are not authenticated by default – including webhooks from OpenAI. We need to set up a bypass for the webhook path.”
If you use Cloudflare with Zero Trust for n8n, webhooks will be blocked by default. We set up an exception specifically for the /webhook/ path. For setting up Cloudflare see https://www.foundic.org/n8n-cloudflare-tunnel-synology-nas.
Part 1 – Create new Access Application:
- Open Cloudflare Zero Trust Dashboard:
- Go to: https://one.dash.cloudflare.com/
- Sign in
- Select your team/account
- Find Access Application:
- Navigate to: Protect & Connect → Zero Trust → Access controls → Applications
- Find your n8n application in the list
- Select “+ Add an application”
- Select: Self-hosted
- Application name: n8n-webhook
- Session Duration: 24 hours
- “+ Add public hostname”
- Subdomain: the one currently in use
- Domain: your domain
- Path:
webhook/*
- Select “Policies” from the left menu
- Click “Add a policy”
- Configure policy:
Policy Name:n8n Webhook Bypass
Action: “Bypass”
Session duration:Same as application session timeout
Selection: Everyone
Click “Save”
- Configure policy:
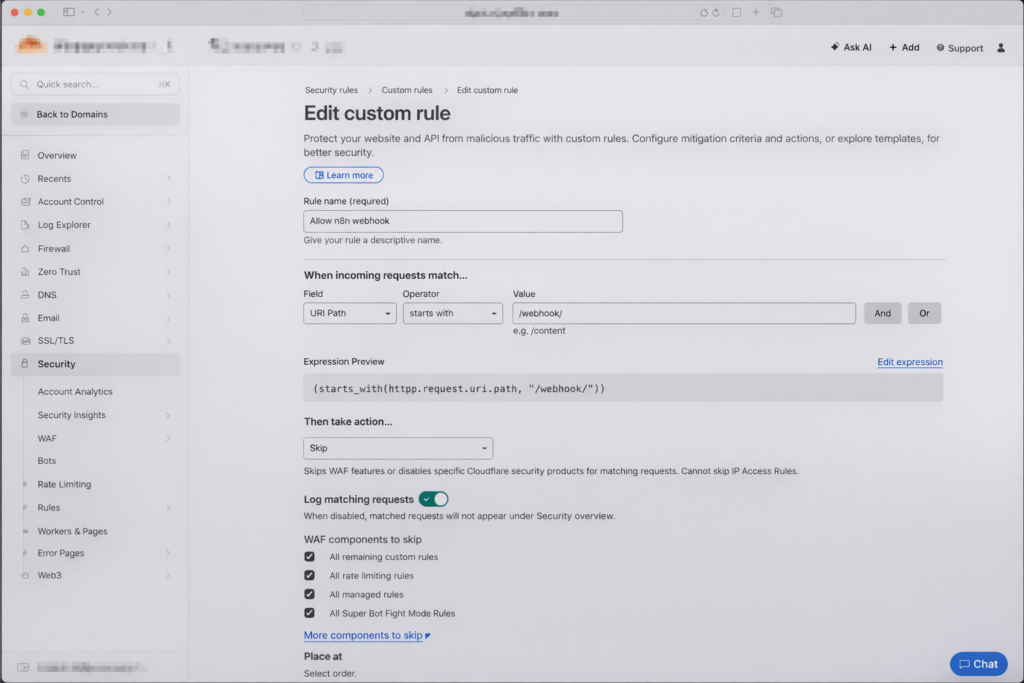
Part 2 – Create WAF rule:
In the Cloudflare Dashboard, go to the top account level → Domains → your domain → (left menu) Security → Overview → in the center in the “Web app exploits” box → Manage custom rules → + Create rule → Custom rules
- Rule name:
Allow n8n Webhook - Field:
URI Path…, Operator:starts with, Value: ../webhook/ - Choose action: Skip
- Enable all security options (WAF, Super Bot Fight Mode, etc.) so OpenAI can pass through unhindered
- Click Deploy
4.9 Build the n8n Workflow
Ulf: “Now comes the part I know – n8n.”
Tanja: “Almost. First we need an app password for Gmail. The regular Google password doesn’t work.”
Ulf: “Why not?”
Tanja: “Because with the normal password, Google requires you to verify through a browser. A machine can’t do that. An app password is a separate 16-digit code designed only for automated access.”
Ulf: “And if I don’t have one?”
Tanja: “Then no email arrives.”
Step 1: Create Gmail App Password
If the n8n workflow is to send a summary to Gmail or Google Mail, you need an app password (not your regular Gmail password). Here’s how to set it up:
Create Gmail App Password:
- Go to https://myaccount.google.com/apppasswords
- (2-factor authentication must be active)
- App name:
n8n - You’ll get a 16-digit password – copy it
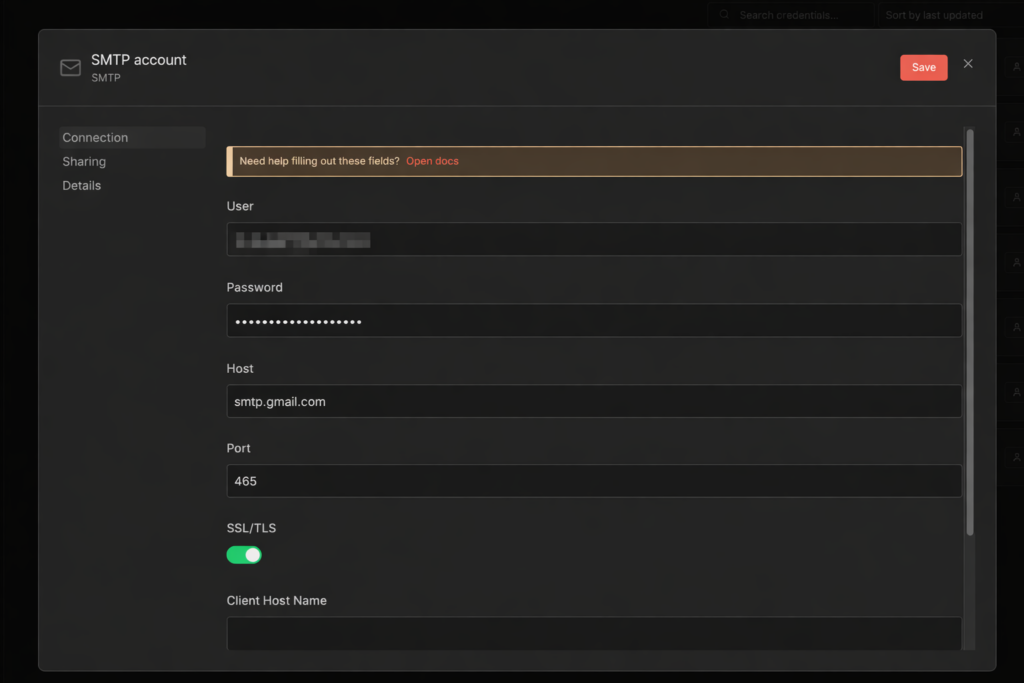
Step 2: Create SMTP Credentials in n8n
Create SMTP credentials in n8n
- n8n → Settings → Credentials → Add Credential → Type: SMTP
- Name:
SMTP Gmail account - User:
your-address@gmail.com - Password: your 16-digit app password
- Host:
smtp.gmail.com - Port:
465 - SSL/TLS: On
- Save

Step 3: The three workflow nodes
Create a new n8n workflow with three nodes in sequence.
Node 1: Webhook
- Method:
POST - Path:
call-summary - Authentication:
None
Node 2: Code in JavaScript
- Mode:
Run Once for All Items - Language:
JavaScript
// Transkript formatieren
const body = $input.first().json.body;
const transcript = body.transcript || [];
const callerName = body.callerName || 'Unbekannt';
const callerNumber = body.callerNumber || 'Unbekannt';
const callStart = body.callStart ? new Date(body.callStart).toLocaleString('de-DE', { timeZone: 'Europe/Berlin' }) : 'Unbekannt';
const callEnd = body.callEnd ? new Date(body.callEnd).toLocaleString('de-DE', { timeZone: 'Europe/Berlin' }) : 'Unbekannt';

// Gespraechsverlauf als Text
let gespraech = '';
for (const entry of transcript) {
  const rolle = entry.role === 'assistant' ? 'Anna (KI)' : 'Anrufer';
  gespraech += `${rolle}: ${entry.text}\n\n`;
}

// Zusammenfassung erstellen
let zusammenfassung = `ANRUF-ZUSAMMENFASSUNG\n`;
zusammenfassung += `========================\n\n`;
zusammenfassung += `Anrufer: ${callerName}\n`;
zusammenfassung += `Telefonnummer: ${callerNumber}\n`;
zusammenfassung += `Anruf Beginn: ${callStart}\n`;
zusammenfassung += `Anruf Ende: ${callEnd}\n\n`;
zusammenfassung += `GESPRAECHSVERLAUF:\n`;
zusammenfassung += `------------------------\n\n`;
zusammenfassung += gespraech;

// HTML Version fuer E-Mail
let html = `<h2>Anruf-Zusammenfassung</h2>`;
html += `<table style="border-collapse:collapse; margin-bottom:20px;">`;
html += `<tr><td style="padding:4px 12px 4px 0; font-weight:bold;">Anrufer:</td><td>${callerName}</td></tr>`;
html += `<tr><td style="padding:4px 12px 4px 0; font-weight:bold;">Telefonnummer:</td><td>${callerNumber}</td></tr>`;
html += `<tr><td style="padding:4px 12px 4px 0; font-weight:bold;">Beginn:</td><td>${callStart}</td></tr>`;
html += `<tr><td style="padding:4px 12px 4px 0; font-weight:bold;">Ende:</td><td>${callEnd}</td></tr>`;
html += `</table>`;
html += `<h3>Gespr\u00e4chsverlauf</h3>`;
for (const entry of transcript) {
  const rolle = entry.role === 'assistant' ? 'Anna (KI)' : 'Anrufer';
  const color = entry.role === 'assistant' ? '#2563eb' : '#059669';
  html += `<p><strong style="color:${color};">${rolle}:</strong> ${entry.text}</p>`;
}

const subject = `Anruf von ${callerName} (${callerNumber}) - ${callStart}`;

return [{ json: { subject, text: zusammenfassung, html, callerName, callerNumber } }];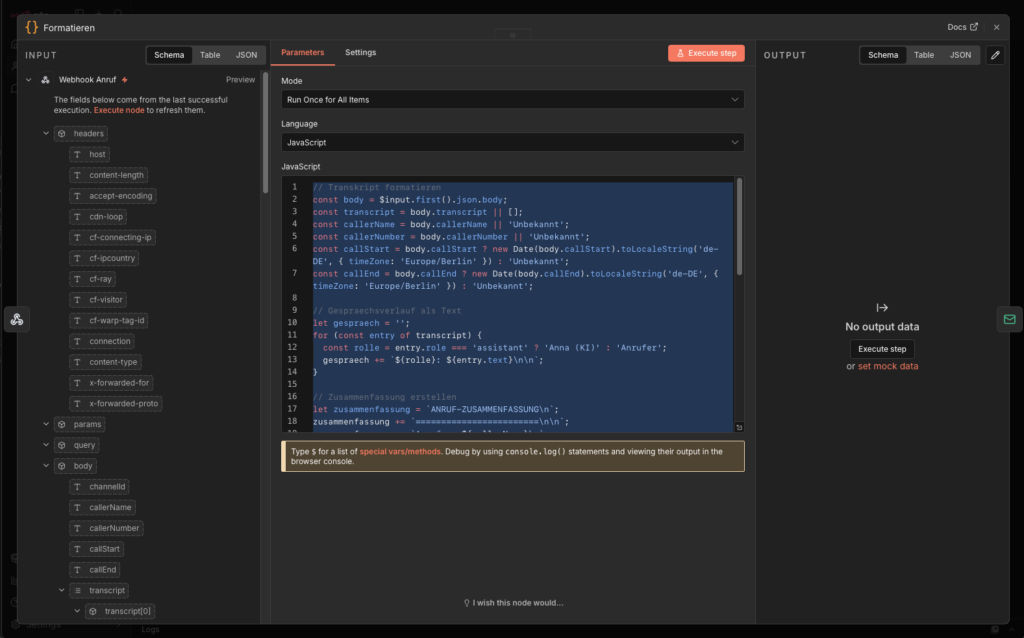
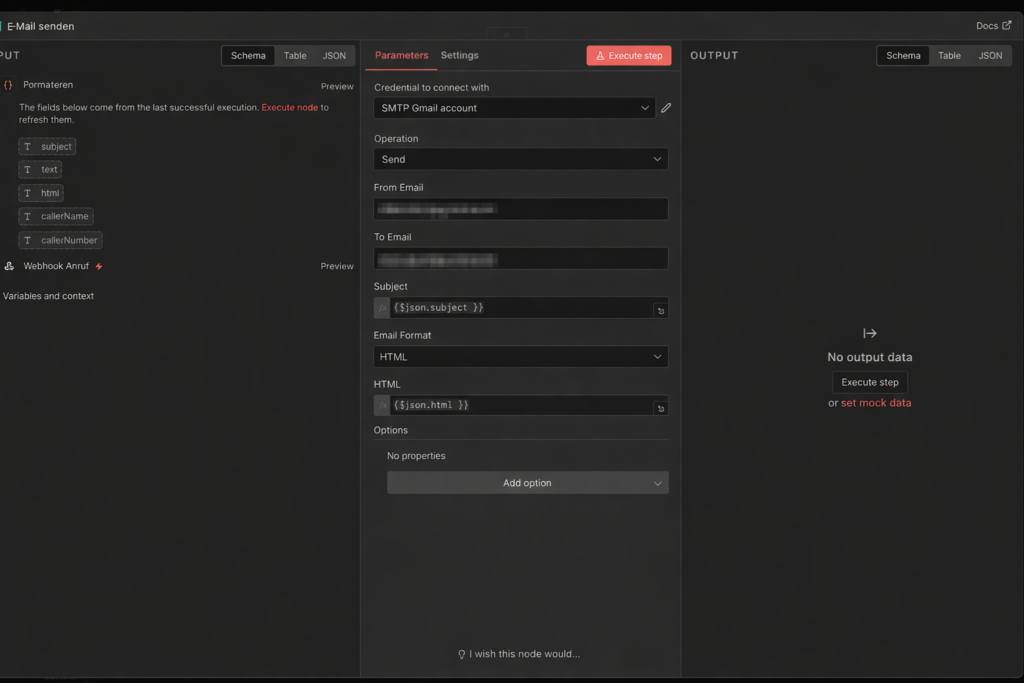
Finally create Node 3: Send Email
- Credential to connect with:
SMTP Gmail account - Operations:
Send - From Email: your email address
- To Email: your email address
- Subject:
{{ $json.subject }} - Email Format:
HTML - HTML:
{{ $json.html }}
Step 4: Activate workflow
Activate the workflow via Publish and copy the webhook URL from the webhook node. It looks something like this:
https://n8n.deine-domain.de/webhook/anruf-zusammenfassung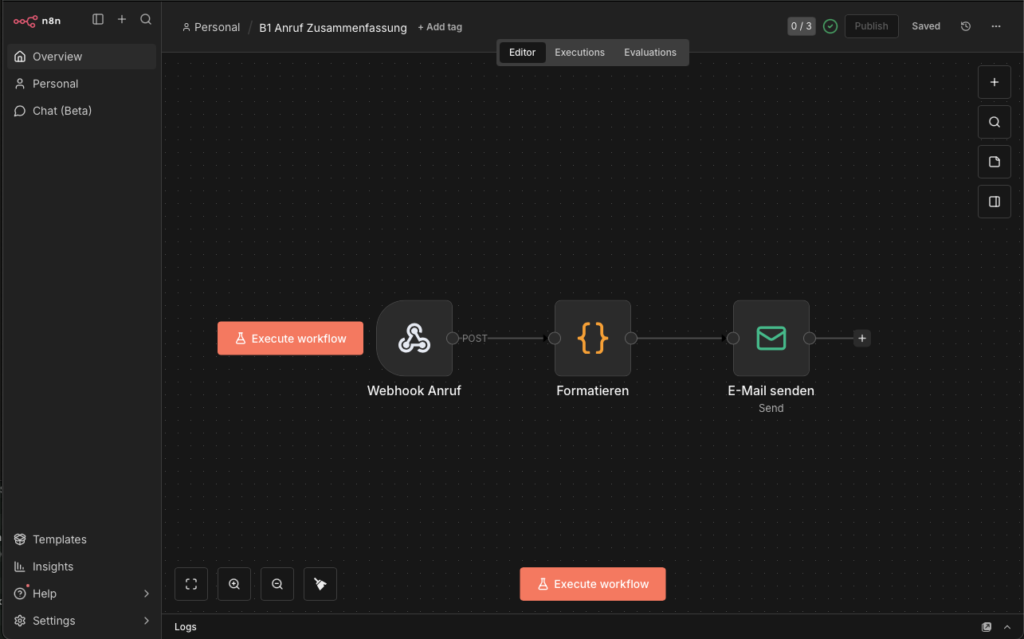
Step 5: Enter URL in config.conf
Open /volume1/docker/openai-relay/config.conf and enter the URL:
N8N_WEBHOOK_URL=https://n8n.deine-domain.de/webhook/anruf-zusammenfassungRestart the openai-relay container. It should now work.
4.10 Optional: AI Hangs Up After Saying Goodbye
Ulf: “Does the AI actually hang up by itself?”
Tanja: “Not by default. It says goodbye and then waits. The caller has to hang up.”
Ulf: “That’s impolite. I’d change that.”
Tanja: “You can. It’s optional, but it makes the conversation flow much smoother.”
The logic is simple: when the AI says goodbye – detected by keywords in the transcript – a timer starts. If the caller doesn’t say anything else within 8 seconds, the system hangs up.
All changes in /volume1/docker/openai-relay/openai.js:
Change 1: After the line let transcriptLog = []; (approx. line 95) insert:
  let goodbyeTimer = null;
  let goodbyeDetected = false;
  const GOODBYE_TIMEOUT_MS = 8000;
  const goodbyePattern = /wiedersehen|wiederh.ren|tsch.ss|sch.nen tag|guten tag noch/i;
Change 2: In the response.audio_transcript.done block, after the transcriptLog.push call in the else branch (AI response), insert:
// Check if assistant said goodbye
              if (goodbyePattern.test(response.transcript)) {
                logger.info(`Goodbye detected for ${channelId}, starting ${GOODBYE_TIMEOUT_MS}ms hangup timer`);
                if (goodbyeTimer) clearTimeout(goodbyeTimer);
                goodbyeTimer = setTimeout(async () => {
                  logger.info(`Goodbye timeout reached for ${channelId}, hanging up`);
                  if (ws && ws.readyState === WebSocket.OPEN) {
                    ws.close();
                  }
                  try {
                    const cd = sipMap.get(channelId);
                    if (cd && cd.channel) {
                      await cd.channel.hangup();
                      logger.info(`Channel ${channelId} hung up after goodbye`);
                    }
                  } catch (e) {
                    logger.error(`Error hanging up channel ${channelId} after goodbye: ${e.message}`);
                  }
                }, GOODBYE_TIMEOUT_MS);
              }
Change 3: In the conversation.item.created block, after if (response.item.role === 'user') { and before lastUserItemId = ..., insert:
              if (goodbyeTimer) {
                clearTimeout(goodbyeTimer);
                goodbyeTimer = null;
                logger.info(`Goodbye timer cancelled for ${channelId}, user is speaking`);
              }
This part is important: if the caller says something again after the goodbye, the timer is cancelled. The AI will then respond again – and start the timer on the next goodbye.
Then restart the container.
5 Conclusion
A few weeks later.
Ulf opens his phone. An email. Subject: “Call from Klaus Müller (0171-…) – today, 2:32 PM.”
Ulf opens it. Complete conversation log. Name, request, urgency – everything there. Three minutes of conversation, summarized in a readable email.
Ulf: “It worked.”
Tanja: “I know.”
Bernd glances over: “I also built a solution. I told my wife to answer the calls.”
Ulf: “And?”
Bernd: “She doesn’t pick up the phone anymore.”
What started as a home server tinkering project turns out to be a surprisingly capable system. A caller can hardly tell the difference from a real conversation – the AI greets warmly, listens, asks follow-up questions, and says goodbye. A few seconds later, the complete summary arrives in the inbox.
What works well: The biggest advantage of this architecture is complete control over your own infrastructure. Asterisk, n8n, and the relay run locally on the Synology – only the AI processing happens at OpenAI. No monthly subscription fees for telephony services, no dependency on external SIP providers, full transparency over the conversation data.
Where it can get tricky: The most difficult part in experience is the initial network configuration – particularly network_mode: host, the firewall rules on the Synology, and the Cloudflare webhook release. Anyone who proceeds carefully and tests each step individually will save themselves a lot of debugging. The motto applies here too: test first, then continue.
Possible next steps:
- Different system prompts depending on phone number or time of day
- Multi-language support
- Integration with a calendar so the AI can directly schedule callback appointments
- Extension of the n8n workflow with an AI-based summary via Claude or ChatGPT
For questions or suggestions for improvement: leave a comment.