
A Friday Evening, an Automation, and a Small Deception
It’s just past ten, the kids are asleep, the dishes are still in the sink, and Miriam really has no energy left for technology. Yet she sits on the sofa with her laptop, because she’s been annoyed by a small thing for weeks: when she walks into the hallway at night, the light blazes on at full brightness and jolts her awake. She wants an automation that only dims the light on at night. So she types her request into an AI chat window, just as she has done many times before.
What comes back looks impressive. Neatly indented code, comments, a plausible structure. Miriam copies everything into her smart home system, saves it — and nothing happens. The motion sensor the AI referenced doesn’t even exist in her home. The lamp it’s supposed to control doesn’t support the suggested brightness level. The AI had no idea what Miriam’s home actually looks like. It made it all up. Politely, confidently — and wrongly.
Almost everyone who has ever tried to get AI help with their smart home knows this moment. The result looks right and still doesn’t work. The reason isn’t malice, and often not even a bad AI model. The reason is much simpler: The AI doesn’t know your home. It guesses.
This is precisely where one of the most exciting developments in the smart home space over the past few months begins. Because there is now a way for an AI to stop guessing and start actually querying your system. That way is called MCP — and when combined with an autonomous AI agent, something emerges that would have sounded like science fiction not long ago: a digital housemate with access to your smart home that builds automations and, when needed, even keeps watch at night.
This article takes you on that journey. From Miriam’s failed automation to an AI watchdog that messages you when something is wrong with your home. And because real power always has a flip side, we’ll also talk openly about the risks at the end — without alarmism, but without glossing over the uncomfortable truths either.
One thing upfront, to set expectations: This is not a click-by-click tutorial, but an architecture and security decision guide for Home Assistant users who want to seriously deploy AI agents. Here you’ll gain the understanding to make the right choices — what building blocks exist, how they work together, and where the pitfalls lie. The exact clicks and commands in this field change so fast that a step-by-step guide would already be outdated by the time it’s published.

Why This Matters Right Now
Home Assistant — the open-source hub that many people use to manage their smart home themselves, rather than relying on Google, Amazon, or Apple — is powerful. That’s precisely why it’s also complex. Anyone who wants to write a good automation needs knowledge of entities, devices, triggers, and a configuration language called YAML (a text-based format in which Home Assistant stores settings — indentation-sensitive and merciless about typos). Until now it was clear: Home Assistant is the platform, but you are the brain behind it. Whether you like it or not.
The idea of letting AI help is obvious. And many people are already doing it. Just not at a level that works particularly well yet. What most people don’t know: there are now much better levels available. You just need to know about them. So let’s look at how the collaboration between humans, AI, and smart home has evolved step by step — from “the AI guesses” to “the AI builds.”
The Four Levels: From Guessing to Understanding
Level 1 – Simple Prompting
This is Miriam’s starting point and the everyday experience of most people: you describe to the AI what you want and get code back. We’ve already seen the problem. Without knowledge of your system, the AI invents Entity IDs (the unique technical names for your devices, such as light.hallway_ceiling), rooms, services, or uses outdated syntax. It can even happen that a particularly “thoughtful” AI mode overcomplicates a simple task and goes off in a completely wrong direction — in a documented test, the AI briefly decided a Home Assistant request was actually a Google Smart Home routine.
For initial ideas, that’s fine. For your specific home, it’s unreliable.
Level 2 – Giving the AI Context
The obvious improvement: feed the AI information. You paste in the real Entity IDs, send screenshots, export historical data as a table, include snippets of existing automations. Now the AI has to guess less and delivers significantly better results.
The catch: it remains manual work. You copy data back and forth, decide yourself what might be relevant, and easily miss important connections in the process. You’re essentially the translator between your home and the AI — and translators make mistakes.
Level 3 – Skills: Teaching the AI Domain Knowledge
Now it gets interesting. A skill is a structured knowledge package that teaches an AI how to work in a specific domain. Think of it like a cheat sheet full of best practices that the AI reads before it gets to work.
For Home Assistant, there’s exactly something like this: a package called Home Assistant Agent Skills that teaches the AI good habits. No unnecessarily complex templates when a simple approach will do. Choose the right automation mode. Don’t rush to edit configuration files when something can more conveniently be done through the interface. In the tests that informed this article, the difference was striking: the same request, the same AI — but with a loaded skill it suddenly considered also turning off the light after a while, and even provided a reason why “Restart” mode is appropriate. Without the skill, other AIs simply left that out entirely.
The reason is important to understand: an AI is not specifically trained on Home Assistant. It guesses from its general training data when which trigger makes sense. A skill takes away that guessing and tells it plainly: in this situation, this is how it’s done.
Level 4 – MCP: The AI Finally Gets to Look Things Up Itself
And here comes the real leap. Until now, the AI has either guessed (Level 1), been fed information by us (Level 2), or received domain knowledge (Level 3). But it could never look directly into your system. MCP changes that.
MCP stands for Model Context Protocol — an open standard that defines how an AI can communicate with external tools and data sources. A clunky name for an elegant idea. Smart home YouTuber simon42, whose videos form a significant part of the foundation for this article, describes it vividly as a “USB-C port for AI tools.” And that’s pretty much spot on: just as USB-C is a universal connector for many devices, MCP is a universal interface through which an AI can communicate with many different systems.
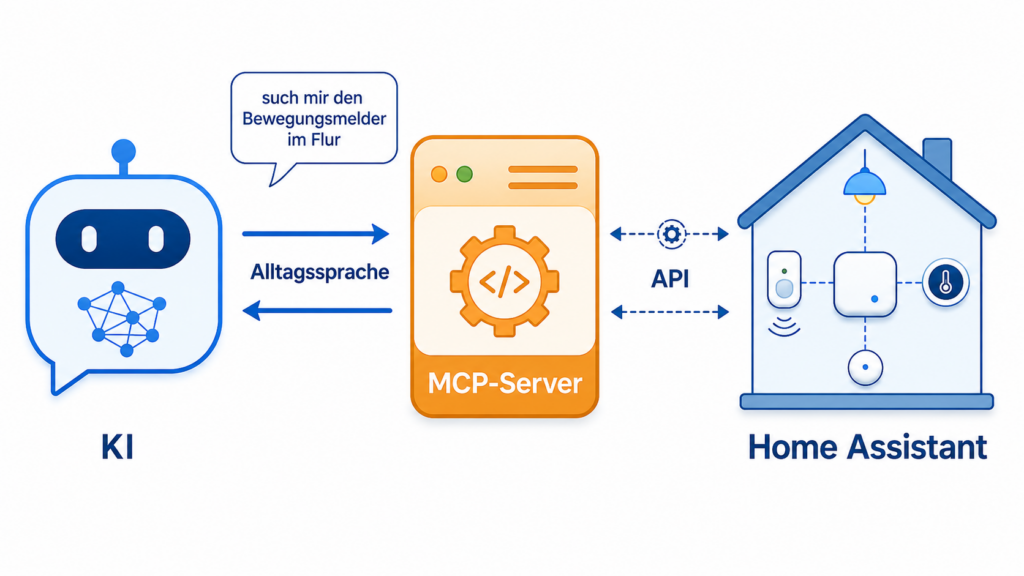
How does it work? Between the AI and Home Assistant, you place an MCP server (a small intermediary program). This server provides the AI with ready-made tools — “search entity,” “query state,” “create automation,” “read dashboard” — each described in natural language so the AI immediately understands what it can do with them. On the other side, the server speaks the technical language of Home Assistant, the API (Application Programming Interface — the programmable interface of a system). The AI doesn’t need to memorize that complicated interface at all. It tells the MCP server “find me the motion sensor in the hallway,” and the server handles the translation.
The result: the AI no longer guesses. It asks. It finds the real devices, the real people in the household, the already existing automations — and can build on them instead of inventing something generic.
A moment to pause — where does your data actually go?
Right at this point it’s worth taking an honest look, especially since many people use Home Assistant because of privacy. If you use a cloud AI like Claude, ChatGPT, or Gemini as the brain, MCP can transmit entity names, device states, logs, people, rooms, presence information, and error messages to that provider. That’s the price of the high quality these models offer. If you don’t want that, you have two levers: either local models (which run on your own hardware, such as via Ollama or LM Studio — slower and generally less capable, but data-frugal) or a strictly limited MCP access where the AI only sees what’s absolutely necessary. This fundamental decision should be made before you start, not after.
One Server, Three Variants — and an Important Distinction
Before we install anything, we need to clear up a confusion that trips up many people. In the Home Assistant universe there are three different MCP building blocks that are easy to mix up.
First, the official integration called “MCP Server.” It turns Home Assistant into a server that an external AI can connect to. The catch: it only shows the AI the devices that have been explicitly enabled for the voice assistant. That’s safe and good for voice control — but far too narrow if the AI is supposed to build automations or troubleshoot problems.
Second, an official integration that works in exactly the opposite direction: it lets the assistant built into Home Assistant reach outward to use external tools. Not relevant for our purposes.
Third — and this is the star of our story — the unofficial server called ha-mcp, whose developer self-deprecatingly calls it “The Unofficial and Awesome Home Assistant MCP Server.” It is architecturally fundamentally different: instead of going through the narrow voice assistant channel, it talks directly to the core of Home Assistant. As a result it can do things the official server simply lacks — read and write configuration, create and edit automations, manage dashboards, analyze error logs, trigger backups, retrieve energy and history data. At the time of research, the project listed nearly ninety individual tools across around two dozen categories (a number that changes constantly — those who want the exact figure should check the current project repository).
The rule of thumb to remember: use the official server for safe voice control of already-approved devices. Use the unofficial ha-mcp when you want an AI that doesn’t just operate your smart home, but helps build and maintain it. More power, more possibilities — and, as should be said here, more responsibility.
For anyone who wants to quickly find the right variant, this overview is a good guide:
| Goal | Better suited |
|---|---|
| Control only approved devices via AI | official Home Assistant MCP Server |
| Analyze automations, dashboards, logs, helpers | ha-mcp |
| Extend the AI inside Home Assistant with external tools | official MCP client integration |
| Production system with minimal risk | official server or ha-mcp in read-only mode |
| Power-user test system | ha-mcp with write tools enabled |
The Autonomous Agent: OpenClaw Takes the Stage
MCP makes the AI smart. But MCP alone still sits in a chat window waiting for you to type something. The next step is an AI agent that runs continuously, is reachable through your usual chat apps, and acts independently. The most prominent representative of this new category is called OpenClaw — a project by Austrian developer Peter Steinberger that launched in November 2025 and racked up over a hundred thousand stars on the developer platform GitHub within days, making it one of the fastest-growing open-source projects ever.
The name itself tells you a lot about the pace of this young industry: the tool was first called Clawdbot (a wordplay on Anthropic’s AI model “Claude”), then after a trademark notice from Anthropic it became Moltbot, and finally OpenClaw — three names in a matter of weeks, accompanied by crypto scammers who hijacked accounts to promote fake coins. In 2026 Steinberger moved to OpenAI; OpenClaw is set to continue as an open-source project under a foundation supported by OpenAI, though details were not fully disclosed. In short: this is a field in flux — some details in this article may already be different by the time you read it.
What OpenClaw Actually Is — and Why That’s Exciting and Unsettling at Once
Technically, OpenClaw is a self-hosted gateway — a gatekeeper program that runs on your own hardware or a server, not in some external cloud. It connects your usual chat services — Telegram, WhatsApp, Signal, Discord, and many more — to an AI model of your choice. You write to the bot like messaging a contact, and it doesn’t just reply — it acts.
That’s the crucial difference from an ordinary chatbot. OpenClaw can execute commands in the terminal, install software, operate a browser, read and write files, send emails, manage calendars. It also has a long-term memory stored as simple text files on the hard drive — you can open them in any editor, back them up, or delete them. And it has what’s called a heartbeat: at a configurable interval, by default every thirty minutes, the agent wakes itself up, checks a to-do list to see if anything needs doing, and acts if necessary — without you prompting it at all.
It’s precisely this ability to act autonomously and continuously that makes OpenClaw so powerful. And it’s exactly the same ability that makes it potentially dangerous. Keep this tension in mind — it runs through the rest of the article.
The Most Important Rule First: Not on Your Main Machine
Before we get to installation, a warning that sits right at the top of the source videos and must sit right at the top here too.
Never simply install an autonomous AI agent on your personal main computer.
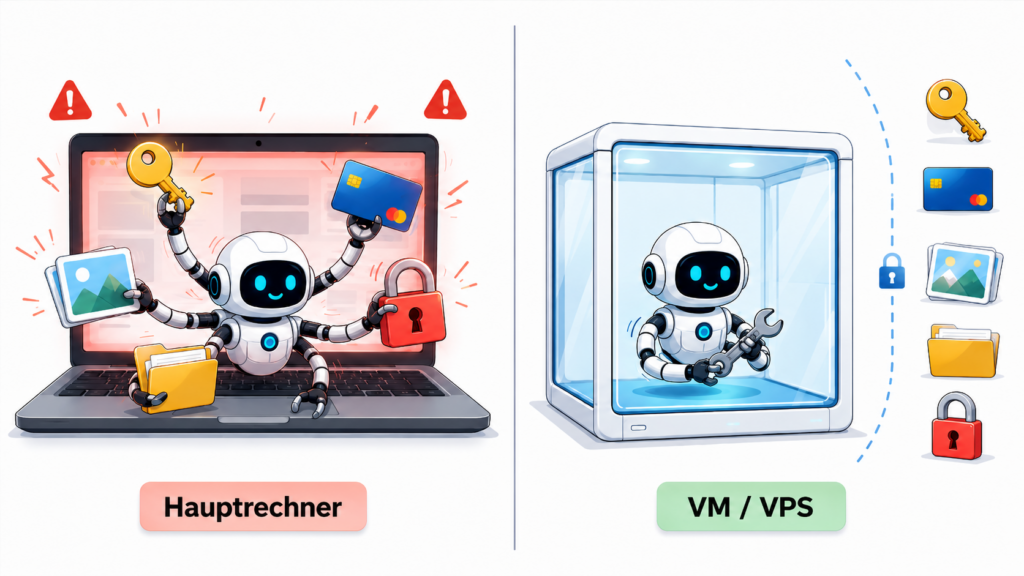
The reason is compellingly logical. An agent on your everyday PC would potentially have access to everything you have access to: your SSH keys (the digital keys for server access), your password manager, your operating system’s keychain, the entire hard drive, your cloud services, your browser with all logged-in accounts. That’s simply too much power for a system that acts on its own.
And the central threat is called Prompt Injection. That’s the technical term for someone secretly slipping instructions to an AI by hiding them in content the AI is processing anyway. An example that makes this concrete: imagine your agent summarizes your emails every morning. Among them is a fake message, supposedly from a delivery service, asking you to log in to online banking via a link to pay customs fees. A human would be suspicious. An agent might interpret this as an action request, navigate to the page, and log in — with your credentials, if it has them. And you might not notice at all.
This isn’t a phantom threat. Security researchers ran exactly these scenarios in practice in 2026. Security firm HiddenLayer demonstrated how an innocuous-looking webpage caused an agent to execute a command in the background while merely summarizing it — without asking. Palo Alto Networks showed how a redirect disguised as a “Good morning” message could trigger an attack whose hidden instruction, thanks to long-term memory, continued to linger in the agent’s context weeks later.
Security researchers sum up this structural problem in a memorable phrase: the Lethal Trifecta. An agent becomes truly dangerous the moment it can do three things simultaneously: access private data, process untrusted content from outside, and communicate outward. A fully equipped agent comes with exactly these three ingredients built in. And — this is the uncomfortable truth — not a single AI provider has reliably solved Prompt Injection to date. OpenClaw itself says this openly in its own security documentation: a strong system prompt is only a soft recommendation, not a hard safeguard.
The solution therefore isn’t a magic formula, but a structural decision: you give the agent a contained, low-risk place to work from the start. To use the analogy, treat it like an intern you don’t blindly trust — give it its own desk and lock the doors to rooms it has no business entering.
That private desk is a virtual machine or a VPS (Virtual Private Server — a rented virtual server in a data center). An isolated computer with no sensitive data on it, from which the agent can’t do any damage in your real digital life.
Runbook: Setting Up OpenClaw Safely
Enough theory. Here are the broad steps for getting such an agent up and running — deliberately presented as a map, not a click-by-click guide, because the details keep changing.
Step 1 – Get the isolated environment. Either rent a VPS (providers like Hostinger advertise their own “Managed OpenClaw” packages that handle maintenance, updates, and backups), or set up a virtual machine. A current Linux version like Ubuntu is recommended as the operating system. Modest resources are enough to get started; two processor cores and a few gigabytes of RAM is comfortable.
Step 2 – Install OpenClaw. On the fresh server, first create a dedicated user account (don’t work as an all-powerful administrator). Then install OpenClaw — typically via a one-line install command. The program needs a current version of Node.js (a runtime environment that runs JavaScript programs outside the browser) and an API key (a secret access key) for the AI model you want to use.
Step 3 – Choose the brain. In the setup wizard, specify which AI model powers the agent. An important practical note here: a model that’s too weak leads to frustration, because it won’t use the tools correctly or will go in circles. For serious use, reach for a capable model — it costs something per request, but saves your sanity.
Step 4 – Connect Telegram. To reach the agent conveniently from your phone, connect a chat channel. Telegram is the simplest. You create a new bot in Telegram’s own BotFather (an official bot for creating new bots) using the /newbot command, assign a name and username, and receive a token — a kind of password for the bot. Enter this in OpenClaw. Crucially: the first incoming message must be authorized via a pairing code (a one-time confirmation code). This isn’t an annoying detour — it’s a security feature that prevents strangers from talking to your agent.
After that, the agent keeps running in the background even after you close the connection to the server. From now on you simply message it via Telegram, like texting a contact.
The Real Trick: An AI Watchdog Named Bernd
Now we put the two puzzle pieces together. We have a continuously running agent (OpenClaw). And we have a technique that gives an AI structured access to Home Assistant (MCP). What happens when you combine both?
You get a 24/7 watchdog for your smart home. In the source videos, he has a name: Bernd.
The idea is as simple as it is compelling. Bernd regularly checks whether something is wrong with your Home Assistant — and reports it to you via Telegram, before you notice it yourself. Or, as the video puts it with a wink, before your partner notices. Sensors that suddenly stop reporting values. Add-ons that have crashed. Devices whose battery is running low. Errors in the logs that are piling up. Pending updates you’d otherwise let slide for months until nothing works anymore.
Here’s how to set him up conceptually:
Bernd runs separately from Home Assistant. That’s not an accident — it’s intentional. If the watchdog ran on the same system it was watching, it would be blind during a failure. A watchdog that goes down together with what it’s watching is no watchdog at all.
Bernd gets access to Home Assistant via the MCP server. Here you connect OpenClaw to the ha-mcp server. If the agent runs on a remote VPS and Home Assistant is at home, you’ll need a secure tunnel between them — more on that shortly.
Bernd gets an identity. You give the agent a detailed brief: who he is, what language he speaks, what he should watch for, what matters to him. Fascinatingly: the agent then writes itself small memory files with names like Identity.md and User.md, continuously saving context about the system. In one test, Bernd independently connected two pieces of information within minutes that were stored separately: that a particular smart plug was listed in the energy dashboard, and that that exact plug was throwing connection errors.
Such a brief doesn’t need to be complex. A workable starting prompt for Bernd might look like this:
Du bist Bernd, mein Home-Assistant-Wächter. Sprich Deutsch.
Prüfe täglich um 18:00 Uhr den Zustand meines Systems.
Melde nur relevante Auffälligkeiten: unavailable Entities,
kritische Logs, gestoppte Add-ons, fehlgeschlagene Automationen,
schwache Batterien, Backup-Status und ausstehende Updates.
Nimm keine Änderungen ohne ausdrückliche Bestätigung vor.
Bewerte jedes Problem als: beobachten, prüfen, dringend.
Bernd gets a schedule. Via a cron job (a time-triggered automatic task, named after the classic Unix utility), he sends a report, for example every evening at 6 PM. The important instruction here is not to just mechanically tick through a fixed list, but to look proactively for anything that stands out — including things you wouldn’t have thought to check yourself.
A good watchdog report covers many areas: system health and pending updates, unreachable devices, critical errors in the logs, stopped add-ons, disabled automations, weakening batteries, backup status, database growth. Ideally, what you end up with is not a bare list of errors but a prioritized assessment: just monitor, check manually, or action required. In practice, a Telegram message lands on your phone in the evening that looks something like this:
Bernd-Report, 18:00 Uhr:
1. Zwei Zigbee-Sensoren sind seit 6 Stunden unavailable.
2. Letztes vollständiges Backup: vor 9 Tagen.
3. Add-on "Mosquitto broker" läuft, aber hatte 3 Neustarts.
Empfehlung: Backup heute anstoßen, Zigbee-Sensoren prüfen.
Exactly this mix of concrete finding and brief recommendation is the real value — not a flood of data, but a short, actionable situation report.
And perhaps the most important rule to start with: Bernd should report, not repair without being asked. A watchdog that makes unsolicited changes to your system is a liability. A watchdog that tells you what’s going on and lets you decide is an asset.
When the AI Becomes the Builder
The watchdog role is the cautious entry point. But MCP can do more than just report. With the unofficial ha-mcp server, the AI can also build — automations, sensors, scenes, entire dashboards.
A real-world example brings this to life. A user casually told his AI he wanted to build a sensor for his weather station that showed rainfall per day, rather than just the running total. A technically non-trivial task with several intermediate steps. The AI first read the best-practice skill, then searched for the appropriate weather entities via MCP, even corrected itself when it initially grabbed the wrong source, and finally created a cleanly configured helper. The human didn’t write a single line of code.
Even more striking: in another case, the AI built a complete baby dashboard, including analysis from a smart sock and a display element for daily fluid intake — tasks that the user freely admitted he would never have had the time or knowledge to do himself. And the same user’s partner, with no prior knowledge of Home Assistant, independently adjusted an automation in the nursery using a voice command. That is the actual point of this technology: it opens a powerful tool — one previously accessible only to experts — to people who were locked out of it before. A genuine case of democratizing technology.
To make this go well, a tiered trust model is recommended. At the very beginning, the AI may only read — analyze, but change nothing. At the next level it may suggest — make a plan that a human then implements. Only after that comes write with approval, where the AI may act but each critical action must be individually confirmed. Fully autonomous writing without confirmation belongs only on a test system or behind a very tightly scoped set of tools.
The following matrix summarizes how risky each action is and how to handle it — it’s a useful guide when deciding which tools to give the agent in the first place:
| Action | Risk | Recommendation |
|---|---|---|
| Read entities | low | good starting point |
| Analyze logs | medium | be mindful of privacy |
| Suggest automation | low–medium | fine for production system |
| Create automation directly | medium | only with approval |
| Manage add-ons | high | disable in most cases |
| Edit YAML files | very high | test system only / with backup |
| Control locks, alarm, EV charger | very high | block entirely |
The Dangerous Chapter: When the AI Gets Access to Configuration Files
There is one feature that even the enthusiasts explicitly warn against — and that is nonetheless tempting: letting the AI directly edit YAML configuration files.
Why tempting? Because some things in Home Assistant simply can’t be done through the nice interface and must be done directly in the configuration files. Certain specialized sensors, for instance. If the AI can touch these files directly, it can do more for you.
Why dangerous? Because a single misplaced indent or a missing character is enough to prevent Home Assistant from starting, or to damage existing integrations. And AIs tend to accidentally “forget” parts of a large file while editing it, then discard them when writing it back. Imagine the AI revises your central configuration file, accidentally drops half of it — and on the next restart your smart home won’t boot.
The developers of the ha-mcp server have therefore moved exactly these tools into a locked-off beta area. You have to consciously activate them with additional components; they’re off by default. That’s a smart precaution, not a coincidence.
The rule to remember, roughly: No backup, no mercy. The AI may only touch YAML files if: first, a fresh backup exists; second, the change is small and comprehensible; third, a configuration check runs before restart; fourth, there’s a clear rollback path; and fifth, the AI doesn’t simultaneously have broad write access to the rest of the system. On your production home system, leave these tools out entirely.
The Safe Path to the Outside World
One more technical puzzle piece that often causes headaches. If Bernd lives on a VPS in a data center and your Home Assistant sits at home in a cabinet in the living room, the two need to communicate somehow. The agent needs a path to the MCP server — and that path should be secure.
You should definitely not just open a port in your router and expose the MCP server directly to the internet. The better choice is protected tunnels: Nabu Casa (the official cloud service from the Home Assistant developers), Tailscale (a service that creates private, encrypted networks between your devices), or a Cloudflare Tunnel (a kind of secured passageway through Cloudflare’s infrastructure). Which option is right depends on your own setup — what they have in common is that they secure the connection instead of leaving it exposed to the internet.
And here’s the warning you should underline in red: the address at which the MCP server is reachable contains a secret portion that is effectively a password. Whoever has this address can — depending on configuration — gain very far-reaching access to your Home Assistant. This URL must never end up in a public chat, a forum, or accidentally pasted into an AI window. Treat it like the key to your home. Because that’s roughly what it is.
One common misconception before we move on: with convenient connections via a Claude account, requests technically travel through the provider’s cloud servers, not through your local network — even when the application is running on your own machine. A MCP server that’s only reachable within your home network therefore can’t simply be connected directly. That’s another reason why the tunnel solutions above come into play.
How I Would Start: A Checklist for Day One
Because this article is meant to be practical, here is the condensed starting configuration — eight points you can check off before trusting the agent with more:
- Read-only, no write access. Start in pure read mode. Initially allow the AI only queries. Only unlock individual write permissions after days of verified trust.
- Disable risky tools. From day one, deactivate the tools with high damage potential: backup restoration, add-on management, system restart, deleting devices or dashboards — and especially the YAML tools.
- A dedicated user — but don’t rely on that alone. Create a dedicated user or token for the agent in Home Assistant, not an administrator account. But carefully check whether your chosen MCP server technically enforces that restricted scope. With the official server, the Assist access control works as a genuine boundary; with the unofficial
ha-mcp, actual access can be significantly broader depending on the setup, so “not admin” alone doesn’t automatically serve as a security boundary. - Backup before any new write permission. Before the AI is allowed to change something for the first time: trigger a backup and verify it succeeded. Every time.
- Practice on a test instance first. Have new things built on a separate test system first, then review them before transferring to the real system.
- No YAML tools on the production system. If at all, only temporarily, with a fresh backup, and a human reading every line.
- Chat channels only with explicit authorization. Open Telegram and similar only via pairing codes and allowlists. No open bots in public groups.
- Set a spending limit. A daily or monthly budget with the AI provider protects against runaway costs from continuous operation — and limits the damage if a key is ever compromised.
Between Intern and Trusted Colleague
Let’s return to Miriam one final time. Had she set up MCP, her AI wouldn’t have referenced an invented motion sensor — it would have found the real one. It would have recognized the correct lamp, chosen the right nighttime brightness, and perhaps even suggested turning the light off again after a few minutes. What had been a frustrating “looks right but doesn’t work” would have become a “works.”
That is the real, tangible progress behind all the unfamiliar terminology. MCP transforms an AI that merely guesses about your home into an AI that can actually query your home. An agent like OpenClaw turns that into a permanently available housemate. This combination is powerful enough to build automations, design dashboards, and stand watch at night. And it is powerful enough to cause real damage if permissions are set incorrectly. Both are true, and both are worth knowing.
Perhaps the most fitting image really is that of the intern. A good intern is a gift: smart, hardworking, a genuine relief, often surprisingly capable. But you don’t hand them the master key, access to the safe, and full signing authority on their first day. You let them show first that they understand what they’re doing. You keep an eye on them. And you give them more responsibility gradually, as they earn it.
The real question this technology raises isn’t a technical one. It is: how much autonomy do we want to give a system that can seem remarkably intelligent, but at its core doesn’t really understand what’s at stake — and that, unlike a human, feels no shame when it makes a mistake? Where do you draw the line between the convenient helper who takes work off your plate, and the autonomous actor you hand the keys of your digital life to?
The tools are ready. The decision about how far to go remains — for now — with us.
How this principle turns into a working nightly watchman is described step by step in Home Assistant with OpenClaw: A Guide to Building an AI Guardian.
FOUNDIC.org is ad-free and has no paywall. If you got something out of this article:  Treat us to a coffee