A field-tested step-by-step guide, including the stumbling blocks from a real-world build
A single missing line break was all it took. Hermes could no longer read the configuration file and silently fell back to default values. The container kept running, the dashboard kept responding, nothing flashed red only every security rule that had been set an hour earlier no longer applied.
How Hermes compares with OpenClaw, and which tool suits which job, is weighed up in Hermes vs. OpenClaw: Which AI Agent Really Belongs to You?.
That is the kind of error that doesn’t shout at you. It just sits there and waits. That is exactly why this guide shows you not only how to install Hermes Agent on a Synology NAS, but also how to check after every critical step whether configuration, permissions, and access protection actually take hold. That’s the part installation guides love to leave out and the part where the real work lies.
Don’t panic: it looks more complicated than it is. You don’t have to be a Linux pro. You just have to be willing to fire off a check command now and then instead of hoping.
To make this guide easier to follow, three people accompany you: the typical office characters: the competent IT colleague, the self-proclaimed expert, and the honest beginner. These three perspectives help you spot the typical stumbling traps.
Tanja is the IT expert. She knows how it works, explains patiently and in a structured way, and doesn’t let bad advice throw her off. If you have a question, Tanja has the answer.
Bernd is the self-proclaimed “expert” who knows everything better and is usually wrong. His shortcuts and half-knowledge regularly lead to problems. He stands for all the dangerous myths and bad practices you should avoid.
Ulf is the learner, just like you. He asks the questions buzzing around in your head and sometimes needs an everyday comparison to understand IT. If Ulf doesn’t get something, that’s perfectly fine that’s what Tanja is there for.
“And… action!”
Tested configuration
Hermes Agent
v2026.7.20(Release 0.19.0) · DSM 7.3.2 · Synology x86_64 · Installation via Container Manager and Docker Compose · Model access OpenAI Codex via OAuth · Messenger Telegram · Verification date: 25 July 2026.Menu structure, model names, supported architectures, and environment variables may change in later releases. Wherever a detail is version-dependent, that is noted in the text.
A naming confusion, cleared up right at the start
The agent in this guide is called “Hermes-Bernd”. The folder is called hermes-bernd, so is the container, and it appears on every screenshot as well.
Bernd: “Excellent choice. Finally someone names something after me.”
Tanja: “Pure coincidence. The name comes from the project’s client, not from you.”
Ulf: “So the agent isn’t… Bernd?”
Tanja: “The agent is software. Bernd is Bernd. Don’t confuse the two, or you’ll be wondering why your container suddenly goes off to fetch coffee.”
So that’s settled. Wherever hermes-bernd appears in the text, it always means the project name. You are of course free to replace it with something else the only important thing is that you then do so everywhere consistently: in the folder name, in the container name, and in every path. Renaming half-heartedly is worse than not renaming at all.
Why it’s worth it
Friday afternoon, open-plan office. Ulf is staring at a blog post about AI agents.
Ulf: “It says an agent like this does things on its own. So like an intern, just without a lunch break?”
Tanja: “Roughly. An agent doesn’t just answer, it acts. It reads files, runs commands, researches on the web.”
Bernd: “Had that ages ago. Runs in the cloud, costs nothing, I don’t have to worry about a thing.”
Tanja: “Exactly. Not about a thing. Not even about where your data ends up.”
AI agents that is, systems that don’t just answer but handle tasks independently, touch files, run commands, research on the web have been the industry’s promise for about two years now. Many agent platforms are run entirely as a cloud service: the agent itself, its configuration, and its memory reside with a provider.
Hermes takes a different path. Hermes Agent from Nous Research is licensed under the MIT license, is available as a Docker image, and can be operated via a web dashboard and via messengers like Telegram. You host the agent runtime, configuration, sessions, and memories yourself on the device that is already sitting in your home anyway, such as a Synology NAS, that is, a network storage device of the kind many people use for backups and photos.
What that means in concrete terms deserves precise wording, because more is often promised here than is actually the case. Configuration, session history, memories, and logs are stored locally on the NAS. But as soon as Hermes uses a cloud model, a web search, Telegram, speech output, or an image provider, the data needed for that particular operation is transmitted to those services.
Ulf: “Wait. Self-hosted means nothing goes out at all, right?”
Bernd: “Sure. It’s sitting in your home. Like a safe.”
Tanja: “No. It’s more like a filing cabinet in your office from which you regularly send copies to external service providers. The cabinet is at your place. The copies are on their way regardless.”
So self-hosted here means above all: local control over the agent, storage, and permissions not fully offline processing.
Which data leaves the NAS?
Model provider (here OpenAI Codex): prompts, conversation context, and everything the agent sends to the model for processing including excerpts from files it is currently working on.
Telegram: all messages in both directions. Telegram chats with bots are not end-to-end encrypted.
Search providers and visited websites: search terms, page views, the connection’s IP address.
Browser automation: processes page content and depending on usage also logins and cookies.
Speech output and image generation: the respective texts or image requests, provided an external provider was selected.Stored locally is not the same as processed locally. Anyone who wants to process strictly confidential data entirely locally needs not only a local model but must additionally disable or control all external services and outbound tool accesses that’s a different project from this guide.
What remains is substantial nonetheless: the decision about what the agent is allowed to do in the first place, which tools it gets, who is allowed to talk to it, and where its traces lie.
This guide follows a real-world build that came together over an afternoon and evening. Everything written here has been verified on a running system including the errors. Especially the errors.
The result in brief
Before you get started, you should know what you’re getting into. At the end of this guide, you’ll have running: a permanently active Hermes container with automatic restart, a locally stored data directory with correct ownership, a password-protected dashboard on the LAN, a Telegram bot with an access list, OpenAI Codex as model access, an enforced storage limit including log rotation and neither a published API port nor a mounted Docker socket.
What this does not solve: confidentiality toward the model provider, HTTPS on the local network, a restriction of outbound connections, the actual tool scope on the Telegram channel, practical proof of the approval requirement, and an external backup.
Bernd: “But that’s not even finished.”
Tanja: “Yes it is. It’s finished enough to operate and honest enough that you know where you have to add more. That’s more than most guides give you.”
Prerequisites
Bernd: “I’ve still got an old NAS in the cupboard. That’ll do for sure.”
Tanja: “Which model?”
Bernd: “No idea. Says something with DS and numbers on it.”
Tanja: “Then that’s exactly where we start.”
This guide was created on a mid-range x86 DiskStation, but nothing about it is tied to a particular model. Hermes has surprisingly modest requirements the real hurdle isn’t computing power, but whether your DiskStation is even allowed to run containers. One step at a time.
Does Container Manager run on my DiskStation?
That is the first and most important question, because it determines everything else. Container Manager is Synology’s graphical Docker interface. Docker in turn isolates processes, file system areas, and networks from one another the programs run in containers and largely stay out of each other’s way and out of the way of the rest of the system.
Ulf: “Containers. Like at the harbor?”
Tanja: “That’s exactly the image intended. Each program gets its own crate, with everything it needs inside. You set the crate down, it runs, and it doesn’t touch the crates next to it.”
Ulf: “So completely sealed off?”
Tanja: “No, and that’s the important part. All the crates stand on the same ship and share the same engine.”
“Largely” is meant literally here: containers share the host’s kernel and are therefore not a complete security boundary like a virtual machine. It becomes critical above all with privileged containers and with a mounted Docker socket more on the latter shortly.
Three conditions have to come together.
First, the DSM version. As of DSM 7.2 the package is called “Container Manager” and comes with support for Docker Compose. On DSM 7.1 and older it is simply called “Docker” the guide works there in principle too, but the project wizard from Phase 7 is missing, and you have to start the Compose file via the command line.
Second, the processor. Officially, Synology supports x86_64 and armv8 (64-bit). Models with a 32-bit ARM processor (armv7) are out, definitively.
Third and this is the most annoying hurdle Synology’s own model list. What matters is not the architecture alone, but whether Synology releases the package for the specific model. Some 64-bit ARM devices are excluded even though they technically could run it: DS118, DS218, DS218play, DS418, DS418j, DS119j, and RS819 share the processor with supported models like the DS220j, but are not allowed to install Container Manager (verification date: July 2026, source: community project ContainerManager_for_all_armv8). For these devices, community workarounds exist that are explicitly not the subject here.
Bernd: “I’ll just pick a model from the list that sounds similar.”
Tanja: “Or you do it right in ten seconds.”
Because such lists go out of date, the most reliable check is also the fastest one anyway.
Fact check: Does it run on your device?
Open the Package Center and search for “Container Manager”.
If it appears with an Install button → your device is released, off you go.
If it doesn’t appear → this is the end of the road, regardless of what any list claims. Then check whether your DSM version is older than 7.2; if so, search for the “Docker” package instead.
What Hermes actually needs
The official documentation for the version used here names concrete figures:
| Resource | Minimum | Recommended |
|---|---|---|
| Memory | 1 GB | 2–4 GB |
| CPU cores | 1 | 2 |
| Disk space (data directory) | 500 MB | 2 GB and up |
The decisive sentence is right below it: “Browser automation (Playwright/Chromium) is the most memory-hungry feature. If you don’t need browser tools, 1 GB is sufficient. With browser tools active, allocate at least 2 GB.”
Translated: the memory hunger comes almost entirely from browser automation that is, from the agent being able to call up and operate websites itself. Without this tool, one gigabyte is enough. With it, at least two.
Ulf: “One gigabyte? My phone has more. So it’ll run anywhere then.”
Tanja: “Careful, that’s the figure for the container alone. DSM wants to keep living too, and so do your other services.”
This exact reading is what matters: these are figures for the container’s needs, not for the recommended total spec of the NAS. Applied to concrete devices, that means:
Under 1 GB total RAM not suitable. A DS220j, for example, ships with 512 MB and is therefore already below the Hermes minimum, even though Container Manager could be installed on it.
1 GB total RAM at the minimum on paper, hardly sensible in practice. The DS223j ships with 1 GB. What’s left of that after DSM isn’t reliably enough for Hermes.
2 GB total RAM limited trial operation. The DS224+ and DS423+ come with 2 GB out of the box. Turn off browser automation, set the container limit to 1 GB. Usable for trying things out, too tight for continuous operation.
4 to 6 GB practical. On many Plus models only after a memory upgrade: the DS224+, for instance, can officially be upgraded from 2 to 6 GB. Container limit 2 GB, browser tools usable.
8 GB and up comfortable. mem_limit: 4g as in the example below. The Synology community generally recommends at least 8 GB of total system memory for Docker operation not because of Hermes, but because with tight memory DSM starts swapping to disk, and then everything grinds.
Disk space: the unpacked image occupies around 2.4 GB. The data directory starts small but grows with sessions, memories, and skills after the first day of operation it was already 146 MB in the example project. Anyone using browser tools should budget 10 GB; without them, 5 GB is comfortably enough.
Processor performance is surprisingly secondary. The thinking is done by a model in the cloud, the NAS spends most of the time waiting for responses the documentation aptly calls the load “mostly I/O bound”. A single core is enough for occasional use. Two help when the browser renders pages.
Ulf: “So my NAS is basically the goalkeeper who mostly stands around and waits until a ball finally comes?”
Tanja: “Very good image. And the cloud is the rest of the team that plays the game.”
And what if my DiskStation has an ARM processor?
Here the situation changed in the summer of 2026, and the answer is more pleasing than expected. The official image is now built multi-architecture: for the version used here, both a linux/amd64 and a linux/arm64 image are available on Docker Hub, both published on the same day, both around 940 MB compressed. On a 64-bit ARM DiskStation, Docker automatically pulls the matching variant you don’t have to do anything further.
Two caveats come with it. First: the original request for ARM64 support was formally closed by the project as “closed as not planned”, while the build scripts now ship the architecture anyway so an image is there, but a promised feature it is not. Second, and more important in practice: the flow of this guide was played through exclusively on x86_64. That an ARM64 image exists does not yet prove that every tool and browser dependency runs smoothly on every Synology ARM model. Anyone building on ARM should additionally check browser automation and optional tools individually; anyone with no appetite for surprises stays on x86_64.
A detail the documentation itself highlights for NAS operators
Notably: the official Docker documentation has its own paragraph for NAS systems, in which Synology is mentioned by name. In essence it says that with mounted network-storage directories the container expects different ownership, and that you should therefore set PUID/PGID to match the host user.
That is exactly what Phase 1 of this guide is about and the pitfall in Phase 3 that cost an hour in the example project. So it is a known problem. Just one whose full scope you only understand once it has caught you out. (In this guide the variables are called HERMES_UID/HERMES_GID; PUID/PGID are confirmed aliases, both work.)
What else you need
Accounts. An account with the model provider, here ChatGPT. A Telegram account, if the agent should be reachable via messenger. And this is the point people easily underestimate SSH access to the NAS. SSH is remote control via text command.
Bernd: “I don’t need SSH, I click everything.”
Tanja: “In at least four places in this guide it won’t work without it. You can take your pick: learn SSH or get stuck at Step 1.2.”
A network audit before you begin. For this guide, all that needs to be free on the NAS is port 9119 the dashboard’s default port. A port is the house number under which a service is reachable on the network; if two services are on the same number, one of them won’t start. Check in Container Manager whether 9119 is still free anyone already running other services on the NAS may have taken it.
Port 8642 also appears in the Hermes documentation, but is not needed here: it belongs to the optional OpenAI-compatible API, which has to be switched on separately via API_SERVER_ENABLED=true. In this guide it is neither activated nor published on the host.
Time. Realistically half a day, if you work carefully. Anyone who skips the stumbling blocks documented here will manage faster but that was precisely the plan.
Fact check: Prerequisites at a glance
DSM: 7.2 or newer for “Container Manager” including the project wizard. DSM 7.1 and older: the “Docker” package, Compose via the command line.
Processor: x86_64 or 64-bit ARM and the model must actually be released in the Package Center.
Memory: 1 GB for the container without browser tools, at least 2 GB with them in addition to what DSM itself needs.
Disk space: around 2.4 GB for the image, plus 5 GB without or 10 GB with browser tools for the data.
Accounts: an account with the model provider, optionally Telegram, and SSH.
Network: port 9119 free. Port 8642 is not needed in this guide.
The map: What should stand there in the end
Before the first command is issued, it’s worth a look at the target picture. Picture it like a floor plan before you start drilling. On the NAS, a single project folder is created:
/volume1/docker/hermes-bernd/
├── data/              → mounted into the container as /opt/data
│                        (configuration, persona, sessions, memories, logs)
├── container.env      → dashboard credentials, readable by the owner only
└── docker-compose.yml → the build instructions for the container
The container itself gets exactly one door to the outside: port 9119, and that too only bound to the NAS’s LAN address. Port 8642 is not published on the host the associated API stays disabled anyway. No SSH for the container and above all no Docker socket.
Ulf: “What is a Docker socket?”
Tanja: “The remote control for Docker itself. Whoever has it can start, stop, and build new containers.”
Bernd: “Handy. Then I’ll give it to the agent so it can update itself.”
Tanja: “With that you’re giving it the keys to the whole house, including the toolbox and the caretaker’s office.”
A writable Docker socket inside the container would effectively give it far-reaching control over Docker itself and thus, in most configurations, root-like control over the host. With an agent that runs commands on its own, that is by far the most consequential line you should not write.
To put network security in perspective, because more is often promised here than holds true: binding to 192.168.1.50:9119 merely causes Docker to listen on exactly this host address instead of on all interfaces. It prevents neither routed access from other network segments nor a later opening via firewall, router, reverse proxy, or tunnel and it does not distinguish between devices: every device that can reach this address also reaches the port. The actual access protection is therefore the password, not the binding.
Two values in the following commands are example values. 192.168.1.50 is the LAN address of the example NAS your own is under Control Panel → Network → Network Interface, and it should be assigned statically, otherwise the port binding points to nothing after the next restart. And /volume1 applies to DiskStations with a single storage pool; anyone who has created several checks the path in File Station via right-click → Properties and inserts their own number.
Phase 1: The foundation
Now we build. And as in every workshop: the foundation is the most boring and most important part.
Step 1.1 – Create the folder
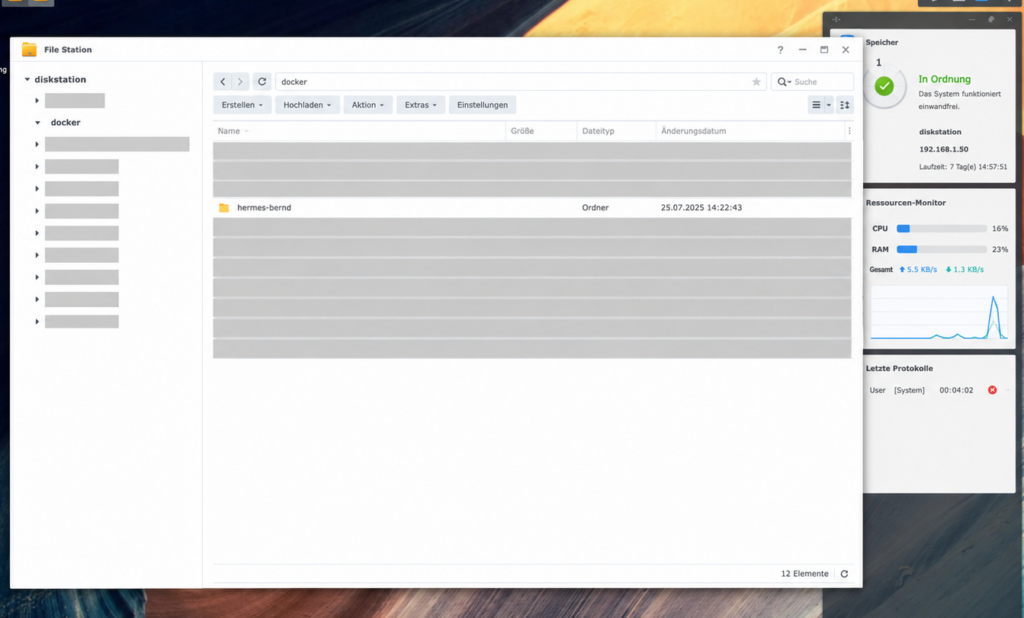
In File Station (Synology’s file manager), create a new folder hermes-bernd in the shared folder docker, and inside it a subfolder data.
Expected result: Both folders appear in File Station with today’s date.
Bernd: “Two folders. Groundbreaking.”
Tanja: “The second one is where every conversation with your agent will later reside. I wouldn’t underestimate it.”
Step 1.2 – The most important number in the whole project
Now comes the step whose significance only reveals itself two hours later. We need the numeric UID and GID of the folder’s owner.
Ulf: “What’s that supposed to be?”
Tanja: “Linux doesn’t know names, only numbers. What you see as ‘nasadmin’ is internally, say, 1026. Like a jersey number: the match report lists the number, not the name.”
Ulf: “And if I enter the wrong number?”
Tanja: “Then someone else plays. And they’ll rearrange your locker room while they’re at it.”
The UID is the user number, the GID the group number under which Linux manages file permissions. File Station only shows you the display name (such as “nasadmin”), not the number.
Via SSH:
stat -c 'UID=%u GID=%g Owner=%U:%G Rechte=%A' /volume1/docker/hermes-bernd/dataExpected result: a line of the form UID=1026 GID=100 Owner=nasadmin:users Rechte=drwx------
Anyone without SSH access can make do: Control Panel → Task Scheduler → Create → Scheduled Task → User-defined script, choose as the user the same account that is to own the project folder not root, because then the check returns UID 0 and GID 0 and thus exactly the wrong values for HERMES_UID/HERMES_GID (incidentally, root also triggers a password prompt), as the script use the same stat command with > /volume1/docker/hermes-bernd/data/owner.txt appended, run the task manually, read the result file in File Station, then delete the file and the task again.
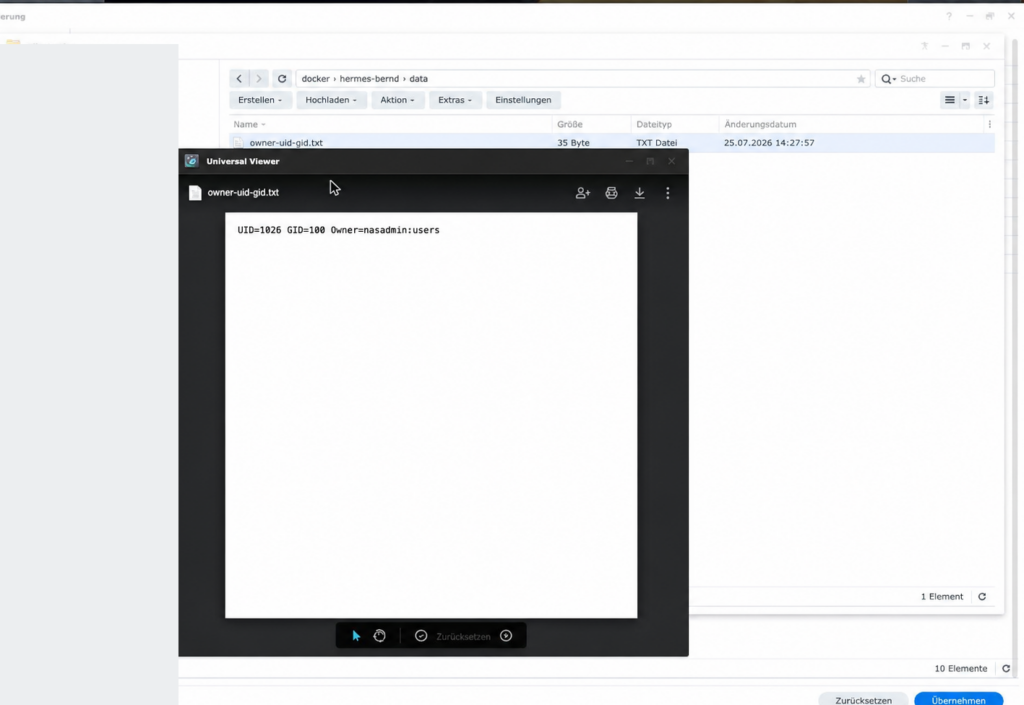
Fact check: Note down these two numbers.
In the example:
1026and100. From now on they reappear in every single Docker command. Anyone who omits them ruins their folder permissions why exactly is coming up in Phase 3. Write them down on a note next to your keyboard.
Step 1.3 – Tighten permissions
On Synology the data folder is often set to drwxrwxrwx by default, that is, readable and writable by everyone, frequently with an additional access list (“Everyone”) on top. For a directory that will later hold all conversation histories, that is not a good starting position.
sudo chmod 700 /volume1/docker/hermes-bernd/data
sudo chmod 700 /volume1/docker/hermes-bernd
ls -ldn /volume1/docker/hermes-bernd/data
Expected result: drwx------ 1 1026 100 ... only the owner has access.
Bernd: “Done. Finished.”
Tanja: “Almost. You’ve changed the door lock. Whether someone still has a spare key you haven’t checked.”
chmod only sets the classic Unix permissions. Whether a Synology access list (ACL) with an entry like “Everyone” is additionally active is revealed by a + at the end of the permissions column and, when in doubt, by a look in File Station under Properties → Permission. This check is worthwhile, because an ACL can override the Unix permissions.
Step 1.4 – Prepare the credentials file
In the project folder (not in data/!) create a file container.env. For now with placeholders only:
HERMES_DASHBOARD_BASIC_AUTH_USERNAME=nasadmin
HERMES_DASHBOARD_BASIC_AUTH_PASSWORD=PLATZHALTER
HERMES_DASHBOARD_BASIC_AUTH_SECRET=PLATZHALTER
Afterwards, setting the permissions is mandatory:
chmod 600 /volume1/docker/hermes-bernd/container.env
ls -ln /volume1/docker/hermes-bernd/container.env
Expected result: -rw------- 1 1026 100 ... only the owner may read and write.
A small aside that otherwise costs you five minutes of searching: File Station cannot create empty text files. The workaround goes via the DSM app Text Editor (File → New, paste content, Save As…, encoding UTF-8) or via SSH.
Fact check: Phase 1 is complete when …
hermes-bernd/anddata/inside it exist.
The owner’s UID and GID are noted down in the example1026and100.ls -ldnreportsdrwx------for both folders.container.envis in the project folder, not indata/, and reports-rw-------.
A possible Synology access list (“Everyone”) has been checkedchmodalone says nothing about that.
Phase 2: The image
Step 2.1 – Download it, but with a date, please
Container Manager → Registry, search for nousresearch/hermes-agent, double-click. In the tag dropdown, latest appears preselected.
Bernd: “Latest. So the newest. I always take that.”
Tanja: “And that’s why something different runs on your setup every month without you noticing.”
Don’t accept it. Instead, scroll down and choose a specific version, in the example v2026.7.20.
The reason is mundane and important: latest is a moving target. On the next restart a different version may start than the one you tested. A fixed tag (an image’s version marker) is far more traceable.
But even it isn’t entirely fixed: tags can in principle be redirected to a different image after the fact. The only immutable thing is the digest, the cryptographic fingerprint of the image’s contents. For this guide the tag is enough anyone who wants it exact additionally documents the digest or writes it directly into the Compose file (image: nousresearch/hermes-agent@sha256:…). Note: with a multi-architecture image the digest differs by architecture, so the value from the x86 machine doesn’t necessarily fit an ARM NAS.
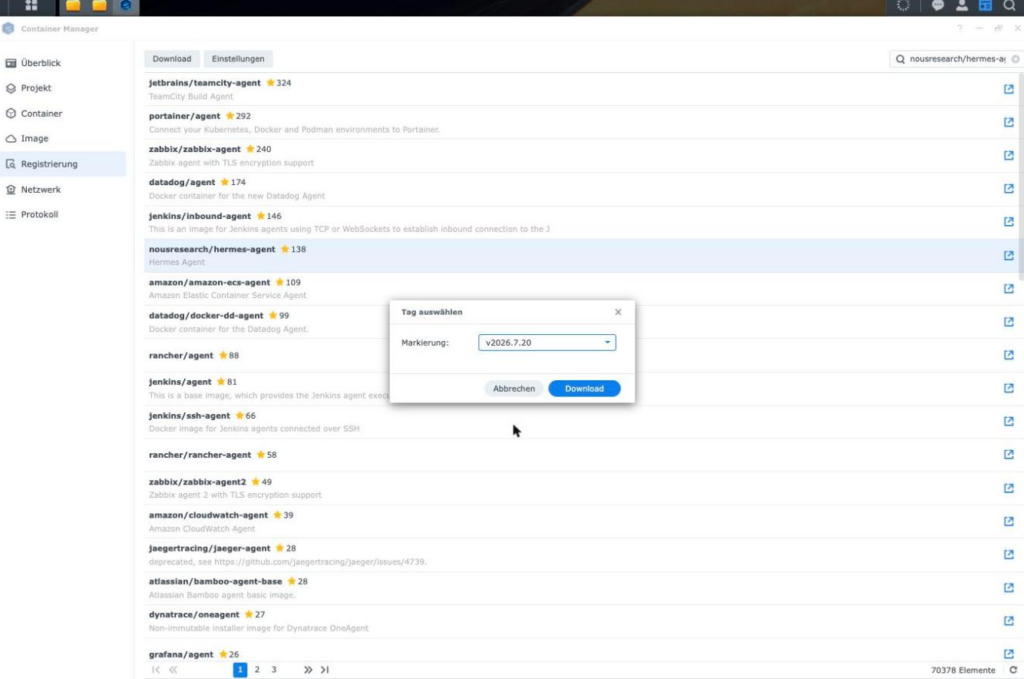
Expected result: the download runs for about a minute, the image appears in the list at around 2.43 GB.
Step 2.2 – Check what you’ve actually downloaded
Open the image detail page and note three values:
- Digest – the cryptographic fingerprint, in the example
sha256:28d5fdf7…ecdfc36. With it you can later prove beyond doubt which build actually ran. - Entrypoint –
/init /opt/hermes/docker/main-wrapper.sh. The/initreveals: inside the container runs s6-overlay, a small supervision system that monitors services and restarts them on crash. - Volume –
/opt/data. That is the path we’ll connect to ourdatafolder shortly.
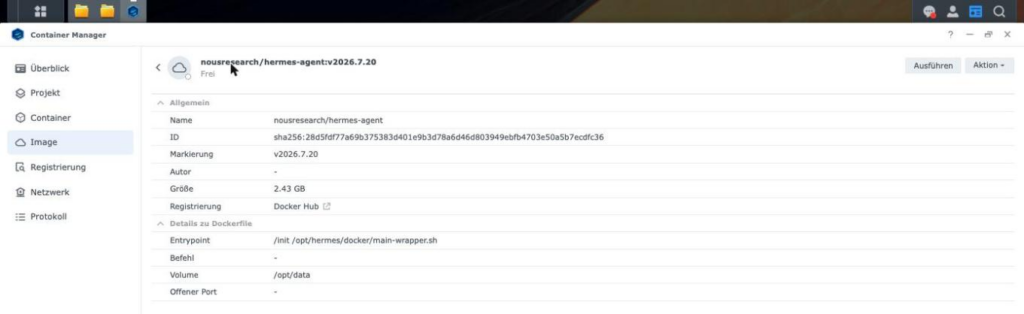
Ulf: “Why should I write that down? It’s just a jumble of letters.”
Tanja: “Because in three months you’ll want to know which version was running back when everything still worked. That’s your serial number.”
Fact check: Phase 2 is complete when …
The image is present locally with a fixed tag, not as
latest.
Three values are noted: digest as the only truly immutable identifier, entrypoint/init /opt/hermes/docker/main-wrapper.shand volume/opt/data.
You’re aware that with a multi-architecture image the digest only applies to the architecture on which you read it off.
Phase 3: The setup wizard
Pitfall 1: Forgetting UID and GID – and the host folder changes owner
Before the first container starts, you have to know a quirk of this image. It’s unpleasant, and in the example project it cost an hour.
Ulf: “What could possibly happen on startup? The container is in its crate, after all.”
Tanja: “Normally, yes. But we’re handing it a folder from the outside. And it touches something on that folder at startup.”
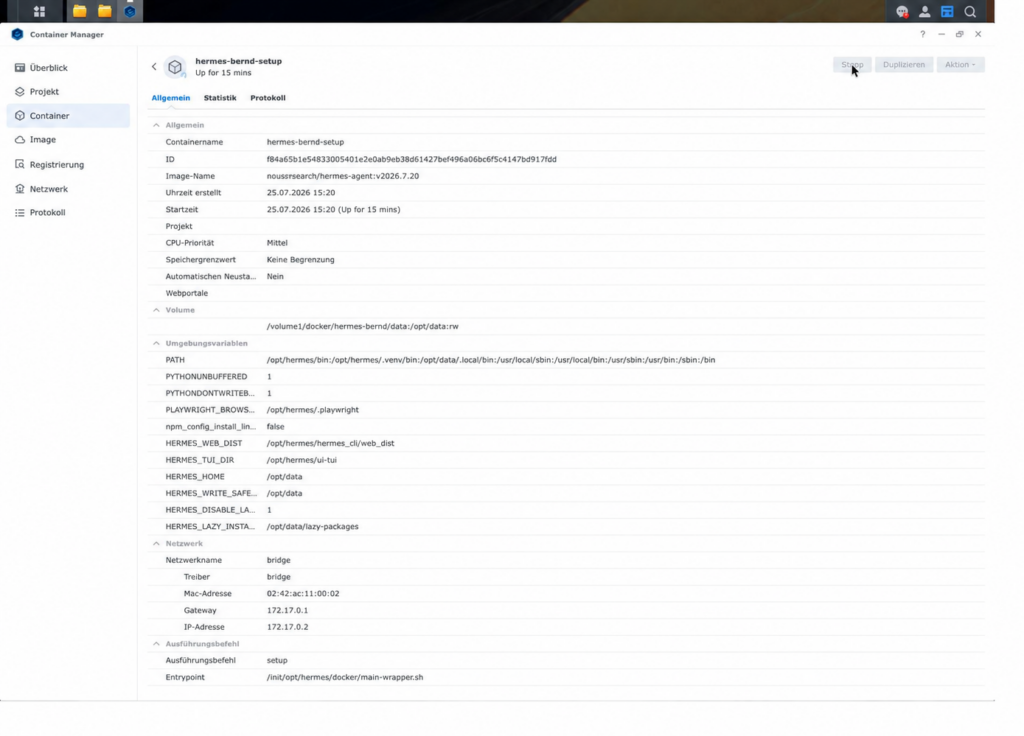
The entrypoint starts as root, the system administrator with unlimited rights, and only then switches to a normal user. During the switch it adjusts the ownership of the mounted directory. And because this is a bind mount the folder isn’t copied but passed straight through from the host it is not a container-internal operation: the command runs on the real folder of your NAS.
If the variables HERMES_UID and HERMES_GID are missing at startup, the container takes its built-in default value in the test, UID 10000 and writes it through onto the host. Your carefully set owner 1026:100 is thereby gone.
Bernd: “Then I’ll just protect the folder with chmod 700. Already did that.”
Tanja: “Root doesn’t care about file permissions. That’s precisely the point of root.”
That is exactly what happened in the project. A container started without the two variables took over the data folder. The repair required root rights via SSH.
Fact check: The rule to remember for the rest of the guide
HERMES_UIDandHERMES_GIDbelong in every container start. Even in throwaway containers. Even in that one quick diagnostic run where surely it doesn’t matter. Especially in that one.
Step 3.1 – Start the setup container
There are two ways, and one of them is considerably less painful.
The original way went via Container Manager: create a container from the image, mount volume data → /opt/data, under “Advanced Settings → Execution Command” set the command to setup, start, then “Action → Open Terminal”. This worked on the first attempt and failed reproducibly on the second with “No teletype terminal found”.
The most likely explanation: whether the container is assigned a TTY when created decides success or failure. A TTY is a terminal interface loosely: the receiver through which an interactive program talks to you. No receiver, no conversation. Verifiable with sudo docker inspect <container> --format 'Tty={{.Config.Tty}}'.
The recommended way sidesteps the question entirely, because it brings its own receiver along:
sudo docker run --rm -it \
  -v /volume1/docker/hermes-bernd/data:/opt/data \
  -e HERMES_UID=1026 -e HERMES_GID=100 \
  nousresearch/hermes-agent:v2026.7.20 setup
The -it guarantees the terminal, --rm clears the container away again by itself after it exits.
Expected result: the wizard starts and asks: “How would you like to set up Hermes?”
Step 3.2 – Cross-check immediately
And here comes the part you please must not skip. The command runs in the foreground. Open a second SSH session and type there right afterward:
ls -ldn /volume1/docker/hermes-bernd/dataExpected result: drwx------ 1 1026 100 ...
If it says something else there in particular 10000 10000 then abort immediately in the first session with Ctrl+C and do not continue. In that case the variables were missing, and the longer you keep running, the more files the container creates under the wrong number.
Ulf: “Two windows at the same time? That feels excessive.”
Tanja: “It takes ten seconds and saves you an hour. That’s the best ratio in this entire guide.”
Step 3.3 – Through the wizard
The wizard guides you through about ten selection screens. Navigate with the arrow keys, confirm with Enter, multi-select with the spacebar.
Setup mode. Three options: “Quick Setup (Nous Portal)” free OAuth login with the manufacturer, no keys of your own. “Full setup” every provider, every tool individually. “Blank Slate” everything off except the bare essentials. If you want to use your own ChatGPT subscription, choose Full setup; only there can the provider be specified deliberately.
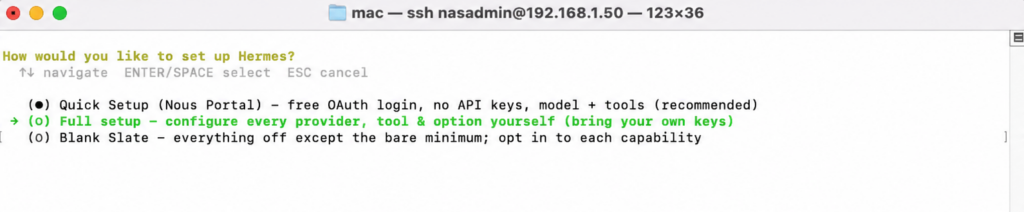
Bernd: “Quick Setup of course. It says Quick, doesn’t it.”
Tanja: “And then you wonder why your paid subscription isn’t being used.”
Provider. In the list select OpenAI, in the submenu Codex.

The login. Now the terminal shows an OAuth device code a short code you enter on a web page to confirm the sign-in without typing your password into someone else’s software. You open the displayed address in the browser, enter the code, sign in, confirm.
A note for context before you do that: OpenAI documents signing in with a ChatGPT account for its own Codex clients. Hermes, as a third-party application, is not explicitly named from which neither a permission nor a prohibition follows. Whether and under what conditions this OAuth usage is permanently supported is thus not clearly documented and may change. Anyone who wants to avoid this uncertainty uses a separate API key with a cost limit or the manufacturer’s access. On top of that: Codex is included in several ChatGPT plans, but which models and which usage limits apply depends on the plan the gpt-5.6-sol used here is not automatically available in every plan.
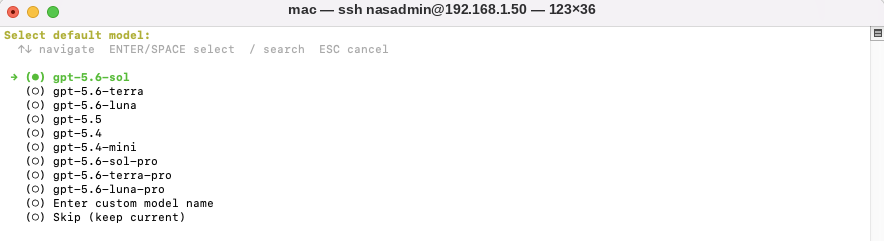
Model. The list shows several variants. In the example gpt-5.6-sol was chosen (preselected).
Terminal backend. Leave it on “local”. The agent then runs commands inside its own container not on the host. That’s exactly how it should be.
Ulf: “And if I choose ‘Host’, does it get faster?”
Tanja: “No. Then the agent gets to issue commands directly on your NAS instead of in its crate. Don’t do that.”
Messaging platforms. Here select only what you really need. In the example: Telegram. The actual setup happens later in a separate wizard.
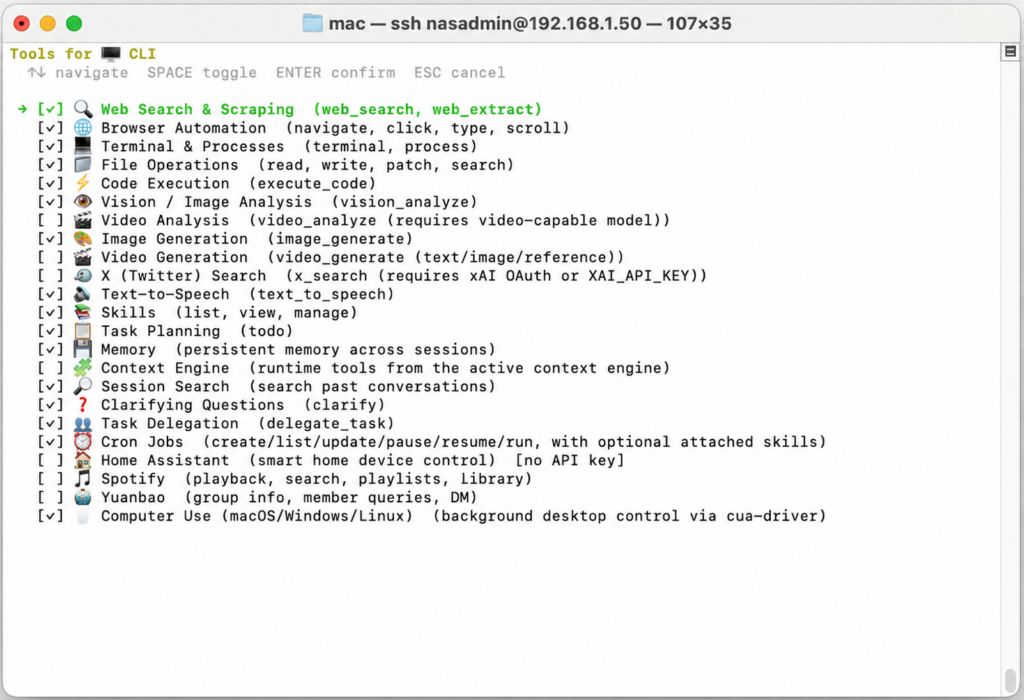
Command-line tools. A checklist with 25 entries, 17 of them enabled. Active are, among others, web search, browser automation, terminal and processes, file operations, code execution, image analysis, speech output, task scheduling, memories, delegation, and cron jobs. Left disabled are video analysis, image and video generation, X search, Home Assistant, Spotify.
Bernd: “I’ll just tick them all. More features, more power.”
Tanja: “Every checkmark is a capability your agent will actually use later. You’re not putting together a wish list here, you’re handing out tools.”
A piece of advice easily missed in this list: “Terminal & Processes”, “File Operations”, and “Code Execution” together mean that an assistant reachable via messenger is allowed to run commands and change files. That is the whole point but it is also the reason we’ll be reining things in shortly in Phase 4.
And here is the point at which owners of smaller DiskStations should make a deliberate decision: “Browser Automation” is by far the biggest memory hog. Behind it sits a complete Chromium browser that the agent remote-controls. Without it, Hermes gets by with one gigabyte according to the documentation; with it, it needs at least two. Anyone with 2 GB of total memory turns the tool off here the web search is unaffected by this and keeps working.
Browser, image, speech, and search providers. In the example: local browser, image generation via Codex, speech output via Microsoft Edge TTS, search via DuckDuckGo.
Completion. The wizard reports “🚀 Ready to go!” and lists follow-up commands. Afterwards the container shuts down its services in an orderly fashion and exits with exit code 0.
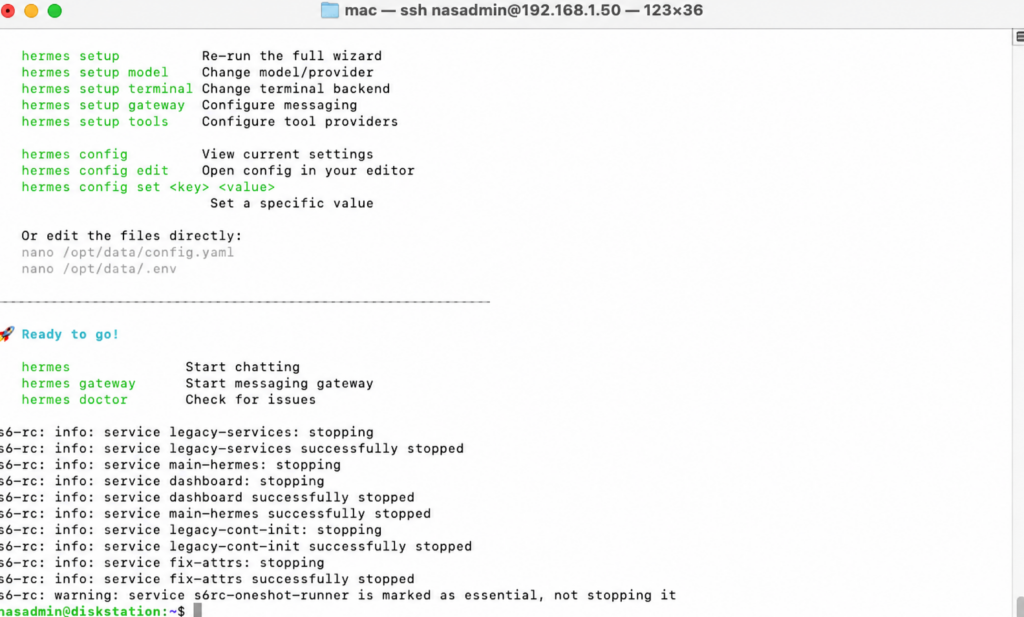
Ulf: “It exited! Is something broken?”
Tanja: “No. The container had exactly one job: run the wizard. That’s done, so the container goes home. Exit code 0 means ‘exited cleanly’.”
Step 3.4 – The first health check
sudo docker run --rm -it \
  -v /volume1/docker/hermes-bernd/data:/opt/data \
  -e HERMES_UID=1026 -e HERMES_GID=100 \
  nousresearch/hermes-agent:v2026.7.20 doctor
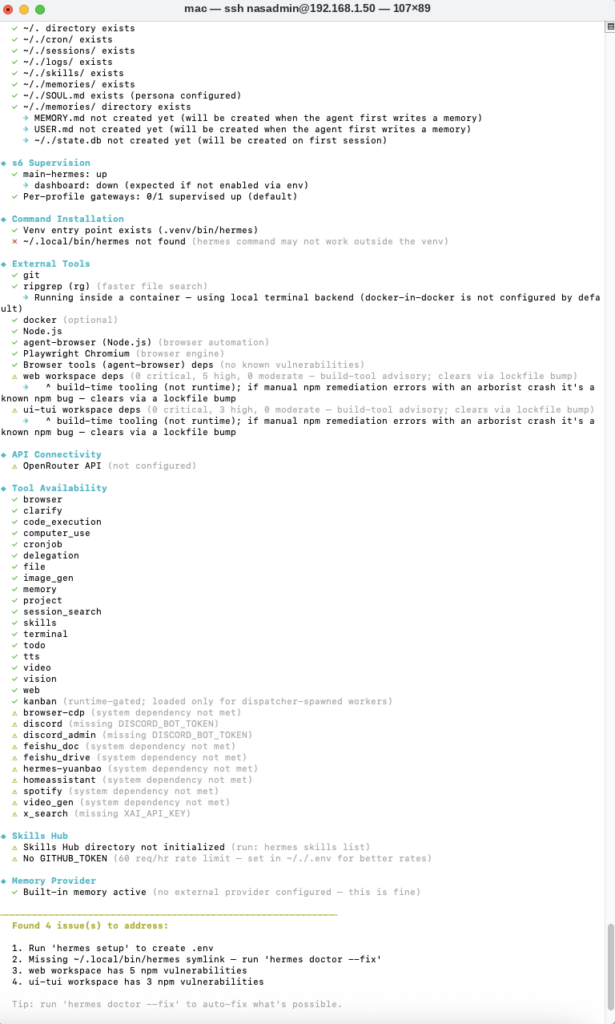
Expected result: a structured report. What matters are ✓ OpenAI Codex auth (logged in) and ✓ Config version up to date (v33). At the end it says “Found 4 issue(s) to address” in the example these were consistently harmless points: a still-missing .env file (only created with the Telegram setup), a missing symlink (cosmetic), and two messages about npm packages that the tool itself classifies as “build-tool advisory, not runtime”.
Bernd: “Four problems! That’s junk.”
Tanja: “Read what kind of problems. Three of them resolve themselves over the next two phases, one is cosmetics. A tool that reports nothing usually just didn’t look.”
A warning about interpretation belongs here too: ✓ SOUL.md exists (persona configured) only means the file exists not that anyone has touched it. At this point it still contains the image’s generic default text.
Fact check: Phase 3 is complete when …
The wizard ended with “Ready to go!” and the container with exit code 0.ls -ldn …/datastill reports1026 100and precisely not10000.hermes doctorshows✓ OpenAI Codex auth (logged in)and✓ Config version up to date.
You’ve read and classified the reported open points, not just counted them.
And the rule sticks:HERMES_UIDandHERMES_GIDbelong in every further container start.
Phase 4: Reining it in
Now it gets interesting, because this is where it’s decided how much autonomy your agent gets. What’s edited is data/config.yaml either via SSH or via File Station (right-click → “Open with” → “Text Editor”).
Step 4.1 – Change three settings
First: approvals. The default is smart a helper model decides which actions go through without a prompt.
Ulf: “Sounds convenient, though.”
Tanja: “It is convenient. But you don’t know the system yet. Trust comes after experience, not before.”
For the introductory phase, smart is therefore the wrong order of trust. New block at the top level:
approvals:
  mode: manual
  cron_mode: deny
manual is meant to bind approval-required tool calls to an explicit release. deny means: scheduled tasks are not executed at all in the first place. The wording “is meant to” is important that the configuration value is set does not yet prove it takes effect at runtime on every relevant call. That’s exactly what Step 8.5 is for.
Second: the emergency brake. Search for tool_loop_guardrails: and change the value:
tool_loop_guardrails:
  hard_stop_enabled: true
That is the protection against infinite loops an agent that gets tangled up in a failing tool call and repeats it a hundred times.
Third: shorten the leash. In the agent: block the default is max_turns: 150. That allows up to 150 agent rounds within a single task.
Ulf: “150 sounds like a lot.”
Tanja: “It is. Imagine your agent hangs in a loop and tries the same thing 150 times. Every round costs time, money, and can trigger a tool action.”
A limit that high, in case of doubt, prolongs the runtime, drives up the costs, and multiplies the number of tool actions that a derailed task can trigger with an unsupervised messenger bot, an unnecessary risk. For the start:
agent:
  max_turns: 40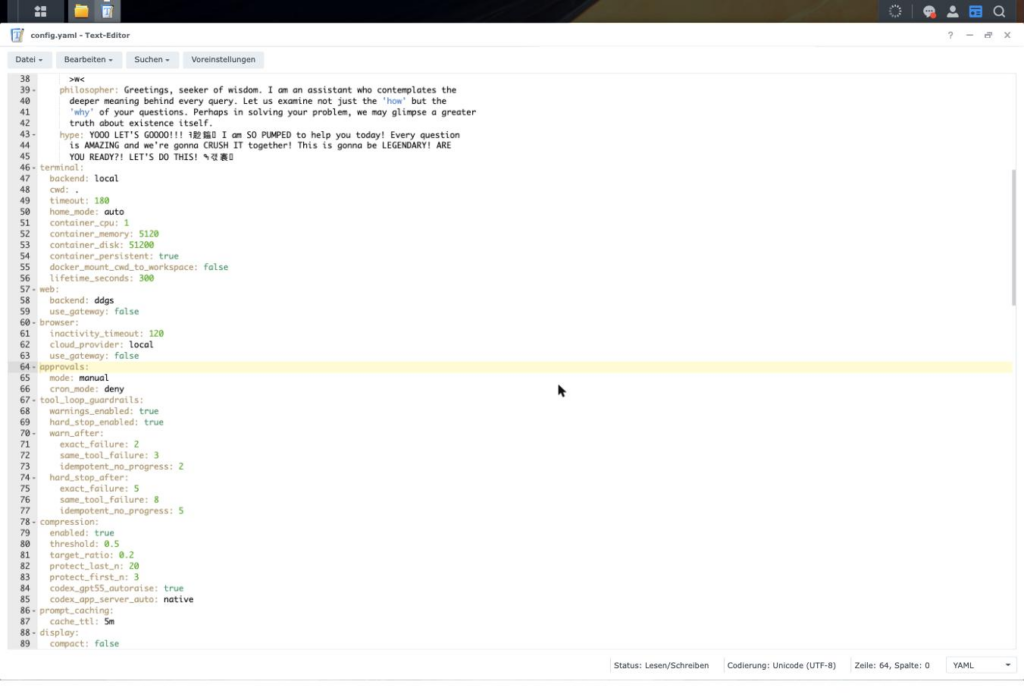
Pitfall 2: Invalid YAML – Hermes silently falls back to default values
And here is the story from the beginning. After saving, the health check ran again and suddenly reported a fifth point:
⚠ hermes config: Failed to parse /opt/data/config.yaml:
  mapping values are not allowed in this context
  in "/opt/data/config.yaml", line 32, column 55.
  Falling back to default config — every user override
  (auxiliary providers, fallback chain, model settings) is being IGNORED
The cause was not with the three changes, but in line 32, in a completely unrelated section with personality templates. There, during editing, two entries had merged into one line a missing line break. YAML (this file’s format, which expresses structure through indentation) could no longer read that and threw away the entire configuration. Not just the broken line. Everything.
Ulf: “Everything? Because of one line break?”
Tanja: “YAML is like a shelf in which the indentation determines what sits on what. If one board hangs crooked, it’s not just the board that topples.”
Bernd: “And where was the error message?”
Tanja: “In the health check. The one you would have skipped.”
That is the real lesson of this section: an invalid configuration file here does not lead to a startup error, but to a silent fallback to default values. Anyone who doesn’t check is running a system they only think they know.
Step 4.2 – So check it
sudo docker run --rm -it \
  -v /volume1/docker/hermes-bernd/data:/opt/data \
  -e HERMES_UID=1026 -e HERMES_GID=100 \
  nousresearch/hermes-agent:v2026.7.20 \
  bash -c 'hermes config get approvals; hermes config get tool_loop_guardrails; hermes config get agent'
Expected result: mode: manual, cron_mode: deny, hard_stop_enabled: true, max_turns: 40 each in the actually loaded state, not just as text in a file.
Fact check: Two tools, two statements
hermes doctorgives a summary “looks good overall”.hermes config getreads out what the program actually understood.
For configuration values, the second statement is the reliable one.
Step 4.3 – The persona
The file data/SOUL.md determines who your assistant is supposed to be. By default it contains a generic text. Replace it with something concrete: name, role, access paths, and not to be underestimated the security preferences in prose, such as that you’re asked before critical actions and that credentials are to be handled with care.
Ulf: “Does that do anything? It’s just text.”
Tanja: “It doesn’t replace a technical setting. But it’s the job description. And the agent reads along with it on every task.”
Fact check: Phase 4 is complete when …
hermes config getnot the look into the file reportsmode: manual,cron_mode: deny,hard_stop_enabled: trueandmax_turns: 40.hermes doctorreports no parse error forconfig.yaml.SOUL.mdcontains your own text instead of the default template.
And you now know: a brokenconfig.yamldoesn’t abort, it silently falls back to default values.
Phase 5: Telegram
Step 5.1 – Create the bot
In Telegram search for @BotFather (the official management account), send /newbot, assign a display name, then the username.
Stumbling block: Telegram usernames allow no hyphens. mein-agent-bot is rejected, mein_agent_bot works. And a tip from practice: choose a name that isn’t already taken a dozen times over why, you’ll see in Step 8.2.
Expected result: BotFather confirms and issues a token the string in the format <zahlen>:AA…, which grants full control over the bot.
Pitfall 3: The bot token that doesn’t expire
Two things about this token are important. It is a password. And it doesn’t expire on its own.
Bernd: “I’ll just quickly send it to my other device via WhatsApp, then I’ve got it everywhere.”
Tanja: “With that you’ve just sent your password through two foreign systems. And unlike a login code, this one never expires.”
If you accidentally reveal it in a screenshot, while copying through a chat window, in an error message you fix it like this: @BotFather → /mybots → select bot → “API Token” → “Revoke current token”. The old token becomes invalid immediately, the new one has to be entered into the configuration and the container reloaded with --force-recreate.
The practical rule that follows from this: copy the token directly from the BotFather app into the terminal, without intermediate stops.
Step 5.2 – Find out your own user ID
In Telegram search for an ID bot (such as @userinfobot) and send /start.
Expected result: a reply with Id: 123456789 or similar. This number is not an authentication secret like the bot token, but it is very much a personal technical identifier it should not be published unnecessarily. This article therefore uses example values throughout.
Stumbling block: There are several similarly named bots, some inactive. If no reply comes, try another one from the results list.
Step 5.3 – The gateway wizard
sudo docker run --rm -it \
  -v /volume1/docker/hermes-bernd/data:/opt/data \
  -e HERMES_UID=1026 -e HERMES_GID=100 \
  nousresearch/hermes-agent:v2026.7.20 gateway setup
A note for everyone who read it differently in documentation: the command is gateway setup, not setup gateway. The order was cross-checked live in the project via --help.
In the platform list, mark Telegram and confirm.
Pitfall 4: The Telegram automation creates a different bot
Now the wizard asks whether the bot should be set up automatically or manually. Option [1] “Automatic” is preselected.
Bernd: “Automatic. Enter. Next.”
Tanja: “Stop. This is exactly where someone walked right into it in the project.”
Don’t confirm. “Automatic” creates a second, separate bot via a brokering service of the manufacturer not the one you just created yourself at BotFather. In the project this was only noticed by the displayed QR code and aborted with Ctrl+C.
Switch with the arrow keys to [2] Manual.
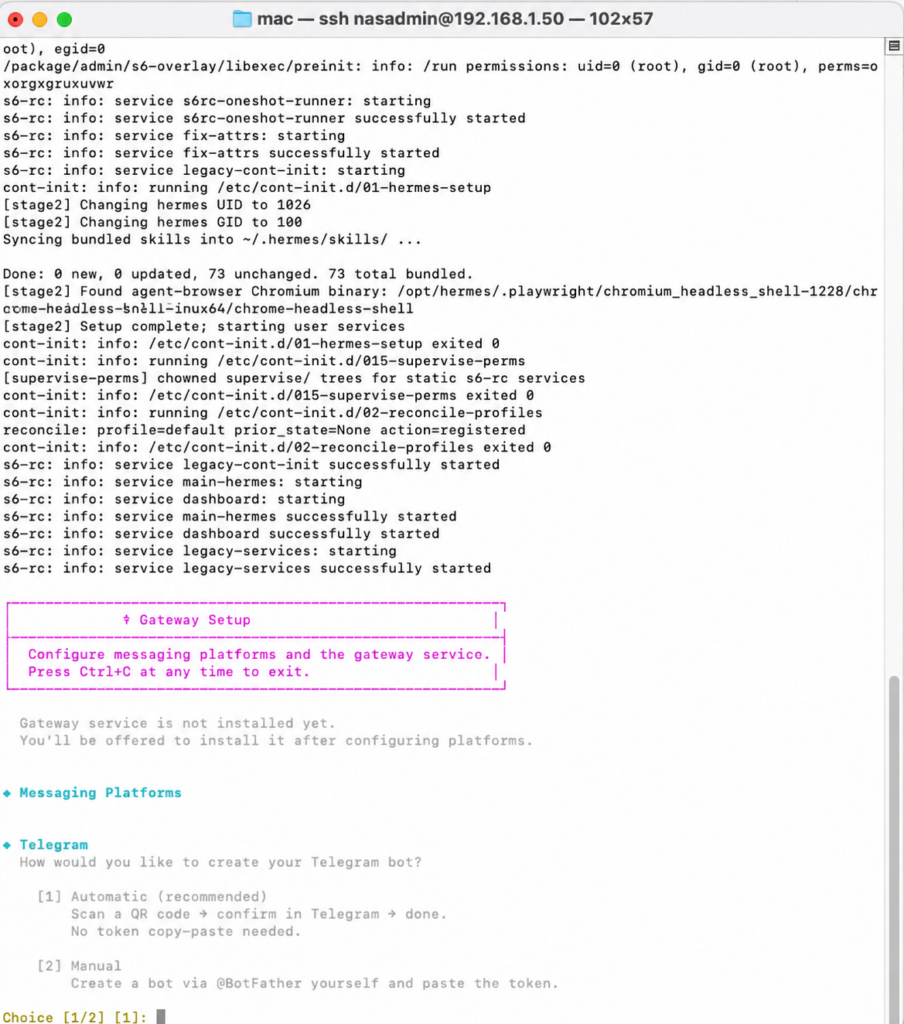
Expected result after entering the token: Telegram token saved
Stumbling block: “Invalid token format” usually means an incomplete copy. The token is longer than it looks in the chat window have it fully selected by tapping instead of dragging by hand.
Step 5.4 – The access list
The wizard now asks for permitted users. Here you enter your own Telegram ID.
Expected result:
Telegram allowlist configured – only listed users can use the bot
Telegram home channel set to 123456789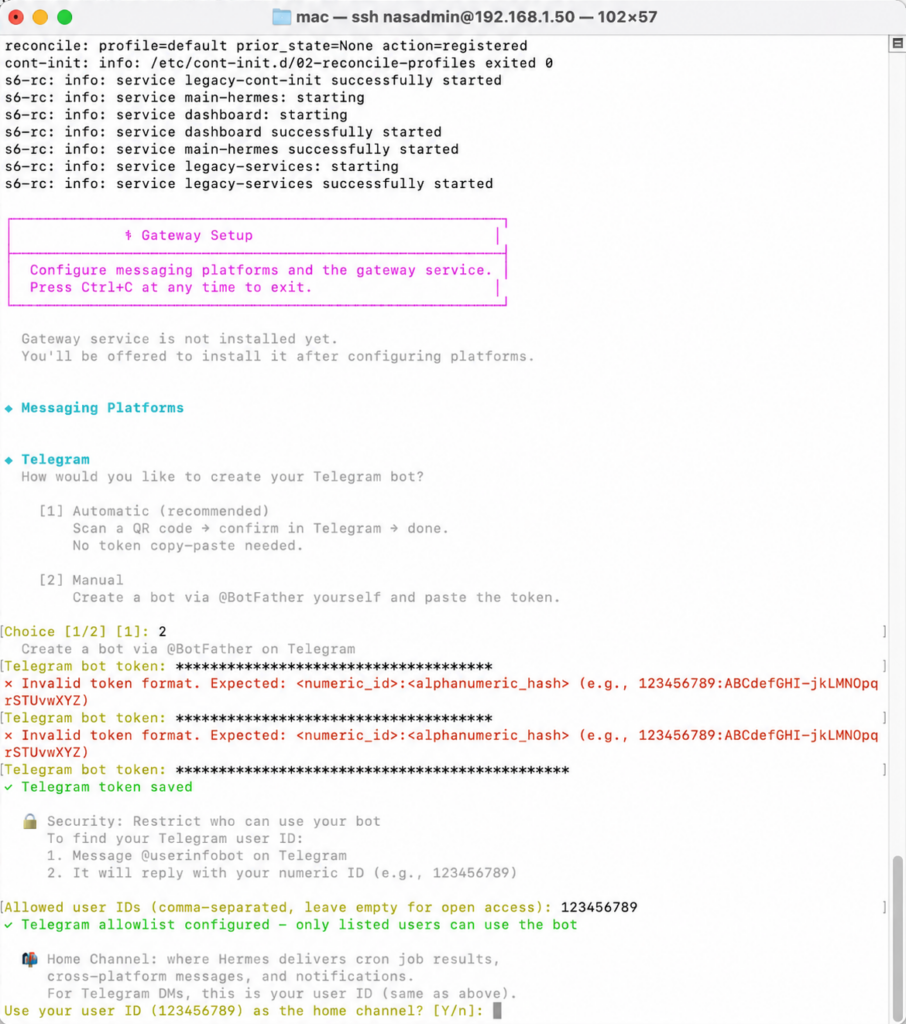
Ulf: “Can’t I just leave that blank? Nobody’s going to find me anyway.”
Tanja: “Your bot name is publicly searchable. And the agent behind it is allowed to read files and run commands. Do you really want that field to stay empty?”
This is the most important security step of this phase. Without an access list, anyone who knows the bot name can talk to an agent that is allowed to read files and run commands.
Finally the wizard reports: “Service install not supported on this platform. Run in foreground: hermes gateway run“. That too is expected the throwaway container has no init system and therefore can’t register a background service. The configuration itself is saved nonetheless. Continuous operation comes in Phase 7.
Fact check: Phase 5 is complete when …
The bot comes from BotFather and was entered in the wizard via [2] Manual not via “Automatic”.
The wizard reportedTelegram token savedandTelegram allowlist configured.
The access list contains your own Telegram ID.
The token has seen no intermediate stops it is a password and doesn’t expire on its own.
You’ve ticked off the message “Service install not supported on this platform” as expected.
Phase 6: Securing the dashboard
Step 6.1 – Enter real values
Now you replace the placeholders in container.env:
HERMES_DASHBOARD_BASIC_AUTH_USERNAME=nasadmin
HERMES_DASHBOARD_BASIC_AUTH_PASSWORD=<a password you choose>
HERMES_DASHBOARD_BASIC_AUTH_SECRET=<output of: openssl rand -hex 32>
The SECRET is the key used to sign session cookies at least 32 random bytes, generated with:
openssl rand -hex 32Ulf: “Can I just use my password again as the secret?”
Tanja: “No. One protects the login, the other the running session. Two locks, two keys.”
Stumbling block: nano is not installed on the DiskStation. Either use vi or the DSM Text Editor.
Pitfall 5: Plaintext in the hash variable, the login fails without a hint
Hermes knows two valid variants. HERMES_DASHBOARD_BASIC_AUTH_PASSWORD_HASH expects a real scrypt hash a deliberately compute-intensive hashing method from which the original password cannot practicably be recomputed, so that it never resides anywhere in plaintext. HERMES_DASHBOARD_BASIC_AUTH_PASSWORD expects the plaintext password, which is only hashed in memory at load time. The first variant is more secure.
In the project a plaintext password ended up in the _HASH variable. Result: the login failed without the error message hinting at it.
Ulf: “But it was the right password?”
Tanja: “Yes. Just in the wrong field. Like sticking your car key into the door lock right key, wrong lock, and nobody tells you why.”
The ensuing troubleshooting cost three quarters of an hour and led to a snippet of the password becoming visible in plaintext during a grep command. Both values had to be replaced afterwards.
Two rules follow from this. First: the variable must match the value plaintext belongs in _PASSWORD, a hash in _PASSWORD_HASH. Second, and this is the more valuable one: never use cat or grep with full output to check credential files. Instead, length-based:
awk '
  /^[[:space:]]*#/ || /^[[:space:]]*$/ { next }
  {
    pos = index($0, "=")
    if (pos > 0) {
      print substr($0, 1, pos - 1) ": length " length(substr($0, pos + 1))
    }
  }
' /volume1/docker/hermes-bernd/container.env
The command deliberately splits only at the first equals sign and skips comments and blank lines. The shorter awk -F= '{print $1": length "length($2)}' would be tempting, but for values that themselves contain an = such as Base64 strings it would report too short a length and thus mislead you precisely on the critical values.
Expected result: a list of the variable names with character lengths enough to check completeness without revealing a single value.
Step 6.2 – Cross-check the structure
ENV=/volume1/docker/hermes-bernd/container.env
ls -ln "$ENV"

user=$(grep -c '^HERMES_DASHBOARD_BASIC_AUTH_USERNAME=' "$ENV")
plain=$(grep -c '^HERMES_DASHBOARD_BASIC_AUTH_PASSWORD=' "$ENV")
hash=$(grep -c '^HERMES_DASHBOARD_BASIC_AUTH_PASSWORD_HASH=' "$ENV")
secret=$(grep -c '^HERMES_DASHBOARD_BASIC_AUTH_SECRET=' "$ENV")

printf 'Username=%s Passwort=%s Hash=%s Secret=%s\n' "$user" "$plain" "$hash" "$secret"

if [ "$user" -eq 1 ] && [ "$secret" -eq 1 ] && [ $((plain + hash)) -eq 1 ]; then
  echo "Struktur: korrekt"
else
  echo "Struktur: FEHLER"
fi
Expected result: -rw------- 1 1026 100 … as well as Struktur: korrekt.
A mere count of all lines with the prefix HERMES_DASHBOARD_BASIC_AUTH would not suffice here it would also reach three if the plaintext and hash variants were set at the same time or the username were missing. The check above therefore explicitly requires exactly one username, exactly one secret, and exactly one of the two password variants. Only counters are output in the process, no values.
A halfway reassuring note at the end of this phase: in the tested version the start fails if the dashboard is bound non-locally and no authentication provider was configured. The former --insecure switch is, according to its own help output, “DEPRECATED / NO-OP” since a hardening in June 2026 it no longer bypasses the sign-in. That significantly lowers the risk of an accidentally wide-open exposure, but replaces neither firewall nor VPN nor HTTPS.
Bernd: “So it’s secure. I can put it on the internet.”
Tanja: “No. It’s secured against forgetfulness, not against the internet.”
Because there’s one thing you shouldn’t skim over: the dashboard in this setup runs over unencrypted HTTP. Password and session cookie travel in plaintext across your local network. For a trusted home network that is acceptable; for access from outside you need a VPN or a properly configured HTTPS reverse proxy. Even a password-protected agent dashboard does not belong directly on the open internet.
Fact check: Phase 6 is complete when …
container.envcontains exactly one username, exactly oneSECRET, and exactly one of the two password variants.
Plaintext is in_PASSWORD, a scrypt hash in_PASSWORD_HASHnever swapped.
TheSECRETcomes fromopenssl rand -hex 32and is not the same as the password.
The file reports-rw-------.
You checked length-based, without outputting a single value.
And you keep in mind: the dashboard speaks HTTP, not HTTPS.
Phase 7: Continuous operation
Step 7.1 – The Compose file
Docker Compose is the build recipe that describes how a container should run permanently.
Ulf: “Why not just another one of those docker-run commands?”
Tanja: “Because you’d have to retype it on every restart error-free. Compose is the written-down recipe instead of cooking from memory.”
Create it as docker-compose.yml in the project folder:
services:
  hermes-bernd:
    image: nousresearch/hermes-agent:v2026.7.20
    container_name: hermes-bernd
    restart: unless-stopped
    command: ["gateway", "run"]
    shm_size: "1gb"
    ports:
      - "192.168.1.50:9119:9119"
    volumes:
      - /volume1/docker/hermes-bernd/data:/opt/data
    env_file:
      - ./container.env
    environment:
      HERMES_DASHBOARD: "1"
      HERMES_DASHBOARD_HOST: "0.0.0.0"
      HERMES_UID: "1026"
      HERMES_GID: "100"
    mem_limit: 4g
    logging:
      driver: json-file
      options:
        max-size: "10m"
        max-file: "3"
You of course adapt the IP address, the volume path, and the two ID numbers to your own system.
Two values hang directly on your DiskStation’s specs. mem_limit: 4g fits a device with 8 GB or more; with 4 GB of total memory 2g belongs there, with 2 GB 1g and then the browser tools should stay off. And shm_size: "1gb" enlarges the shared memory area /dev/shm that Chromium needs for browser automation; the documentation names exactly this value. The value is not necessarily fully allocated as physical memory up front it is an upper limit, not a reservation. Without browser automation the line can be dropped anyway.
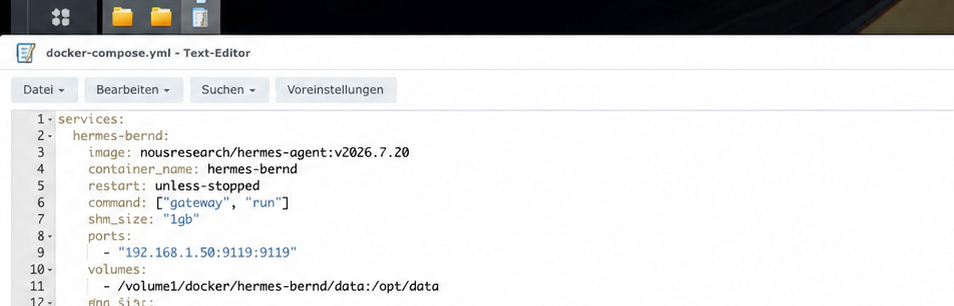
Three details that aren’t obvious. env_file is relative to the project folder that makes the file portable. mem_limit instead of a deploy: block, because the latter is silently ignored by some Compose versions. And the log rotation prevents container logs from unnoticeably filling up your disk.
Addendum from 29 August 2026: three lines that are still missing here
What this file already gets right is described above: HERMES_UID and HERMES_GID put the container on an unprivileged user, the port is bound to a single address instead of every interface, the credentials live in container.env rather than in clear text in this file, plus a memory limit and log rotation. Compared with the setup described in Home Assistant with OpenClaw: A Guide to Building an AI Guardian, three lines are still missing – and they cost nothing:
    security_opt:
      - no-new-privileges:true
    cap_drop:
      - ALL
    read_only: true
What they do. no-new-privileges stops a process inside the container from gaining more rights than it started with by way of a setuid program – the line closes exactly the route by which an unprivileged user still becomes a privileged one. cap_drop: ALL takes away the kernel capabilities an agent of this kind does not need. And read_only: true makes the container’s root filesystem read-only; the data directory stays writable because it is mounted as a volume.
Said honestly: these three lines have not been tested on this setup. read_only is the one most likely to break something – if the agent needs a writable path outside the volume, a tmpfs entry for /tmp helps. So add one line at a time, run docker compose up -d --force-recreate after each, then hermes doctor and a look at the dashboard. If something drops out, it is clear without searching which line it was.
Pitfall 6: cpus: prevents the start on some Synology kernels
In the original version there was additionally cpus: 2.0 here. The start failed:
Error response from daemon: NanoCPUs can not be set,
as your kernel does not support CPU CFS scheduler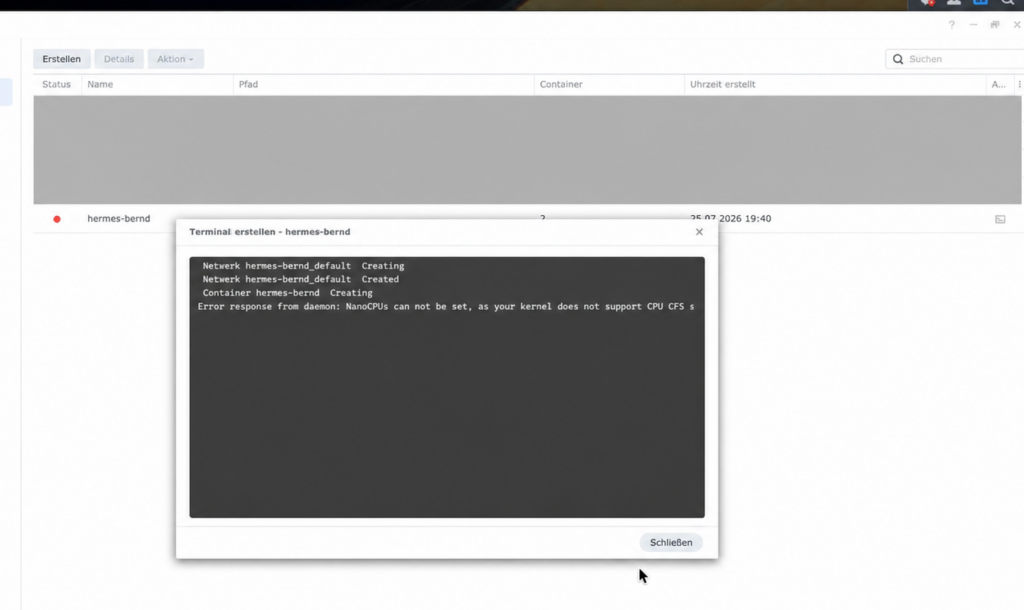
Bernd: “Kernel broken. Reinstall.”
Tanja: “The kernel isn’t broken, it just can’t do this one thing. Like a car without cruise control drives anyway.”
The DSM kernel of this DiskStation is built without CONFIG_CFS_BANDWIDTH a known behavior on quite a few Synology models. Docker simply can’t apply the setting. The solution is unspectacular: remove the line. The memory limit is unaffected by this and is enforced.
Step 7.2 – Start
Container Manager → Project → Create, project name hermes-bernd, set the path to /docker/hermes-bernd. To the prompt “A docker-compose.yml exists in the selected path”, answer with “Use existing docker-compose.yml”. Leave the web portal settings disabled the port publishing is already handled by the Compose file.
Alternatively via SSH:
cd /volume1/docker/hermes-bernd && sudo docker compose up -dExpected result: Container hermes-bernd Creating → Created → Starting → Started, exit code 0.
Step 7.3 – Check the permissions immediately
The same root-entrypoint effect as in Phase 3 applies here too this time on a container that runs permanently. So check right away:
ls -ldn /volume1/docker/hermes-bernd/dataExpected result: drwx------ 1 1026 100 ...
Additionally, you can read directly in the startup log that it worked:
sudo docker logs --tail 200 hermes-berndExpected result: among others [stage2] Changing hermes UID to 1026, Changing hermes GID to 100, and at the end the decisive line: → gateway is now running under s6 supervision (auto-restart on crash, dashboard supervised alongside if HERMES_DASHBOARD is set).
Ulf: “s6 supervision what is that?”
Tanja: “A little watchdog inside the container. If the main process dies, it restarts it. Like a coach who sends the substitute onto the field immediately.”
Fact check: Phase 7 is complete when …
The Compose file is in the project folder and
env_filepoints relatively to./container.env.mem_limitmatches your NAS’s specs andcpus:does not appear.
The port is bound to one LAN address.
The log rotation is set.ls -ldn …/datastill reports1026 100after the start.
The log saysgateway is now running under s6 supervision.
Phase 8: Verification
Now comes the part most people skip and precisely for that reason it’s covered here in detail.
Step 8.1 – The dashboard, in two stages
Do not call up the landing page directly. There is a known bug (Issue #55130) in which the automatic redirect to / can fail with HTTP 500 when Basic Auth is the only sign-in provider. So the status endpoint first:
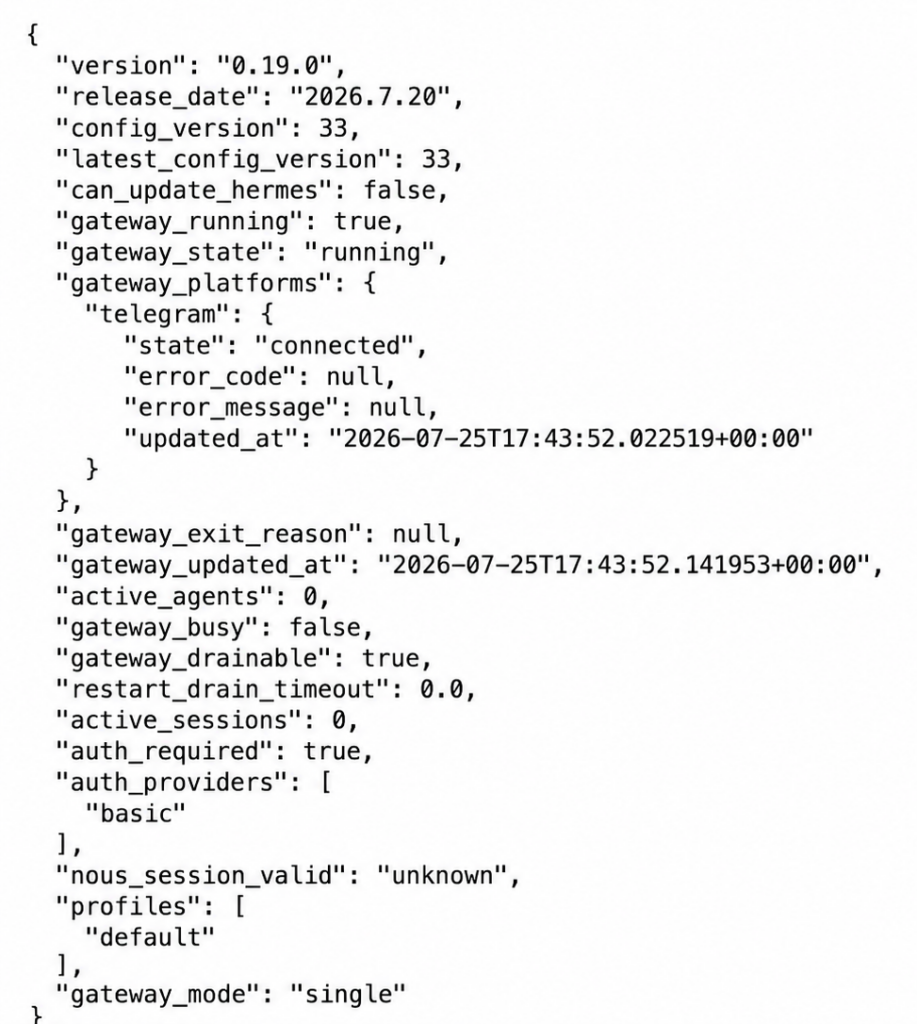
curl -s http://192.168.1.50:9119/api/statusExpected result: JSON with "gateway_running":true, "gateway_state":"running", "auth_required":true, "auth_providers":["basic"] and if Telegram is set up "gateway_platforms":{"telegram":{"state":"connected"}}.
Then in the browser call up directly http://192.168.1.50:9119/login, not the root.
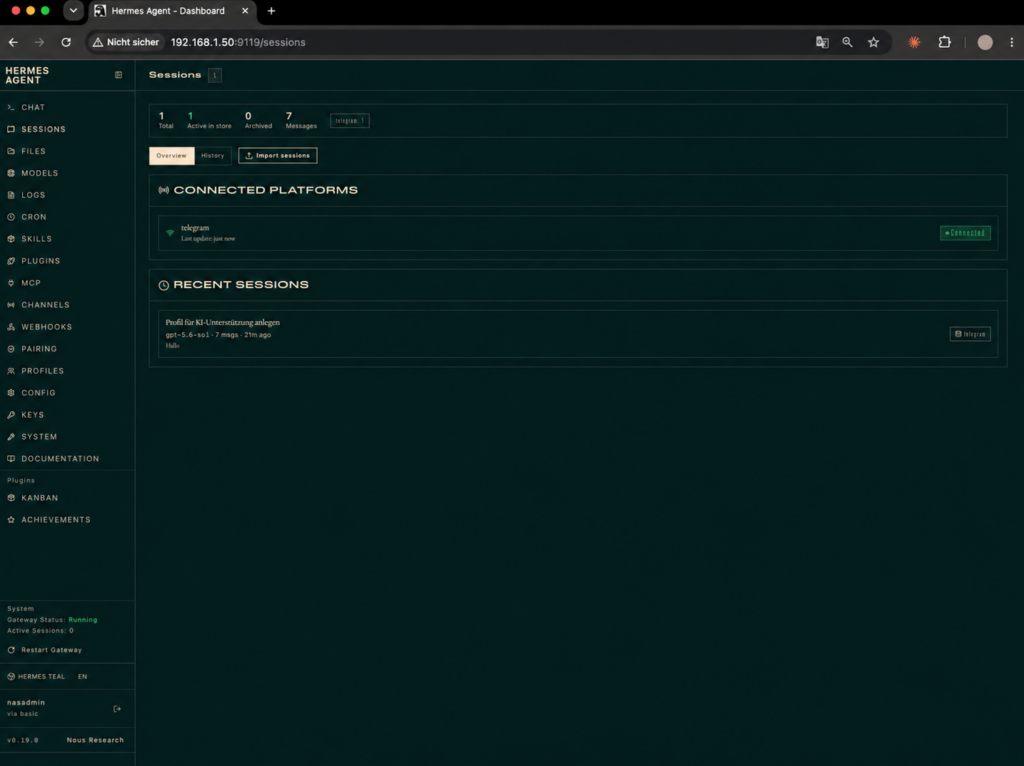
Expected result: a login form with the banner “PUBLIC BIND · AUTH REQUIRED”. After login, the dashboard shows the signed-in user at the bottom left with the addition “via basic”.
Bernd: “Why all this curl stuff first? I just want to log in.”
Tanja: “Because the status endpoint tells you in a single line whether gateway, Telegram, and authentication are up. If the login then jams, you already know it’s not the service’s fault.”
Step 8.2 – Telegram for real
Send your own bot /start and a short message.
Expected result: the bot shows “typing…” and replies.
Stumbling block from practice: the Telegram search returns several similarly named hits. In the project the first test message went to a completely unfamiliar bot with the name parts swapped around. Compare the username exactly before the test that’s precisely the reason for the tip in Step 5.1 about the unmistakable name.
After that, you explicitly verify that really only your ID is permitted:
sudo docker exec hermes-bernd env | grep -c '^GATEWAY_ALLOW_ALL_USERS='
sudo docker exec hermes-bernd env | grep -c '^TELEGRAM_ALLOW_ALL_USERS='
Expected result: 0 in each case.
Fact check: There are two variables, not one
GATEWAY_ALLOW_ALL_USERSis the global switch.TELEGRAM_ALLOW_ALL_USERSis the platform-specific one.
Both exist, both are taken into account during authorization. It is not enough to check only one of them.
Step 8.3 – The restart test
sudo docker restart hermes-berndExpected result: after one to two minutes Telegram is connected again, the configuration holds, earlier sessions are still visible in the dashboard. Directly after the restart the status briefly shows "gateway_state":"starting" and Telegram "connecting" that is a normal transitional state, not an error.
Ulf: “I looked after ten seconds and saw ‘connecting’. Panic?”
Tanja: “No. Go get coffee, look again.”
Step 8.4 – The ports and limit check
sudo docker port hermes-bernd
sudo docker inspect hermes-bernd --format 'Restart={{.HostConfig.RestartPolicy.Name}} Memory={{.HostConfig.Memory}} NanoCPUs={{.HostConfig.NanoCpus}}'
Expected result: 9119/tcp -> 192.168.1.50:9119 and nothing else in particular no port 8642 published on the host. As well as Restart=unless-stopped Memory=4294967296 NanoCPUs=0 four gibibytes are enforced, the CPU limit is missing as is known.
Step 8.5 – The test people like to forget
All the checks so far confirm configuration values. Whether approvals.mode: manual actually behaves that way at runtime is not verified by this.
Bernd: “The value is in the file, isn’t it. What could still go wrong there?”
Tanja: “Between ‘is in the file’ and ‘takes effect when it counts’ lie exactly the incidents that make you run tests like this.”
For this you need a real occasion and one that can’t break anything.
A clean test procedure looks like this: first you create a meaningless throwaway folder inside the container, say under /tmp, and put an empty file in it. Then you ask the agent via Telegram to remove exactly this folder with a recursive delete command an action Hermes should classify as potentially dangerous. Under no circumstances point at real data for this test.
Expected result: the agent does not run the command immediately, but sends a prompt into the Telegram chat and waits for a reply like yes or no. As long as there is no explicit consent, nothing on the file system may change.
Play through both directions: once decline and check whether the folder is still there, once consent and check whether it disappears. Only when both are correct is the approval requirement more than a value in a file.
In the example project this test is still outstanding to this day. In all honesty it belongs on the list before anyone talks about “production”.
Fact check: Phase 8 is complete when …
/api/statusreportsgateway_running: true,auth_required: trueand if set up Telegramconnected.
Login via/loginworks, the banner shows “PUBLIC BIND · AUTH REQUIRED”.
Both allow switches,GATEWAY_ALLOW_ALL_USERSandTELEGRAM_ALLOW_ALL_USERS, are not set.
The restart survives configuration, Telegram connection, and earlier sessions.docker portshows 9119 only.
The approval test from Step 8.5 has been played through in both directions decline and consent.
Maintenance and Operation
The container is running. Now comes the part that decides things over the months.
Restarting – and here Pitfall 7 lurks. Without a configuration change, sudo docker restart hermes-bernd is enough. After a change to container.env or the Compose file, however, that is not enough: a simple restart does not re-read the environment variables, the container keeps running with the old values and you go looking for the error in the file that has long been correct.
Ulf: “That’s mean.”
Tanja: “That’s the most commonly lost half hour in the entire Docker world.”
After every change to these two files, therefore:
cd /volume1/docker/hermes-bernd && sudo docker compose up -d --force-recreateReading logs. docker logs hermes-bernd shows above all the startup sequence and is suited for crash diagnosis. The actual conversation and tool history is in data/logs/gateways/default/current.
Changing the configuration. Where possible, use hermes config get <pfad> to check and the set commands offered by the program instead of manual text editing see the line-break incident. After every change, hermes doctor.
Updating. Read the release notes, take a full backup, change the tag in the Compose file, then docker compose pull && docker compose up -d --force-recreate, then hermes doctor and repeat the tests from Phase 8. Note the old and new tag including digest that’s your way back if the new version behaves differently.
Backing up. And specifically the entire project folder, not just data/ the dashboard credentials are in container.env one level above. Target: another volume or, better, another device, encrypted.
Bernd: “I’ll just copy that into a second folder on the same disk.”
Tanja: “And when the disk dies? A copy next to the original isn’t a backup, it’s a second original.”
Don’t share the log directory. data/logs/ contains conversation content. It must not appear in any network share, any web root, or any tunnel forwarding. The background is a real case: an attacker was discovered because he left the logs of his own agents standing on the network with an open directory listing. What applies to attackers applies to everyone else too.
Check the router. In the FRITZ!Box under Internet → Permit Access → Port Sharing, disable the automatic port forwarding (UPnP, a mechanism by which devices open doors to the outside on their own authority) for the NAS. Otherwise a service can put the laboriously locked-away port onto the internet itself at the next restart.
Fact check: The five operating rules
After changes to
container.envor the Compose file always--force-recreate, never justrestart.
Check values withhermes config getinstead of reading them in the file.
Before every update: read the release notes, take a backup, note the old tag including digest.
The entire project folder is backed up, encrypted, to another device.data/logs/belongs in no share it holds conversation content.
Troubleshooting
If something jams here are the cases that actually occurred in the project.
| Symptom | Cause | Solution |
|---|---|---|
Folder data/ suddenly owned by UID 10000 | Container started without HERMES_UID/HERMES_GID; root entrypoint took over the host folder | Reset via SSH with sudo chown -R 1026:100; pass the variables in every container start from now on |
| “No teletype terminal found” when opening the terminal | Container created without a TTY | Use docker run --rm -it … setup instead of the Container Manager terminal; check existing containers with docker inspect <name> --format 'Tty={{.Config.Tty}}' |
| Configuration changes have no effect | YAML syntax error somewhere in config.yaml → silent fallback to default values | hermes doctor reads out the parse error with line number; after the fix cross-check with hermes config get |
Container won’t start, NanoCPUs can not be set | DSM kernel without CFS bandwidth support | Remove the cpus: line from the Compose file; mem_limit stays in effect |
| Dashboard login fails despite correct password | Plaintext value is in the _PASSWORD_HASH variable | Rename to HERMES_DASHBOARD_BASIC_AUTH_PASSWORD (or generate a real scrypt hash), then docker compose up -d --force-recreate |
Change to container.env has no effect | docker restart does not reload env_file | docker compose up -d --force-recreate |
| Landing page returns HTTP 500 | Known redirect bug with Basic Auth as the only provider | Call /login directly; beforehand curl /api/status for diagnosis |
| Telegram: “Invalid token format” | Incomplete copy of the token | Copy the token fully from BotFather again; if in doubt regenerate via /revoke |
| Wrong bot replies (or none at all) | Several similarly named bots in the Telegram search | Compare the username exactly, if necessary open directly via t.me/<name> |
hermes doctor reports “4 issues” | Missing .env, missing symlink, npm advisories in the build tooling | Uncritical in this constellation .env is created with the Telegram setup, the rest is cosmetic or affects no runtime |
| Gateway reports “Service install not supported” | Throwaway container without an init system | Expected continuous operation runs via the Compose container with s6 supervision |
| “Container Manager” doesn’t appear in the Package Center | Model not released (32-bit ARM or excluded by Synology) or DSM older than 7.2 | Update DSM; on older devices search for the “Docker” package. On excluded armv8 models only a community workaround remains |
| No “Project” menu in Container Manager | DSM 7.1 or older, “Docker” package without a Compose wizard | Start the Compose file via SSH: cd <projektordner> && sudo docker compose up -d |
| Container keeps getting killed, NAS turns sluggish | Too little memory, DSM swaps to disk | Lower mem_limit (2 GB with 4 GB total RAM) and deselect the browser tools in the wizard they are by far the biggest memory item |
Go-Live Checklist
Before you let the agent loose on real data:
[ ] Bot token revoked and replaced if it was ever visible anywhere
[ ] External backup set up and a restore tested once
[ ] Approval test passed with a harmless throwaway folder
    (both directions: decline and approve)
[ ] Tool scope on the Telegram channel reviewed and deliberately fixed
[ ] TELEGRAM_ALLOWED_USERS set, GATEWAY_ALLOW_ALL_USERS and
    TELEGRAM_ALLOW_ALL_USERS demonstrably not set
[ ] Dashboard not exposed to the open internet; access from outside
    only via VPN or an HTTPS reverse proxy
[ ] Port 8642 not published on the host
[ ] No Docker socket mounted into the container
[ ] data/logs/ in no share, no web root, no tunnel route
[ ] UPnP for the NAS disabled in the router
[ ] Image tag and full digest documented
[ ] hermes doctor with no blocking findingsBernd: “Twelve items. I don’t have time.”
Tanja: “Then you don’t have time for the cleanup afterwards either.”
Status after the first day of operation
The container ran stably in the testing so far. Docker is configured with restart: unless-stopped, gateway and dashboard additionally run under s6 supervision a deliberately induced crash was, however, not tested, so the self-healing is configured and documented, not practically proven. The restart and persistence test was passed. Dashboard and Telegram are reachable, the dashboard only with a password, the bot only for one permitted account. The memory limit is demonstrably enforced, the API port stays closed, no Docker socket is mounted, and both configuration and session history survive a restart.
Before productive use with sensitive data, three release criteria remain different risks, but all of them conditions, not wishes:
- A tested external backup. So far it is planned, not set up; a first successful run is missing.
- A passed runtime test of the approval function. So far only the configuration value
approvals.mode: manualis confirmed, not the behavior on a real tool call triggered via Telegram. - A checked and deliberately defined tool scope for Telegram. There is much to suggest that the bot there inherits the same full set as the command line, including file access and code execution but it is not proven.
The first point protects against data loss, the other two limit the risk of uncontrolled agent actions. That one can even name them this precisely is because every step was logged along the way with timestamp, verification method, and way back. That is the difference between “runs” and “is under control”.
The real effort lies elsewhere
Anyone who has worked through this guide will have noticed one thing: the installation itself is not the hard part. Load the image, start the container, click through the wizard that’s maybe ninety minutes. All the rest, which is the larger part of this text, consists of checking whether what was configured actually arrived.
Ulf: “I thought doing it yourself saves money.”
Tanja: “It shifts costs. The cloud service doesn’t take this work off your hands because it doesn’t arise there but because someone else does it and gets paid for it.”
This is no coincidence and no peculiarity of this software. It is the actual barrier to entry with self-hosted technology. Whoever takes it on gets control. And an operational responsibility that was previously invisible.
After that the harder question begins. An agent that can change files, run commands, and write code is useful precisely for that reason. Every restriction manual approval, a shortened leash, disabled tools makes it a little less useful.
Bernd: “So I’ll just turn all of that back off after two weeks.”
Tanja: “Maybe. But then as a decision, not out of convenience. That’s the difference.”
In the introductory phase the trade-off is easy: you don’t know the system, so you rein things in. But approvals.mode: manual is exactly the kind of precaution that, after three weeks of reliable prompts, starts to become annoying.
The right setting is therefore not an installation value you set once, but an operational decision you have to review regularly. Which leaves the question on which it all hinges: When do you loosen it and by what exactly would you recognize that it was too early?
FOUNDIC.org is ad-free and has no paywall. If this guide helped you:  Treat us to a coffee