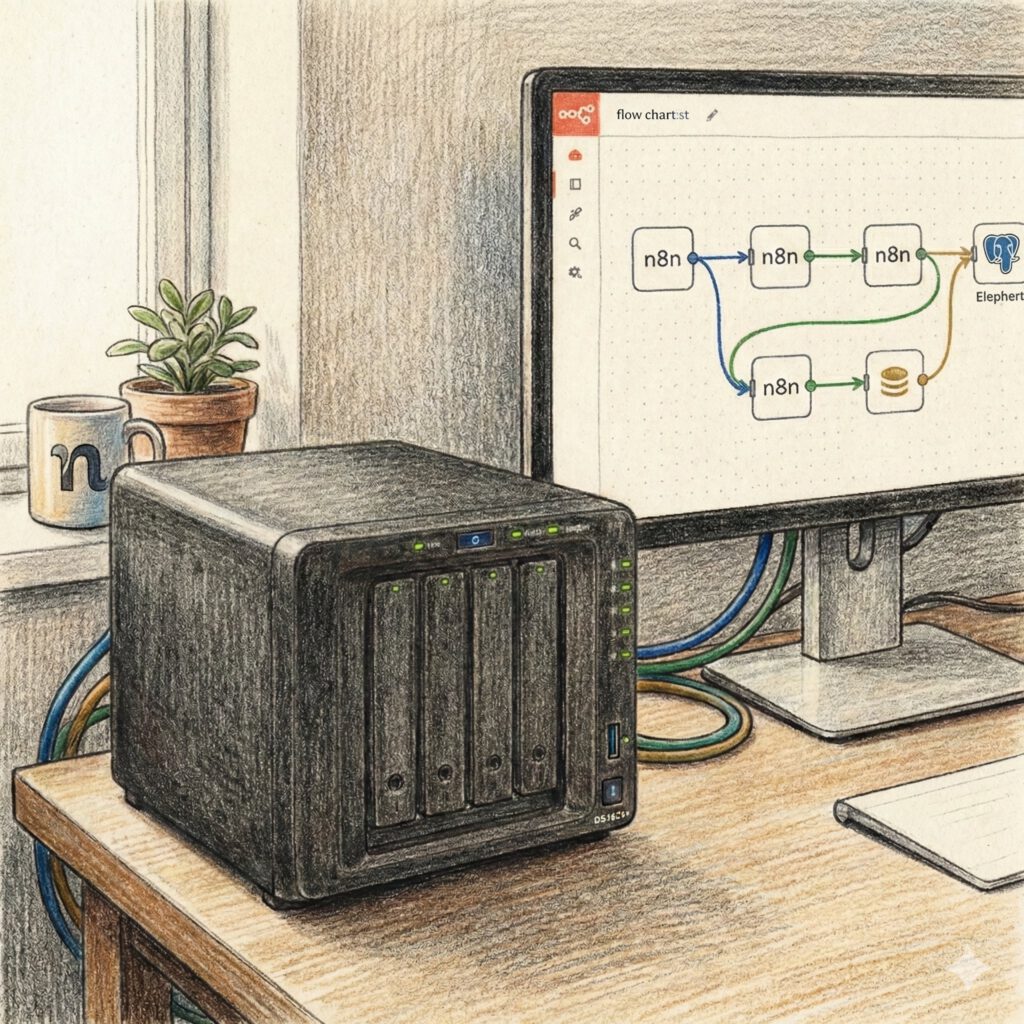
Automation was long considered the domain of large enterprises: expensive, complex, difficult to control. With n8n, that has changed. Suddenly, enterprise-grade automation can run on a device that many people already have sitting in their basement or home office: a Synology DiskStation.
In this guide, I’ll show you step-by-step how to self-host n8n – cleanly containerized, optionally with a stable PostgreSQL database. No prior knowledge required, just curiosity.
To make this guide easier to follow, three characters will guide you through the journey:
The typical office characters: the competent IT colleague, the self-proclaimed expert, and the honest beginner. These three perspectives will help you recognize typical pitfalls and truly understand n8n.
Tanja is the IT expert. She knows how n8n works, explains patiently and systematically – and doesn’t get flustered by bad advice. When you have a question, Tanja has the answer.
Bernd is the self-proclaimed “expert”. He thinks he knows everything better – and is usually wrong. His abbreviations and half-knowledge regularly lead to problems. He represents all the dangerous myths and bad practices you should avoid.
Ulf is the learner. He asks the questions swirling in your head, and sometimes needs an everyday comparison to understand IT. When Ulf doesn’t understand something, that’s perfectly fine – that’s what Tanja is there for.
“And… Action!”
Monday morning, 8:47 AM. Bernd enters the office with two coffees and a self-satisfied grin.
Bernd: “Guys, I figured it out. Automation is the future. Found this tool yesterday – n8n or something. Runs on my laptop. Already built three workflows. One of them sorts my emails. Well, it moved everything to spam, but the principle works.”
Tanja doesn’t even look up from her screen.
Tanja: “Bernd, is that tool still running?”
Bernd: “Uh… I closed my laptop.”
Tanja: “Then it’s not running anymore.”
Bernd: “But… I clicked save!”
Ulf yawns. “Man, can’t we just put that in the cloud? Like Netflix? Always on, always there.”
Tanja turns around. “We can. Then it costs 20 to 50 euros a month, depending on how many workflows you build. Or…” – she points to an inconspicuous box under her desk – “…you use this thing that’s already running at your place and collecting dust.”
“My Synology?” Ulf looks skeptical. “That can only store movies.”
Tanja: “Movies, backups, photos… and now also your automation. Costs you zero extra. Runs 24/7. And your data stays with you, not with some provider looking at it for ads.”
Bernd interrupts: “Sounds complicated.”
“It’s not,” says Tanja. “You click through a few settings, start two containers, done. Takes less than half an hour.”
Bernd: “Containers? Like… shipping containers?”
Ulf laughs. “Bro, she just said ‘half an hour’. Even we can pull that off.”
1 What is n8n?
n8n is an open-source platform for workflow automation. Think of it like building a machine with LEGO blocks – except the blocks aren’t wheels or motors, but apps, services, and data.
You connect, for example:
- Gmail with Google Sheets
- A weather API with Slack
- A webhook with an AI that automatically summarizes emails for you
All of this happens via a visual interface: You drag boxes onto a workspace, connect them with arrows, set conditions. Done is the workflow.
The key difference from other tools:
n8n is low-code, but not no-code. This means: Beginners click their workflows together without writing a line of code. Advanced users can add JavaScript or Python whenever things get complicated.
- You can embed AI models directly
- OpenAI, Anthropic Claude, or even local models via Ollama
Typical use cases:
- Process emails automatically (e.g., filter invoices and put them in a database)
- Connect APIs together (e.g., automatically transfer new Trello cards to Notion)
- Analyze, transform, forward files (e.g., automatically summarize PDFs with AI)
- Orchestrate notifications, reports, webhooks
And the most important thing: n8n is yours. No foreign cloud. No lock-in. Your data, your control.
Ulf: “Okay, but why should I go through the hassle? There must be simpler tools out there.”
Tanja: “There are. Zapier, for example. Does roughly the same. But at some point it costs real money – 20, 50, 100 euros a month, depending on how many workflows you build and how often they run. n8n costs you: nothing. Zero euros. Runs on your own hardware.”
Bernd: “And if I don’t have the hardware?”
Tanja: “Then you rent a server for 5 euros a month. Still cheaper. But most of us already have a Synology lying around. It’s perfect for this.”
Ulf: “What can n8n do that Zapier can’t?”
Tanja: “Customize everything. Write custom nodes. Connect local databases. Run AI models that aren’t in the cloud. And you can export workflows as code and share them – open source, basically.”
1.1 Advanced Features and Integration Options
n8n is not a simple “if-then” tool. It’s a real automation platform with over 400 pre-built integrations:
Apps and services: Google Sheets, Slack, Notion, GitHub, Trello, Airtable, WordPress…
Databases: MySQL, PostgreSQL, MongoDB, Redis
AI services: OpenAI, Anthropic Claude, Hugging Face, Ollama (for local models)
Trigger types:
- Time-based (Cron jobs): “Every Monday at 9 AM”
- Webhooks: “As soon as someone submits a form”
- Manual: “Only when I click ‘Start'”
- External events: “When a new entry appears in the database”
Debugging happens in real-time: You see exactly what data goes into and out of each block. If a workflow doesn’t work, you can trace every single step.
And if an integration is missing? n8n has a huge community with thousands of self-built nodes. And there’s a template database: pre-made workflows that you can simply import via copy & paste. Do you need a PDF summarizer with AI? Already exists. Email router? Also available. CRM synchronization? Works.
You don’t have to build everything yourself. You can build on existing solutions.
Bernd: “Wait. If it’s that easy, why doesn’t everyone do it?”
Tanja: “Because most people think automation is complicated. And because many don’t know their NAS can do more than store movies.”
Ulf: “But what do I actually do with it? Give me an example that doesn’t sound nerdy.”
Tanja: “Okay. You get emails from customers with questions every day. Some are urgent, some aren’t. n8n reads the emails, analyzes them with AI, sorts them by priority, and only sends you the important ones as push notifications to your phone. Everything else automatically lands in Notion with a summary.”
Ulf: “That works?”
Tanja: “It does. And takes about 15 minutes if you use the template from the community.”
1.2 Practical Examples of n8n Workflows
To help you better understand what n8n does in practice, here are some concrete scenarios:
System synchronization: You maintain customer data in a CRM (e.g., HubSpot), but also want it in Google Sheets because your team works better there. n8n automatically syncs both systems: New entries in the CRM land in the spreadsheet, changes in the spreadsheet are written back to the CRM.
Automated notifications: As soon as a certain event occurs – a new lead, a closed deal, an error in a system – n8n sends you a message. Slack, email, Telegram, whatever you use.
AI-powered data processing: You upload a document. n8n sends it to an AI model (e.g., Claude), has it summarized, extracts key facts, and stores the result in a database. All automatically, as soon as the file arrives.
Content management: New blog posts from an RSS feed are automatically saved to Notion, analyzed, and tagged appropriately. At the end of the week, you get a summary of the most interesting articles.
These aren’t science fiction scenarios. These are workflows people are using today. And you can get them ready-made from the community.
2 Why Self-Host n8n?
Self-hosting isn’t an end in itself. It’s a deliberate choice with clear advantages:
Data sovereignty: Your workflows, your access credentials, your logs – everything stays local. No third party can listen in, no cloud company has access. If you process sensitive data (customer data, finances, internal processes), that’s a real advantage.
Cost control: No usage-based pricing. No “You’ve reached your limit, pay more now” popup. You pay once for the hardware (which you already have) and then: nothing more.
Extensibility: You can connect your own databases, run local AI models, write custom scripts. With cloud services, you’re limited to what the provider gives you.
Learning curve: You understand how systems really work. Not just “I click here, magic happens,” but “I understand what a container is, how databases work, how networks communicate.” That’s knowledge that helps you long-term.
And: A Synology NAS is surprisingly well-suited for this. Reliable, power-efficient, always available. It’s probably already running 24/7 at your place for backups and media. Now you just do more with it.
Bernd: “But I don’t feel like messing with servers. I just want it to work.”
Tanja: “Then use the cloud version of n8n. Costs you 20 euros a month, works right away. But: You give up control. And you pay for every execution, every workflow, every integration.”
Ulf: “And if I self-host, I don’t pay anything?”
Tanja: “You pay electricity. Maybe 2 to 3 euros a month if the NAS is running anyway. And a little time one-time for setup. After that: it runs.”
Bernd: “How much time?”
Tanja: “If you’re doing it for the first time? An hour. If you follow this guide? Thirty minutes.”
Ulf: “Okay. And what do I need for that?”
2.1 Self-Hosting vs. Hosted Solution
Let’s compare this quickly so you can make an informed decision:
| Criteria | Self-Hosting (this guide) | n8n Cloud (hosted) |
|---|---|---|
| Cost | ~2–3 € electricity/month (if NAS already running) | From €20/month, increases with usage |
| Data control | 100% with you | Stored with n8n Inc. |
| Maintenance | You take care of it | Handled for you |
| Extensibility | Unlimited (custom nodes, local models) | Limited to cloud features |
| Setup time | 30–60 minutes (one-time) | 5 minutes (sign up) |
| Learning effect | High (you understand how it works) | Low (black box) |
For many, the cloud version is the quickest start. But long-term, especially if you want more control, self-hosting is the better choice.
2.2 Prerequisites
This guide is based on the following equipment:
- Synology DiskStation DS1621+
- CPU architecture: x86_64 (Intel/AMD)
- DSM 7.2 or newer
- At least 2 GB RAM (recommended: 4 GB or more)
The steps also work on other x86 Synology models. If you have an older or ARM-based NAS, some Docker images may not work. Check compatibility beforehand if in doubt.
You don’t need prior knowledge of Linux, databases, or networking. You just need to be willing to click through a few settings and understand what you’re doing.
Ulf: “Wait. What is x86? Is that important?”
Tanja: “That’s the processor architecture. Basically the language your chip understands. Most Synology models with Intel or AMD processors are x86. If you have a very old or cheap NAS, it might use ARM – then some Docker images won’t run.”
Bernd: “How do I know what I have?”
Tanja: “Control Panel → Info Center. It says there. Or just google the model.”
Ulf: “And the 4 GB RAM – is that required?”
Tanja: “No. n8n runs on 2 GB too. But if you want to use PostgreSQL – the better database – you should have 4 GB. Otherwise, space gets tight.”
2.2 Basic Concepts (briefly explained)
Before we start, let’s clarify two terms you’ll keep encountering:
Docker / Container
Think of a container like a toolbox. In the box is everything a program needs: code, libraries, settings. You can open the box, the program runs. You can close it, the program stops. And most importantly: the box is cleanly separated from the rest of your system. If something breaks in the box, the rest stays intact.
Docker is the system that manages these boxes. On Synology, it’s now called Container Manager.
Volume
A volume is a mapped folder. Imagine you work in your office (the container), but all your important documents are in a filing cabinet in the basement (the NAS). The container accesses this folder, reads and writes files – but the files themselves remain outside the container.
Why is this important? Because containers are forgetful. If you delete a container, all data in it is gone. But if the data is in a volume, it remains. You can restart the container, update it, delete it – the data is safe.
Bernd: “So a container is like a virtual machine?”
Tanja: “Similar, but much leaner. A VM simulates a complete computer including the operating system. A container shares the operating system with the host but is still isolated. That’s why a container starts in seconds, a VM takes minutes.”
Ulf: “And if I delete the container, are my workflows gone?”
Tanja: “Only if you don’t use a volume. That’s why we’re mapping a folder on the NAS now. Then your data stays even after a restart or update.”
2.4 SQLite or PostgreSQL? A Conscious Choice
n8n can work with two different databases:
SQLite is an embedded database. It’s automatically installed with n8n, requires no additional configuration. Everything runs in a single file. Simple, uncomplicated, immediately ready to go.
When do you use SQLite?
- If you’re trying n8n for the first time
- If you have one to five simple workflows
- If you don’t feel like additional complexity
- If you only use n8n privately
PostgreSQL is a full-fledged relational database. It runs in its own container, requires its own settings, its own ports. Sounds complicated – but it’s not. And it’s more stable, faster, and better for production use.
When do you use PostgreSQL?
- If you want to use n8n seriously (multiple workflows, scheduled processes)
- If you want to store and analyze data long-term
- If you have at least 4 GB RAM
- If you ever want to scale (more workflows, more data, more complexity)
Rule of thumb: Under 4 GB RAM → SQLite; 4 GB RAM and above → PostgreSQL
This guide shows you both paths. You decide. And you can always switch later (with some effort, but it’s possible).
Ulf: “So if I want to keep it simple, I take SQLite?”
Tanja: “Exactly. Runs immediately, no additional configuration. But if you notice n8n getting slower or you have many workflows, you switch to PostgreSQL.”
Bernd: “I’ll take PostgreSQL, of course. Sounds more professional.”
Tanja: “Bernd, you have 2 GB RAM.”
Bernd: “Ah, that’s enough.”
Tanja: “No. You’ll have problems. Take SQLite. Or upgrade your RAM.”
Ulf: “I have 8 GB. What do I take?”
Tanja: “PostgreSQL. No question.”
3 The Installation Steps for n8n
Now it gets practical. We’ll go step-by-step through the installation. You don’t need to skip anything, guess anything, or make assumptions. Just follow along.
The overview:
- Preparing the DiskStation
- Downloading the PostgreSQL image (optional, only if you use PostgreSQL)
- Setting up the PostgreSQL database (optional)
- Project variant with Docker Compose (alternative for advanced users)
- Downloading the n8n image
- Configuring the n8n container
- First login to n8n
If you’re using SQLite, skip steps 2 and 3. If you’re using Docker Compose, skip 2, 3, 5, and 6 and jump straight to step 4.
Sounds complicated? It’s not. Let’s go.
3.1 Preparing the DiskStation
Before we can start n8n, the NAS needs to be prepared. Three things are important: install Container Manager, create folders for data, set permissions.
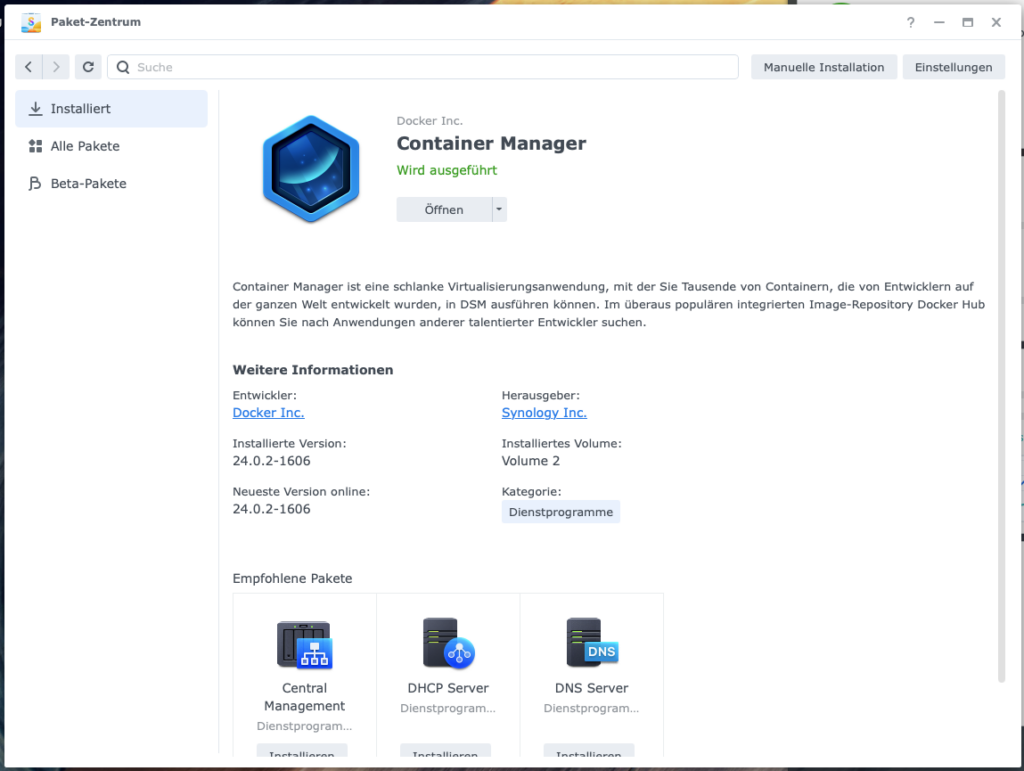
Installing Container Manager
Open the Package Center on your DiskStation. Search for Container Manager and click Install. Container Manager is what used to be called “Docker.” A tool for running software in isolated environments – called containers.
Why containers? Because they’re cleanly separated from the rest of the system. If a container crashes, the whole NAS doesn’t crash. If you do an update, it only affects the container. If you uninstall n8n, no file remnants are left behind. Containers are like mini-computers inside your computer: own file system, own network, own processes. But they share hardware with the host. That makes them lean and fast.
Ulf: “So that’s like a virtual machine?”
Tanja: “Similar, but much more efficient. A VM needs a complete operating system. A container uses the NAS operating system. That’s why a container starts in seconds.”
Bernd: “And if I delete the container, everything is gone?”
Tanja: “The container, yes. But not the data – if you use a volume. That’s why we’re creating folders now.”
Creating folder structure in File Station
Open File Station on your DiskStation. Navigate to the docker folder (was automatically created when you installed Container Manager). Create a new subfolder called n8n.
Your path should now look like: /volume1/docker/n8n
Why do we need this? n8n needs to store data: workflows, settings, logs, uploaded files. Without a fixed storage location, this data is lost every time you restart. The /docker/n8n folder is this storage location – a volume that’s mapped between the NAS and the container.
If you want to use PostgreSQL, create two additional subfolders now:
- /docker/n8n/app_data – for n8n configuration and uploaded files
- /docker/n8n/postgres_data – for the database itself
Your structure then looks like:
/docker
└── n8n
    ├── app_data
    └── postgres_data
If you’re using SQLite, the main /docker/n8n folder is enough. n8n needs a place to store data – workflows, settings, logs. This happens via volumes, i.e., mapped folders between the DiskStation and the container. Without these folders, all data is lost on restart.
In the shared docker folder (which was automatically created when you installed Container Manager), you create a subfolder n8n. If you’ve decided on PostgreSQL, create two additional subfolders:
- /docker/n8n/app_data – for n8n configuration and processed files
- /docker/n8n/postgres_data – for the database itself
Ulf: “Why is the folder called docker? I thought it’s called Container Manager now?”
Tanja: “Synology renamed it, but internally the folder is still called docker. It’s just a name. Important thing is that you put your data there.”
Bernd: “Can I put the folder somewhere else?”
Tanja: “You can. But then you have to adjust the paths later. Stick with the standard, it’s easier.”
Tip: Disable file compression
If you’ve enabled file compression on your volume (a Synology feature to save space), you should disable it for the postgres_data folder.
Why? Because databases constantly access their files – reading, writing, changing. Compression massively slows this process down. PostgreSQL becomes sluggish, workflows run slower, sometimes there are even timeouts.
To disable compression:
- Right-click on postgres_data folder → Properties
- Tab General → Uncheck “Enable compression”
- Save
For app_data and n8n, compression is not critical. But for databases: never.
Checking permissions
Right-click on the /docker/n8n folder → Properties → Tab Permissions
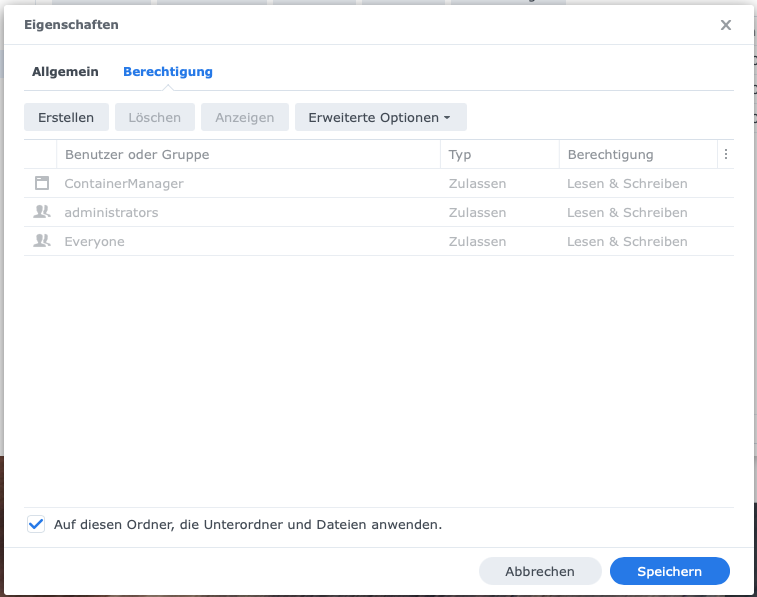
Important: The group “Everyone” needs read and write permissions.
Why? Because the container runs as a different user than you do. If permissions aren’t right, n8n can’t access the folder and either won’t start or throws cryptic error messages.
If the permission isn’t set yet:
- Click Edit
- Select the group “Everyone”
- Set checkmarks for Read and Write
- Enable “Apply to subfolders”
- Save
Bernd: “Everyone? That sounds insecure. Can’t everyone access my data?”
Tanja: “Everyone here means: all users on this NAS. Not everyone on the internet. As long as your NAS isn’t publicly accessible, there’s no problem.”
Ulf: “And if I want it more secure?”
Tanja: “Then you create a special user for Docker, give only that user rights, and adjust the container config. But that’s overkill for the beginning.”
Frequent Errors & Solutions When Starting Containers
One of the most common errors when starting n8n is this message:
Error: permission denied open '/home/node/.n8n/configThis means: The container doesn’t have write permissions on the folder.
Solution 1 (via UI): Go back to Properties → Permissions and check if “Everyone” really has read and write permissions. If not: set them, save, restart the container.
Solution 2 (via SSH, the “crowbar”): If the UI doesn’t help, open an SSH connection to the NAS and enter:
sudo chmod -R 777 /volume1/docker/n8nThis gives all users full permissions on the folder. It’s not particularly elegant, but it works. In production use, you should later restrict permissions to the specific Docker user – but for the beginning, this is okay.
Bernd: “Why do I need SSH? Can’t I do this in the interface?”
Tanja: “In most cases, yes. But sometimes permissions are so messed up that you have to access them via terminal. That’s the safe way.”
Ulf: “Okay, folders are there, permissions are set. What now?”
Tanja: “Now we get the software. Either PostgreSQL – or straight to n8n if you’re taking SQLite.”
3.2 Downloading the PostgreSQL Image (optional, only if you use PostgreSQL)
If you’re using SQLite, skip this step and go directly to step 3.5. If you prefer to use Docker Compose, jump directly to step 3.4.
For PostgreSQL, we first need the image – a kind of template for the container. Synology downloads these images from a public registry (the “Docker Hub”).
Open Container Manager → Tab Registration. In the search bar: Type postgres.
Multiple results appear. You want the official image, recognizable by the green “Docker Official Image” badge.
Click it → Download. Now you need to select a tag. A tag is a version number. Choose 16. That’s the current stable version (as of January 2025) and will be supported long-term.
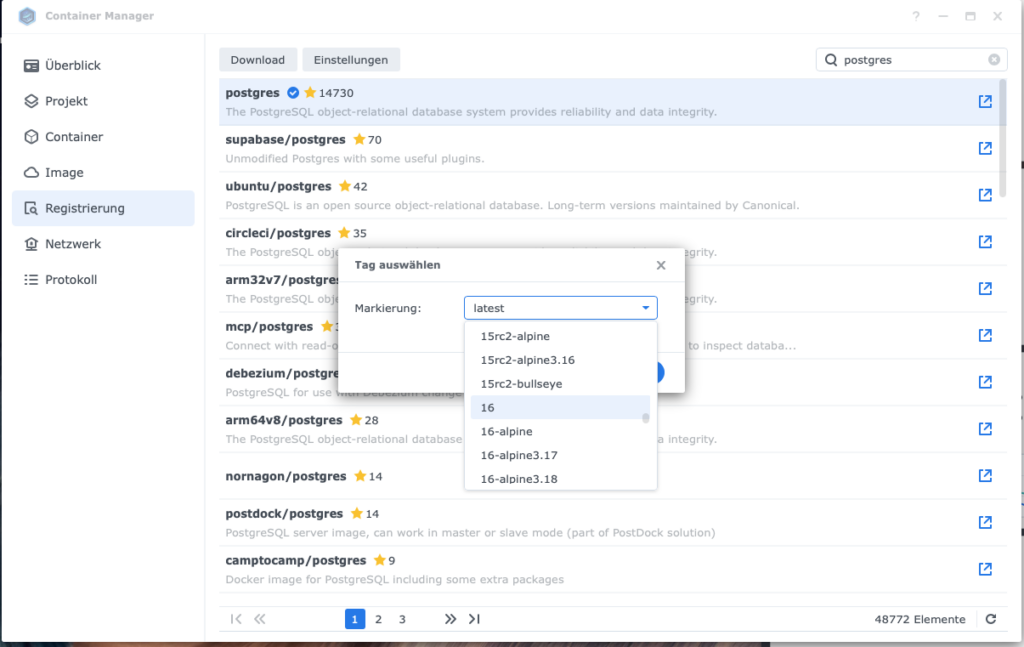
The download runs for a few minutes. You see the progress in the Image tab. Once the download is done, you can continue.
Ulf: “Why not just take latest? Then I always have the newest version.”
Tanja: “Because latest is risky. If PostgreSQL does a big update – say, from version 16 to 17 – your database might not be compatible anymore. Suddenly nothing works, and you don’t know why. With a fixed version, you’re safe.”
Bernd: “But then I have to manually update later, right?”
Tanja: “Yes. But better to update in a controlled way than to accidentally break it.”
3.3 Setting Up the PostgreSQL Database (optional)
Now we configure the PostgreSQL container. This is the part many find complicated – but once you know what each setting means, it’s easy.
| Setting | Value / Recommendation |
|---|---|
| Container name | n8n-postgres |
| Resource limitation | Not enabled |
| Auto-restart | Enabled |
| Web portal via Web Station | Not enabled |
| Port settings | Local port: 5433, Container port: 5432, Type: TCP |
| Volume settings | Folder: /docker/n8n/postgres_data; Mount path: /var/lib/postgresql/data |
| Environment variables | POSTGRES_USER: n8n_admin; POSTGRES_PASSWORD: random password; POSTGRES_DB: n8n_db |
| Network | bridge (standard) |
Go to Container Manager → Tab Image. Search for postgres:16 → Click → Run.
A wizard opens. We go through it step-by-step.
Step 1: General Settings
Container name: n8n-postgres
This is simply the name the container runs under. You can choose freely, but pick something meaningful. If you ever have multiple databases, you don’t want to guess which one belongs to n8n.
Resource limitation: Not enabled (for now)
You can limit containers to a certain amount of RAM or CPU. That makes sense if you’re running many containers and don’t want to overload the NAS. But for the beginning: leave it off. If PostgreSQL later eats too much, you set it to Medium and limit RAM to 2048 MB or 4096 MB.
Auto-restart: Enabled
This is important. If the NAS restarts – due to an update, power outage, whatever – PostgreSQL should come back up automatically. Otherwise, n8n suddenly doesn’t have a database and you’ll wonder why nothing works.
Set up web portal via Web Station: Not enabled
This is a Synology comfort function to make containers accessible via a nice web interface. We don’t need it here. PostgreSQL doesn’t have a web UI anyway.
Click Next.
Step 2: Port Settings
PostgreSQL runs on port 5432 by default. But: if you have multiple databases on the NAS, that port might already be taken.
That’s why we map:
- Local port: 5433
- Container port: 5432
- Type: TCP
This means: Internally, in the container, PostgreSQL runs on 5432 (as usual). But from outside – from the NAS or from n8n – you access it via 5433.
Important: Check if the port is released in the firewall. Go to Control Panel → Security → Firewall → Edit Rules. If a firewall is active, add a rule that allows port 5433 for local connections.
Click Next.
Ulf: “Why is the port even important? Can’t I just enter anything?”
Tanja: “A port is like a door in a building. Every application needs its own door, so the data knows where to go. If two applications want to use the same door, there’s trouble.”
Bernd: “And if I don’t know if a port is free?”
Tanja: “Just try it. If the container doesn’t start and you get an error message like ‘Port already in use’, pick a different one.”
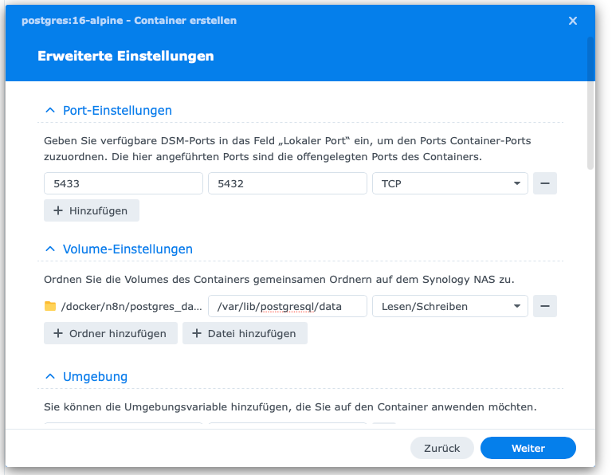
Step 3: Volume Settings
Here’s where the magic happens: You connect the container with a folder on the NAS.
Click “Add folder” → Select /docker/n8n/postgres_data. In the “Mount path” field, enter: /var/lib/postgresql/data
This means: Everything PostgreSQL stores in the container under /var/lib/postgresql/data (i.e., the entire database) actually lands on the NAS under /docker/n8n/postgres_data.
Why is this important? Because containers are ephemeral. If you delete the container, all data in it is gone. But if the data is on the NAS, it stays. You can update the container, restart it, delete it – the database remains.
Click Next.
Bernd: “Can I have multiple volumes?”
Tanja: “Sure. But PostgreSQL only needs one. For n8n, we need a second one later.”
Step 4: Environment Variables
Environment variables are configuration settings that tell the container how to behave. For PostgreSQL, three are important:
Click “+ Add” and enter the following:
| Variable | Value | Explanation |
|---|---|---|
| POSTGRES_USER | n8n_admin | This is the username for the database. You’ll need it later to connect n8n to PostgreSQL. |
| POSTGRES_PASSWORD | secure password | The password for the user. Pick a random password, at least 20 characters, letters, numbers, special characters. Save it in a password manager. |
| POSTGRES_DB | n8n_db | This is the name of the database itself. PostgreSQL creates it automatically on startup. |
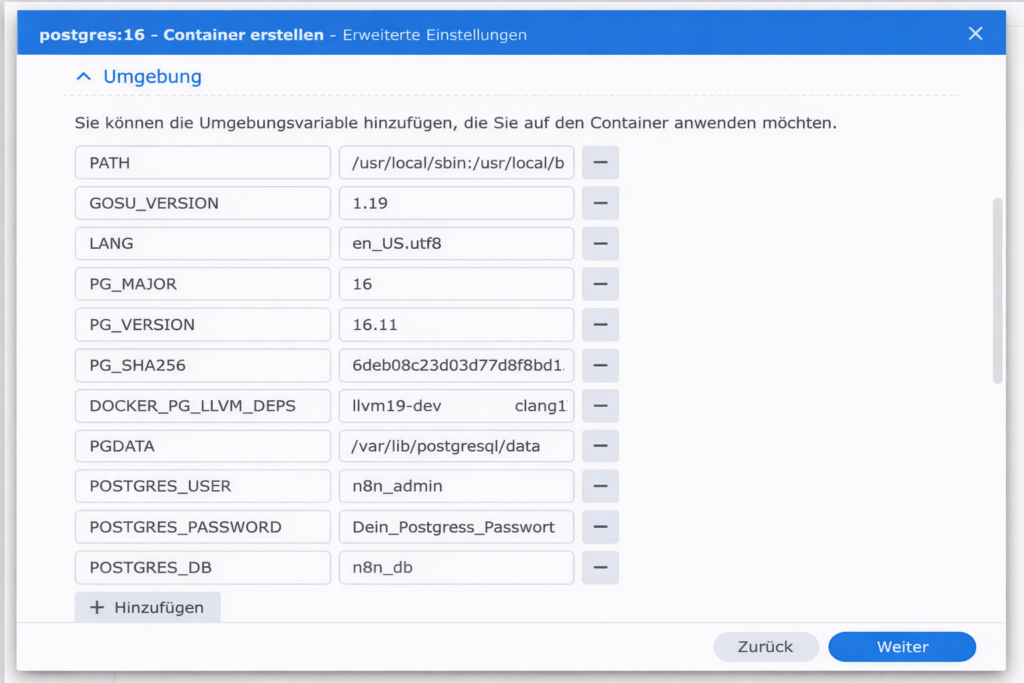
Important: Write down the password somewhere. You’ll need it soon when we configure n8n.
Click Next.
Ulf: “Can I leave the password empty? Just skip it?”
Tanja: “No. PostgreSQL won’t even start without a password. And even if it did – that would be a huge security risk.”
Bernd: “And if I forget the password?”
Tanja: “Then you can’t log into the database anymore. You’d have to set everything up again. So: password manager.”
Step 5: Network
Everything stays on default here. The network is called bridge – that’s the standard network where all containers can talk to each other.
Click Next.
Step 6: Summary
Synology shows you an overview of all settings now. Check once more:
- Container name: n8n-postgres
- Auto-restart: enabled
- Port: 5433 → 5432
- Volume: /docker/n8n/postgres_data → /var/lib/postgresql/data
- Environment variables: user, password, DB name set
Everything correct? Click Done. The container starts. After a few seconds, it should show up in the Container tab as “running.”
Ulf: “How do I know if PostgreSQL really works?”
Tanja: “Check the logs. Go to Container Manager, click on the n8n-postgres container, then Details → Log. You should see a line like: database system is ready to accept connections. Then it’s working.”
Bernd: “And if there’s an error?”
Tanja: “Read the error message. Usually it’s a permissions issue or wrong environment variables. Go through the steps again.”
3.4 Project Variant with Docker Compose (Alternative)
Docker Compose is a method to start multiple containers with a single configuration file. Instead of configuring each container individually, you write everything in a file and you’re done.
Why should you use Docker Compose?
- Repeatable: You can save the configuration, back it up, transfer it to other systems.
- Easy maintenance: All services (n8n, PostgreSQL) are started and stopped together.
- Scalable: If you later want to add Redis, a reverse proxy, or other services, you just extend the file.
Docker Compose is for:
Anyone who prefers writing code over clicking through UIs. If you’d rather maintain settings in a text file than click through menus, this is your way.
Step 1: Create Project
Open Container Manager → Tab Project → Create. Project name: n8n-stack (or whatever you want to call it). Path: /volume1/docker/n8n. Source: “create docker-compose.yml”
A text editor now opens. Delete everything that’s there and paste the following code:
version: '3.8'

services:
  db:
    image: postgres:16
    container_name: n8n-postgres
    restart: unless-stopped
    environment:
      - POSTGRES_USER=n8n_admin
      - POSTGRES_PASSWORD=Your_Postgres_Password
      - POSTGRES_DB=n8n_db
    volumes:
      - /volume1/docker/n8n/postgres_data:/var/lib/postgresql/data
    healthcheck:
      test: ["CMD-SHELL", "pg_isready -U n8n_admin -d n8n_db"]
      interval: 5s
      timeout: 5s
      retries: 5
    networks:
      - n8n-network

  n8n:
    image: n8nio/n8n:latest
    container_name: n8n-app
    restart: unless-stopped
    ports:
      - "5678:5678"
    environment:
      - DB_TYPE=postgresdb
      - DB_POSTGRESDB_HOST=db
      - DB_POSTGRESDB_PORT=5432
      - DB_POSTGRESDB_DATABASE=n8n_db
      - DB_POSTGRESDB_USER=n8n_admin
      - DB_POSTGRESDB_PASSWORD=Your_Postgres_Password
      - N8N_ENCRYPTION_KEY=Your_Encryption_Key
      - N8N_SECURE_COOKIE=false
      - WEBHOOK_URL=https://n8n.your-domain.xyz/
    volumes:
      - /volume1/docker/n8n/app_data:/home/node/.n8n
    depends_on:
      db:
        condition: service_healthy
    networks:
      - n8n-network

networks:
  n8n-network:
    driver: bridge
What’s happening here? We’re defining two services: db (PostgreSQL) and n8n (n8n itself). Both run in the same network (n8n-network), so they can talk to each other. n8n waits until PostgreSQL is ready (depends_on with service_healthy). All the settings we clicked before are now in this file.
What do you need to adjust?
- Password: Replace Your_Postgres_Password with your own secure password (at least 20 characters, randomly generated).
- Encryption key: Replace Your_Encryption_Key with a random password of your choice. Without N8N_ENCRYPTION_KEY, you risk unreadable secrets on reinstall or migration.
- Webhook URL: If you later use Cloudflare or your own domain, enter it here. For now, you can omit it or set it to http://YOUR-NAS-IP:5678/
Click Next, then Done. The system downloads both images (if not already there) and starts the containers. This can take a few minutes.
Ulf: “Okay, that looks complicated. Do I have to understand all of it?”
Tanja: “Not every detail. But you should know roughly what’s happening: Two containers are started, both get their settings, both can talk to each other. Done.”
Bernd: “And if I want to change something?”
Tanja: “Then go back to the project, click Edit, change the file, and restart. All centralized.”
Step 2: Check if Everything is Running
Go to Container Manager → Tab Container. You should now see two containers:
- n8n-postgres – Status: running
- n8n-app – Status: running
Additionally, after a few seconds, Cloudflare tunnel should show as “Healthy” on the Tunnel tab. Now n8n is accessible via the domain: https://n8n.your-domain.xyz
If one isn’t running, click on it and check the log. Usually it’s a typo in the YAML file or a permissions issue.
If both are running, you can jump directly to Step 3.7.
Tanja: “Docker Compose is my preferred way. Once set up correctly, it just works. And if I want to transfer the setup to another NAS, I just copy the file.”
Ulf: “But don’t I also need to copy the folders?”
Tanja: “Of course. Copy folders, adjust docker-compose.yml, start. But that’s still faster than clicking everything again.”
3.5 Downloading the n8n Image
If you used Docker Compose, skip this step.
Now we get n8n itself. We also need the image first.
Open Container Manager → Tab Registration. In the search bar: Type n8nio/n8n.
The official n8n image appears. Click it → Download. Select the tag “latest”.
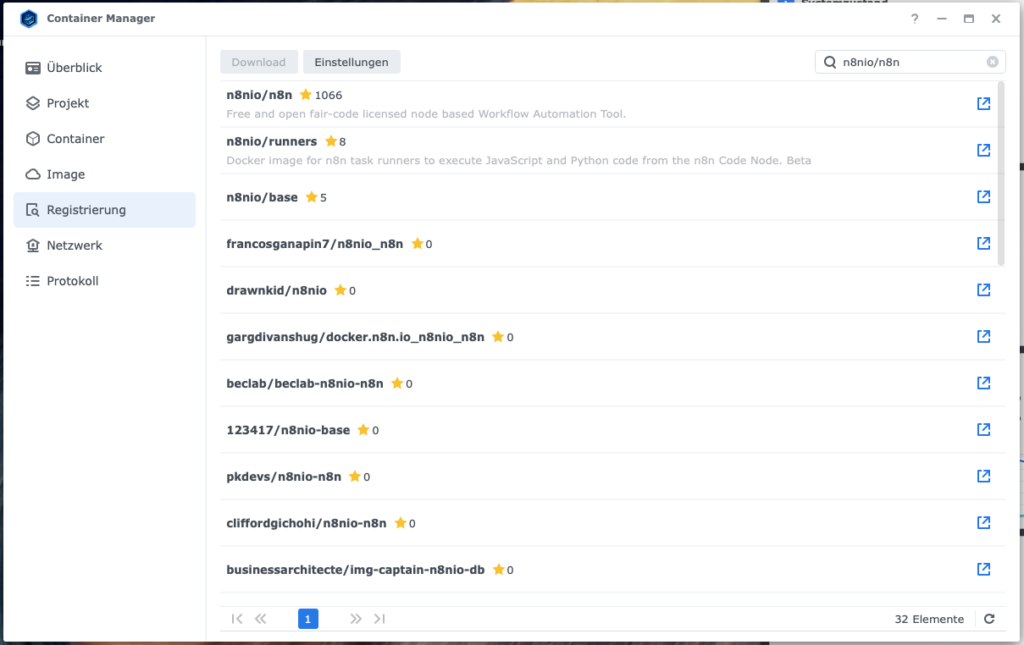
With n8n, latest is okay because the developers version cleanly and updates usually go smoothly. If you want to be safer, pick a fixed version (e.g., 1.70.0 or whatever is current).
The download runs for a few minutes. Once it’s done, we continue.
Bernd: “Why is the image called n8nio/n8n? That sounds weird.”
Tanja: “That’s the naming convention on Docker Hub. n8nio is the publisher, n8n is the product. Like postgres for PostgreSQL.”
3.6 Configuring the n8n Container
Now comes the longest step – but also the most important. This is where you set how n8n runs.
The most important settings:
| Setting | Value / Recommendation |
|---|---|
| Container name | n8n-app |
| Resource limitation | Not enabled |
| Auto-restart | Enabled |
| Web portal via Web Station | Not enabled |
| Port settings | Local port: 5678, Container port: 5678, Type: TCP |
| Volume settings (SQLite) | Folder: /docker/n8n; Mount path: /home/node/.n8n |
| Volume settings (PostgreSQL) | Folder: /docker/n8n/app_data; Mount path: /home/node/.n8n |
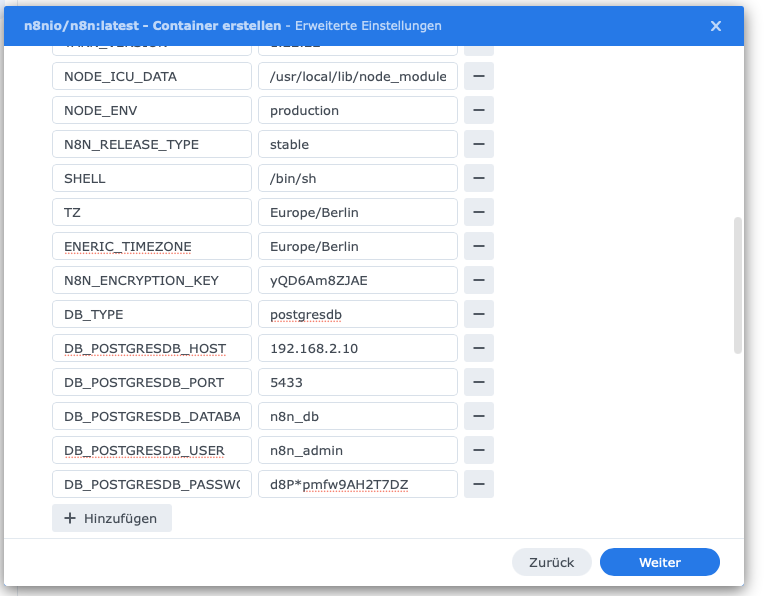
| Environment variables (both) | TZ: Europe/Berlin; GENERIC_TIMEZONE: Europe/Berlin; N8N_ENCRYPTION_KEY: random password; WEBHOOK_URL: https://n8n.your-domain.de/; N8N_SECURE_COOKIE: false |
| Environment variables (PostgreSQL only) | DB_TYPE: postgresdb; DB_POSTGRESDB_HOST: NAS IP; DB_POSTGRESDB_PORT: 5433; DB_POSTGRESDB_DATABASE: n8n_db; DB_POSTGRESDB_USER: n8n_admin; DB_POSTGRESDB_PASSWORD: password |
| Network | bridge (standard) |
Go to Container Manager → Tab Image. Search for n8nio/n8n:latest → Click → Run. The wizard opens again. Let’s go through it step-by-step.
Step 1: General Settings
Container name: n8n-app
Resource limitation: Not enabled (for now)
n8n is normally sparing. But if you run many workflows in parallel or process large files, it can use RAM. If needed, set to Medium later and limit to 2–4 GB.
Auto-restart: Enabled
Like with PostgreSQL: if the NAS restarts, n8n should come back up automatically.
Set up web portal via Web Station: Not enabled
We don’t need it. n8n has its own web UI.
Click Next.
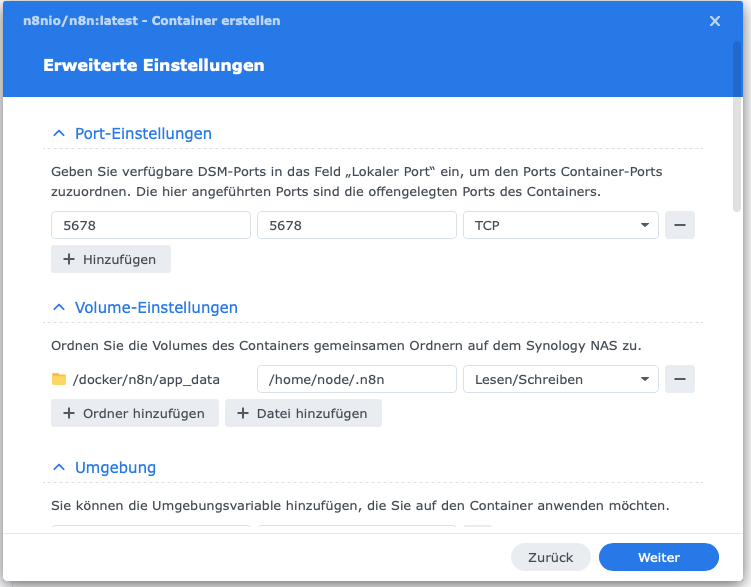
Step 2: Port Settings
n8n runs on port 5678 by default. That’s also the port you’ll use later in the browser.
Enter:
- Local port: 5678
- Container port: 5678
- Type: TCP
Important: Check the firewall. Go to Control Panel → Security → Firewall → Edit Rules and make sure port 5678 is released for local connections.
Click Next.
Step 3: Volume Settings
Here we differ depending on whether you’re using SQLite or PostgreSQL.
For SQLite: Click “Add folder” → Select /docker/n8n. In “Mount path” field: /home/node/.n8n
For PostgreSQL: Click “Add folder” → Select /docker/n8n/app_data. In “Mount path” field: /home/node/.n8n
This means: All data n8n stores in the container under /home/node/.n8n (workflows, settings, logs) actually lands on the NAS under /docker/n8n or /docker/n8n/app_data.
Click Next.
Step 4: Environment Variables
| Variable | Value | Explanation |
|---|---|---|
| TZ | Europe/Berlin | The timezone. Important for time-scheduled workflows. Without it, everything runs in UTC. |
| GENERIC_TIMEZONE | Europe/Berlin | Same timezone, once more for n8n internal processes. |
| N8N_ENCRYPTION_KEY | random password | A key with which n8n encrypts sensitive data (e.g., API keys). Without this key, you risk unreadable credentials on reinstall. At least 20 characters, letters and numbers. |
| WEBHOOK_URL | https://n8n.your-domain.de/ | The URL under which n8n is reachable from outside. Important: The trailing slash is mandatory, otherwise webhooks won’t work. If you don’t have a domain yet, enter http://YOUR-NAS-IP:5678/ for now. |
| N8N_SECURE_COOKIE | false | Temporary solution. Normally this should be true (for HTTPS), but as long as you don’t have an SSL certificate, it needs to be false. Otherwise you can’t log in. Once you’ve set up Cloudflare in Step 8, change it to true. |
Additionally for PostgreSQL:
If you’re using PostgreSQL, a few more variables come now:
| Variable | Value | Explanation |
|---|---|---|
| DB_TYPE | postgresdb | Tells n8n to use PostgreSQL (instead of SQLite). |
| DB_POSTGRESDB_HOST | Your NAS IP | The address under which PostgreSQL runs. For example, 192.168.178.50. Not localhost – that doesn’t work in containers. |
| DB_POSTGRESDB_PORT | 5433 | The port we set for PostgreSQL earlier. |
| DB_POSTGRESDB_DATABASE | n8n_db | The database name. |
| DB_POSTGRESDB_USER | n8n_admin | The username. |
| DB_POSTGRESDB_PASSWORD | The password from Step 3 | The password you set for PostgreSQL. |
Click Next.
Ulf: “Why do I need to enter the NAS IP? I thought the containers run on the same machine?”
Tanja: “They do. But each container has its own network. When n8n calls localhost, it means its own container – not the NAS. That’s why you need the NAS IP.”
Bernd: “And if I don’t know the IP?”
Tanja: “Look in Control Panel → Network → Network Interface. It says there.”
Step 5: Network
Also stays on default here: bridge.
Click Next.
Step 6: Summary
Synology shows all settings again. Check:
- Container name: n8n-app
- Auto-restart: enabled
- Port: 5678 → 5678
- Volume: correctly mapped
- Environment variables: all set
Everything correct? Click Done. The container starts.
Tanja: “And now the exciting question: Does it work?”
Ulf: “How do I know?”
Tanja: “Open your browser and type: http://YOUR-NAS-IP:5678”
3.7 First Login to n8n
Open your browser. Type: http://YOUR-NAS-IP:5678 (replace YOUR-NAS-IP with the actual IP, e.g., http://192.168.178.50:5678)
After a few seconds, the n8n interface should open.
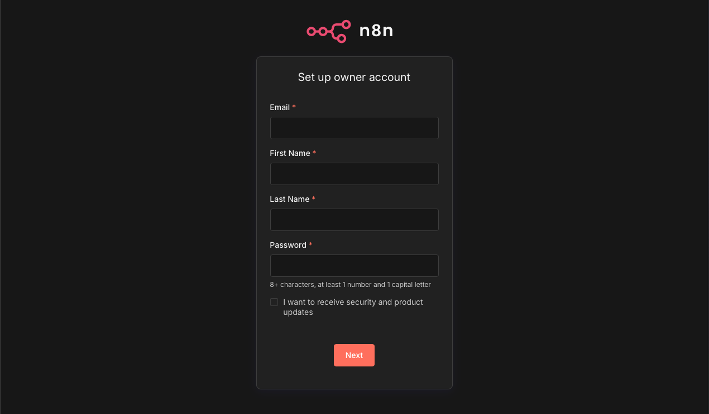
You now see a form: “Set up owner account”
You create your admin account here:
- Email: Your real email address (important for the license key)
- First name / Last name: Can also be a pseudonym
- Password: Again: at least 20 characters, random, secure
Click “Sign up.” n8n sends you an email with a free license key. It unlocks a few extra features (community support, templates, etc.). You don’t strictly need it, but it’s worth it.
Once the email arrives: Go to n8n → Settings → Usage & Plan. Enter the license key. Save.
Done. n8n is operational.
Ulf: “And now? What do I do first?”
Tanja: “Look around. Click Workflows → New Workflow. Drag a few nodes onto the workspace. Experiment. That’s the best way to learn.”
Bernd: “I got an error message here: ‘Your n8n server is configured to use a secure cookie…’ What’s that about?”
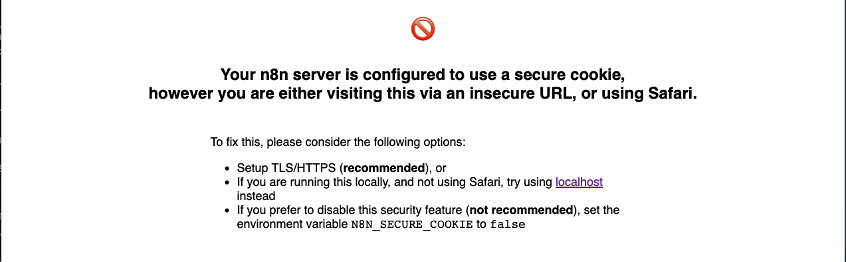
Tanja: “It means N8N_SECURE_COOKIE is set to true, but you’re not using HTTPS. Go back to the container, set the variable to false, restart the container. Then it’ll work.”
Bernd: “And later back to true?”
Tanja: “Exactly. Once you have Cloudflare or an SSL certificate.”
4 Conclusion
Tanja leans back.
“Done. Your n8n is now running on your Synology NAS. You have full control, you don’t pay anything extra, and you can get started.”
Ulf: “And now I build workflows?”
Tanja: “Exactly. Start small. Connect two apps. Send yourself a notification when something happens. Try the AI integration. And if you get stuck, check the template database. There’s usually something already there for almost everything.”
Bernd: “I already have an idea. I want n8n to automatically…”
Tanja: “Bernd. Please. Start with something simple. Otherwise you’ll be sitting here again tomorrow wondering why everything’s on fire.”
Ulf: “And if I have questions?”
Tanja: “Write them in the comments below this article. Or check the n8n community. Or just try. The nice thing about containers: you can’t break anything. Worst case, you restart.”
You made it. n8n is installed. PostgreSQL is running (if you decided to use it). You have an admin account and can get started.
The next step: Build workflows. Automate something that bothers you.
And if you have improvement suggestions for this guide – or ideas for workflows you’d like me to test – write it in the comments.
Good luck. And: Have fun. Automation isn’t rocket science. It’s LEGO for adults.