There is a moment many know: n8n is running cleanly in your own network (an exact step-by-step guide for setting up n8n via Docker can be found here). You’re clicking your first workflows, webhooks are working locally – and then comes the desire to go public. Access from anywhere. Reliable URLs for Stripe, GitHub, or Telegram. But please without port forwarding, without makeshift solutions, and without that uneasy feeling of putting your NAS naked on the internet.
This is exactly where Cloudflare Tunnel comes into play. No magic, no marketing promise – but a sober, remarkably elegant solution. To make this guide easier to understand, three people will guide you through it:
The competent IT colleague, the self-proclaimed expert, and the honest beginner. These three perspectives will help you recognize typical pitfalls and really understand n8n.
Tanja is the IT expert. She knows how n8n works, explains patiently and in a structured way – and doesn’t let bad advice rattle her. If you have a question, Tanja has the answer.
Bernd is the self-proclaimed “expert” who knows everything better and usually gets it wrong. His abbreviations and his half-knowledge regularly lead to problems. He represents all the dangerous myths and bad practices you should avoid.
Ulf is the learner, just like you. He asks the questions that are swirling in your head, and sometimes needs an everyday comparison to understand IT. When Ulf doesn’t understand something, that’s completely okay – that’s what Tanja is there for.
And… Action!
Ulf leans back and crosses his arms: “Wait a minute. I’ve got n8n running on my NAS now, the thing is doing its workflows – why should I stress myself out with some tunnels? Can’t I just open a port and call it a day?”
Bernd nods smugly: “Exactly! Open port 5678 to the outside, done. I did that with my old web server back in the day. It… well, usually worked.”
Tanja looks skeptical. “Until your IP address landed on a bot list and you had login attempts from Kazakhstan every minute, right?”
Bernd shrugs: “It was just busy.”
Tanja sighs: “A port forwarding is like an open door in your house with a sign saying: ‘Please knock before you break in.’ Cloudflare Tunnel does something more elegant: The tunnel opens a connection from the inside to the outside. Nobody can knock on your door because the door doesn’t even exist from the outside.”
Ulf furrows his brow: “That sounds like football tactics. We’re not defending, we just don’t have a penalty box?”
Tanja: “Pretty much exactly. And Cloudflare stands as the goalkeeper in front of the tunnel – and only lets through what should get through.”
1. Why Cloudflare?
Cloudflare is actually known for sitting in front of websites and intercepting malicious traffic before it even arrives. A reverse proxy, so to speak – a kind of bouncer who decides who gets in and who stays out.
Cloudflare Tunnel does something similar, just in reverse: Instead of your server waiting for incoming connections (and having to open a port), the tunnel opens an encrypted connection from the inside to the outside. Cloudflare then sits in front of this connection and only lets through what should get through.
This has four crucial advantages:
- No open ports: Your firewall stays closed. Nobody can scan or attack your NAS directly.
- Automatic HTTPS: Cloudflare takes care of SSL certificates. You don’t have to renew anything, don’t have to configure anything.
- Protection against bots & DDoS: Cloudflare filters millions of requests per second. Your NAS only sees legitimate traffic.
- Login protection via email / MFA: You can set up an additional authentication layer in front of n8n – without n8n even knowing about it.
- Stable webhook URLs: External services like Stripe or Telegram need URLs that don’t change and are always reachable. Cloudflare delivers that.
Ulf: “Sounds too good to be true. What’s the catch?”
Tanja: “The catch is that you need your own domain. It doesn’t have to be expensive – often 10 euros a year is enough – but without a domain it won’t work. Cloudflare needs to know which address to manage for you.”
Bernd grins: “I once bought a domain. bernd-is-the-best.de. Unfortunately, nobody visited it.”
Tanja mutters: “Surprise.”
2. Overview: Setup in Four Steps
- Set up Cloudflare account & domain
- Set up Cloudflare Tunnel as Docker container on Diskstation
- Prepare n8n container for the new URL
- Secure access via Cloudflare Zero Trust
We intentionally go step by step – clickable, understandable, without assuming prior knowledge.
2.1 Step: Set up Cloudflare Account & Domain
Registration & Adding Domain
Go to Cloudflare.com and create an account if you don’t have one yet. After logging in or registering, you click on Domains -> Onboard a domain -> Enter an existing domain and enter your domain – for example your-domain.de.
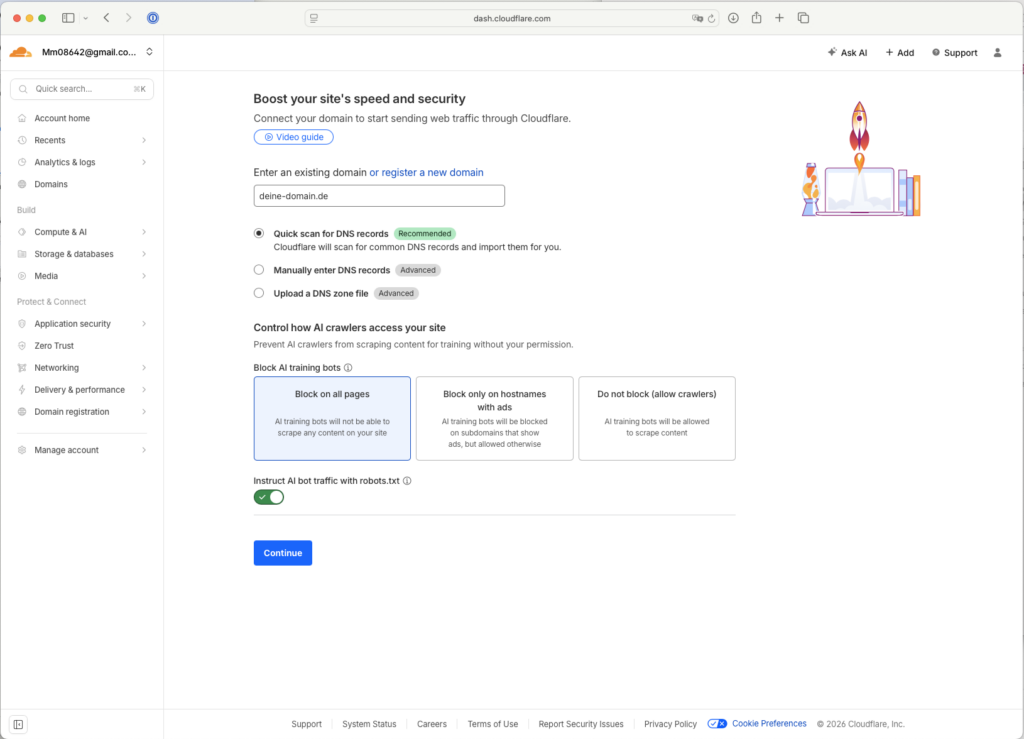
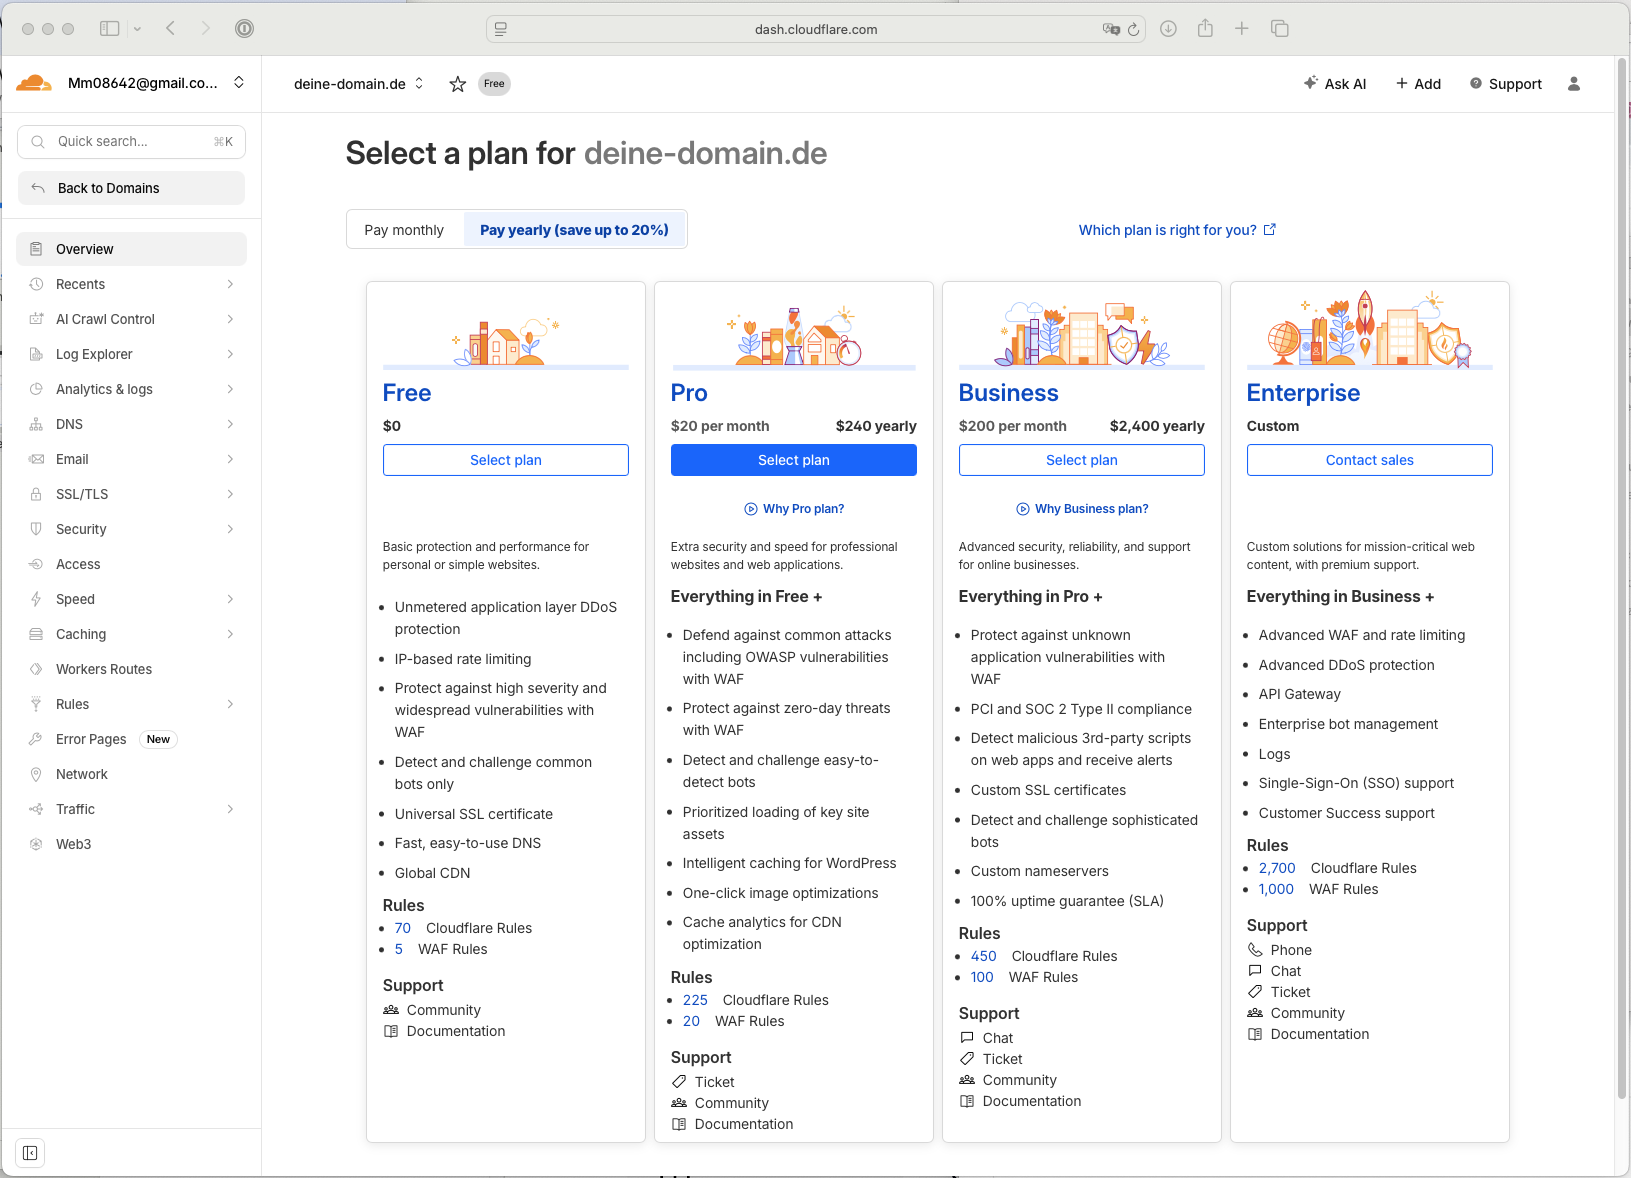
Cloudflare then offers you various plans. Select the Free Plan – that’s completely sufficient.
Tanja nods. “Good question. Right now, nothing. You’re just telling Cloudflare: ‘Hey, I have this domain, can you manage it for me?’ But you don’t get control until you change the nameservers. That’s coming now.”
Changing Nameservers
Now comes the crucial step: Cloudflare needs to take control of your domain. To do that, you need to change the nameservers.
What are nameservers? Imagine the internet is a huge city, and your domain is an address. Nameservers are the phone book – they determine which IP address is behind a domain. When someone calls your-domain.de, their browser asks the nameservers: “Where do I find this?”
Cloudflare shows you on the page “Change your nameservers” or under Configure DNS -> DNS -> Records -> Cloudflare Nameservers two addresses, such as (the name before the first dot may be different):
- aurora.ns.cloudflare.com
- ben.ns.cloudflare.com
You need to enter these two Cloudflare nameservers at your domain registrar. Exactly where depends on the provider. Look under Domain Management -> DNS -> NS Record or under Manage Domain -> Tools -> Nameserver. Enter the two Cloudflare nameservers there and delete the old ones.
Ulf: “Wait. I delete the old ones? What happens to my website?”
Tanja: “It’s possible that your domain will be unreachable for a short time. This is called DNS propagation – the new nameservers need to spread across the internet first. Usually takes a few minutes, but can take up to 24 hours.”
Bernd grins: “It took three days for me. But I also forgot to click ‘Save’.”
The change can take up to 24 hours – usually faster. On the Cloudflare platform, you can see under Overview -> Check Nameservers whether the switchover is complete.
Email Verification
At some point during this process, often while you’re waiting for the nameserver check, Cloudflare will ask you to confirm your email address. Simply click the link in the email you receive. You can’t proceed without this verification. After that, you can create your first tunnel.
Ulf (annoyed): “Why are they sending me an email now?”
Tanja: “Because they want to make sure you don’t register some domain that doesn’t belong to you. If someone could register google.de at Cloudflare without being the owner, we’d have a problem.”
Bernd nods: “I tried that once. Didn’t work.”
Creating Your First Tunnel
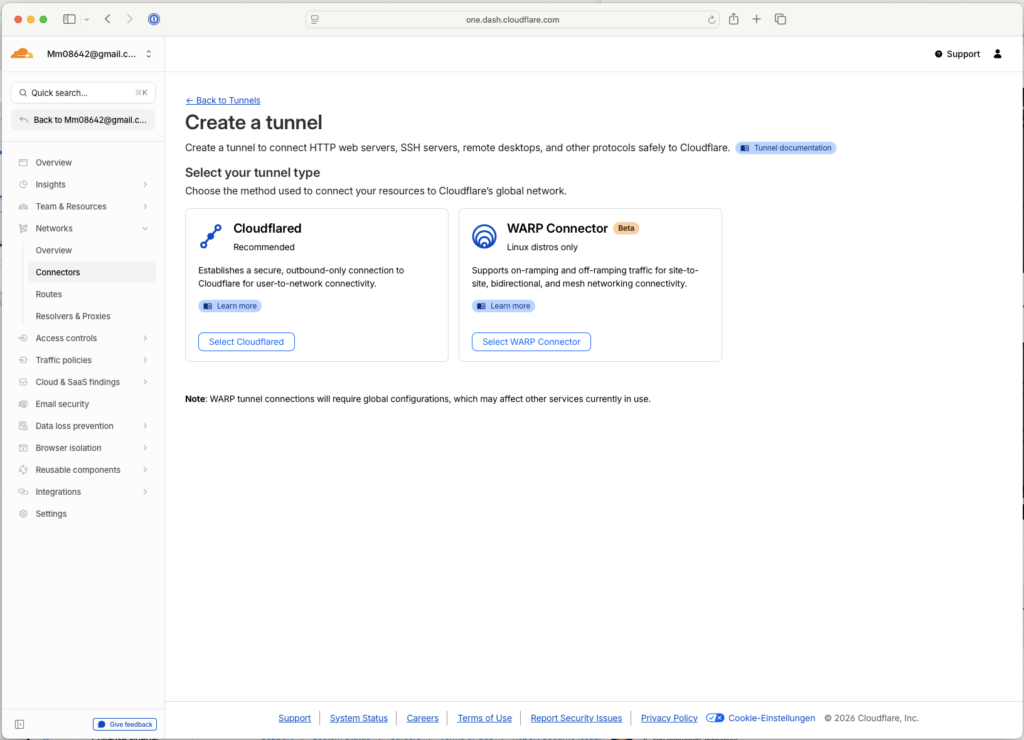
Once your domain is set up, you can create your first tunnel. Go to Account Home -> Zero Trust (not in the menu but on the right side of the page) -> Networks -> Add Tunnels -> Create a tunnel (Alternatively: Zero Trust -> Networks -> Connectors -> Tunnels). Select “Select Cloudflared” as the tunnel type and enter a freely chosen name (e.g. n8n-tunnel).
On the next page, Cloudflare shows you a long token. You’ll need it in a moment – copy it. You won’t see it again later.
Ulf skeptical: “How long is that thing?”
Tanja: “Long! Looks like a password explosion. But that’s exactly what makes it secure. Copy it into a text file – you’ll need it in the next step.”
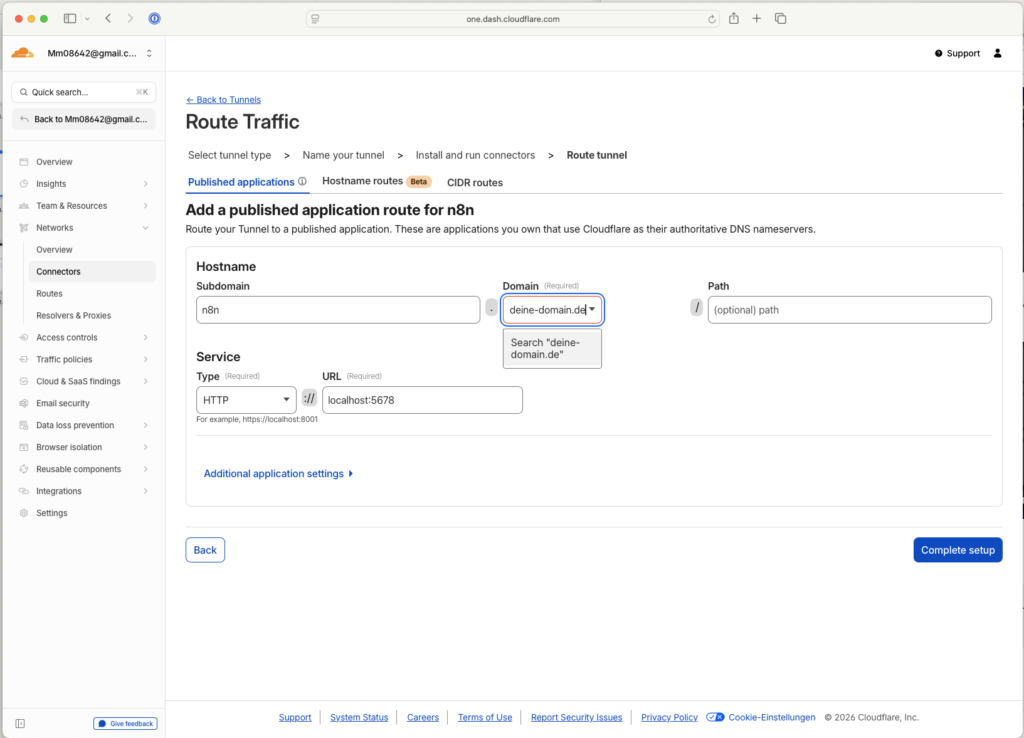
Click Next and fill in the following fields:
- Subdomain: n8n (freely selectable)
- Domain: Select your domain from the list
- Type: HTTP
- URL: localhost:5678 (this is the local port of n8n on your DiskStation)
Ulf: “What’s a subdomain now?”
Tanja: “A subdomain is like a room in your house. Your domain is the house – your-domain.de. The subdomain is a specific room inside it – n8n.your-domain.de. This gives you the ability to have a separate address for n8n without having to buy a whole new domain.”
Bernd nods wisely: “I once set up admin.bernd-is-the-best.de. Then I forgot the password.”
A subdomain makes sense because it creates a clearly defined technical access point through which you can control security, access rules, and webhooks independently from the main domain – without affecting other services or content of your domain.
Click “Save tunnel.” Done. The tunnel is created, but not yet active because the Cloudflared container on your Diskstation is still missing. We’ll set that up now.
2.2 Step: Set up Cloudflare Tunnel as Docker Container on Diskstation
Ulf: “Okay. Now things get serious. We’re tinkering with the NAS.”
Tanja: “Right, but don’t panic. We’re just downloading a container and starting it. It’s less complicated than it sounds.”
Bernd grins: “I once started a container. It then killed all the other containers.”
Tanja: “Because you forgot to set the network correctly. That’s why we’ll do it step by step now.”
Download & Start Container
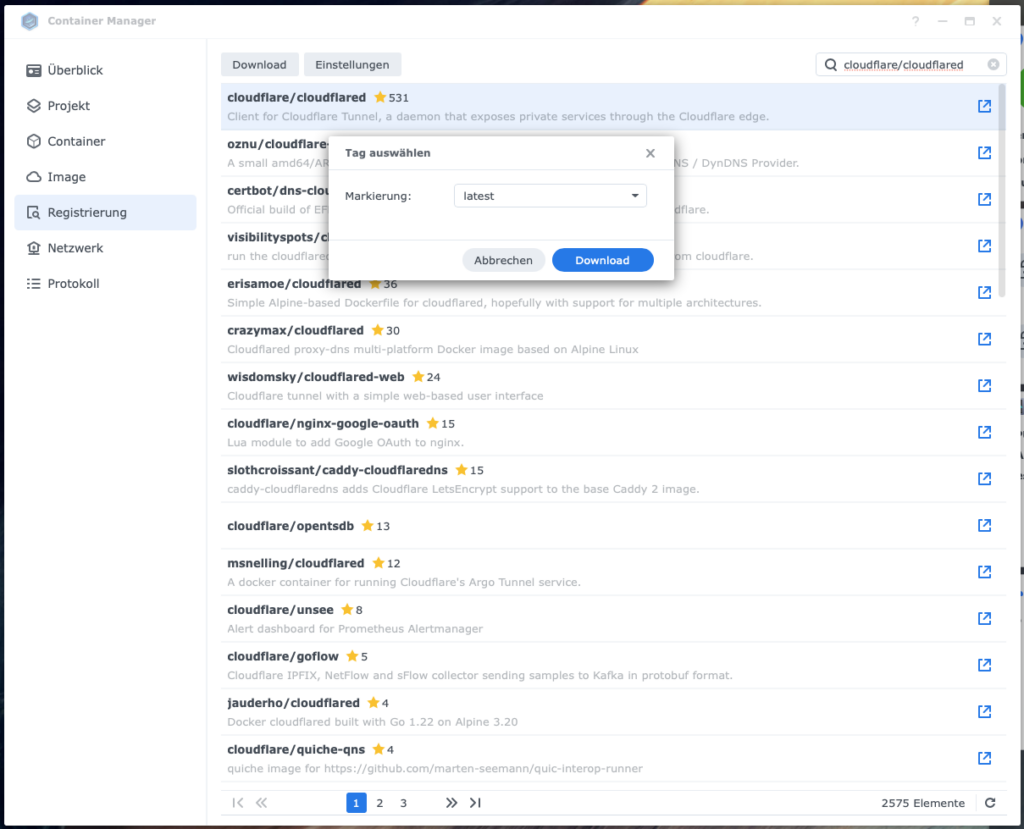
Open Container Manager on your Synology and go to Registration.
Container Manager → Registration
Image search: cloudflare/cloudflared
Tag: latest
Download
Ulf: “What’s an image?”
Tanja: “An image is like a blueprint. The container is the finished house built from this blueprint. You download the blueprint, and in the next step you build the house.”
Create Container
Once the image is downloaded, click on it and select “Run.” Now comes the wizard that will guide you through the setup.
Important: The following settings are crucial:
- Enable auto-restart: Check this. This ensures the container will automatically restart if your NAS reboots.
- Network: Select “host” (not bridge!). This is important so the container can access localhost:5678 – i.e., your n8n container.
Ulf: “Why host?”
Tanja: “Because the Cloudflare container needs to talk to your n8n container. If you choose bridge, the Cloudflare container won’t see localhost:5678 because localhost then only means the container itself, not your NAS. With host, all containers share the same network.”
Bernd nods: “I did that wrong once too. The container then talked to itself.”
Now comes the crucial step: the execution command.
Set Execution Command
tunnel run --token <YOUR_TOKEN_FROM_ABOVE>
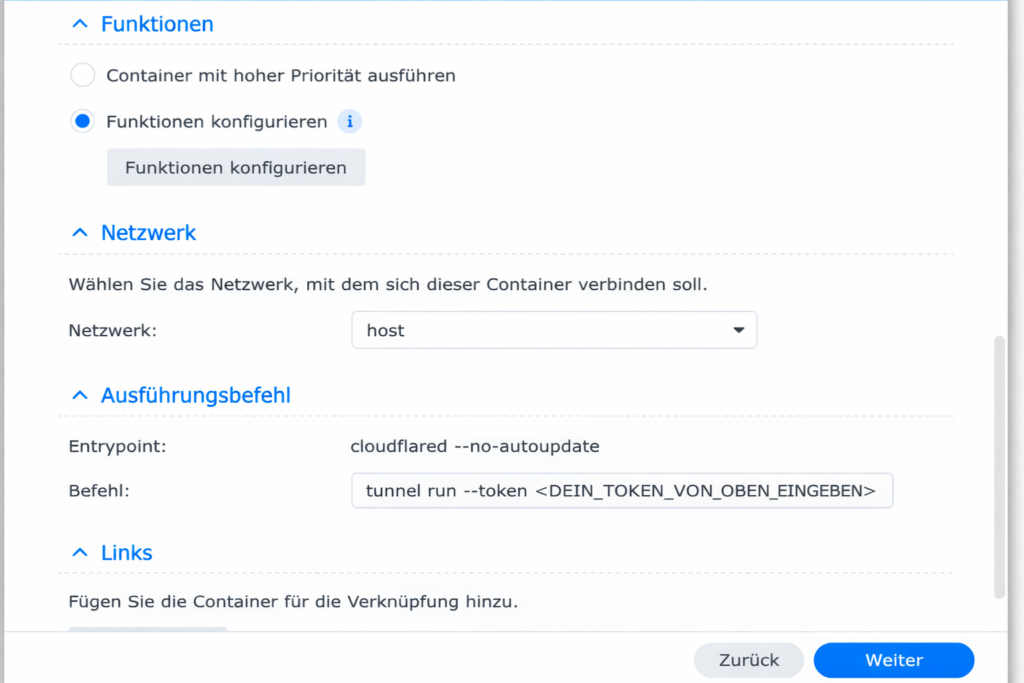
Replace <YOUR_TOKEN_FROM_ABOVE> with the long token you copied from Cloudflare earlier.
Ulf: “You mean I’m supposed to paste this endless code in there? Without spaces? Without making a typo?”
Tanja: “Exactly, that’s why: Copy, don’t type. A single wrong letter and the container will start, but won’t connect to Cloudflare.”
Click Next and then Finish. The container starts. If everything worked out, it should be running with a green status under Containers.
The Moment of Truth
Now comes the moment of truth: Open a browser and enter https://n8n.your-domain.de. You should see the n8n login page – via HTTPS, without having installed any certificates.
Ulf stares at the screen: “That… that just worked?”
Tanja smiling: “Welcome to the world of Cloudflare magic.”
If not, check:
- Is the n8n container running?
- Is the Cloudflared container running?
- Is the correct URL in the tunnel (localhost:5678)?
- Is the token entered correctly (without spaces at the beginning/end)?
Bernd scratches his head: “Mine said ‘Bad Gateway.’ I just deleted everything and started over.”
Tanja: “That was probably the token. One space too many and Cloudflare doesn’t understand a thing.”
2.3 Step: Prepare n8n Container for the New URL
So far, n8n works – but it doesn’t know yet that it’s now reachable via a new URL. This may sound like a minor detail, but it’s crucial: Webhooks – notifications from external services like Stripe, Telegram, or GitHub – need a return address. If n8n thinks it’s running under http://localhost:5678, it sends this wrong address to external services. They can’t call back.
Ulf: “Wait, what are webhooks again?”
Tanja: “Imagine you order a pizza. You give the delivery service your address so they know where to ring the bell. A webhook is exactly that – n8n gives an external service an address where it can send a message when something happens. For example: ‘Hey n8n, someone just paid, do something with this info.'”
Bernd nods: “I once set up a webhook. It then sent to localhost. Didn’t work.”
Tanja mutters: “Surprise.”
So you need to tell n8n: “You’re now reachable at https://n8n.your-domain.de.”
How you do this depends on how you originally set up n8n. Two options:
Option A: Container Created Manually (via Container Manager)
If you manually created the n8n container via Container Manager (not via Docker Compose), you need to adjust the environment variables. Unfortunately, Synology doesn’t allow editing containers afterward – you need to duplicate the container.
Go to Containers, select your n8n container, and click Action → Stop.
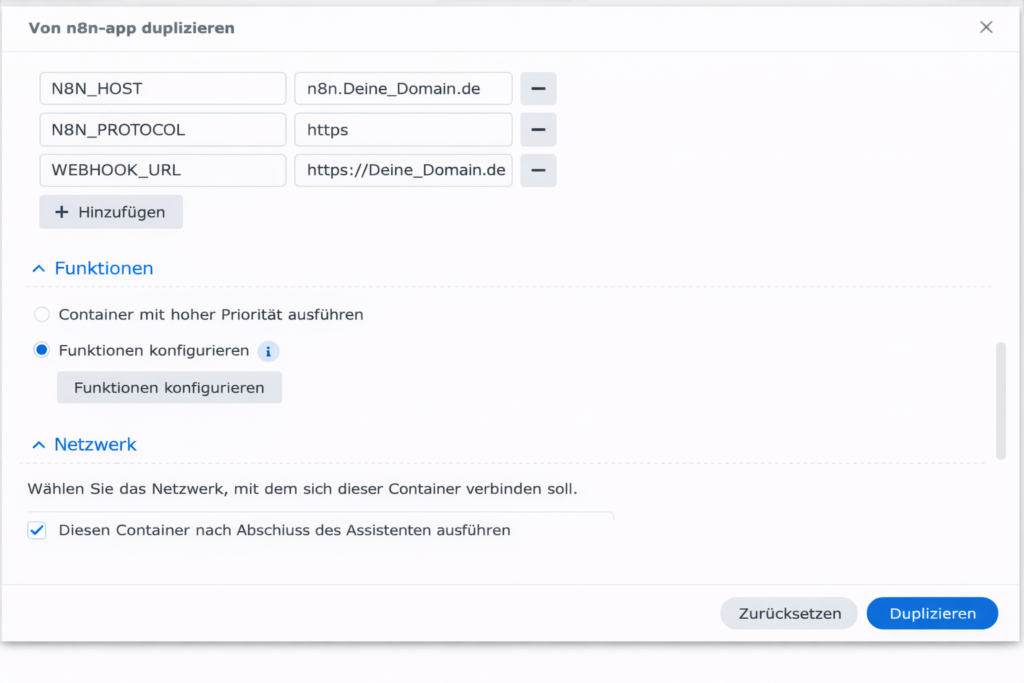
Then click Action → Duplicate. In the new container wizard, add the following variables under Environment:
N8N_HOST: n8n.Your_Domain.deN8N_PROTOCOL: httpsWEBHOOK_URL: https://n8n.Your_Domain.de/
Ulf: “Why is it https now?”
Tanja: “Because Cloudflare takes care of the HTTPS certificate. Your n8n itself only speaks HTTP, but to the outside world – for everyone – it’s HTTPS. That’s why n8n needs to know: ‘Hey, when you register webhooks, tell the services to use https://, not http://'”
If present: N8N_SECURE_COOKIE=true → You can leave this line as is (if present) – or set it if it’s missing. This ensures that cookies are only sent over encrypted connections.
Start the new container.
Option B: n8n via Docker Compose (Project)
If you set up n8n via Docker Compose (a detailed description can be found here), the adjustment is more elegant:
Stop the project in Container Manager. If you want to use the same project name, delete the old project. Create a new project and select the same folder path. Synology automatically loads the existing compose.yaml.
In the compose.yaml under services → n8n → environment, add the following three lines (after N8N_SECURE_COOKIE) and change N8N_SECURE_COOKIE to true since HTTPS now comes externally:
environment:
  - DB_TYPE=postgresdb
  - DB_POSTGRESDB_HOST=db
  - DB_POSTGRESDB_PORT=5432
  - DB_POSTGRESDB_DATABASE=n8n_db
  - DB_POSTGRESDB_USER=n8n_admin
  - DB_POSTGRESDB_PASSWORD=<POSTGRES_PASSWORD>
  - N8N_ENCRYPTION_KEY=<YOUR_ENCRYPTION_KEY>
  # --- CHANGE TO TRUE ---
  - N8N_SECURE_COOKIE=true
  # --- NEW VARIABLES FOR CLOUDFLARE ---
  - N8N_HOST=n8n.Your_Domain.de
  - N8N_PROTOCOL=https
  - WEBHOOK_URL=https://n8n.Your_Domain.de/
Ulf: “Why is that more elegant now?”

Tanja: “Because you simply edit the file instead of duplicating the whole container. You change three lines, save, done. No click marathon.”
Now everything should run as desired. n8n is reachable over the internet, knows its own URL, and can register webhooks correctly.
2.4 Step: Secure Access via Cloudflare Zero Trust
Ulf: “Wait a minute,” says Ulf. “Now my n8n is public on the internet? Can anyone access it?”
Tanja: “Exactly. Anyone who knows the URL can theoretically access the login page. n8n itself has user login, but there’s no protection against someone trying a hundred passwords a minute or looking for vulnerabilities.”
Bernd nods wisely: “I experienced that once. Eventually, login attempts came faster than I could say ‘stop’.”
Cloudflare offers an elegant solution: Access Control. This is an additional authentication layer in front of n8n. When someone calls https://n8n.your-domain.de, Cloudflare first checks whether the email address is allowed – and then sends a 6-digit code by email. Only with the correct code can you even reach the n8n login page.
Tanja: “It’s like an anteroom. Before you get to the office, you have to identify yourself to the receptionist first.”
Set Up Access Application
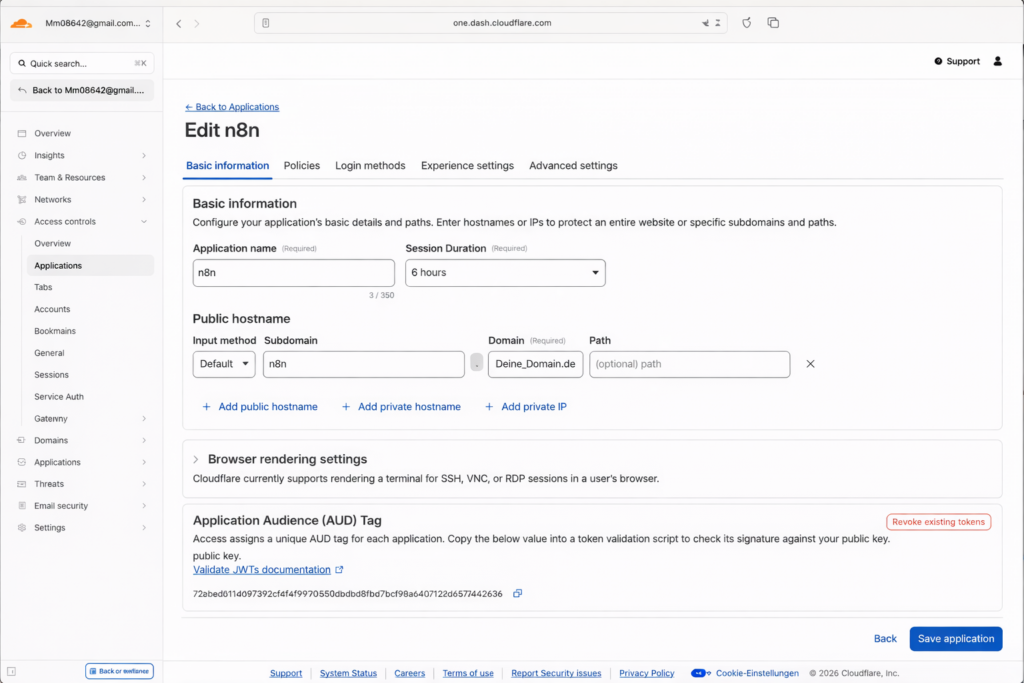
On the Cloudflare platform, go to Account Home -> Zero Trust (not in the menu but on the right side of the page) -> Go to Zero Trust -> Access Control -> Applications -> Add an application -> Type: Self-hosted
Settings:
- Application Name: n8n (freely selectable)
- Session Duration: 6 hours (how long the access remains valid)
- Subdomain: n8n (as above)
- Domain: Select your domain
Ulf: “What’s a session?”
Tanja: “A session is like a day pass. Once you’ve authenticated once, you don’t have to enter the code every time. After 6 hours, the pass expires and you have to log in again.”
Then create a policy -> Add a policy
Policy name: n8n_access (freely selectable)
Action: Allow
Include -> Selector: emails (select), Value: Enter email address(es)
Click “Save policy” and then “Save application”
Important: Exempt Webhooks
Ulf: “Wait, if everyone needs this code now, what about the webhooks? They come from outside?”
Tanja: “Exactly the problem. If Stripe, Telegram, or GitHub send a webhook to n8n, Cloudflare Access will block them. They don’t have an email address and can’t enter a code.”
Bernd nods: “Stripe eventually gave up for me. I thought my server was dead.”
The solution: You create a second subdomain just for webhooks. You protect it differently. Go back to Networking → Tunnels, open your tunnel, and add a second route:
- Subdomain: n8n-webhook
- Domain: Your Domain
- Type: HTTP
- URL: localhost:5678
Save it. Now n8n is reachable via two URLs:
https://n8n.your-domain.de(protected by Access, for you)https://n8n-webhook.your-domain.de(publicly accessible, for webhooks)
Ulf: “Isn’t that unsafe?”
Tanja: “A bit. But the webhook URL only knows who gets it from you. And external services often validate their own webhooks – Stripe, for example, sends a signature that you can verify in n8n.”
You don’t need to create an Access Policy for the webhook URL. Or you create one that only allows the /webhook/ path (depending on how paranoid you are). In n8n itself, you then need to make sure with each webhook trigger that you use the webhook subdomain, i.e.: https://n8n-webhook.your-domain.de/webhook/...
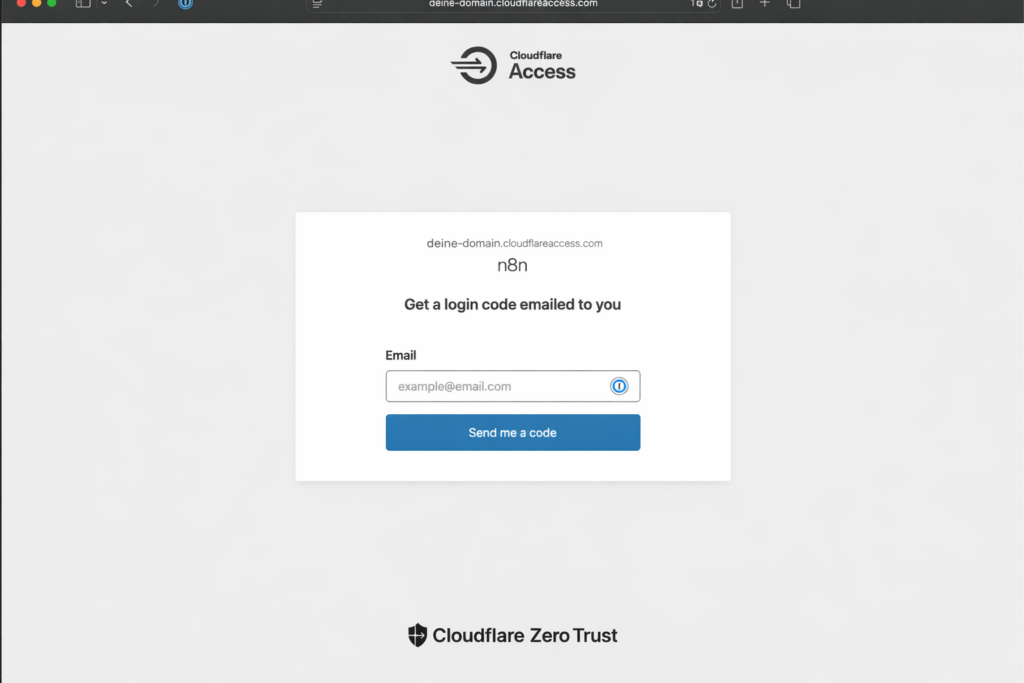
The Final Test
When you now open https://n8n.your-domain.de, you won’t go directly to the n8n login, but Cloudflare will place a Cloudflare Access page in front of it, where you enter one of your Cloudflare email addresses. You’ll then receive a 6-digit code that you need to unlock it.
Ulf: “That’s like online banking”
Tanja: “Exactly, and that’s exactly why it’s secure.”
3. Conclusion
If you want to self-host n8n and also secure external access, check out our guide on n8n self-hosting on Synology NAS – the perfect complement to this tutorial.
You have an n8n that’s reachable over the internet, without open ports, without manual SSL certificates, without even having looked at your router configuration. Cloudflare stands as a bouncer in front of it, filters bots, protects against DDoS, and only lets you in.
Webhooks work, external services can communicate with n8n, and you can access your automations from anywhere – from the coffee shop, from the airport, from the couch.
This is the moment when a local experiment becomes useful infrastructure. Not an enterprise solution, sure – but one that runs reliably without you having to worry about updates or security gaps every week.
Ulf leans back. “Okay, I’ll admit it. That was easier than I thought.”
Bernd nods. “I still have no idea what I did. But it works.”
Tanja smiles. “That’s exactly the point.”
Cloudflare doesn’t make hosting unnecessary. But it makes it accessible – even for people who aren’t system administrators, but just want to build workflows that work.
Do you have suggestions for improvement on this guide or foundic.org? I’d love to hear your feedback in the comments!